1993 CHEVROLET SUBURBAN tire type
[x] Cancel search: tire typePage 190 of 386
Loss of Control
Let’s review what driving experts say about what happens whe\
n the three
control systems (brakes, steering and acceleration) don’t ha\
ve enough friction
where the tires meet the road to do what the driver has asked.
In any emergency, don’t give up. Keep trying
to steer, and constantly seek an
escape route or area of less danger.
Skidding
In a skid, a driver can lose control of the vehicle. Defensive d\
rivers avoid
most skids by taking reasonable care suited
to existing conditions, and by not
“overdriving” those conditions. But skids are always possib\
le.
The three types of skids correspond
to your vehicle’s three control systems.
In the braking skid your wheels aren’t rolling. In the steering
or cornering
skid,
too much speed or steering in a curve causes tires to slip and lose
cornering force. And in the acceleration skid too much throttle causes the
driving wheels to spin.
A cornering skid and an acceleration skid are best handled by easing your
foot off the accelerator pedal. If your vehicle starts to slide (as when you turn
a corner on a wet, snow-
or ice-covered road), ease your foot off the
accelerator pedal as soon as you feel the vehicle start
to slide. Quickly steer
the way you want the vehicle
to go. If you start steering quickly enough, your
vehicle will straighten out. As it does, straighten the front wheels.
Of course, traction is reduced when water, snow, ice, gravel,
or other material
is on the road.
For safety, you’ll want to slow down and adjust your driving to
these conditions.
It is important to slow down on slippery surfaces because
stopping distance will be longer and vehicle control more limit\
ed.
While driving on a surface with reduced traction,
try your best to avoid
sudden steering, acceleration,
or braking (including engine braking by shifting
to a lower gear). Any sudden changes could cause the tires t\
o slide. You
may not realize the surface is slippery until your vehicle is \
skidding. Learn to
recognize warning clues-such as enough water, ice or packed snow on the
road to make a “mirrored surface”-and slow down when you have any\
doubt.
Remember: Any anti-lock braking system (ABS) helps avoid only the braking
skid. Steer the way you want
to go.
4-23
ProCarManuals.com
Page 191 of 386
Driving Guidelines (Utility Models)
This multipurpose passenger vehicle is defined as a utility vehicle in
Consumer Information Regulations issued by the National Highway \
Traffic
Safety Administration (NHTSA) of the United States Department of
Transportation. Utility vehicles have higher ground clearance and\
a narrower
track to make them capable
of performing in a wide variety of off-road
applications. Specific design characteristics give them a higher center of
gravity than ordinary cars. An advantage of the higher ground clearance is a
better view
of the road allowing you to anticipate problems. They are not
designed for cornering at the same speeds as conventional 2-whe\
el drive
vehicles any more than low-slung sports cars are designed to p\
erform
satisfactorily under off-road conditions. If at
all possible, avoid sharp turns or
abrupt maneuvers.
As with other vehicles of this type, failure to operate this
vehicle correctly may result in
loss of control or vehicle rollover.
OffmRoad Driving with Your Four-Wheel
Drive Vehicle
This off-road guide is for vehicles that have four-wheel drive. (Also, see
“Anti-lock Brakes” in the Index.)
If your vehicle doesn’t have four-wheel drive,
you shouldn’t drive off-road unless you’re on
a level, solid surface.
Off-road driving can be great fun. But it does have some definite hazards.
The greatest of these is the terrain itself.
“Off-roading” means you’ve left the great North American road system behind.
Traffic lanes aren’t marked. Curves aren’t banked. There a\
re no road signs.
Surfaces can be slippery, rough, uphill
or downhill. In short, you’ve gone right
back to nature.
Off-road driving involves some new skills. And that’s why it’s very important
that you read this guide. You’ll find many driving tips and suggestions. These
will help make your off-road driving safer and more enjoyable.
Before You Go Off-Roading
There are some things to do before you go out. For example, be sure to
have all necessary maintenance and service work done. Be sure you read \
all
the information about your four-wheel drive vehicle in this manual.
Is there
enough fuel?
Is the spare tire fully inflated? Are the fluid levels up where
they should be? What are the local laws that apply to off-roading where you’ll
be driving?
If you don’t know, you should check with law enforcement people
in the area. Will you be on someone’s private land?
If so, be sure to get the
necessary permission.
4-24
ProCarManuals.com
Page 226 of 386
A B
AN490002
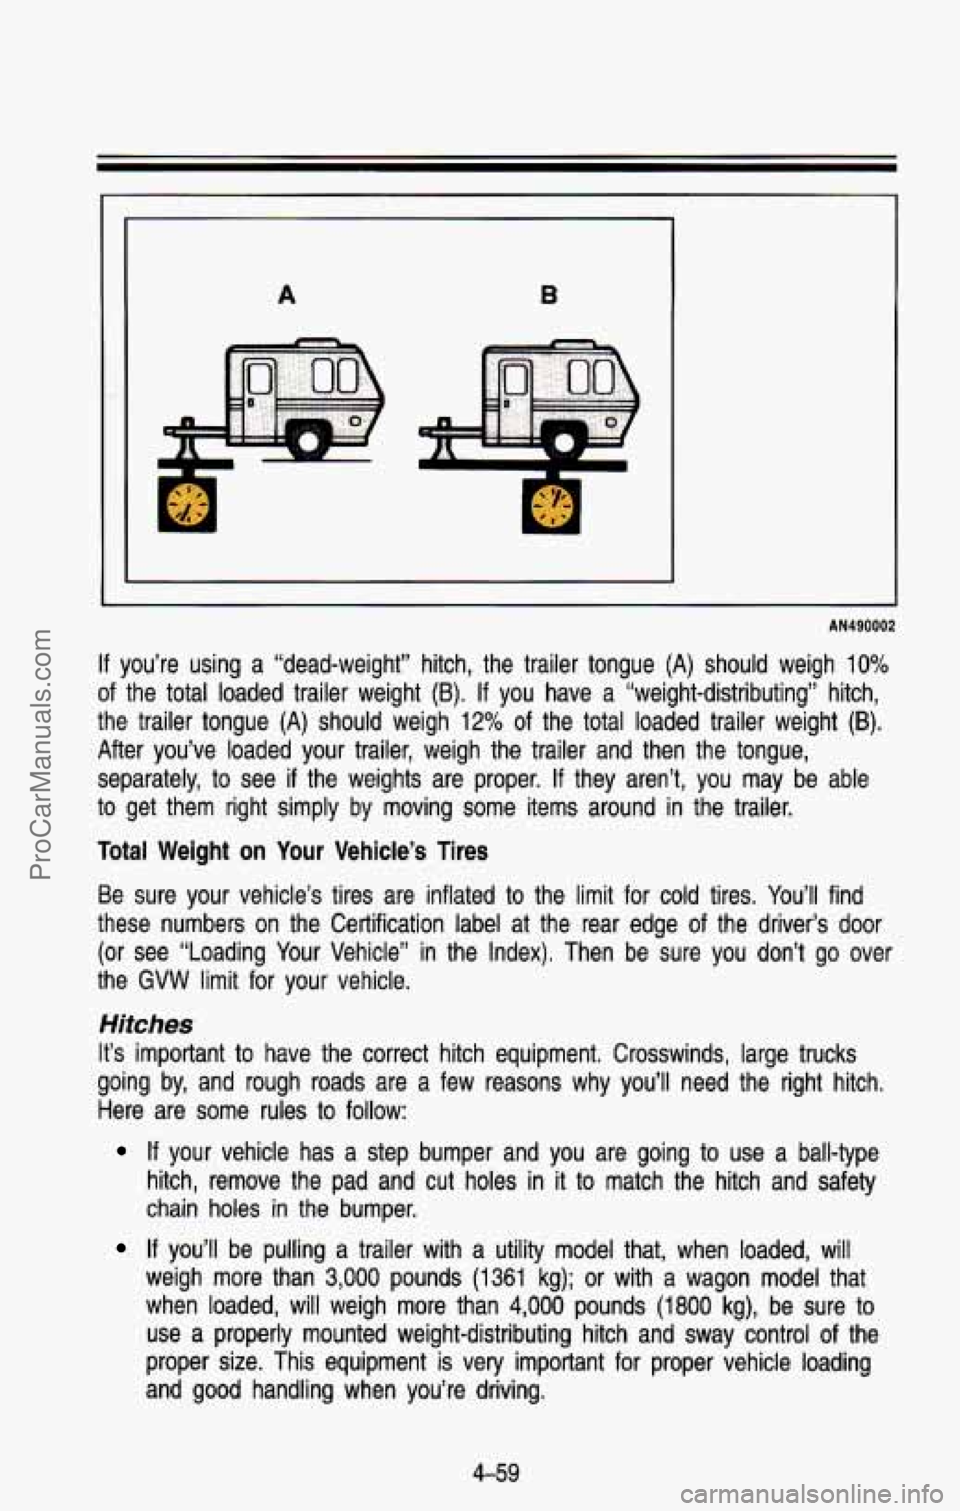
If you’re using a “dead-weight” hitch, the trailer tongue (A) should weigh \
10%
of the total loaded trailer weight (8). If you have a “weight-distributing” hitch,
the trailer tongue
(A) should weigh 12% of the total loaded trailer weight (B).
After you’ve loaded your trailer, weigh the trailer and then the tongue,
separately, to see if the weights are proper.
If they aren’t, you may be able
to get them right simply by moving some items around in the trailer.
Total Weight on Your Vehicle’s Tires
Be sure your vehicle’s tires are inflated to the limit for cold tires. You’ll find
these numbers on the Certification label at the rear edge of \
the driver’s
door
(or see “Loading Your Vehicle” in the Index). Then be sure you don’t go over
the
GVW limit for your vehicle.
Hitches
It’s important to have the correct hitch equipment. Crosswinds, large trucks
going by, and rough roads are a few reasons why you’ll need the right hitch,
Here are some rules to follow:
If your vehicle has a step bumper and you are going to use a ball-type
hitch, remove the pad and cut holes in it to match the hitch and safety
chain holes in the bumper.
If you’ll be pulling a trailer with a utility model that, when loaded, will
weigh more than
3,000 pounds (1361 kg); or with a wagon model that
when loaded, will weigh more than
4,000 pounds (1 800 kg), be sure to
use a properly mounted weight-distributing hitch and sway control
of the
proper size. This equipment
is very important for proper vehicle loading
and good handling when you’re driving.
4-59
ProCarManuals.com
Page 315 of 386
Don’t let anyone tell you that underinflation or overinflation is all right. It’-
9. If your tires don’t have enough air (underinflation) you can get
Too much flexing
Too much heat
tire overloading
Bad wear
Bad handling
Bad fuel economy.
I If your tires have too much air (overinflation), you can get:
Unusual wear
Bad handling
Rough ride
Needless damage from road hazards.
nth
or more. Also, check the
tire pressure of the spare tire.
How to Check: Use a good quality pocket-type gage to check tire pressure.
Simply looking at the tires will not tell you the pressure, e\
specially if you
have radial tires-which may look properly inflated even
if they’re
underinflated.
If your tires have valve caps, be sure to put them back on. The\
y help
prevent leaks by keeping out dirt and moisture.
Special Tire Inflation
If you have 16 inch tires on your vehicle, and:
- You’ll be driving for very long at speeds of 66 mph (105 km/h) to 75
mph
(120 km/h) where legal, inflate tires 10 psi (70 kPa) more than
the recommended
cold inflation pressure,
- You’ll be driving for very long at speeds of 76 mph (120 kmih) to 85
mph (135 km/h) where legal, cold inflation pressure should be
increased
by 10 psi (70 kPa) and you must also reduce axle load
capacity by
10%. Do not drive over 85 mph (135 kmlh) even if
it’s legal.
- Inflation pressures should never exceed 10 psi (70 kPa) above the
inflation specified for the maximum
load of the tire.
6-50
ProCarManuals.com
Page 319 of 386
Service & Appearance Care
If you ever replace your tires with those not having a TPC Spec number,
make sure they are the same size, load range, speed rating an\
d construction
type (bias, bias-belted or radial) as your original tires.
I CAUTION
A
Mixing tires could cause you to lose control while driving. If you mix
tires
of different sizes or types (radial and bias-belted tires) the
vehicle may not handle properly, and you could have a crash. Be
sure
to use the same size and type tires on all wheels.
I
Uniform Tire Quarity Grading
The following information relates to the system developed by the United
States National Highway Traffic Safety Administration which grade\
s tires by
treadwear, traction and temperature performance. (This applies o\
nly to
vehicles sold in the United States.)
Treadwear
The treadwear grade is a comparative rating based on the wear \
rate of the
tire when tested under controlled conditions on a specified government test
course.
For example, a tire graded 150 would wear one and a half (1 1/2)
times as well on the government course as a tire graded 100. The relative
performance
of tires depends upon the actual conditions of their use,
however, and may depart significantly from the norm due to var\
iations
in
driving habits, service practices and differences in road characteristics and
climate.
Traction-A, B, C
The traction grades, from highest to lowesr are: A, 8, and C. They represent
the tire’s ability to stop on wet pavement as measured under controlled
conditions on specified government test surfaces of asphalt and concrete. A
tire marked
C may have poor traction performance.
Warning: The traction grade assigned to this tire is based on braking
(straight-ahead) traction tests and does not include cornering \
(turning) traction.
Temperature-A, B, C
The temperature grades are A (the highest), B, and C, representing the tire’s
resistance to the generation
of heat and its ability to dissipate heat when
tested under controlled conditions on a specified indoor laborat\
ory test wheel.
Sustained high temperature can cause the material
of the tire to degenerate
and reduce tire life, and excessive temperature can lead to sudden tire
failure. The grade
C corresponds to a level of performance which all
passenger car tires must meet under the Federal Motor Vehicle \
Safety
6-54
ProCarManuals.com
Page 320 of 386
Standard No. 109. Grades B and A represent higher levels of performance on
the laboratory
test wheel than the minimum required by law.
Warning: The temperature grade for this tire is established for a tire that is
properly inflated and not overloaded. Excessive speed, underinfla\
tion, or
excessive loading, either separately or in combination, can cause heat buildup
and possible tire failure.
Those grades are molded on the sidewalls of passenger car tires.
While the tires available as standard or optional equipment on \
General Motors
vehicles may vary with respect to these grades, all such tires meet General
Motors performance standards and have been approved for use on General
Motors vehicles.
All passenger type (P Metric) tires must conform to Federal
safety requirements in addition to these grades.
Wheel Alignment and Tire Balance
The wheels on your vehicle were aligned and balanced carefully \
at the
factory to give you the longest tire life and best overall performance.
In
most cases, you will not need to have your wheels aligned again.
However,
if you notice unusual tire wear or your vehicle pulling one way or
the other, the alignment may need to be reset.
If you notice your vehicle
vibrating when driving on a smooth road, your wheels may need to be
rebalanced.
Wheel Replacement
Replace any wheel that is bent, cracked or badly rusted. If wheel nuts keep
coming loose, the wheel, wheel bolts, and wheel nuts should be\
replaced.
If
the wheel leaks air out, replace it (except some aluminum whe\
els, which can be repaired). See your GM truck dealer
if any of these conditions exist. Your
dealer will know what kind of wheel you need.
Each new wheel should have the same load carrying capacity, di\
ameter,
width, offset, and be mounted the same way as the one it replaces.
If you need to replace any of your wheels, wheel bolts, or wheel nuts,
replace them only with
new GM original equipment parts. This way, you will
be sure you have the right wheel, wheel bolts, and wheel nuts\
for your
vehicle.
6-55
ProCarManuals.com
Page 323 of 386
Service & Appearance Care
Cleaning the Inside of Your Vehjcle
Use a vacuum cleaner often to get rid of dust and loose dirt\
. Wipe vinyl with
a clean, damp cloth.
Your GM dealer has
two GM cleaners-a solvent-type spot lifter and a foam-type
powdered cleaner. They will clean normal spots and stains very \
well.
Here are some cleaning tips:
Always read the instructions on the cleaner label.
Clean up stains as soon as you can-before they set.
Use a clean cloth or sponge, and change to a clean area often. A soft
brush may be used
if stains are stubborn.
Use solvent-type cleaners in a well ventilated area only. If you use them,
don’t saturate the stained area.
If a ring forms after spot cleaning, clean the entire area immedi\
ately or it
will set.
Using Foam-Type CIeaner on Fabric
Vacuum and brush the area to remove any loose dirt.
Always clean a whole trim panel or section. Mask surrounding trim along
stitch or welt lines.
Mix Multi-Purpose Powdered Cleaner following the directions on t\
he
Use suds only and apply with a clean sponge.
container label.
Don’t saturate the material.
Don’t rub
it roughly.
As soon as you’ve cleaned the section, use a sponge to remove the
suds.
Rinse the section with a clean, wet sponge.
Wipe off what’s left with a slightly damp paper towel or cloth.
Then dry it immediately with an air hose, a hair dryer or a heat lamp.
NOTICE I
Be careful with a hair dryer or heat lamp. You could scorch the fabric
Wipe with a clean cloth.
6-58
ProCarManuals.com