1993 CHEVROLET SUBURBAN low oil pressure
[x] Cancel search: low oil pressurePage 141 of 386
Featurns & Controls
30
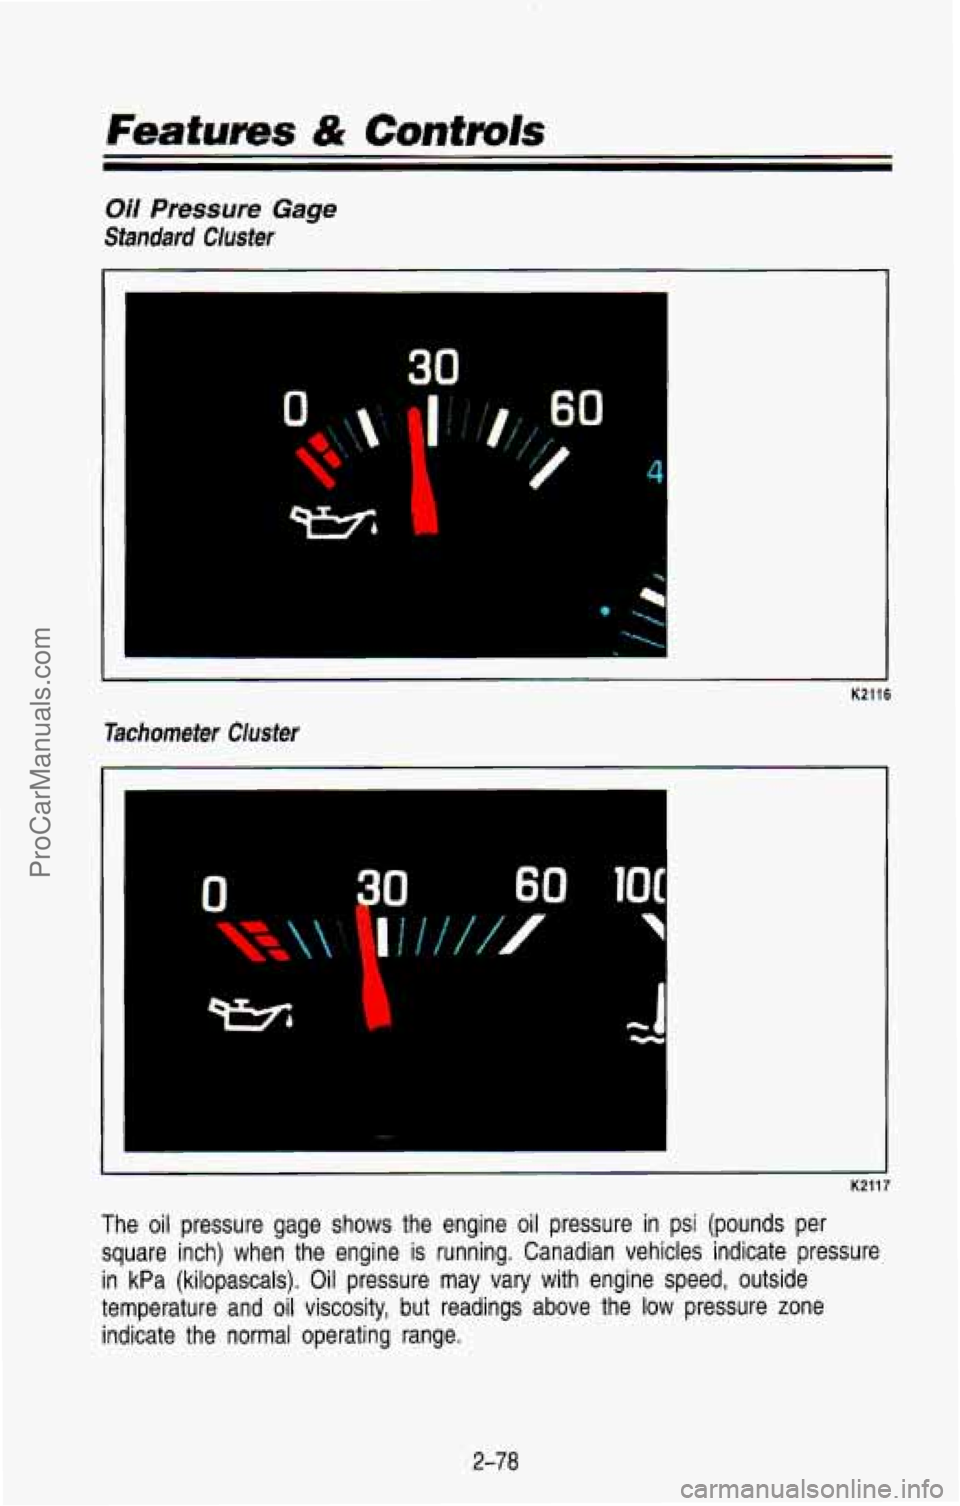
Oil Pressure Gage
Standard Ciusier
Tachometer
Cluster
K2116
K2117
The oil pressure gage shows the engine oil pressure in psi (\
pounds per square inch) when the engine
is running. Canadian vehicles indicate pressure
in kPa (kilopascals). Oil pressure may vary with engine speed\
, outside
temperature and
oil viscosity, but readings above the low pressure zone
indicate the normal operating range.
2-78
ProCarManuals.com
Page 142 of 386
A reading in the low pressure zone may be caused by a dangerouslv low oil
level or other problem causing low oil pressure. Check your oi\
l as soon as
possible.
CAUTION
Don’t keep driving if the oil pressure is low. If you do, your engine
can become so hot that it catches on fire, You or others could be
burned. Check your oil as soon as possible and have your vehicle
serviced.
e NOTICE
I
Damage to your engine from neglected oil problems can rnstly at,,
not covered by your ‘Avanty.
I
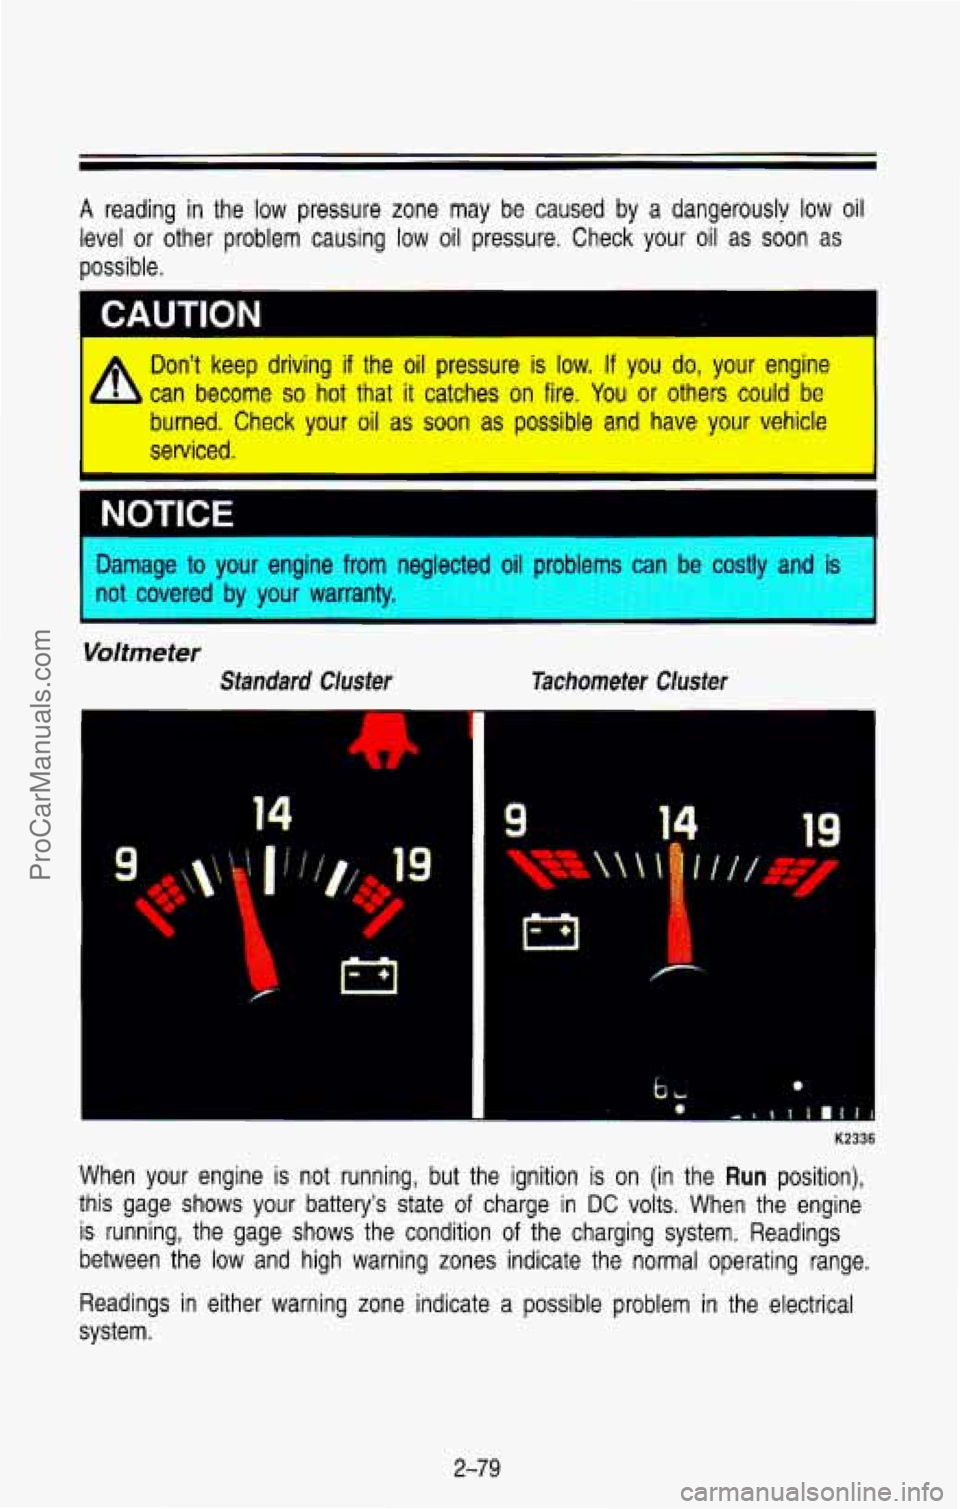
Voltmeter
Standard Cluster
14
Tachometer Cluster
19
GL
K2336
When your engine is not running, but the ignition is on (in \
the Run position),
this gage
shows your battery’s state of charge in DC volts. When the engine
is running, the gage shows the condition
of the charging system. Readings
between the low and high warning zones indicate the normal ope\
rating range.
Readings in either warning zone indicate a possible problem in \
the electrical
system.
2-79
ProCarManuals.com
Page 324 of 386
Using Solvent-Type CIeaner on Fabric
First, see if you have to use solvent-type cleaner at all. Some spots and
stains will clean
off better with just water and mild soap.
If you need to use it, then:
Gently scrape excess soil from the trim material with a clean, dull knife
or scraper. Use very little cleaner, light pressure and clean cloths
(preferably cheesecloth). Cleaning should start at the outside \
of the stain,
“feathering” toward the center. Keep changing
to a clean section of the
cloth
.
When you clean a stain from fabric, immediately dry the area with an air
hose, hair dryer, or heat lamp
to help prevent a cleaning ring. (See
previous NOTICE.)
Fabric Profection
Your vehicle has upholstery that has been treated with ScotchgardTM \
Fabric
Protector, a
3M product. ScotchgardTM protects fabrics by repelling oil and
water, which are the carriers
of most stains. Even with this protection, you
still need
to clean your upholstery often to keep it looking new.
Further information on cleaning is available by calling
1-800-433-3296 (in
Minnesota,
1-800-642-61 67).
Special Cleaning Problems
Greasy or Oily Stains: Like grease, oil, butter, margarine, shoe polish, coffee
with cream, chewing gum, cosmetic creams, vegetable oils, wax c\
rayon, tar
and asp ha1
t .
Carefully scrape off excess stain.
Then follow the solvent-type instructions above.
Shoe polish, wax crayon, tar and asphalt will stain if left on a vehicle
seat fabric. They should be removed as soon as possible. Be c\
areful, because the cleaner will dissolve them and may cause them
to bleed.
Non-Greasy Stains: Like catsup, coffee (black), egg, fruit, fruit juice, milk,
soft drinks, wine, vomit, urine and blood.
Carefully scrape off excess stain, then sponge the place with cool water.
If a stain remains, follow the foam-type instructions above.
If an odor lingers after cleaning vomit or urine, treat the area with a
watedbaking soda solution:
1 teaspoon (5 ml) of baking soda to 1 cup
(250 ml) of lukewarm water.
Finally, if needed, clean lightly with solvent-type cleaner.
6-59
ProCarManuals.com
Page 355 of 386
Scheduled Maintenance Services
Explanation Of Scheduled Maintenance Services
Below are explanations of the services listed in the maintenance charts.
The proper fluids and lubricants to use are listed in this section. Make sure
whoever services your vehicle uses these.
All parts should be replaced and
all necessary repairs done before you or anyone else drives the ve\
hicle.
1. ENGINE OIL AND OIL FILTER CHANGE* -ALWAYS USE SG OR
SG/CE QUALITY, ENERGY CONSERVING II OILS OF THE PROPER
VISCOSITY. To determine the preferred viscosity oil for your vehicle’s
engine (e.g. SAE 5W-30 or
10W-30), see “Engine Oil” in the Index.
2. CHASSIS LUBRICATION -Lubricate the front suspension, king pin
bushings, steering linkage, transmission, and transfer case shift\
linkage,
parking brake cable guides, propshaft splines
(2 wheel drive), brake
pedal springs, and clutch pedal springs at the intervals specif\
ied.
If you have a 3500 HD, lubricate the king pins and king pin bushings
every
1,500 miles (2500 km) for Maintenance Schedule 1, or every 3,000
(5000 km) for Maintenance Schedule 2.
Ball joints and king pin bushings should not be lubricated unl\
ess their
temperature is
10°F (-12”C), or higher. When the weather is cold, let
them warm up before lubrication
or they could be damaged.
Also, be sure to check all the vehicle fluid levels at this time.
3.
CLUTCH FORK BALL STUD LUBRICATION -Lubricate the clutch fork
ball stud through the fitting on the clutch housing. Lubricant \
must be
added “sparingly” to the fitting, as only.
0066 Ib. (.003 kg) is required to
lubricate the ball stud surface. Do not add lubricant more often than the
intervals in the Maintenance Charts.
Too much lubricant will damage
the clutch
assembly.
4. ENGINE IDLE SPEED ADJUSTMENT (DIESEL ENGINES)* -Adjust to
the specifications shown on the underhood label. You must use
calibrated test equipment.
5. COOLING SYSTEM SERVICE* -Drain, flush and refill system with new
coolant. See “Engine Coolant” in the Index for the proper\
coolant and
mixture
to use in your vehicle.
Also inspect the hoses and replace them if they i cracked, swollen, or
deteriorated. Tighten all hose clamps (except consrant tension clamps).
Remove debris and clean the outside of the radiator and air c\
onditioning
condenser. Wash the radiator neck.
To ensure proper operation, pressure
test the radiator and cap.
* An Emission Control Service
7-1 8
ProCarManuals.com
Page 358 of 386
23. EXHAUST PRESSURE EGULATOR VALVE INSPECTION* -Check that
the valve works properly. Correct any binding. Inspect hoses fo\
r cracks,
chafing or decay. Replace parts
as needed.
24. TIRE AND WHEEL ROTATION AND INSPECTION -For proper wear
and maximum tire life, rotate tires
at the first 6,000 miles (10 000
kilometers) for Schedule I (t) or 7,500 miles (12 500 kilometers) for
Schedule
II (.) and then every 15,000 miles (25 000 kilometers)
thereafter.
Follow the instructions and patterns shown in Section 6.
Check tires for uneven wear or damage. If irregular or premature wear is
apparent, check wheel alignment.
Also, check for damaged wheels. See
“Tires” in the Index for more information.
For dual wheels, whenever the vehicle, wheels, or fasteners are new\
,
have the wheel fastener torque set at the first 100,
1,000 and 6,000
miles
(160, 1600 and 10 000 km).
For
3500 H.D. Models, block the tires opposite those being removed to
keep the vehicle from rolling.
25.
DRIVE AXLE SERVICE -Check readfront axle fluid level and add as
needed. Check constant velocity joints and axle seals for leaki\
ng.
Locking differential-Drain fluid at first oil change and refill. Check
fluid level and add as needed at subsequent oil changes. In dusty
areas, or trailer towing applications drain fluid at every
15,000 miles
(24 135 kilometers) and refill$
every oil change. In dusty areas,
or trailer towing applications, drain
fluid every 15,000 miles
(24 135 kilometers) and refi1l.t
Standard differential -Check fluid level and add as needed at
More frequent lubrication may be required on heavy-duty or off-road
use.
26. BRAKE SYSTEM INSPECTION -When the engine oil is changed,
inspect the lines
and hoses for proper hookup, binding, leaks, cracks,
chafing, etc. Check the parking brake adjustment, and the fluid level in
the master cylinder.
A low fluid level can indicate worn disc brake pads
which may need to be serviced$
*An Emission Control Service
tA fluid loss in these systems may indicate a problem. Have them
inspected and repaired
at once.
7-2 1
ProCarManuals.com
Page 359 of 386
Scheduled Maintenance Services
When the wheels are removed for rotation, inspect disc brake p\
ads for wear
and rotors for surface condition.
Also inspect drum brake linings for wear and
cracks. Inspect other brake parts, including drums, wheel cylind\
ers, parking
brake, etc., at the same time. Remove any rust
or dirt from the wheel and
mounting surfaces before mounting the wheel.
Inspect brakes more often if driving habits or conditions result in
frequent braking.
Owner Checks and Services
Listed below are owner checks and services which should be made at the
time period specified to help ensure proper safety, emission pe\
rformance, and
dependability of your vehicle.
Be sure any necessary repairs are completed at once. Whenever \
any fluids
or lubricants are added to your vehicle, make sure they are the proper ones,
as shown in this Section.
At Least Once a Month
Tire inflation pressure check --Check the tires for proper inflation. If they
are low, inflate them to the level specified on the certification label
or on the
tire inflation charts. See “Loading Your Vehicle” or “Inflation-Tire Pressure” in
the Index.
At Least Once a Year
Key lock cylinder lubrication --Lubricate key lock cylinders with engine oil.
See the “Recommended Fluid and Lubricants” chart in this section.
Transmission neutral or clutch start switch operation
4 When you are doing this check, the vehicle could move suddenly. If
it does, you or others could be injured. Follow the steps below. I
1. Before you start, be sure you have enough room around the veh\
icle.
2. Firmly apply both the manual parking brake and the regular bra\
ke. See
“Brakes” and “Parking Brake” in the Index.
Do not use the accelerator
pedal.
3. Be ready to turn off the engine immediately if it starts.
4. On automatic transmission vehicles, try to start the engine in each gear.
The starter should work only in
P (Park) or N (Neutral).
7-22
ProCarManuals.com
Page 360 of 386
On manual transmission vehicles, put the shift lever in N (Neutral), push the
clutch down halfway, and try
to start the engine. The starter should work only
when the clutch is pushed down all the way to the floor.
Steering column lock operation -While parked, try to turn the key to Lock
in each gear shift position.
With an automatic transmission, the key should turn to
Lock only when the
gear shift is in
P (Park).
On vehicles with a key release lever,
try to turn the key to Lock without
pressing the lever. The key should turn to
Lock only with the key lever
depressed.
On all vehicles, the key should come out only in
Lock.
Parking brake and transmission
P (PARK) mechanism operation -
A
When you are doing this check, your vehicle could begin to move.
You
or others could be injured and property could be damaged.
Make sure there
is room in front of your vehicle in case you begin
to roll. Be ready to apply the regular brake at once should the
vehicle begin to move.
Park on a fairly steep hill, with the vehicle facing downhill. Keeping yo\
ur foot
on the regular brake, set the manual parking brake.
CAUTION
To check the parking brake: With the engine running and the
transmission in
N (Neutral), slowly remove foot pressure from the regular
brake pedal.
Do this until the vehicle is held by the parking brake only.
To check the “Park” mechanism’s holding ability: Apply the \
regular brake
and shift to
P (Park). Release the manual parking brake, then slowly
release the regular brake.
Lap and shoulder belts condition and operation -Inspect belt system,
including: webbing, buckles, latch plates, retractors, guide loop\
s and anchors.
Have a belt assembly replaced if the webbing has been cut or otherwise
damaged.
Body Lubrication Service -Lubricate all body door hinges with engine oil.
Also lubricate the tailgate, tailgate handle pivot points, and \
tailgate mounted
spare tire carrier
(if equipped). Lubricate the body hood, fuel door and rear
compartment hinges, latches and locks including interior glove b\
ox and
console doors, and any folding seat hardware. Lubricate the hoo\
d safety lever
pivot and prop rod pivot.
More frequent lubrication may be required when
exposed to a corrosive environment.
7-23
ProCarManuals.com