1993 CHEVROLET S10 manual radio set
[x] Cancel search: manual radio setPage 129 of 356
Downloaded from www.Manualslib.com manuals search engine Comforf Controls & Audio Systems
In this part you’ll find out how to operate the comfort contro\
l systems and
audio systems offered with your vehicle. Be sure to read about the particular
system supplied with your vehicle.
For explanation of vehicle
symbols, refer to “Vehicle Symbols” in
Section
0.
Comfort Controls ..............I..........I....I..........................I.......r......\
........................... 3-3
Flow-Through Ventilation System
..................................................................... 3-3
Heating System
.... -..- ........................................................................\
.................. 3-5
Heating/Air Conditioning System
............................................*.......,-.. ........ - ...... 3-6
Engine Block Heater
........................................................................\
..................... 3-7
Audio Systems
..................................................I....I................\
I.I..I.I...................I.I. 3-7
FM Stereo ........................................................................\
.................................. 3-8 .
AM ........ -...... ........ =....... ........ ...... ...... ........ ..... ...... .......... . ....... ........... .............. . .... .3-8
AM Stereo
................... ........................ ............................................................. 3-8
How to Operate Your ETR* AM Radio
..... .................... -.. ............ .......... 3-9
How to Operate
Your ETRB AM-FM
Stereo Audio System
........................................................................\
........... 3-11
How to Operate Your ETR@ AM-FM
Stereo Audio Cassette System
................................................................... 3-1 3
3-1
Page 135 of 356
Downloaded from www.Manualslib.com manuals search engine VENT: The air comes out at the vents on your instrument panel and \
at your
front side windows.
BI-LEV NC: With this, outside air comes in through the heater floor vent and
the instrument panel vents. This setting is useful in cool weather with bright
sunlight.
NORM
NC: This setting cools the outside air. If you first used MAX, use
NORM as soon as the vehicle has cooled down,
so outside air will be going
through your vehicle.
MAX NC: This cools the air the fastest. Move the other lever all the \
way to
Cold. MAX lets in only a little air from the outside. You can use MAX at first
when it’s really hot outside and you need to cool
off quickly.
OFF: The blower is off, but air still will come from outlets at the front of your
vehicle. The system will try
to keep the air at the chosen temperature.
Engine Block Heater
If you use the optional engine block heater before starting your \
engine, your
heating system will produce warmer air faster, to heat the pas\
senger
compartment in cold weather. See “Engine Block Heater” in the Index.
Audio Systems
I CAUTION
A
Hearing damage frolm lloud noise is almost undetectable until it is too
late. Your
hearing can adapt to higher volmes of sound. So’und that
seems normal can
be loud an’d harmfull to your hearing. Jake
precaution’s by adjusting the volume control
on your radio to a safe
sound level before your hearing adapts to
it.
To help avoid hearing IOSS or damage:
* Adjust the volume control to the lowest setting.
Increase volume SliOWly until you hear comfortably and
clearlv.
- -
Your L-.CO@ audio system has been designed to operate easily and give
years of listening pleasure. But you will get the most enjoyment out of it if
you acquaint yourself with
it first. Find out what your Delco@ system can do
and how to operate all its controls, to be sure you’re getting the most out of
the advanced engineering that went into it.
3-7
Page 140 of 356
Downloaded from www.Manualslib.com manuals search engine I r. . .. >-
Comfort Controls & Audio Systems
SEEK
Press the SEEK button to cause the receiver to SEEK the next higher station
and stop.
SCAN
When you press SCAN, the radio will go to the next station a\
nd pause and
will keep scanning until you press SCAN again. SCAN appears in the
VF
display.
Pushbuttons
The four pushbuttons let you return to favorite stations.
You can set the pushbuttons for up
to fourteen favorite stations (7 AM and
7 FM). Just:
Tune in the desired station.
Press the SET pushbutton. (SET appears in the VF display for a few
seconds.)
Within 5 seconds, push one of the four pushbuttons to store the station.
Whenever you press that button, the preset station will return.\
NOTE:
Up to three additional stations may be preset on each band by pressing two
adjoining buttons at the same time. (The station will return when the same
two buttons are pressed again.)
Clock
To set the clock, just:
Push the SET pushbutton.
Within 5 seconds, press and hold
on the display. SEEK
until the correct minute appears
Press and hold SCAN until the correct hour appears on the dis\
play.
TREBLE
Slide the TREBLE lever up to increase the treble response. If a station is
weak or noisy, slide the TREBLE lever down to reduce the noise.
BASS
Slide the BASS lever up to increase the bass response. Adjust the BASS
lever
to give a pleasing sound to your ear.
3-1 2
Page 141 of 356
Downloaded from www.Manualslib.com manuals search engine How to Operate Your ETP AM-FM Stereo Audio
Cassette System
F
B-.
I K4310
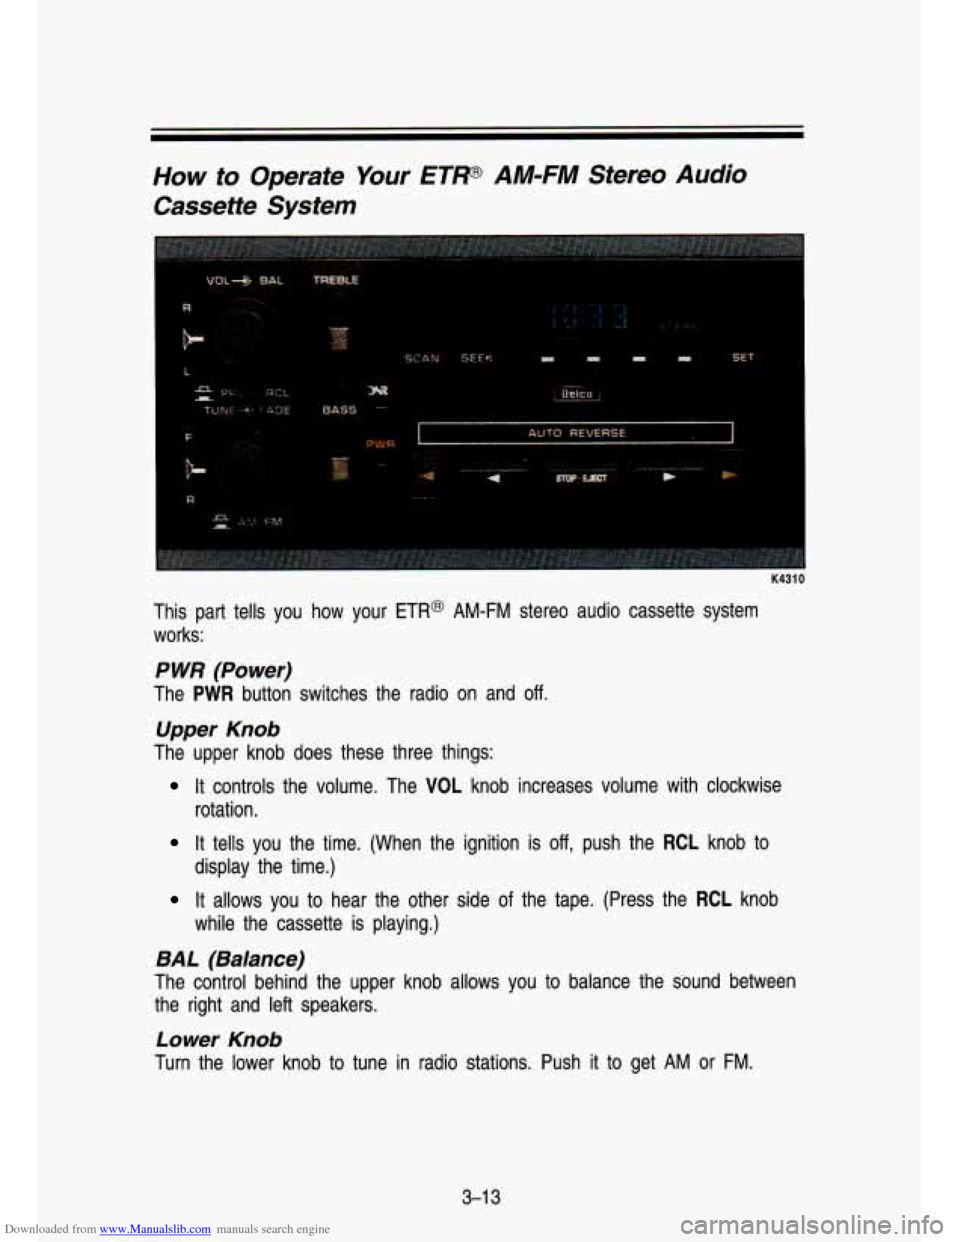
This part tells you how your ETR@ AM-FM stereo audio cassette system
works:
P WR (Power)
The PWR button switches the radio on and off.
Upper Knob
The upper knob does these three things:
It controls the volume. The VOL knob increases volume with clockwise
rotation.
It tells you the time. (When the ignition is off, push the RCL knob to
It allows you to hear the other side of the tape. (Press the RCL knob
display the time.)
while
the cassette is playing.)
BAL (Balance)
The control behind the upper knob allows you to balance the sound between
the right and left speakers.
Lower Knob
Turn the lower knob to tune in radio stations. Push it to get AM or FM.
3-1 3
Page 142 of 356
Downloaded from www.Manualslib.com manuals search engine Comfort Confmls & Audio Systems
FADE
The control behind the lower knob fades the sound between your\
front and rear speakers.
SEEK
Pressing the SEEK button will cause the receiver to SEEK the next higher
station and stop.
SCAN
When you press SCAN, the radio will go to the next station and pause, and
will keep scanning until you press SCAN again. SCAN appears in the VF
display.
Pushbuttons
The four pushbuttons let you return to favorite stations. You can set the
pushbuttons for up to fourteen favorite stations
(7 AM and 7 FM). Just:
Tune in the desired station.
Press the SET pushbutton. (SET appears in the VF display for \
5
seconds.)
Within 5 seconds, push one of the four pushbuttons to store the station.
Whenever you press that button, the preset station will return.\
. ~ ~~.
NOTE:
In addition to the four stations set as above, up to three additional stations
may be preset on each band by pressing two adjoining pushbutto\
ns at the
same time.
Tune in the desired station.
Press the SET pushbutton. (SET appears in the VF display for 5
seconds.)
Within 5 seconds, press any two adjoining pushbuttons at the same time. \
(The station will return when the same two buttons are presse\
d again.)
Clock
To set the clock, just:
Press the SET pushbutton.
Within 5 seconds, press and hold SEEK until the correct minute appears
Press and hold SCAN until the correct hour appears on the dis\
play.
on the display.
3-1 4
Page 143 of 356
Downloaded from www.Manualslib.com manuals search engine TREBLE
Slide the TREBLE lever up to increase the treble response. If the station is
weak or noisy, slide the TREBLE lever down to reduce the noise.
BASS
Slide the BASS lever up to increase the bass response. Adjust the BASS
lever to give a pleasing sound to your ear.
DNP
This is the Dynamic Noise Reduction button. DNR@ helps remove background\
hiss from the radio or tape player. You may want to leave it pushed in all the
time.
DNR@ is a registered trademark of National Semiconductor Corporation.
To Play A Cassette
Your tape player is built to work best with tapes that are 30 to 45 minutes
long on each side. Tapes longer than that are
so thin they may not work well
in this player.
Once the tape
is playing, use the upper and lower knobs for volume balance
and fade just as you
do for the radio. The arrows indicate which side of the
tape is being played.
Forward
To rapidly advance the tape, press the arrow pointing right and t\
he tape will
rapidly go forward until you press the STOP-EJECT button lightl\
y.
Reverse
To rapidly reverse the tape, press the arrow pointing left and the tape will
rapidly reverse until you press the STOP-EJECT button lightly.
PROGRAM
To go from one side of the tape to the other, press the VOL-BAUPROG-RCL
knob (Volume).
EJECT
To remove the tape or stop the tape and switch to radio, press \
the
STOP-EJECT button.
3-1 5
Page 144 of 356
Downloaded from www.Manualslib.com manuals search engine Comfort Contmls & Audio Systems
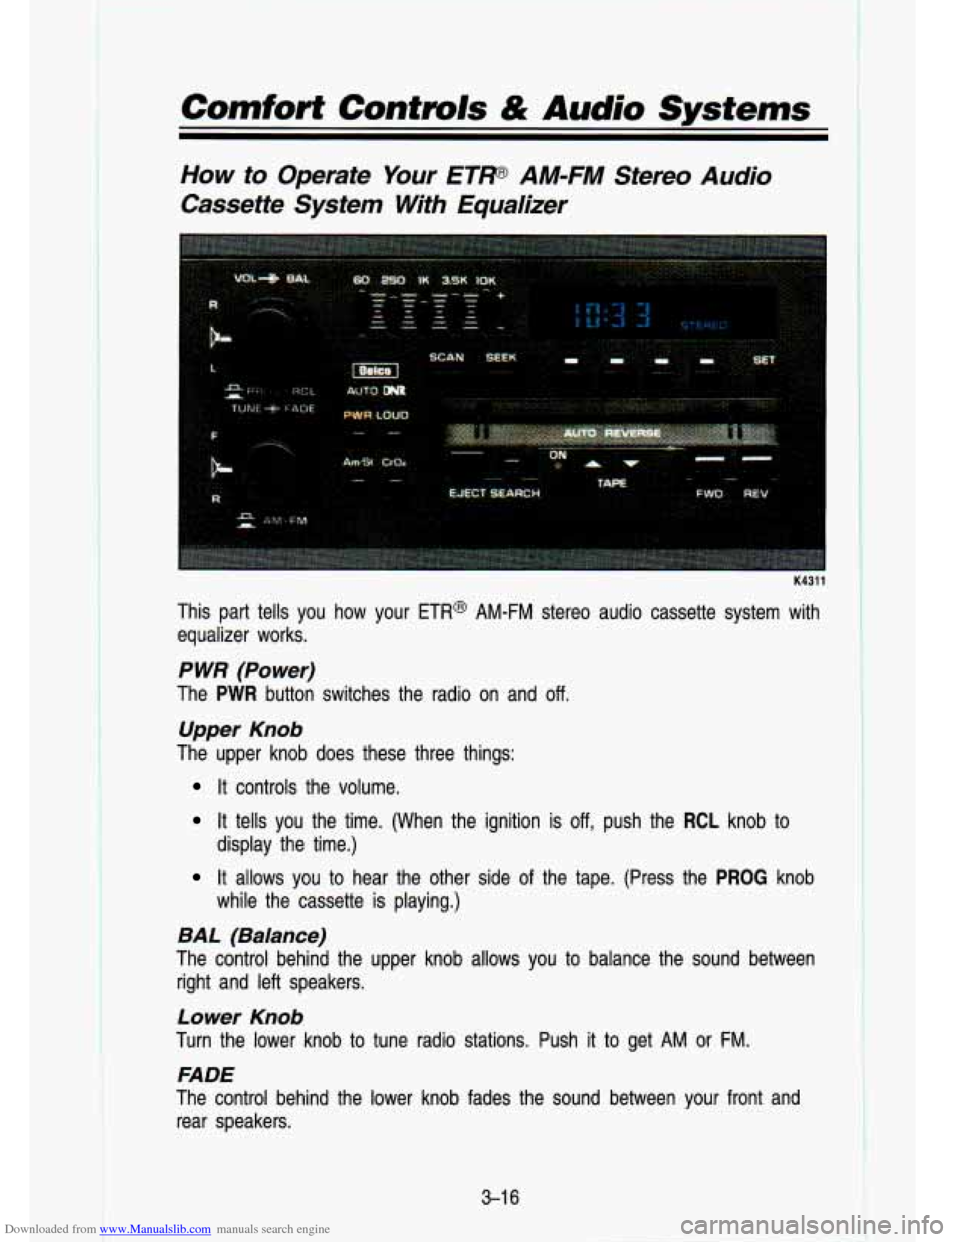
How to Operate Your ETW AM-FM Stereo Audio
Cassette System With Equalizer
K4311
This part tells you how your ETR@ AM-FM stereo audio cassette system with
equalizer works.
P WR (Power)
The PWR button switches the radio on and off.
Upper Knob
The upper knob does these three things:
It controls the volume.
It tells you the time. (When the ignition is off, push the RCL knob to
It allows you to hear the other side of the tape. (Press the PROG knob
display the time.)
while the cassette is playing.)
BAL (Balance)
The control behind the upper knob allows you to balance the sound between
right and left speakers.
Lower Knob
Turn the lower knob to tune radio stations. Push it to get AM or FM.
FADE
The control behind the lower knob fades the sound between your\
front and rear speakers.
3-1 6
Page 145 of 356

Downloaded from www.Manualslib.com manuals search engine SEEK
Pressing the SEEK button will cause the receiver to SEEK the, \
next higher
station and stop.
SCAN
When you press SCAN, the radio will go to the next station and pause and
will keep scanning until you press SCAN again. SCAN appears in the graphic
display.
Pushbuttons
The four pushbuttons let you return to favorite stations. You can Set the
pushbuttons for up to fourteen favorite stations
(7 AM and 7 FM). Just:
Tune in the desired station.
Press the SET pushbutton. (NOTE: The display will show SET for about
5 seconds.)
Within the 5 seconds, push one of the four pushbuttons. Whenever you
press that button, the preset station will return.
NOTE:
In addition to the four stations set as above, up to three additional stations
may be preset on each band by pressing two adjoining buttons at the same
time. Just:
Tune in the desired station.
Press the SET pushbutton.
Within 5 seconds, press any two adjoining pushbuttons at the same time.
(The station will return when the same two buttons are presse\
d again.)
Clock
To set the clock, just:
Push the SET pushbutton.
Within 5 seconds, press and hold SEEK until the correct minute appears
on the display.
Press and hold SCAN until the correct hour appears on the dis\
play.
Adjust The Tone
Use the levers in the upper left corner to set the bass, midrange, and treble
until you get the sound you want. The
60 and 250 levers adjust the bass; 1K
is midrange; and 3.5K and 10K control the treble.
We suggest you start with the center lever
(IK) in the midpoint position, then
move the others up until you get the amount of bass and treble you like.
3-1 7