1993 CHEVROLET S10 CD player
[x] Cancel search: CD playerPage 130 of 356
Downloaded from www.Manualslib.com manuals search engine Comfort Contmls & Audio Systems
How to Operate Your ETRs AM-FM
Stereo Audio Cassette System
With Equalizer ......................................... 3-1 6
Care
of Your Cassette Tape Player .............................................................. 3-1 9
How to Operate Your ETR@ AM-FM
Stereo Audio Compact Disc (CD) System
........................... - .................... 3-20
Care
of Your Compact Disc ........................................................................\
... 3-25
Fixed Mast Antenna
........................................................................\
.................... 3-26
3-2
Page 143 of 356
Downloaded from www.Manualslib.com manuals search engine TREBLE
Slide the TREBLE lever up to increase the treble response. If the station is
weak or noisy, slide the TREBLE lever down to reduce the noise.
BASS
Slide the BASS lever up to increase the bass response. Adjust the BASS
lever to give a pleasing sound to your ear.
DNP
This is the Dynamic Noise Reduction button. DNR@ helps remove background\
hiss from the radio or tape player. You may want to leave it pushed in all the
time.
DNR@ is a registered trademark of National Semiconductor Corporation.
To Play A Cassette
Your tape player is built to work best with tapes that are 30 to 45 minutes
long on each side. Tapes longer than that are
so thin they may not work well
in this player.
Once the tape
is playing, use the upper and lower knobs for volume balance
and fade just as you
do for the radio. The arrows indicate which side of the
tape is being played.
Forward
To rapidly advance the tape, press the arrow pointing right and t\
he tape will
rapidly go forward until you press the STOP-EJECT button lightl\
y.
Reverse
To rapidly reverse the tape, press the arrow pointing left and the tape will
rapidly reverse until you press the STOP-EJECT button lightly.
PROGRAM
To go from one side of the tape to the other, press the VOL-BAUPROG-RCL
knob (Volume).
EJECT
To remove the tape or stop the tape and switch to radio, press \
the
STOP-EJECT button.
3-1 5
Page 146 of 356
Downloaded from www.Manualslib.com manuals search engine Comfort Controls & Audio Systems
Am-St Button
The Am-St is just below the PWR button. Push this when you tune to an
AM station that broadcasts in stereo. Your STEREO light will come on when
you’re receiving
AM stereo. If you push Am-St and there is no more noise, it
means the station is weak. You’ll hear the station better if you don’t use
Am-St. Just push the Am-St button again
to delete stereo.
LOUD
The loudness button is next to the PWR button. Push it to get more bass
sound.
DNP
Your audio system has automatic Dynamic Noise Reduction. It helps remove
background hiss noise from the radio or tape player.
DNR@ is a registered trademark of the National Semiconductor Corporation.
To Play A Cassette
Your tape player is built to work best with tapes that are 30 to 45 minutes
long on each side. Tapes longer than that are
so thin they may not work well
in this player.
Once the tape is playing, use the upper and lower knobs for \
volume, balance
and fade, just as you did for radio. The arrows indicate which side of the
tape is being played.
Cr02
The Cr02 button lets you set the system for the type of cassette being used.
If you are using chrome or metal tapes, push the Cr02 button in.
FWD (Forward)
To rapidly advance the tape, press FWD, and the tape will rapidly go forward
until you press the REV button lightly.
REV (Reverse)
To rapidly reverse the tape, press REV, and the tape will rapidly\
reverse until
you press the
WD button lightly.
SEARCH
Push the SEARCH button to the right. (The ON light will come on.)
Push
FWD to go to the beginning of the next selection.
Push REV with the SEARCH
ON light lit, and the tape will reverse to the
beginning
of the current selection.
3-1 8
Page 147 of 356
Downloaded from www.Manualslib.com manuals search engine PROGRAM
To go from one side of the tape to the other, press the upper knob.
EJECT
To remove the tape or stop the tape and switch to radio, press \
the EJECT
button.
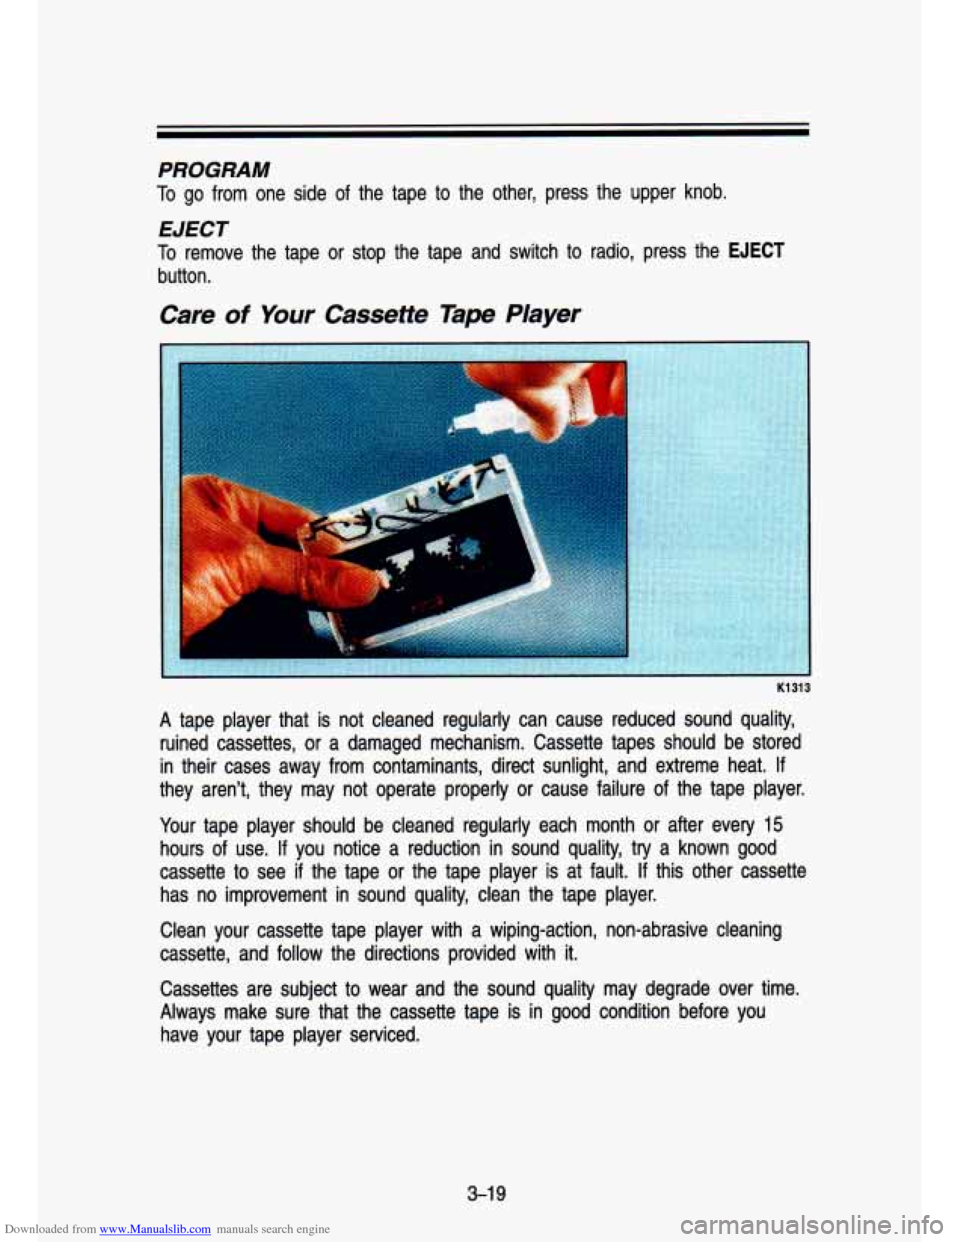
A tape player that is not cleaned regularly can cause reduced so\
und quality,
ruined cassettes,
or a damaged mechanism. Cassette tapes should be stored
in their cases away from contaminants, direct sunlight, and extreme\
heat.
If
they aren't, they may not operate properly or cause failure of the tape player.
Your tape player should be cleaned regularly each month or after ev\
ery
15
hours of use. If you notice a reduction in sound quality, try a known good
cassette to see if the tape or the tape player is at fault.
If this other cassette
has no improvement in sound quality, clean the tape player.
Clean your cassette tape player with a wiping-action, non-abrasi\
ve cleaning
cassette, and follow the directions provided with
it.
Cassettes are subject to wear and the sound quality may degrade over time.
Always make sure that the cassette tape is in good condition before you
have your tape player serviced.
3-1 9
Page 148 of 356
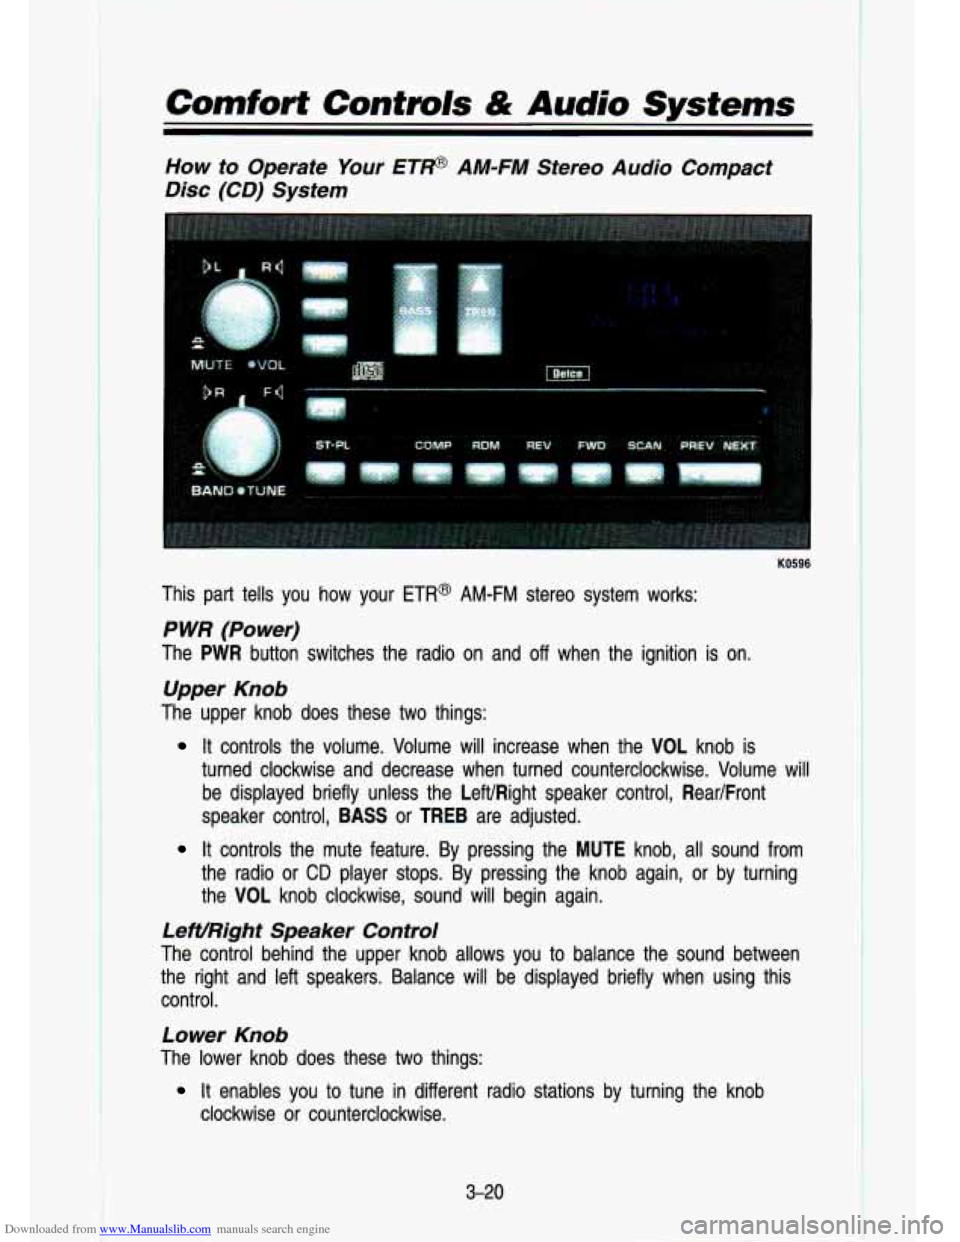
Downloaded from www.Manualslib.com manuals search engine Comfort Controls & Audio Systems
How to Operate Your ETP AM-FM Stereo Audio Compact
Disc (CD) System
KO596
This part tells you how your ETR@ AM-FM stereo system works:
P WR (Power)
The PWR button switches the radio on and off when the ignition is on.
Upper Knob
The upper knob does these two things:
It controls the volume. Volume will increase when the VOL knob\
is
turned clockwise and decrease when turned counterclockwise. Volum\
e will
be displayed briefly unless the LeWRight speaker control, Rear/Front
speaker control,
BASS or TREB are adjusted.
It controls the mute feature. By pressing the MUTE knob, all sound from
the radio or
CD player stops. By pressing the knob again, or by turning
the VOL knob clockwise, sound will begin again.
LeWRight Speaker Control
The control behind the upper knob allows you to balance the s\
ound between
the right and left speakers. Balance will be displayed briefly \
when using this
control.
Lower Knob
The lower knob does these two things:
clockwise or counterclockwise.
It enables you to tune in different radio stations by turning the knob
3-20
Page 151 of 356
Downloaded from www.Manualslib.com manuals search engine REV
Press and hold the REV button to quickly return to a favorite passage. The
counter reading will be displayed when using this control.
FWD
Press and hold the button to advance quickly within a track. Release it
to resume playing. Watch the display to stop at a specific passage.
SCAN
Press SCAN to sample each track for approximately 10 seconds. Scanning
will continue until the
RDM, SCAN or any other motion button is pressed
again.
PREV
If you hold the PREV (4 SEEK) button, or press it more than once, the disc
will return to previous tracks.
NEXT
Press NEXT (SEEK b) to hear the next track now instead of waiting until the
present track is finished.
If you hold this button or press it more than once,
the disc will advance further.
ST-PL
Press ST-PL (Stop-Play) to make the disc stop and the radio play. Press
ST-PL again to restart the disc at the point where it stopped.
Press
PWR or turn the ignition key off to stop the disc player. The disc stays
in the player and will resume playing at the point where it stopped.
Press EJECT to eject the disc and make the radio play. The disc will start at
tract
1 when you reinsert it.
Anti-Theft Feature
Delco LOC ll@ is an Anti-Theft feature for the compact disc player. It can be
used or ignored. If ignored, the system plays normally.
If it is used, your
player won’t be usable
if it is ever stolen, because it won’t turn on.
The instructions below tell you how to enter a secret code into the system.
If
your car loses battery power for any reason, you must unlock \
the system with
the secret code before the radio will turn on.
To Lock The System:
1. Write down any 6 digit number and keep it in a safe place.
2. Turn the ignition to the “Accessory” or “Run” position.
3. Press the PWR button to turn the radio off.
3-23
Page 315 of 356
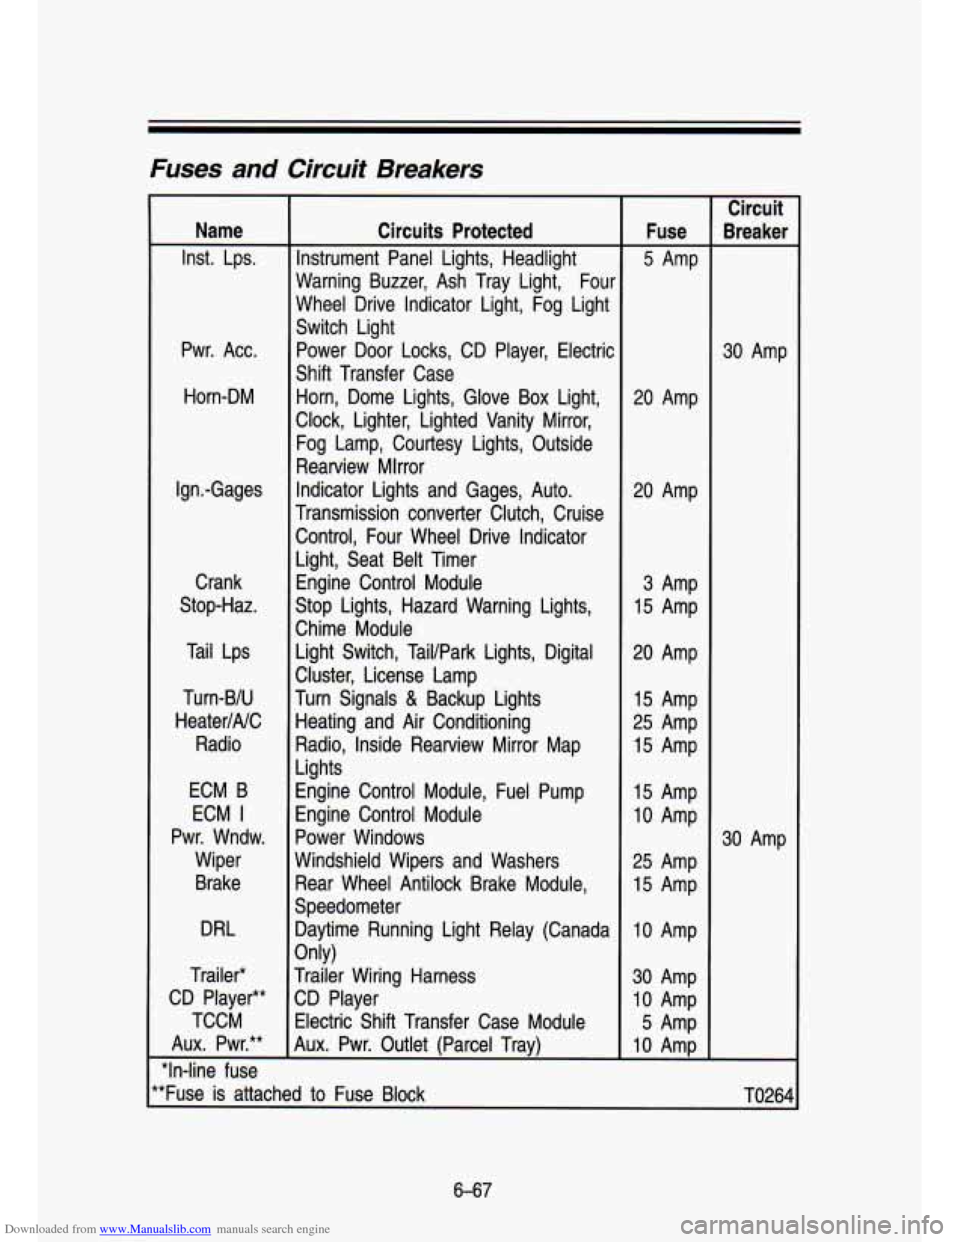
Downloaded from www.Manualslib.com manuals search engine Fuses and Circuit Breakers
Name
Inst. Lps.
Pwr. Acc. Horn-DM
Ign.-Gages Crank
Stop-Haz.
Tail Lps
Turn-BIU
HeaterINC Radio
ECM B
ECM
I
Pwr. Wndw. Wiper
Brake
DRL
Trailer*
CD Player**
TCCM
Aux. Pwr.**
"In-line fuse Circuits Protected
Instrument Panel Lights, Headlight
Warning Buzzer, Ash Tray Light, Four
Wheel Drive Indicator Light, Fog Light
Switch Light Power Door Locks, CD Player, Electric
Shift Transfer Case Horn, Dome Lights, Glove Box Light,
Clock, Lighter, Lighted Vanity Mirror,
Fog Lamp, Courtesy Lights, Outside
Rearview Mlrror
Indicator Lights and Gages, Auto.
Transmission converter Clutch, Cruise Control, Four Wheel Drive Indicator
Light, Seat Belt Timer Engine Control Module
Stop Lights, Hazard Warning Lights,
Chime Module Light Switch, Tail/Park Lights, Digital
Cluster, License Lamp
Turn Signals
& Backup Lights
Heating and Air Conditioning
Radio, Inside Rearview Mirror Map
Lights
Engine Control Module, Fuel Pump
Engine Control Module
Power Windows
Windshield Wipers and Washers Rear Wheel Antilock Brake Module,
Speedometer Daytime Running Light Relay (Canada
Trailer Wiring Harness
CD Player
Electric Shift Transfer Case Module
Aux. Pwr. Outlet (Parcel Trav)
Only) Fuse
5 Amp
20 Amp
20 Amp
3 Amp
15 Amp
20 Amp 15 Amp
25 Amp
15 Amp
15 Amp
10 Amp
25 Amp
15 Amp
10 Amp
30 Amp
10 Amp
5 Amp
10 AmD Circuit
kea ker
30 Amp
30 Amp
'*Fuse is attached to Fuse Block
TO264
6-67
Page 347 of 356

Downloaded from www.Manualslib.com manuals search engine INDEX
Section
A
Accessory Power Outlet .............. 2-53
Air Cleaner
.................................... 6-14
Air Conditioning
................... 3-6, 6-35
Fan Lever
..................................... 3-6
Function Lever
............................ 3-6
Refrigerant Capacity
................. 6-65
Temperature Lever
...................... 3-6
Antenna, Fixed Mast
................... 3-26
Antilock Brakes (See “Brakes”)
Appearance Care
.......................... 6-50
Materials
.................................... 6-56
Arbitration Program
........................ 8-3
Audio Systems
............................... 3-7
AM Radio
..................................... 3-9
AM-FM Stereo Audio Compact
Disc (CD) System
................... 3-20
AM-FM Stereo Audio System
........................ 3-1 1
AM-FM Stereo Audio System with Cassette Deck
............ >.3-13
AM-FM Stereo Audio System
with Cassette Deck and Equalizer
................................. 3-1 6
Anti-Theft System
.................... 3-23
Compact Disc Care
.................. 3-25
Automatic Transmission
............... 2-1 6
Fluid
............................................ 6-1 6
Axle
Front
........................................... 6-22
Rear
............................................ 6-2 1
A
B
Battery ........................................... 6-31
Belts (See “Safety Belts”)
Better Business Bureau Mediation
.................................... -8-3
Blizzard
.......................................... 4.53
Brakes
Adjustment
................................. 4-17
Antilock
...................................... 4-14
Fluid
........................................... 6-29
Leak Check
............................... 6-30
Master Cylinder
........................ 6-29
Parking
....................................... 2-21
Pedal Travel
.............................. 4-17
Rear Drum Brakes
................... 4-17
Replacing Parts
........................ 6-30
System Warning Light .2-66, 4-16
Trailer
......................................... 4-59
Wear Indicators
........................ 4-16
Braking
.......................................... 4-12
In Emergencies
........................ 4-17
Break-In, New Vehicle
................... 2-9
Bulb Replacement
....................... 6-31
Replacement Chart
.................. 6-63
C
Capacities and Specification
Charts
........................................ 6-61
Carbon Monoxide
... 2.26. 2.27. 4-53
Cassette Tape Player
(See “Audio Systems”)
9-1