1993 CHEVROLET PLYMOUTH ACCLAIM fuse block
[x] Cancel search: fuse blockPage 597 of 2438
HORNS
CONTENTS
page page
GENERAL INFORMATION .................. 1
HORN SWITCH REPLACEMENT ............ 3 TESTING HORN SYSTEM
................. 1
GENERAL INFORMATION
WARNING: ON VEHICLES EQUIPPED WITH AIR
BAG, SEE GROUP 8M, RESTRAINT SYSTEMS FOR
STEERING WHEEL OR COLUMN REMOVAL PROCE-
DURES.
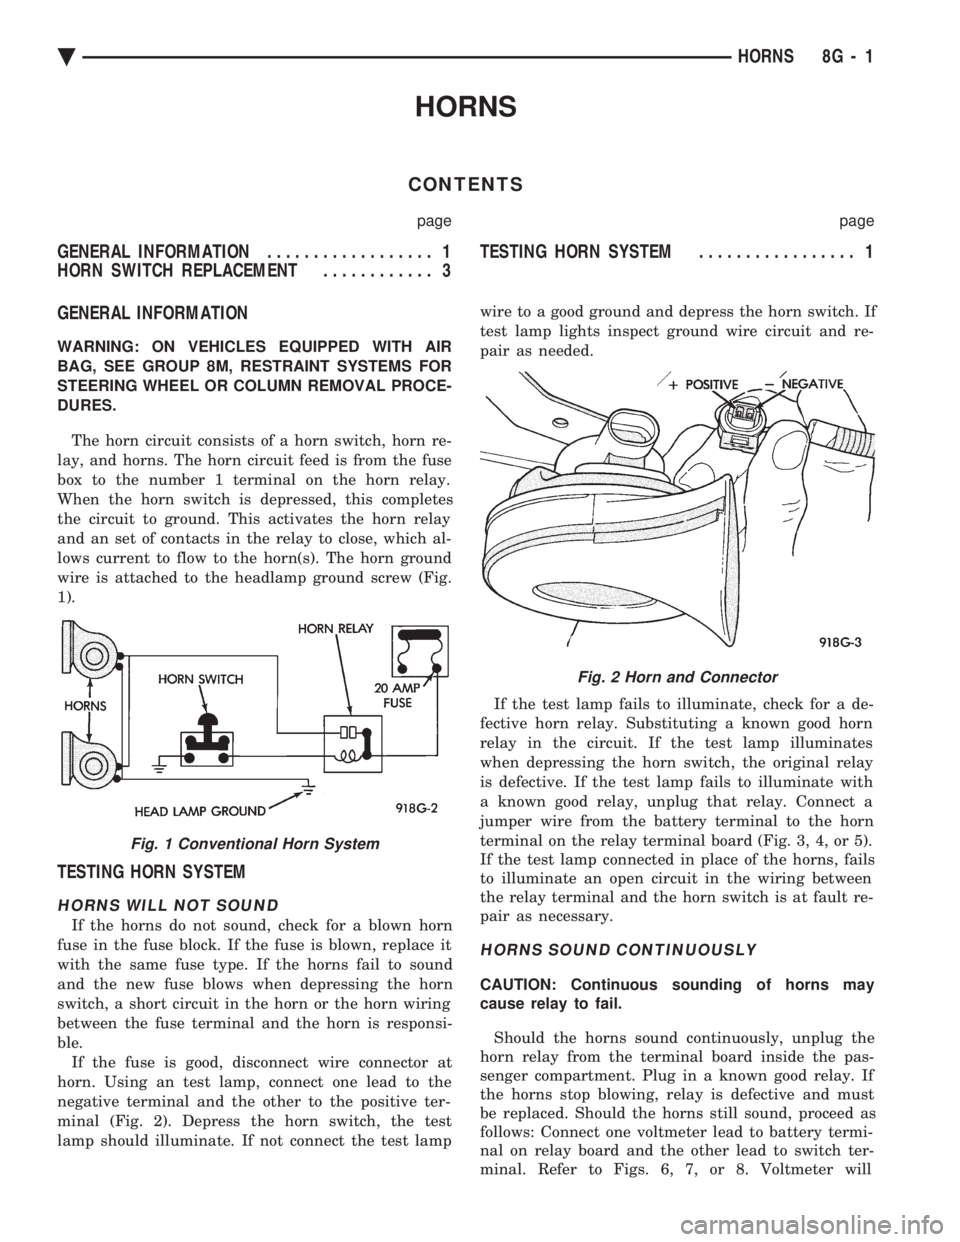
The horn circuit consists of a horn switch, horn re-
lay, and horns. The horn circuit feed is from the fuse
box to the number 1 terminal on the horn relay.
When the horn switch is depressed, this completes
the circuit to ground. This activates the horn relay
and an set of contacts in the relay to close, which al-
lows current to flow to the horn(s). The horn ground
wire is attached to the headlamp ground screw (Fig.
1).
TESTING HORN SYSTEM
HORNS WILL NOT SOUND
If the horns do not sound, check for a blown horn
fuse in the fuse block. If the fuse is blown, replace it
with the same fuse type. If the horns fail to sound
and the new fuse blows when depressing the horn
switch, a short circuit in the horn or the horn wiring
between the fuse terminal and the horn is responsi-
ble. If the fuse is good, disconnect wire connector at
horn. Using an test lamp, connect one lead to the
negative terminal and the other to the positive ter-
minal (Fig. 2). Depress the horn switch, the test
lamp should illuminate. If not connect the test lamp wire to a good ground and depress the horn switch. If
test lamp lights inspect ground wire circuit and re-
pair as needed.
If the test lamp fails to illuminate, check for a de-
fective horn relay. Substituting a known good horn
relay in the circuit. If the test lamp illuminates
when depressing the horn switch, the original relay
is defective. If the test lamp fails to illuminate with
a known good relay, unplug that relay. Connect a
jumper wire from the battery terminal to the horn
terminal on the relay terminal board (Fig. 3, 4, or 5).
If the test lamp connected in place of the horns, fails
to illuminate an open circuit in the wiring between
the relay terminal and the horn switch is at fault re-
pair as necessary.
HORNS SOUND CONTINUOUSLY
CAUTION: Continuous sounding of horns may
cause relay to fail.
Should the horns sound continuously, unplug the
horn relay from the terminal board inside the pas-
senger compartment. Plug in a known good relay. If
the horns stop blowing, relay is defective and must
be replaced. Should the horns still sound, proceed as
follows: Connect one voltmeter lead to battery termi-
nal on relay board and the other lead to switch ter-
minal. Refer to Figs. 6, 7, or 8. Voltmeter will
Fig. 1 Conventional Horn System
Fig. 2 Horn and Connector
Ä HORNS 8G - 1
Page 621 of 2438
WINDSHIELD WIPER AND WASHER SYSTEMS
CONTENTS
page page
GENERAL WIPER INFORMATION ........... 1
INTERMITTENT WINDSHIELD WIPER MOTOR AND SWITCH SERVICE PROCEDURES .... 12
WINDSHIELD WASHERS ................. 17 WINDSHIELD WIPER BLADE AND ARM SERVICE
PROCEDURES ......................... 1
WINDSHIELD WIPER MOTOR AND LINKAGE ASSEMBLY SERVICE PROCEDURES ....... 3
GENERAL WIPER INFORMATION
WARNING: ON VEHICLES EQUIPPED WITH AIR-
BAG, SEE GROUP 8M, RESTRAINT SYSTEMS FOR
STEERING WHEEL OR COLUMN REMOVAL PROCE-
DURES.
The windshield wipers can be operated with the
windshield wiper switch only when the ignition
switch is in the ACCESSORY or IGNITION position.
A fuse, located in the fuse block, protects the cir-
cuitry of the wiper system and the vehicle. The wiper motor has permanent magnet fields. The speeds are determined by current flow to the appro-
priate set of brushes. The intermittent wipe system, in addition to low
and high speed, has a delay mode. The delay mode
has a range of 2 to 15 seconds. This is accomplished
by a variable resistor in the wiper switch and is con-
trolled electrically by a relay. The wiper system completes the wipe cycle when
the switch is turned OFF. The blades park in the
lowest portion of the wipe pattern.
WINDSHIELD WIPER BLADE AND ARM SERVICE PROCEDURES
WIPER BLADES
Wiper blades, exposed to the weather for a long pe-
riod of time, tend to lose their wiping effectiveness.
Periodic cleaning of the wiper blade is suggested to
remove the accumulation of salt and road film. The
wiper blades, arms, and windshield should be cleaned
with a sponge or cloth and a mild detergent or nona-
brasive cleaner. If the blades continue to streak or
smear, they should be replaced.
WIPER BLADE ELEMENT CHANGE
(1) Turn wiper switch ON, position blades to a con-
venient place by turning the ignition switch ON and
OFF. (2) Lift wiper arm to raise blade off glass.
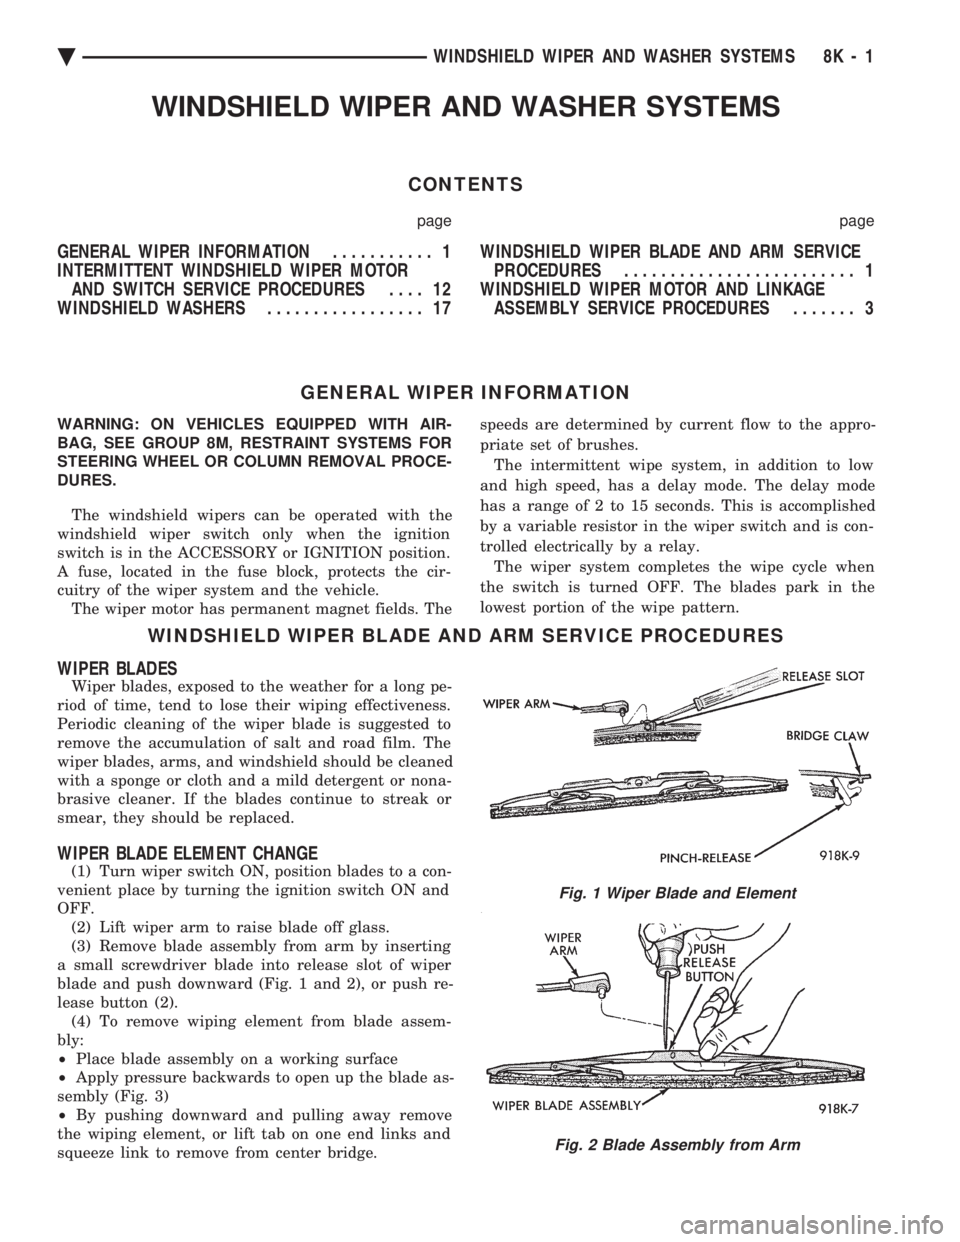
(3) Remove blade assembly from arm by inserting
a small screwdriver blade into release slot of wiper
blade and push downward (Fig. 1 and 2), or push re-
lease button (2). (4) To remove wiping element from blade assem-
bly:
² Place blade assembly on a working surface
² Apply pressure backwards to open up the blade as-
sembly (Fig. 3)
² By pushing downward and pulling away remove
the wiping element, or lift tab on one end links and
squeeze link to remove from center bridge.
Fig. 1 Wiper Blade and Element
Fig. 2 Blade Assembly from Arm
Ä WINDSHIELD WIPER AND WASHER SYSTEMS 8K - 1
Page 623 of 2438
(3) Secure arm to pivot with attaching nut and
tighten 17 to 22 N Im (155 to 195 in. lbs.) torque.
(4) Close head cover and remove pin from arm pin
hole.
WIPER ARM ADJUSTMENT
FRONT ARM ADJUSTMENT
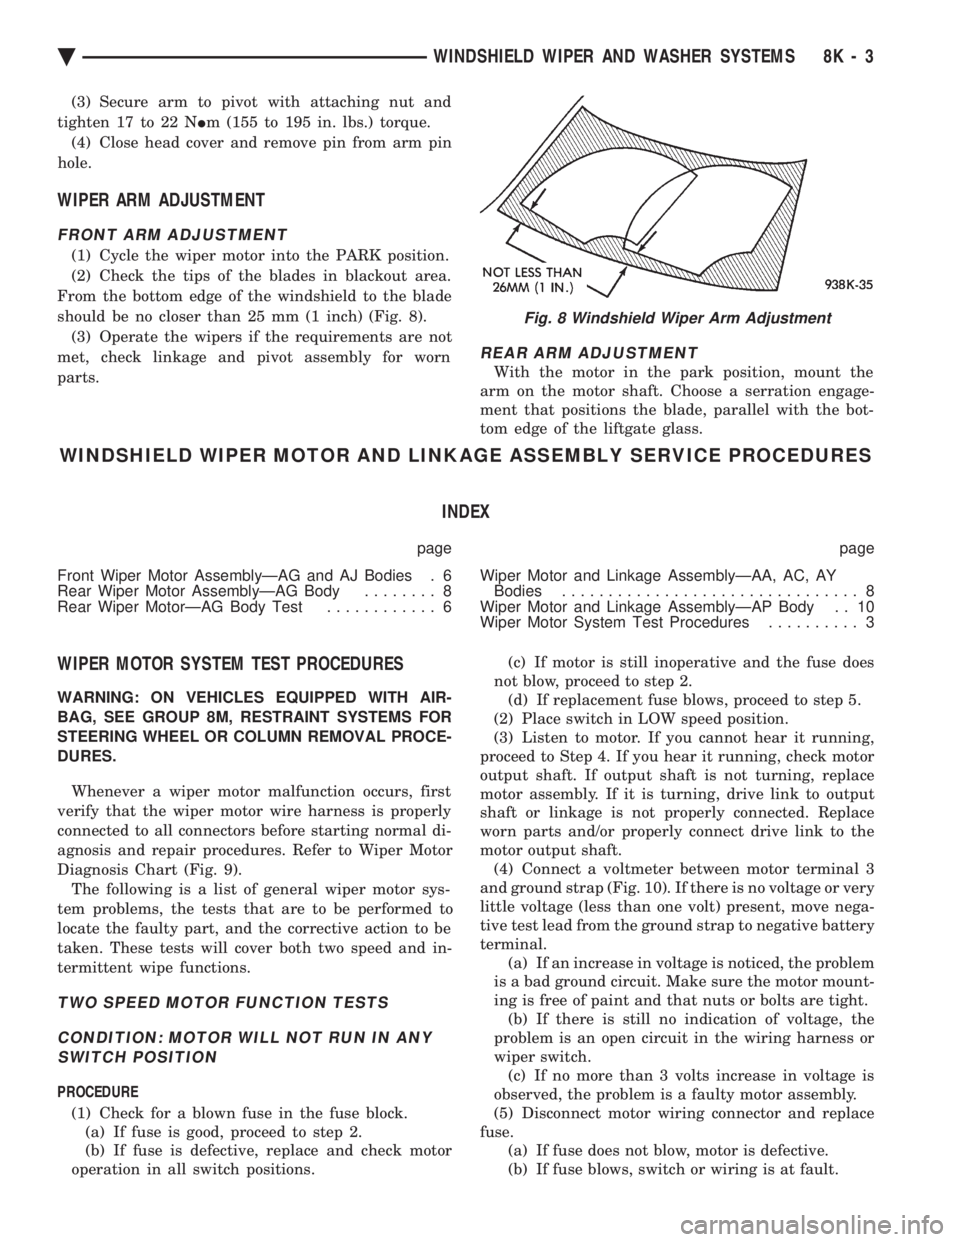
(1) Cycle the wiper motor into the PARK position.
(2) Check the tips of the blades in blackout area.
From the bottom edge of the windshield to the blade
should be no closer than 25 mm (1 inch) (Fig. 8). (3) Operate the wipers if the requirements are not
met, check linkage and pivot assembly for worn
parts.
REAR ARM ADJUSTMENT
With the motor in the park position, mount the
arm on the motor shaft. Choose a serration engage-
ment that positions the blade, parallel with the bot-
tom edge of the liftgate glass.
WINDSHIELD WIPER MOTOR AND LINKAGE ASSEMBLY SERVICE PROCEDURES
INDEX
page page
Front Wiper Motor AssemblyÐAG and AJ Bodies . 6
Rear Wiper Motor AssemblyÐAG Body ........ 8
Rear Wiper MotorÐAG Body Test ............ 6 Wiper Motor and Linkage AssemblyÐAA, AC, AY
Bodies ................................ 8
Wiper Motor and Linkage AssemblyÐAP Body . . 10
Wiper Motor System Test Procedures .......... 3
WIPER MOTOR SYSTEM TEST PROCEDURES
WARNING: ON VEHICLES EQUIPPED WITH AIR-
BAG, SEE GROUP 8M, RESTRAINT SYSTEMS FOR
STEERING WHEEL OR COLUMN REMOVAL PROCE-
DURES.
Whenever a wiper motor malfunction occurs, first
verify that the wiper motor wire harness is properly
connected to all connectors before starting normal di-
agnosis and repair procedures. Refer to Wiper Motor
Diagnosis Chart (Fig. 9). The following is a list of general wiper motor sys-
tem problems, the tests that are to be performed to
locate the faulty part, and the corrective action to be
taken. These tests will cover both two speed and in-
termittent wipe functions.
TWO SPEED MOTOR FUNCTION TESTS
CONDITION: MOTOR WILL NOT RUN IN ANY SWITCH POSITION
PROCEDURE
(1) Check for a blown fuse in the fuse block. (a) If fuse is good, proceed to step 2.
(b) If fuse is defective, replace and check motor
operation in all switch positions. (c) If motor is still inoperative and the fuse does
not blow, proceed to step 2. (d) If replacement fuse blows, proceed to step 5.
(2) Place switch in LOW speed position.
(3) Listen to motor. If you cannot hear it running,
proceed to Step 4. If you hear it running, check motor
output shaft. If output shaft is not turning, replace
motor assembly. If it is turning, drive link to output
shaft or linkage is not properly connected. Replace
worn parts and/or properly connect drive link to the
motor output shaft. (4) Connect a voltmeter between motor terminal 3
and ground strap (Fig. 10). If there is no voltage or very
little voltage (less than one volt) present, move nega-
tive test lead from the ground strap to negative battery
terminal. (a) If an increase in voltage is noticed, the problem
is a bad ground circuit. Make sure the motor mount-
ing is free of paint and that nuts or bolts are tight. (b) If there is still no indication of voltage, the
problem is an open circuit in the wiring harness or
wiper switch. (c) If no more than 3 volts increase in voltage is
observed, the problem is a faulty motor assembly.
(5) Disconnect motor wiring connector and replace
fuse. (a) If fuse does not blow, motor is defective.
(b) If fuse blows, switch or wiring is at fault.
Fig. 8 Windshield Wiper Arm Adjustment
Ä WINDSHIELD WIPER AND WASHER SYSTEMS 8K - 3
Page 643 of 2438
LAMPS
CONTENTS
page page
BULB APPLICATION TABLE ............... 38
CONCEALED HEADLAMPS ................ 27
EXTERIOR LAMP SWITCHES AND HEADLAMP ALIGNMENT ........................... 3
EXTERIOR LAMP SYSTEMS .............. 25
EXTERIOR LAMPSÐAA BODY ............. 7
EXTERIOR LAMPSÐAC BODY ............ 10 EXTERIOR LAMPSÐAG BODY
............ 14
EXTERIOR LAMPSÐAJ BODY ............ 16
EXTERIOR LAMPSÐAP BODY ............ 19
EXTERIOR LAMPSÐAY-BODY ............ 22
GENERAL INFORMATION .................. 1
ILLUMINATED ENTRY SYSTEM ........... 33
GENERAL INFORMATION
Each vehicle is equipped with lamps used for illumi-
nating and indicating purposes. A circuit must have a
good ground to be complete. Circuit ground occurs
when the lamp socket makes contact with the metal
body. On vehicles with plastic lamps, a wire between
the socket and the body makes the grounds. When changing lamp bulbs, check the socket for
corrosion. If corrosion is present, clean contacts with a
wire brush and coat the inside of the socket with
Mopar tMulti-purpose Grease or equivalent.
CAUTION: Do not touch the glass of halogen bulbs
with fingers or any possibly oily surface, reduced
bulb life will result.
BODY IDENTIFICATION
Throughout this Group, references are made to the
vehicle family or body code. To decode the vehicle
identification plates, refer to the Introduction Section
at the front of this manual.
DIAGNOSTIC PROCEDURES
Begin electrical system failure diagnosis by testing
all related fuses and circuit breakers in the fuse block
and engine compartment. When a vehicle experiences problems with the head-
lamp system, verify the condition of the battery con-
nections, charging system, headlamp bulbs, wire con-
nectors, relay, high beam dimmer switch and headlamp
switch. Refer to Wiring Diagrams manual for compo-
nent locations and circuit information.
SYMPTOM
Headlamps are dim when engine is idling of
with ignition turned OFF. Canada cars must
have lamps ON. ACTION
² Clean battery terminal clamps and posts. Refer to
Group 8B, Battery/Starter/Generator Service for
proper procedures.
² Test charging system output. Refer to Group 8A,
Battery/Starting/Charging Systems Diagnostics for
proper testing procedures.
² Test for high resistance in headlamp circuits.
² Defective headlamp bulb.
SYMPTOM
Bulbs burn out frequently.
ACTION
² Test charging system output. Refer to Group 8A,
Battery/Starting/Charging Systems Diagnostics for
proper testing procedures.
² Check for loose or corroded connector terminals or
splices in headlamp circuits. Refer to Wiring Diagrams
manual for component and splice locations.
SYMPTOM
Headlamps are dim with engine running above
idle. Canada cars must have lamps ON.
ACTION
² Test charging system output. Refer to Group 8A,
Battery/Starting/Charging Systems Diagnostics for
proper testing procedures.
² Test for high resistance in headlamp circuits.
² Defective headlamp bulb.
SYMPTOM
Headlamps flash randomly.
ACTION
² Test for poor circuit ground.
² Test for high resistance in headlamp circuits.
Ä LAMPS 8L - 1
Page 688 of 2438
CLOCKSPRING
WARNING: BEFORE BEGINNING ANY AIR BAG
SYSTEM REMOVAL OR INSTALLATION PROCE-
DURES, REMOVE AND ISOLATE THE BATTERY
NEGATIVE (-) CABLE (GROUND) FROM THE VEHI-
CLE BATTERY. THIS IS THE ONLY SURE WAY TO
DISABLE THE AIR BAG SYSTEM. FAILURE TO DO
SO COULD RESULT IN ACCIDENTAL AIR BAG DE-
PLOYMENT, AND POSSIBLE INJURY.
WHEN AN UNDEPLOYED AIR BAG ASSEMBLY
IS TO BE REMOVED FROM THE STEERING
WHEEL, DISCONNECT BATTERY GROUND CA-
BLE AND ISOLATE. ALLOW SYSTEM CAPACI-
TOR TO DISCHARGE FOR TWO MINUTES, THEN
BEGIN AIR BAG REMOVAL.
REMOVAL
(1) Place the front wheels in the straight ahead po-
sition before starting the repair. (2) Disconnect battery negative cable and isolate.
(3) Wait two minutes for the reserve capacitor to
discharge before removing undeployed module. (4) Remove the air bag module.
(5) Remove Speed Control switch and connector if
so equipped or cover. (6) Disconnect horn terminals.
(7) Remove the steering wheel.
(8) Remove upper and lower steering column
shrouds to gain access to clockspring wiring. (9) Disconnect the 2-way connector between the
clockspring and the instrument panel wiring harness
on top of the fuse block. (10) To remove, pull clockspring assembly from the
steering column by lifting locating fingers as neces-
sary. The clockspring cannot be repaired, and must
be replaced if faulty.
INSTALLATION
(1) Snap clockspring onto the steering column. If
the clockspring is not properly positioned, follow the
clockspring centering procedure before installing
steering wheel. (2) Connect the clockspring to the instrument
panel harness, ensure wiring locator clips are prop-
erly seated on wiring trough. Ensure harness locking
tabs are properly engaged. (3) Install steering column shrouds. Be sure air
bag wire is inside of shrouds. (4) Front wheels should still be in the straight-
ahead position. Install steering wheel, ensure the
flats on hub align with clockspring. Pull the horn
lead through the smaller upper hole. Pull the air bag
and speed control leads through the larger bottom
hole. Ensure leads are not pinched under the steer-
ing wheel. (5) Connect the horn lead wire, then the air bag
lead wire to the air bag module. (6) Install the air bag module and tighten nuts to
9to11N Im (80 to 100 in. lb.) torque.
(7) Install speed control switch and connector or
cover. (8) Do not connect battery negative cable. Refer to
Air Bag Systems Check for proper procedure.
CLOCKSPRING CENTERING PROCEDURE
If the rotating tape within the clockspring is not
positioned properly with the steering wheel and the
front wheels, the clockspring may fail during use.
The following procedure MUST BE USED to center
the clockspring if it is not known to be properly po-
sitioned, or if the front wheels were moved from the
straight ahead position.
WARNING: BEFORE BEGINNING ANY AIR BAG
SYSTEM REMOVAL OR INSTALLATION PROCE-
DURES, REMOVE AND ISOLATE THE BATTERY
NEGATIVE (-) CABLE (GROUND) FROM THE VEHI-
CLE BATTERY. THIS IS THE ONLY SURE WAY TO
DISABLE THE AIR BAG SYSTEM. FAILURE TO DO
THIS COULD RESULT IN ACCIDENTAL AIR BAG
DEPLOYMENT AND POSSIBLE INJURY.
WHEN AN UNDEPLOYED AIR BAG ASSEMBLY
IS TO BE REMOVED FROM THE STEERING
WHEEL, DISCONNECT BATTERY GROUND CA-
BLE AND ISOLATE. ALLOW SYSTEM CAPACI-
TOR TO DISCHARGE FOR TWO MINUTES, THEN
BEGIN AIR BAG REMOVAL. (1) Place front wheels in the straight ahead posi-
tion. (2) Wait two minutes for the reserve capacitor to
discharge before removing undeployed module. (3) Refer to Steering Wheel procedures for removal
of air bag module and steering wheel. (4) Depress the two plastic locking pins to disen-
gage locking mechanism (Fig. 10). (5) Keeping locking mechanism disengaged, rotate
the clockspring rotor in the CLOCKWISE DIREC-
TION to the end of travel. Do not apply excessive
torque. (6) From the end of travel, rotate the rotor two full
turns and a half in the counterclockwise direction.
The horn wire should end up at the top and the squib
wire at the bottom. Engage clockspring locking
mechanism. (7) Refer to Steering Wheel procedures for installa-
tion of steering wheel and air bag module. (8) Do not connect battery negative cable. Refer to
Air Bag System Check for proper procedure.
8M - 6 RESTRAINT SYSTEMS Ä
Page 695 of 2438
POWER LOCKS
CONTENTS
page page
CIRCUIT BREAKER TEST .................. 1
DECK LID OPERATION ................... 3
DECK LID PULL-DOWN SYSTEMÐAC and AY BODIES .............................. 3
DOOR LOCK INHIBIT ..................... 6
DOOR LOCK INHIBIT ..................... 1
DOOR LOCK MOTOR REPLACEMENT ........ 3
DOOR LOCK SYSTEM TEST ............... 3
ELECTRIC MOTOR TEST .................. 2 GENERAL INFORMATION
.................. 1
KEYLESS ENTRY SYSTEM ................ 1
LAMP OUTAGE MODULE REPLACEMENT .... 6
POWER DOOR LOCKS .................... 2
POWER PULL DOWN .................... 4
REMOTE KEYLESS ENTRY ................ 5
REMOTE KEYLESS MODULE REPLACEMENT . . 6
SWITCH TEST .......................... 1
WIRING VOLTAGE TEST .................. 1
GENERAL INFORMATION
All doors can be locked or unlocked electrically by
operating the switch on a front door panel or arm
rest. The rear doors can be locked or unlocked by actu-
ation of the front door switch, or can be locked or un-
locked mechanically and independently with their
respective locking knobs. The front doors can be locked or unlocked mechan-
ically with the locking knob regardless of electrical
locking and unlocking actuation with the front door
knobs. The right and left front door on all car lines can be
locked or unlocked mechanically from the outside
with the key or electrically as described above. The
left front can also be unlocked by actuation of the in-
side remote door handle. The right front door on AC,
AG, AJ and AY can be unlocked by actuation of the
inside remote door handle. The deck lid lock consists of a latch with internal
solenoid and push button switch. The solenoid is en-
ergized only when the push button is depressed.
DOOR LOCK INHIBIT
The power door lock inhibit system prevents the
doors from being locked using the power door locks
when either of two conditions occur: (1) The key is in the ignition switch and any of the
doors are open. The ignition switch does not have to
be ON. (2) The key is in the ignition switch and the head-
lamp are on.
KEYLESS ENTRY SYSTEM
The system allows locking and unlocking of vehicle
door(s) and Trunk lid by remote control using a hand
held radio transmitter. The ignition switch must be
OFF before the trunk lid can be unlocked with the
transmitter. The receiver may receive signals from two trans-
mitters. Each transmitter has its own code, and the
code has been stored in memory. If the transmitter is
replaced or a second transmitter is add, the code on
both units have to be placed in memory.
CIRCUIT BREAKER TEST
Find correct circuit breaker on fuse block. Pull out
slightly but be sure that circuit breaker terminals
still contact terminals in fuse block. Connect ground
wire of voltmeter to a good ground. With probe of
voltmeter positive wire, check both terminals of cir-
cuit breaker for 12 volts. If only one terminal checks
at 12 volts, circuit breaker is defective and must be
replaced. If neither terminal shows 12 volts, check
for open or shorted circuit to circuit breaker.
WIRING VOLTAGE TEST
The following wiring test sequence determines
whether or not voltage is continuous through the
body harness to switch. (1) Remove left side switch from trim panel.
(2) Carefully separate multiple terminal block on
wiring harness from switch body. (3) Connect one lead of test light to a ground ter-
minal:
² Black Wire AA and AC Bodies
² Gray wire AG and AJ Bodies
² Touch other test light lead to Red Wire terminal.
² If test light comes on, the wiring circuit between
the battery and switch is functional.
² If test light does not come on, check 30 amp circuit
breaker or for a open circuit.
SWITCH TEST
Remove the switch from its mounting location. Us-
ing an ohmmeter, refer to (Fig. 1) to determine if
continuity is correct in the Lock and Unlock switch
positions. If these results are not obtained, replace
the switch.
Ä POWER LOCKS 8P - 1
Page 707 of 2438

POWER SEATS
CONTENTS
page page
ADJUSTER ............................. 3
CIRCUIT BREAKER TEST .................. 1
ENTHUSIAST SEAT ....................... 4
GENERAL INFORMATION .................. 1
HARNESS VOLTAGE TEST ................. 1
HORIZONTAL AND VERTICAL TRANSMISSIONS ....................... 3
MEMORY CONTROL MODULE REPLACEMENT ....................... 19
MOTOR ................................ 3
MOTOR TESTS .......................... 1
POWER MEMORY SEAT, RECLINER AND MIRRORS ............................. 5 POWER MEMORY SEAT, RECLINER AND
MIRRORS DIAGNOSIS ................... 9
POWER RECLINER MECHANISM ........... 18
POWER RECLINER MOTOR AND CABLE ..... 17
RECLINER SWITCH REPLACEMENT ......... 19
RECLINER SWITCH TEST ................. 19
SEAT ASSEMBLY ........................ 3
SWITCH REPLACEMENT REMOVAL .......... 5
SWITCH TEST ........................... 5
SWITCH TEST ........................... 3
TEST PROCEDURES ...................... 6
TEST PROCEDURES ...................... 1
GENERAL INFORMATION
Power seats can be adjusted in six different direc-
tions up, down, forward, back, tilt forward, or tilt
rearward. A three armature permanent magnet reversible mo-
tor is coupled through cables to worm gear box assem-
blies located in the seat tracks, providing the various
seat movements. The electrical circuit is protected by a 30 amp circuit
breaker located on the fuse block.
TEST PROCEDURES
Before any testing is attempted the battery should be
carefully charged and all connections and terminals
cleaned and tightened to insure proper continuity and
grounds. With dome lamp on, apply switch in direction of
failure. If dome lamp dims the seat motor is trying to
work indicating mechanical jamming. If dome lamp
does not dim, then proceed with the following electrical
tests.
CIRCUIT BREAKER TEST
Find correct circuit breaker on fuse block. Pull out
slightly but be sure that circuit breaker terminals still
contact terminals in fuse block. Connect ground wire of
voltmeter to a good ground. With probe of voltmeter
positive wire, check both terminals of circuit breaker
for battery voltage. If only one terminal checks at
battery voltage, circuit breaker is defective and must
be replaced. If neither terminal shows battery voltage,
check for open or shorted circuit to circuit breaker.
HARNESS VOLTAGE TEST
The following test will determine whether or not
voltage is continuous through the body harness to the
switch. (1) Remove power seat switch from mounting posi-
tion and disconnect switch from wiring harness. (2) Connect one lead of test light to ground terminal,
black wire (BK) of center section, and touch other test
light lead to red wire (RD) terminal. (3) If test light comes on, harness to switch is good.
If test light does not come on, perform circuit breaker
test.
MOTOR TESTS
AA BODY
(1) Remove switch from mounting position and dis-
connect from harness. (2) To check the center motor, connect a jumper wire
between pin 5 and pin 3 (Fig. 1). Connect a second
jumper wire between pin 7 and pin 4 If motor does not
operate, reverse the jumpers, pin 5 to pin 4 and pin 7 to
pin 3. If motor still does not operate check wiring
between switch connector and motor assembly. If wir-
ing checks good replace motor assembly. (3) To check the front motor, connect a jumper wire
between pin 5 and pin 1 (Fig. 1). Connect a second
jumper wire between pin 7 and pin 8. If motor does not
operate, reverse the jumpers, pin 5 to pin 8 and pin 7 to
pin 1. If motor still does not operate check wiring
between switch connector and motor assembly. If wir-
ing checks good replace motor assembly.
(4) To check the rear motor, connect a covered jumper
wire between pin 5 and pin 6 (Fig. 1). Connect a second
Ä POWER SEATS 8R - 1
Page 715 of 2438
above. When the control module has finished, it will
return to the normal operating mode after ten sec-
onds if no further switches are activated.The control module will also return to normal op-
erating mode if any manual seat or recliner move-
ment switch is actuated during the ten second
timeout. If the system has found a problem, refer to the ap-
propriate diagnosis condition.
POWER MEMORY SEAT, RECLINER AND
MIRRORS DIAGNOSIS
Before any diagnosis is done on the system, move
the seat switches and listen for relays clicking in the
control module under the seat. If relays can be heard,
the main battery and ground circuits to the control
module as well as the battery circuit to the switches
in the driver's door are good. When checking for voltage or continuity, always
use a volt/ohm meter to get accurate readings. The
seat and recliner switches must be activated to check
for voltage at the seat and recliner motors or at the
input to the control module from the switches. The control module creates a special voltage supply
for the position sensing functions. It also shuts down
after five seconds, in order to check this or any other
voltage being fed back to the control module. A
switch may have to be activated more than once to
verify a voltage reading. The voltage from the con-
trol module that feeds the seat and recliner position
sensing potentiometer, will be between 4.5 to 5 volts.
For simplicity in the diagnosis section, the feed volt-
age will be called 5 volts. On the position sensing
wires, these voltages will always be less than 5 volts
but more than 0 volts. Typically the high level is at
a maximum of about 4.25 volts and the low level can
be as little as 0.1 volts. If any seat or recliner potentiometer or mirror
rheostat position sense wires are crossed, the control
module will not move that part of the system. The
seat or mirror will be in a fault diagnostic mode.
CONDITION: SYSTEM WILL NOT OPERATE.
PROCEDURE
(1) Check for forward/rearward operation of re-
cliner. If not operable, check for an open or loose cir-
cuit breaker mounted in board on the relay bank in
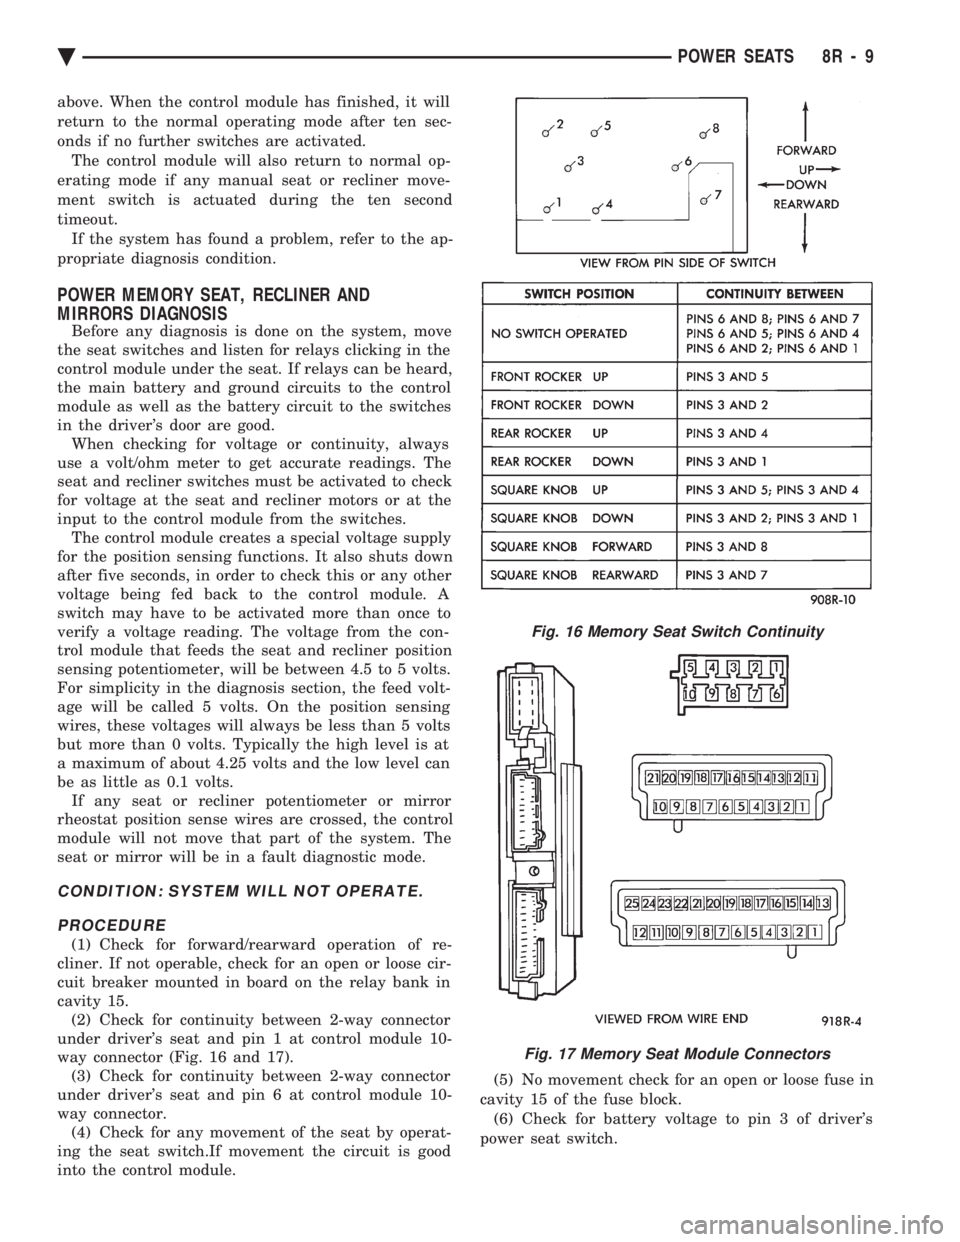
cavity 15. (2) Check for continuity between 2-way connector
under driver's seat and pin 1 at control module 10-
way connector (Fig. 16 and 17). (3) Check for continuity between 2-way connector
under driver's seat and pin 6 at control module 10-
way connector. (4) Check for any movement of the seat by operat-
ing the seat switch.If movement the circuit is good
into the control module. (5) No movement check for an open or loose fuse in
cavity 15 of the fuse block. (6) Check for battery voltage to pin 3 of driver's
power seat switch.
Fig. 16 Memory Seat Switch Continuity
Fig. 17 Memory Seat Module Connectors
Ä POWER SEATS 8R - 9