1993 CHEVROLET PLYMOUTH ACCLAIM fascia
[x] Cancel search: fasciaPage 653 of 2438
AERO HEADLAMP HOUSING
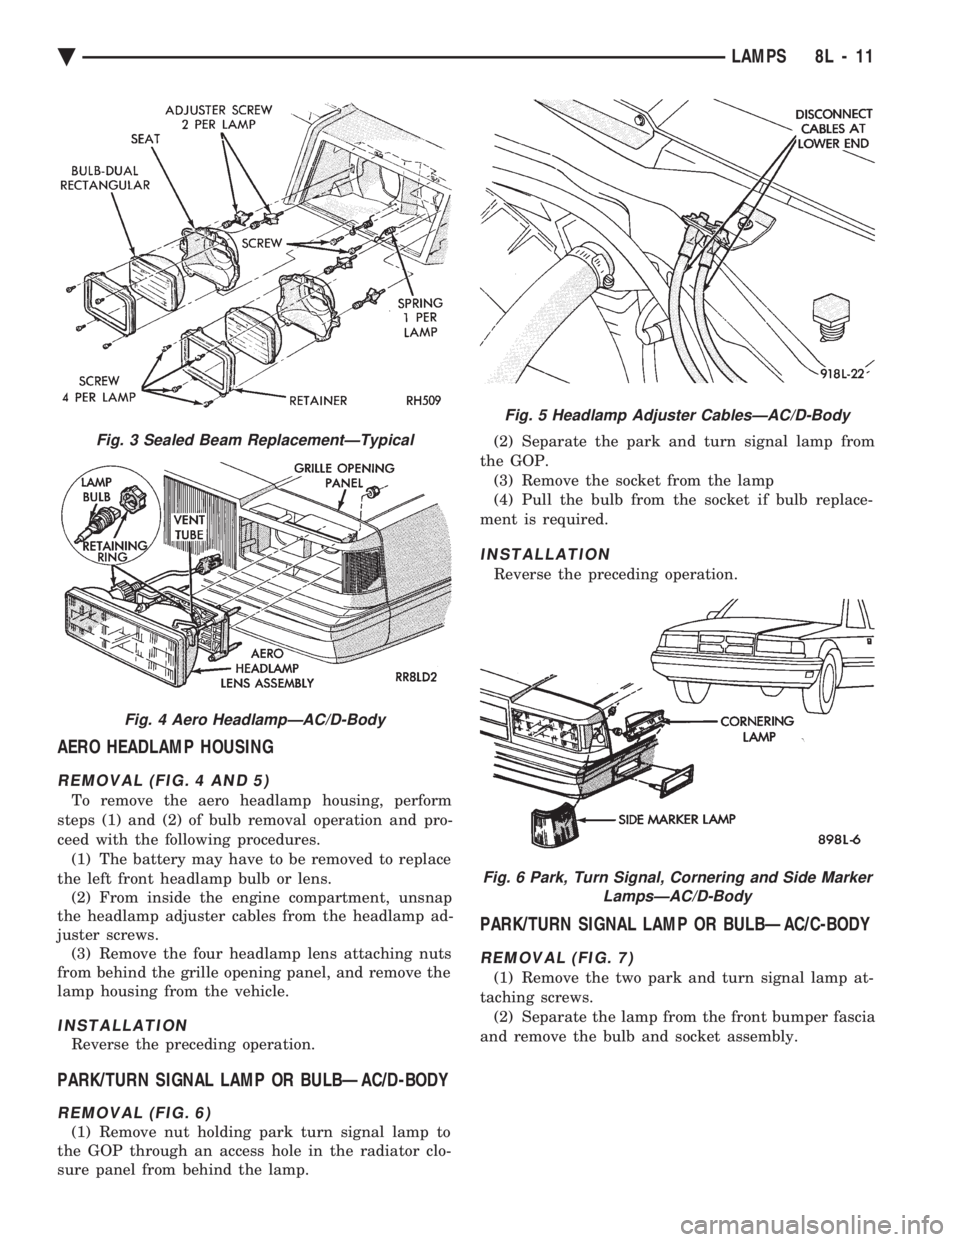
REMOVAL (FIG. 4 AND 5)
To remove the aero headlamp housing, perform
steps (1) and (2) of bulb removal operation and pro-
ceed with the following procedures. (1) The battery may have to be removed to replace
the left front headlamp bulb or lens. (2) From inside the engine compartment, unsnap
the headlamp adjuster cables from the headlamp ad-
juster screws. (3) Remove the four headlamp lens attaching nuts
from behind the grille opening panel, and remove the
lamp housing from the vehicle.
INSTALLATION
Reverse the preceding operation.
PARK/TURN SIGNAL LAMP OR BULBÐAC/D-BODY
REMOVAL (FIG. 6)
(1) Remove nut holding park turn signal lamp to
the GOP through an access hole in the radiator clo-
sure panel from behind the lamp. (2) Separate the park and turn signal lamp from
the GOP. (3) Remove the socket from the lamp
(4) Pull the bulb from the socket if bulb replace-
ment is required.
INSTALLATION
Reverse the preceding operation.
PARK/TURN SIGNAL LAMP OR BULBÐAC/C-BODY
REMOVAL (FIG. 7)
(1) Remove the two park and turn signal lamp at-
taching screws. (2) Separate the lamp from the front bumper fascia
and remove the bulb and socket assembly.
Fig. 3 Sealed Beam ReplacementÐTypical
Fig. 4 Aero HeadlampÐAC/D-Body
Fig. 5 Headlamp Adjuster CablesÐAC/D-Body
Fig. 6 Park, Turn Signal, Cornering and Side Marker LampsÐAC/D-Body
Ä LAMPS 8L - 11
Page 656 of 2438
EXTERIOR LAMPSÐAG BODY INDEX
page page
Back-Up Lamps .......................... 15
Center High Mounted Stop Lamp Bulb ........ 15
Fog Lamp or Bulb ........................ 14
Headlamp Diagnosis ...................... 14
Headlamp Housing and Bulb ................ 14 License Plate Lamp or Bulb
................ 15
Park and Turn Signal Lamp or Bulb .......... 14
Tail, Stop, Turn Signal, Side Marker, Back-Up Lamp ................................ 15
HEADLAMP DIAGNOSIS
For headlamp diagnosis, refer to the Headlamp Di-
agnosis at the beginning of this Group. Refer to Wir-
ing Diagrams manual for circuit and component
locations.
HEADLAMP HOUSING AND BULB
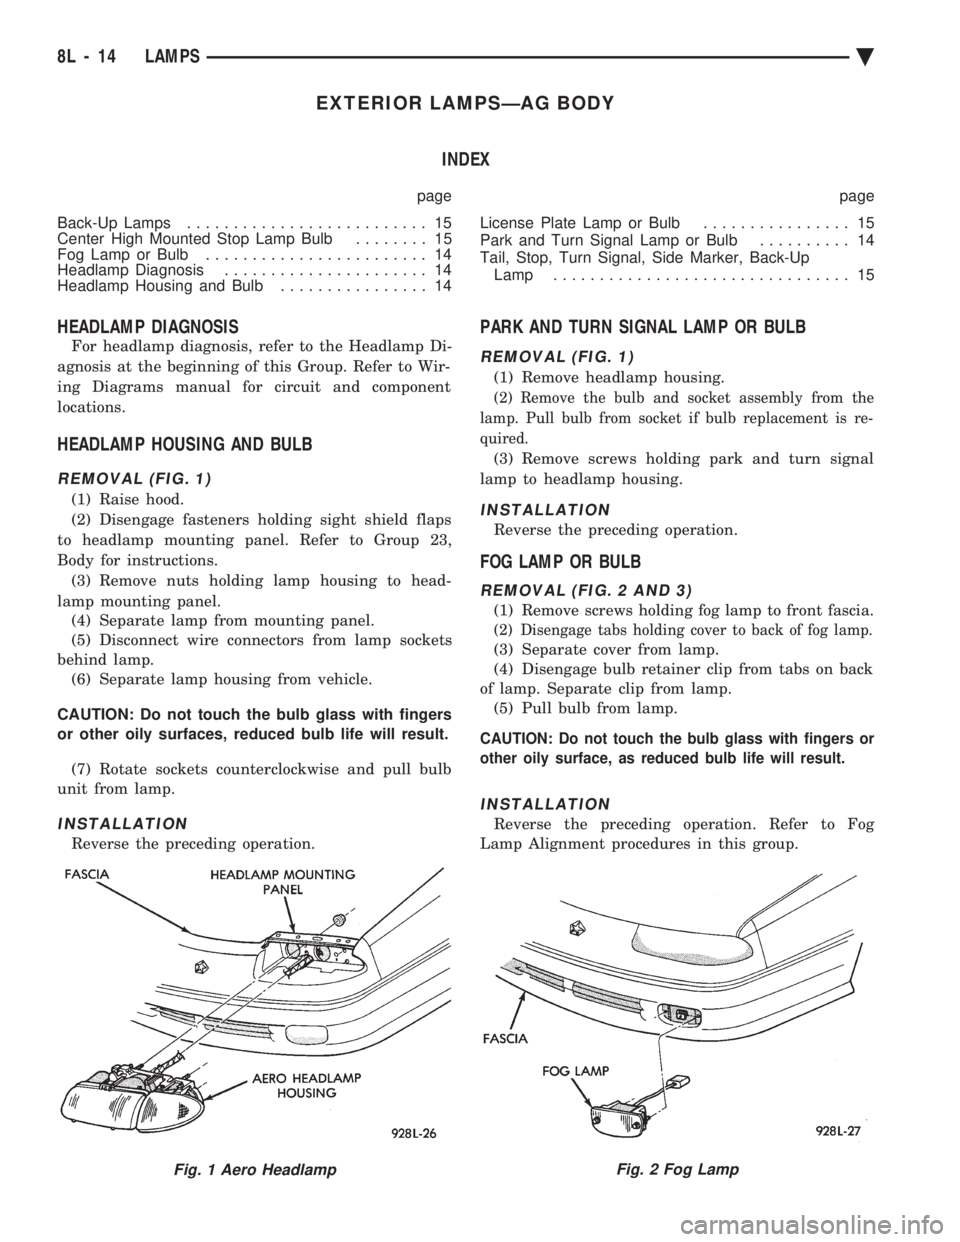
REMOVAL (FIG. 1)
(1) Raise hood.
(2) Disengage fasteners holding sight shield flaps
to headlamp mounting panel. Refer to Group 23,
Body for instructions. (3) Remove nuts holding lamp housing to head-
lamp mounting panel. (4) Separate lamp from mounting panel.
(5) Disconnect wire connectors from lamp sockets
behind lamp. (6) Separate lamp housing from vehicle.
CAUTION: Do not touch the bulb glass with fingers
or other oily surfaces, reduced bulb life will result. (7) Rotate sockets counterclockwise and pull bulb
unit from lamp.
INSTALLATION
Reverse the preceding operation.
PARK AND TURN SIGNAL LAMP OR BULB
REMOVAL (FIG. 1)
(1) Remove headlamp housing.
(2) Remove the bulb and socket assembly from the
lamp. Pull bulb from socket if bulb replacement is re-
quired.
(3) Remove screws holding park and turn signal
lamp to headlamp housing.
INSTALLATION
Reverse the preceding operation.
FOG LAMP OR BULB
REMOVAL (FIG. 2 AND 3)
(1) Remove screws holding fog lamp to front fascia.
(2) Disengage tabs holding cover to back of fog lamp.
(3) Separate cover from lamp.
(4) Disengage bulb retainer clip from tabs on back
of lamp. Separate clip from lamp. (5) Pull bulb from lamp.
CAUTION: Do not touch the bulb glass with fingers or
other oily surface, as reduced bulb life will result.
INSTALLATION
Reverse the preceding operation. Refer to Fog
Lamp Alignment procedures in this group.
Fig. 1 Aero HeadlampFig. 2 Fog Lamp
8L - 14 LAMPS Ä
Page 658 of 2438
EXTERIOR LAMPSÐAJ BODY INDEX
page page
Back-Up Lamp .......................... 17
Back-Up Lamp Bulb ...................... 17
Center High Mounted Stop Lamp (CHMSL) Bulb . 18
Center High-Mounted Stop Lamp Assembly (CHMSL) ............................. 18
Cornering Lamp or Bulb ................... 16
Front Side Marker Lamp ................... 16
Front Side Marker Lamp Bulb ............... 16
Headlamp Module and Bulb ................ 16 Headlamps
............................. 16
License Plate Lamp or Bulb ................ 17
Park and Turn Signal Lamp or Bulb .......... 16
Rear Side Marker Lamp ................... 17
Rear Side Marker Lamp Bulb ............... 17
Tail, Stop, Turn Signal Bulb or Lamp ......... 17
Trunk Lid Tail Lamp ...................... 17
Trunk Lid Tail Lamp Bulb .................. 17
HEADLAMPS
HEADLAMP MODULE AND BULB
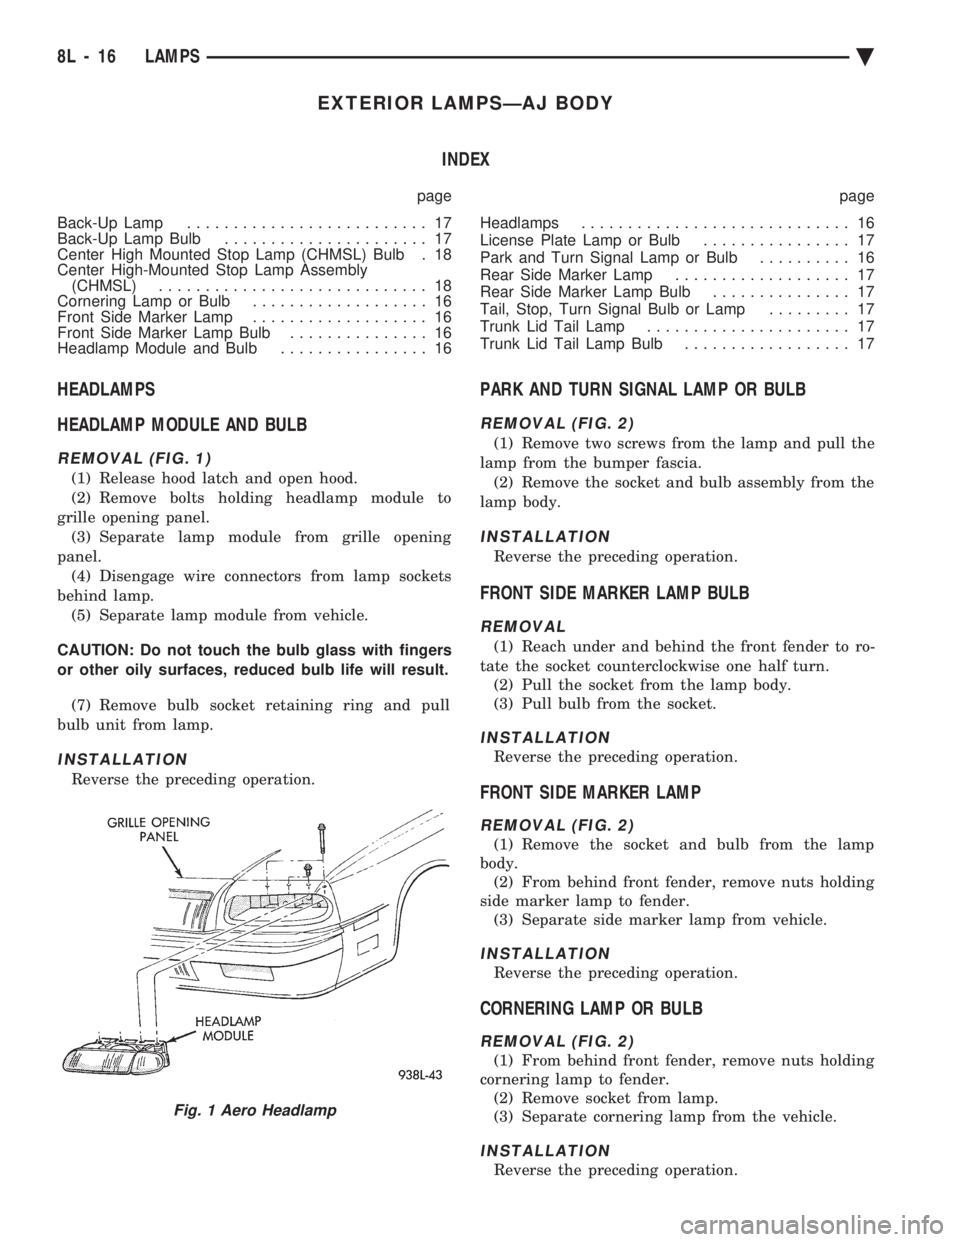
REMOVAL (FIG. 1)
(1) Release hood latch and open hood.
(2) Remove bolts holding headlamp module to
grille opening panel. (3) Separate lamp module from grille opening
panel. (4) Disengage wire connectors from lamp sockets
behind lamp. (5) Separate lamp module from vehicle.
CAUTION: Do not touch the bulb glass with fingers
or other oily surfaces, reduced bulb life will result. (7) Remove bulb socket retaining ring and pull
bulb unit from lamp.
INSTALLATION
Reverse the preceding operation.
PARK AND TURN SIGNAL LAMP OR BULB
REMOVAL (FIG. 2)
(1) Remove two screws from the lamp and pull the
lamp from the bumper fascia. (2) Remove the socket and bulb assembly from the
lamp body.
INSTALLATION
Reverse the preceding operation.
FRONT SIDE MARKER LAMP BULB
REMOVAL
(1) Reach under and behind the front fender to ro-
tate the socket counterclockwise one half turn. (2) Pull the socket from the lamp body.
(3) Pull bulb from the socket.
INSTALLATION
Reverse the preceding operation.
FRONT SIDE MARKER LAMP
REMOVAL (FIG. 2)
(1) Remove the socket and bulb from the lamp
body. (2) From behind front fender, remove nuts holding
side marker lamp to fender. (3) Separate side marker lamp from vehicle.
INSTALLATION
Reverse the preceding operation.
CORNERING LAMP OR BULB
REMOVAL (FIG. 2)
(1) From behind front fender, remove nuts holding
cornering lamp to fender. (2) Remove socket from lamp.
(3) Separate cornering lamp from the vehicle.
INSTALLATION
Reverse the preceding operation.
Fig. 1 Aero Headlamp
8L - 16 LAMPS Ä
Page 659 of 2438

TAIL, STOP, TURN SIGNAL BULB OR LAMP
REMOVAL (FIG. 3)
(1) Open deck lid and remove the plastic wing nut
securing the rear trim cover in place. (2) Pivot the end of the trim panel out of the way
to gain access, and remove three plastic wing-nuts
securing the lamp to the vehicle. (3) Separate the tail lamp from the body far
enough to rotate the socket and bulb assemblies
counterclockwise one-half turn and pull the sockets
out of the lamp body. (4) Remove the bulb from socket.
INSTALLATION
Reverse the preceding operation.
TRUNK LID TAIL LAMP BULB
REMOVAL (FIG. 3)
(1) Remove deck lid liner as necessary. Through
access hole in the inner deck lid, rotate socket coun-
terclockwise one-half turn, and pull the socket and
bulb assembly from the lamp body. (2) Remove the bulb from the socket.
INSTALLATION
Reverse the preceding operation.
TRUNK LID TAIL LAMP
REMOVAL (FIG. 3)
(1) Remove bulb and sockets from trunk lid tail
lamp. (2) Remove six nuts and four screws securing the
tail lamp to the deck lid and remove the lamp assem-
bly from the vehicle.
INSTALLATION
Reverse the preceding operation.
BACK-UP LAMP BULB
REMOVAL (FIG. 3)
(1) From behind the rear bumper fascia, rotate the
bulb and socket assembly counterclockwise one-half
turn and pull the bulb and socket out of the lamp body.
(2) Remove the bulb from the socket.
INSTALLATION
Reverse the preceding operation.
BACK-UP LAMP
REMOVAL (FIG. 3)
(1) Remove the socket and bulb assembly from the
lamp body. (2) Remove two screws from the lamp and pull the
lamp from the rear bumper fascia.
INSTALLATION
Reverse the preceding operation.
REAR SIDE MARKER LAMP BULB
REMOVAL (FIG. 3)
(1) Open the deck lid and remove the fastener
(wing nut) from the lower rear trim panel. Rotate the
inner quarter trim panel forward to gain access to
the lamp assembly. Rotate counterclockwise one-half
turn, and pull the socket and bulb from the lamp
body. (2) Remove the bulb from the socket.
INSTALLATION
Reverse the preceding operation.
REAR SIDE MARKER LAMP
REMOVAL (FIG. 3)
(1) Remove the socket and bulb assembly.
(2) Remove two attaching nuts from the lamp be-
hind the quarter panel and remove the lamp from
the vehicle.
INSTALLATION
Reverse the preceding operation.
LICENSE PLATE LAMP OR BULB
REMOVAL (FIG. 3)
(1) Remove screws holding license plate lamp to
rear bumper fascia.
Fig. 2 Park, Turn Signal, Cornering and Side Marker LampÐTypical
Fig. 3 Tail, Stop, Turn Signal, Back-Up, LicensePlate and Side Marker Lamps
Ä LAMPS 8L - 17
Page 662 of 2438
PARK AND TURN SIGNAL LAMP OR BULB
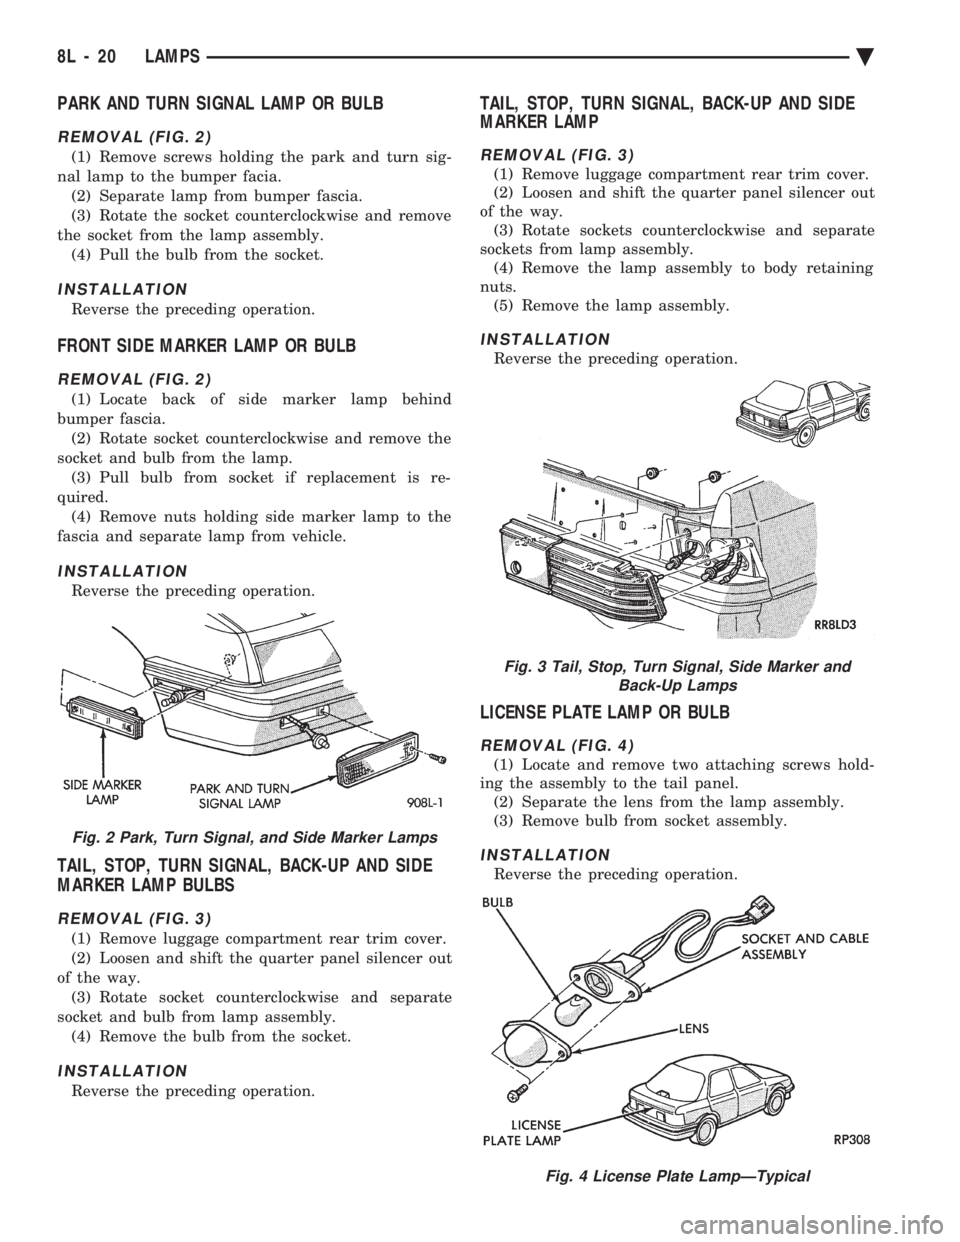
REMOVAL (FIG. 2)
(1) Remove screws holding the park and turn sig-
nal lamp to the bumper facia. (2) Separate lamp from bumper fascia.
(3) Rotate the socket counterclockwise and remove
the socket from the lamp assembly. (4) Pull the bulb from the socket.
INSTALLATION
Reverse the preceding operation.
FRONT SIDE MARKER LAMP OR BULB
REMOVAL (FIG. 2)
(1) Locate back of side marker lamp behind
bumper fascia. (2) Rotate socket counterclockwise and remove the
socket and bulb from the lamp. (3) Pull bulb from socket if replacement is re-
quired. (4) Remove nuts holding side marker lamp to the
fascia and separate lamp from vehicle.
INSTALLATION
Reverse the preceding operation.
TAIL, STOP, TURN SIGNAL, BACK-UP AND SIDE
MARKER LAMP BULBS
REMOVAL (FIG. 3)
(1) Remove luggage compartment rear trim cover.
(2) Loosen and shift the quarter panel silencer out
of the way. (3) Rotate socket counterclockwise and separate
socket and bulb from lamp assembly. (4) Remove the bulb from the socket.
INSTALLATION
Reverse the preceding operation.
TAIL, STOP, TURN SIGNAL, BACK-UP AND SIDE
MARKER LAMP
REMOVAL (FIG. 3)
(1) Remove luggage compartment rear trim cover.
(2) Loosen and shift the quarter panel silencer out
of the way. (3) Rotate sockets counterclockwise and separate
sockets from lamp assembly. (4) Remove the lamp assembly to body retaining
nuts. (5) Remove the lamp assembly.
INSTALLATION
Reverse the preceding operation.
LICENSE PLATE LAMP OR BULB
REMOVAL (FIG. 4)
(1) Locate and remove two attaching screws hold-
ing the assembly to the tail panel. (2) Separate the lens from the lamp assembly.
(3) Remove bulb from socket assembly.
INSTALLATION
Reverse the preceding operation.
Fig. 2 Park, Turn Signal, and Side Marker Lamps
Fig. 3 Tail, Stop, Turn Signal, Side Marker and Back-Up Lamps
Fig. 4 License Plate LampÐTypical
8L - 20 LAMPS Ä
Page 663 of 2438
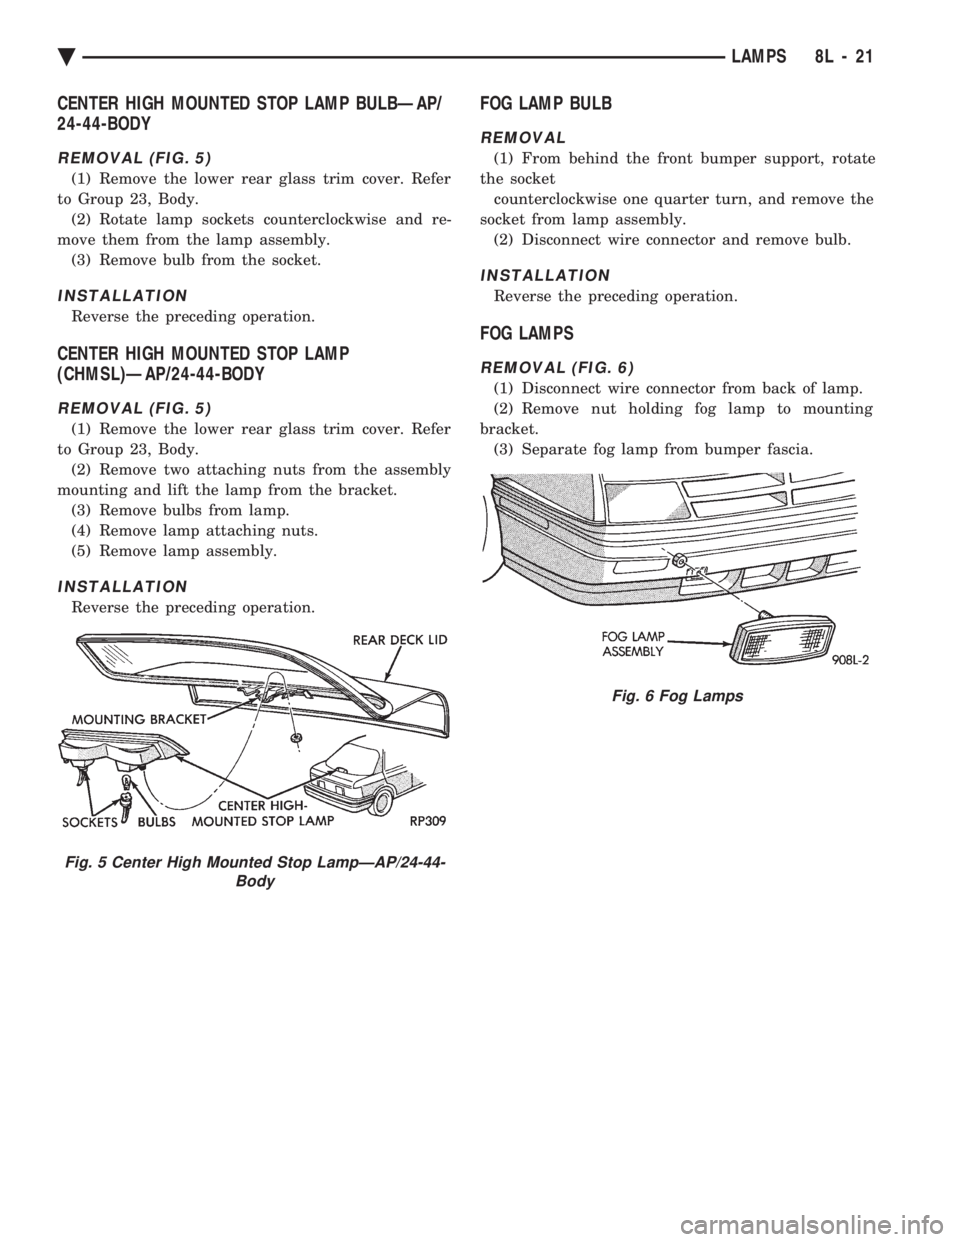
CENTER HIGH MOUNTED STOP LAMP BULBÐAP/
24-44-BODY
REMOVAL (FIG. 5)
(1) Remove the lower rear glass trim cover. Refer
to Group 23, Body. (2) Rotate lamp sockets counterclockwise and re-
move them from the lamp assembly. (3) Remove bulb from the socket.
INSTALLATION
Reverse the preceding operation.
CENTER HIGH MOUNTED STOP LAMP
(CHMSL)ÐAP/24-44-BODY
REMOVAL (FIG. 5)
(1) Remove the lower rear glass trim cover. Refer
to Group 23, Body. (2) Remove two attaching nuts from the assembly
mounting and lift the lamp from the bracket. (3) Remove bulbs from lamp.
(4) Remove lamp attaching nuts.
(5) Remove lamp assembly.
INSTALLATION
Reverse the preceding operation.
FOG LAMP BULB
REMOVAL
(1) From behind the front bumper support, rotate
the socket counterclockwise one quarter turn, and remove the
socket from lamp assembly. (2) Disconnect wire connector and remove bulb.
INSTALLATION
Reverse the preceding operation.
FOG LAMPS
REMOVAL (FIG. 6)
(1) Disconnect wire connector from back of lamp.
(2) Remove nut holding fog lamp to mounting
bracket. (3) Separate fog lamp from bumper fascia.
Fig. 5 Center High Mounted Stop LampÐAP/24-44- Body
Fig. 6 Fog Lamps
Ä LAMPS 8L - 21
Page 669 of 2438
CONCEALED HEADLAMPS INDEX
page page
Concealed Headlamp MotorÐAC-Body ........ 29
Diagnostic Procedures ..................... 27
General Information ....................... 27 Headlamp DoorÐAC-Body
................. 29
Headlamp DoorÐAY Body ................. 29
Headlamp Drive MotorÐAY Body ............ 30
GENERAL INFORMATION
For proper operation of the Concealed Headlamp
System, refer to the Owner's Manual provided with
the vehicle.
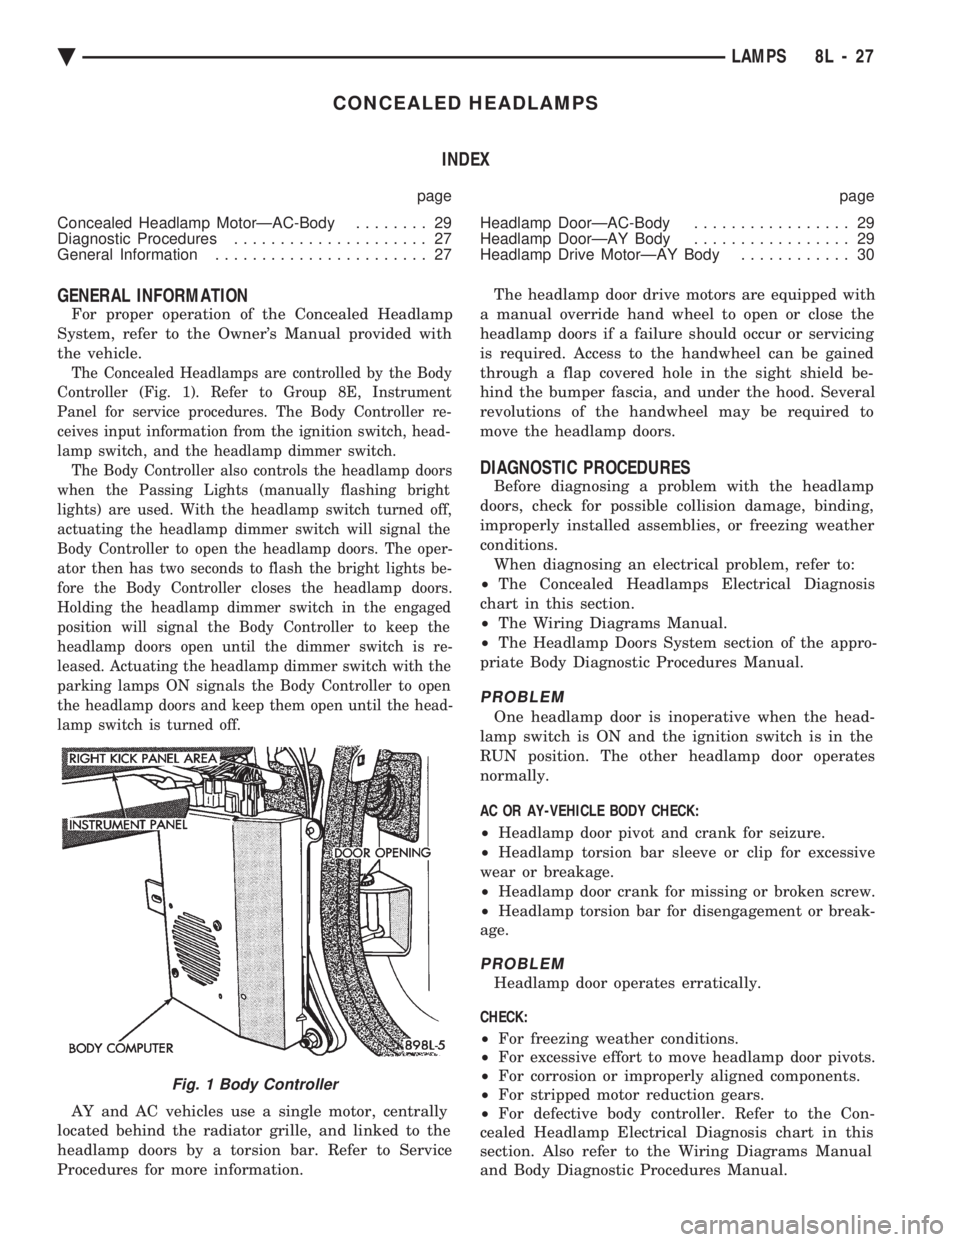
The Concealed Headlamps are controlled by the Body
Controller (Fig. 1). Refer to Group 8E, Instrument
Panel for service procedures. The Body Controller re-
ceives input information from the ignition switch, head-
lamp switch, and the headlamp dimmer switch. The Body Controller also controls the headlamp doors
when the Passing Lights (manually flashing bright
lights) are used. With the headlamp switch turned off,
actuating the headlamp dimmer switch will signal the
Body Controller to open the headlamp doors. The oper-
ator then has two seconds to flash the bright lights be-
fore the Body Controller closes the headlamp doors.
Holding the headlamp dimmer switch in the engaged
position will signal the Body Controller to keep the
headlamp doors open until the dimmer switch is re-
leased. Actuating the headlamp dimmer switch with the
parking lamps ON signals the Body Controller to open
the headlamp doors and keep them open until the head-
lamp switch is turned off.
AY and AC vehicles use a single motor, centrally
located behind the radiator grille, and linked to the
headlamp doors by a torsion bar. Refer to Service
Procedures for more information. The headlamp door drive motors are equipped with
a manual override hand wheel to open or close the
headlamp doors if a failure should occur or servicing
is required. Access to the handwheel can be gained
through a flap covered hole in the sight shield be-
hind the bumper fascia, and under the hood. Several
revolutions of the handwheel may be required to
move the headlamp doors.
DIAGNOSTIC PROCEDURES
Before diagnosing a problem with the headlamp
doors, check for possible collision damage, binding,
improperly installed assemblies, or freezing weather
conditions. When diagnosing an electrical problem, refer to:
² The Concealed Headlamps Electrical Diagnosis
chart in this section.
² The Wiring Diagrams Manual.
² The Headlamp Doors System section of the appro-
priate Body Diagnostic Procedures Manual.
PROBLEM
One headlamp door is inoperative when the head-
lamp switch is ON and the ignition switch is in the
RUN position. The other headlamp door operates
normally.
AC OR AY-VEHICLE BODY CHECK:
² Headlamp door pivot and crank for seizure.
² Headlamp torsion bar sleeve or clip for excessive
wear or breakage.
² Headlamp door crank for missing or broken screw.
² Headlamp torsion bar for disengagement or break-
age.
PROBLEM
Headlamp door operates erratically.
CHECK:
² For freezing weather conditions.
² For excessive effort to move headlamp door pivots.
² For corrosion or improperly aligned components.
² For stripped motor reduction gears.
² For defective body controller. Refer to the Con-
cealed Headlamp Electrical Diagnosis chart in this
section. Also refer to the Wiring Diagrams Manual
and Body Diagnostic Procedures Manual.
Fig. 1 Body Controller
Ä LAMPS 8L - 27
Page 671 of 2438

PROBLEM
Headlamp door or doors fit poorly, rattle, or bang
when coming open or closed.
CHECK:
² Headlamp door fascia mounting bracket or adjust-
able stops for improper alignment.
² Headlamp door pivot brackets or door/crank lateral
adjustment for improperly aligned collar.
² For missing or worn pivot bushings.
² For defective motor.
HEADLAMP DOORÐAC-BODY
REMOVAL (FIG. 2)
(1) Remove the grill. Refer to Group 23, Body.
(2) Remove the front bumper assembly. Refer to
Group 23, Body. (3) Loosen and separate the grille opening panel
from the front fender on the side of the vehicle af-
fected. Refer to Group 23, Body. (4) Compress torsion bar retainer clip tabs to-
gether and slide the retainer toward the center of the
vehicle. Separate the torsion bar from the door crank
on the side of the vehicle affected. (5) Remove headlamp door side trim covers and
lower trim covers. (6) Remove outer pivot screw, door crank screw,
and loosen the door (lateral) adjustment collar. (7) Remove the door crank from the door and ad-
justment collar. (8) Lower the door from under the grille opening
panel and remove the door from the vehicle.
INSTALLATION
Reverse the preceding operation.
CONCEALED HEADLAMP MOTORÐAC-BODY
REMOVAL (FIG. 2)
(l) Remove the grille. Refer to Group 23, Body.
(2) Compress torsion bar retainers and slide them
toward the center of the vehicle. Separate the torsion
bar from the door cranks. (3) Disconnect the headlamp door drive motor wire
connector. Remove three motor attaching bolts and
separate the drive motor and torsion bar from the ve-
hicle.
INSTALLATION
Reverse the preceding operation.
HEADLAMP DOORÐAY BODY
REMOVAL
(1) Turn headlight switch ON.
Fig. 2 Concealed headlampsÐAC-body
Ä LAMPS 8L - 29