1993 CHEVROLET DYNASTY wheel torque
[x] Cancel search: wheel torquePage 623 of 2438
(3) Secure arm to pivot with attaching nut and
tighten 17 to 22 N Im (155 to 195 in. lbs.) torque.
(4) Close head cover and remove pin from arm pin
hole.
WIPER ARM ADJUSTMENT
FRONT ARM ADJUSTMENT
(1) Cycle the wiper motor into the PARK position.
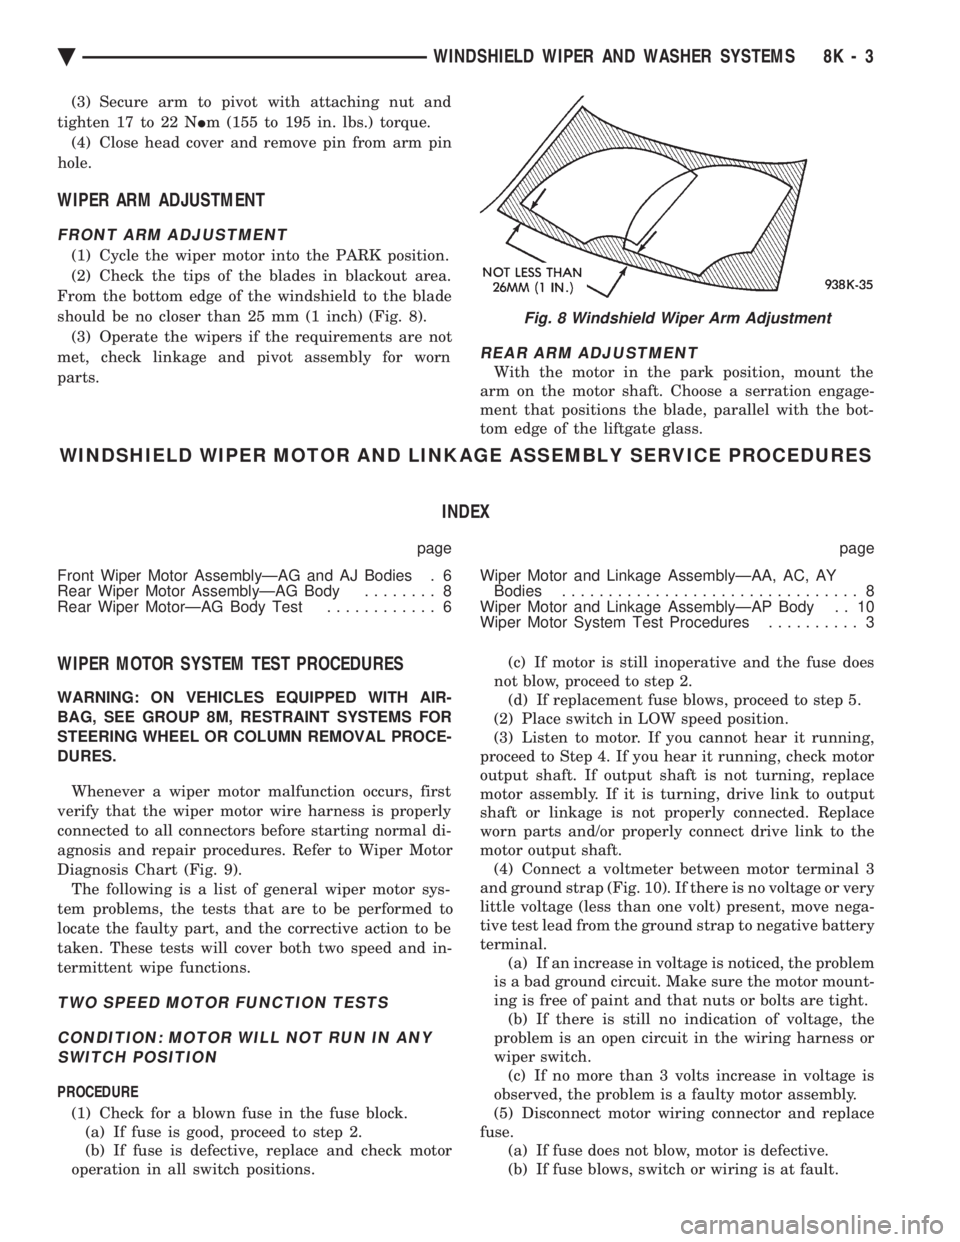
(2) Check the tips of the blades in blackout area.
From the bottom edge of the windshield to the blade
should be no closer than 25 mm (1 inch) (Fig. 8). (3) Operate the wipers if the requirements are not
met, check linkage and pivot assembly for worn
parts.
REAR ARM ADJUSTMENT
With the motor in the park position, mount the
arm on the motor shaft. Choose a serration engage-
ment that positions the blade, parallel with the bot-
tom edge of the liftgate glass.
WINDSHIELD WIPER MOTOR AND LINKAGE ASSEMBLY SERVICE PROCEDURES
INDEX
page page
Front Wiper Motor AssemblyÐAG and AJ Bodies . 6
Rear Wiper Motor AssemblyÐAG Body ........ 8
Rear Wiper MotorÐAG Body Test ............ 6 Wiper Motor and Linkage AssemblyÐAA, AC, AY
Bodies ................................ 8
Wiper Motor and Linkage AssemblyÐAP Body . . 10
Wiper Motor System Test Procedures .......... 3
WIPER MOTOR SYSTEM TEST PROCEDURES
WARNING: ON VEHICLES EQUIPPED WITH AIR-
BAG, SEE GROUP 8M, RESTRAINT SYSTEMS FOR
STEERING WHEEL OR COLUMN REMOVAL PROCE-
DURES.
Whenever a wiper motor malfunction occurs, first
verify that the wiper motor wire harness is properly
connected to all connectors before starting normal di-
agnosis and repair procedures. Refer to Wiper Motor
Diagnosis Chart (Fig. 9). The following is a list of general wiper motor sys-
tem problems, the tests that are to be performed to
locate the faulty part, and the corrective action to be
taken. These tests will cover both two speed and in-
termittent wipe functions.
TWO SPEED MOTOR FUNCTION TESTS
CONDITION: MOTOR WILL NOT RUN IN ANY SWITCH POSITION
PROCEDURE
(1) Check for a blown fuse in the fuse block. (a) If fuse is good, proceed to step 2.
(b) If fuse is defective, replace and check motor
operation in all switch positions. (c) If motor is still inoperative and the fuse does
not blow, proceed to step 2. (d) If replacement fuse blows, proceed to step 5.
(2) Place switch in LOW speed position.
(3) Listen to motor. If you cannot hear it running,
proceed to Step 4. If you hear it running, check motor
output shaft. If output shaft is not turning, replace
motor assembly. If it is turning, drive link to output
shaft or linkage is not properly connected. Replace
worn parts and/or properly connect drive link to the
motor output shaft. (4) Connect a voltmeter between motor terminal 3
and ground strap (Fig. 10). If there is no voltage or very
little voltage (less than one volt) present, move nega-
tive test lead from the ground strap to negative battery
terminal. (a) If an increase in voltage is noticed, the problem
is a bad ground circuit. Make sure the motor mount-
ing is free of paint and that nuts or bolts are tight. (b) If there is still no indication of voltage, the
problem is an open circuit in the wiring harness or
wiper switch. (c) If no more than 3 volts increase in voltage is
observed, the problem is a faulty motor assembly.
(5) Disconnect motor wiring connector and replace
fuse. (a) If fuse does not blow, motor is defective.
(b) If fuse blows, switch or wiring is at fault.
Fig. 8 Windshield Wiper Arm Adjustment
Ä WINDSHIELD WIPER AND WASHER SYSTEMS 8K - 3
Page 686 of 2438

AIR BAG MODULE
WARNING: BEFORE BEGINNING ANY AIR BAG
SYSTEM REMOVAL OR INSTALLATION PROCE-
DURES, REMOVE AND ISOLATE THE BATTERY
NEGATIVE (-) CABLE (GROUND) FROM THE VEHI-
CLE BATTERY. THIS IS THE ONLY SURE WAY TO
DISABLE THE AIR BAG SYSTEM. FAILURE TO DO
THIS COULD RESULT IN ACCIDENTAL AIR BAG
DEPLOYMENT AND POSSIBLE PERSONAL INJURY. UNDEPLOYED AIR BAG REMOVAL FROM THE
STEERING WHEEL: DISCONNECT BATTERY
GROUND CABLE AND ISOLATE. ALLOW SYS-
TEM CAPACITOR TO DISCHARGE FOR TWO
MINUTES. BEGIN AIR BAG REMOVAL.
REMOVAL
When removing a deployed module, wear rubber
gloves, eye protection and a long sleeve shirt as de-
posits may be on the surface which could irritate the
skin and eyes. (1) Disconnect battery negative cable and isolate.
(2) Wait two minutes for the reserve capacitor to
discharge before removing undeployed module. (3) Remove four nuts attaching air bag module to
steering wheel (Fig. 5).
(4) Lift module, and disconnect electrical connector
from rear of module. (5) Remove module.
(6) When replacing a deployed module, the clock-
spring must also be replaced. Refer to Clockspring
Removal and Installation for proper procedure.
INSTALLATION
(1) Connect clockspring wiring connector to the
module, by pressing straight in on the connector. (2) Install four nuts and tighten to 9 to 11 N Im (80
to 100 in. lbs.) torque. (3) Do not connect battery negative cable. Refer to
Air Bag System Check for proper procedure.
LEFT FRONT IMPACT SENSOR
REMOVAL
WARNING: BEFORE BEGINNING ANY AIR BAG
SYSTEM REMOVAL OR INSTALLATION PROCE-
DURES, REMOVE AND ISOLATE THE BATTERY
NEGATIVE (-) CABLE (GROUND) FROM THE VEHI-
CLE BATTERY. THIS IS THE ONLY SURE WAY TO
DISABLE THE AIR BAG SYSTEM. FAILURE TO DO
THIS COULD RESULT IN ACCIDENTAL AIR BAG
DEPLOYMENT AND POSSIBLE PERSONAL INJURY. (1) Disconnect battery negative cable and isolate.
(2) Disconnect speed control servo from battery
tray, if equipped. (3) Remove battery, battery tray, powertrain con-
trol module and coolant bottle. (4) Disconnect impact sensor electrical connector.
(5) Remove three screws holding sensor to radiator
closure panel. Remove left sensor (Fig. 6).
INSTALLATION
(1) Mount left sensor (arrow pointed forward) to
engine side of closure panel using three screws pro-
vided with new sensor. Tighten to 10 to 13 N Im (90
to 120 in. lbs.) torque.
Fig. 5 Air Bag Module
Fig. 6 Left Impact Sensor
8M - 4 RESTRAINT SYSTEMS Ä
Page 688 of 2438

CLOCKSPRING
WARNING: BEFORE BEGINNING ANY AIR BAG
SYSTEM REMOVAL OR INSTALLATION PROCE-
DURES, REMOVE AND ISOLATE THE BATTERY
NEGATIVE (-) CABLE (GROUND) FROM THE VEHI-
CLE BATTERY. THIS IS THE ONLY SURE WAY TO
DISABLE THE AIR BAG SYSTEM. FAILURE TO DO
SO COULD RESULT IN ACCIDENTAL AIR BAG DE-
PLOYMENT, AND POSSIBLE INJURY.
WHEN AN UNDEPLOYED AIR BAG ASSEMBLY
IS TO BE REMOVED FROM THE STEERING
WHEEL, DISCONNECT BATTERY GROUND CA-
BLE AND ISOLATE. ALLOW SYSTEM CAPACI-
TOR TO DISCHARGE FOR TWO MINUTES, THEN
BEGIN AIR BAG REMOVAL.
REMOVAL
(1) Place the front wheels in the straight ahead po-
sition before starting the repair. (2) Disconnect battery negative cable and isolate.
(3) Wait two minutes for the reserve capacitor to
discharge before removing undeployed module. (4) Remove the air bag module.
(5) Remove Speed Control switch and connector if
so equipped or cover. (6) Disconnect horn terminals.
(7) Remove the steering wheel.
(8) Remove upper and lower steering column
shrouds to gain access to clockspring wiring. (9) Disconnect the 2-way connector between the
clockspring and the instrument panel wiring harness
on top of the fuse block. (10) To remove, pull clockspring assembly from the
steering column by lifting locating fingers as neces-
sary. The clockspring cannot be repaired, and must
be replaced if faulty.
INSTALLATION
(1) Snap clockspring onto the steering column. If
the clockspring is not properly positioned, follow the
clockspring centering procedure before installing
steering wheel. (2) Connect the clockspring to the instrument
panel harness, ensure wiring locator clips are prop-
erly seated on wiring trough. Ensure harness locking
tabs are properly engaged. (3) Install steering column shrouds. Be sure air
bag wire is inside of shrouds. (4) Front wheels should still be in the straight-
ahead position. Install steering wheel, ensure the
flats on hub align with clockspring. Pull the horn
lead through the smaller upper hole. Pull the air bag
and speed control leads through the larger bottom
hole. Ensure leads are not pinched under the steer-
ing wheel. (5) Connect the horn lead wire, then the air bag
lead wire to the air bag module. (6) Install the air bag module and tighten nuts to
9to11N Im (80 to 100 in. lb.) torque.
(7) Install speed control switch and connector or
cover. (8) Do not connect battery negative cable. Refer to
Air Bag Systems Check for proper procedure.
CLOCKSPRING CENTERING PROCEDURE
If the rotating tape within the clockspring is not
positioned properly with the steering wheel and the
front wheels, the clockspring may fail during use.
The following procedure MUST BE USED to center
the clockspring if it is not known to be properly po-
sitioned, or if the front wheels were moved from the
straight ahead position.
WARNING: BEFORE BEGINNING ANY AIR BAG
SYSTEM REMOVAL OR INSTALLATION PROCE-
DURES, REMOVE AND ISOLATE THE BATTERY
NEGATIVE (-) CABLE (GROUND) FROM THE VEHI-
CLE BATTERY. THIS IS THE ONLY SURE WAY TO
DISABLE THE AIR BAG SYSTEM. FAILURE TO DO
THIS COULD RESULT IN ACCIDENTAL AIR BAG
DEPLOYMENT AND POSSIBLE INJURY.
WHEN AN UNDEPLOYED AIR BAG ASSEMBLY
IS TO BE REMOVED FROM THE STEERING
WHEEL, DISCONNECT BATTERY GROUND CA-
BLE AND ISOLATE. ALLOW SYSTEM CAPACI-
TOR TO DISCHARGE FOR TWO MINUTES, THEN
BEGIN AIR BAG REMOVAL. (1) Place front wheels in the straight ahead posi-
tion. (2) Wait two minutes for the reserve capacitor to
discharge before removing undeployed module. (3) Refer to Steering Wheel procedures for removal
of air bag module and steering wheel. (4) Depress the two plastic locking pins to disen-
gage locking mechanism (Fig. 10). (5) Keeping locking mechanism disengaged, rotate
the clockspring rotor in the CLOCKWISE DIREC-
TION to the end of travel. Do not apply excessive
torque. (6) From the end of travel, rotate the rotor two full
turns and a half in the counterclockwise direction.
The horn wire should end up at the top and the squib
wire at the bottom. Engage clockspring locking
mechanism. (7) Refer to Steering Wheel procedures for installa-
tion of steering wheel and air bag module. (8) Do not connect battery negative cable. Refer to
Air Bag System Check for proper procedure.
8M - 6 RESTRAINT SYSTEMS Ä
Page 689 of 2438
STEERING WHEEL
WARNING: BEFORE BEGINNING ANY AIR BAG
SYSTEM REMOVAL OR INSTALLATION PROCE-
DURES, REMOVE AND ISOLATE THE BATTERY
NEGATIVE (-) CABLE (GROUND) FROM THE VEHI-
CLE BATTERY. THIS IS THE ONLY SURE WAY TO
DISABLE THE AIR BAG SYSTEM. FAILURE TO DO
THIS COULD RESULT IN ACCIDENTAL AIR BAG
DEPLOYMENT AND POSSIBLE PERSONAL INJURY. WHEN AN UNDEPLOYED AIR BAG ASSEMBLY
IS TO BE REMOVED FROM THE STEERING
WHEEL, DISCONNECT BATTERY GROUND CA-
BLE AND ISOLATE. ALLOW SYSTEM CAPACI-
TOR TO DISCHARGE FOR TWO MINUTES.
BEGIN AIR BAG REMOVAL.
REMOVAL
(1) Make sure front wheels are straight, and steer-
ing column is locked in place. (2) Disconnect battery negative cable and isolate.
(3) Wait two minutes for the reserve capacitor to
discharge before removing undeployed module. (4) Remove four nuts attaching air bag module
from the back side of steering wheel. (5) Lift module, and disconnect connector from rear
of module. (6) Remove speed control switch and connector if
so equipped or cover. (7) Remove steering wheel retaining nut.
(8) Remove steering wheel with steering wheel
puller Tool C-3428B.
INSTALLATION
(1) If the clockspring is not properly positioned or if front wheels were moved, follow the clockspring
centering procedure before installing steering wheel.
With the front wheels in the straight ahead position.
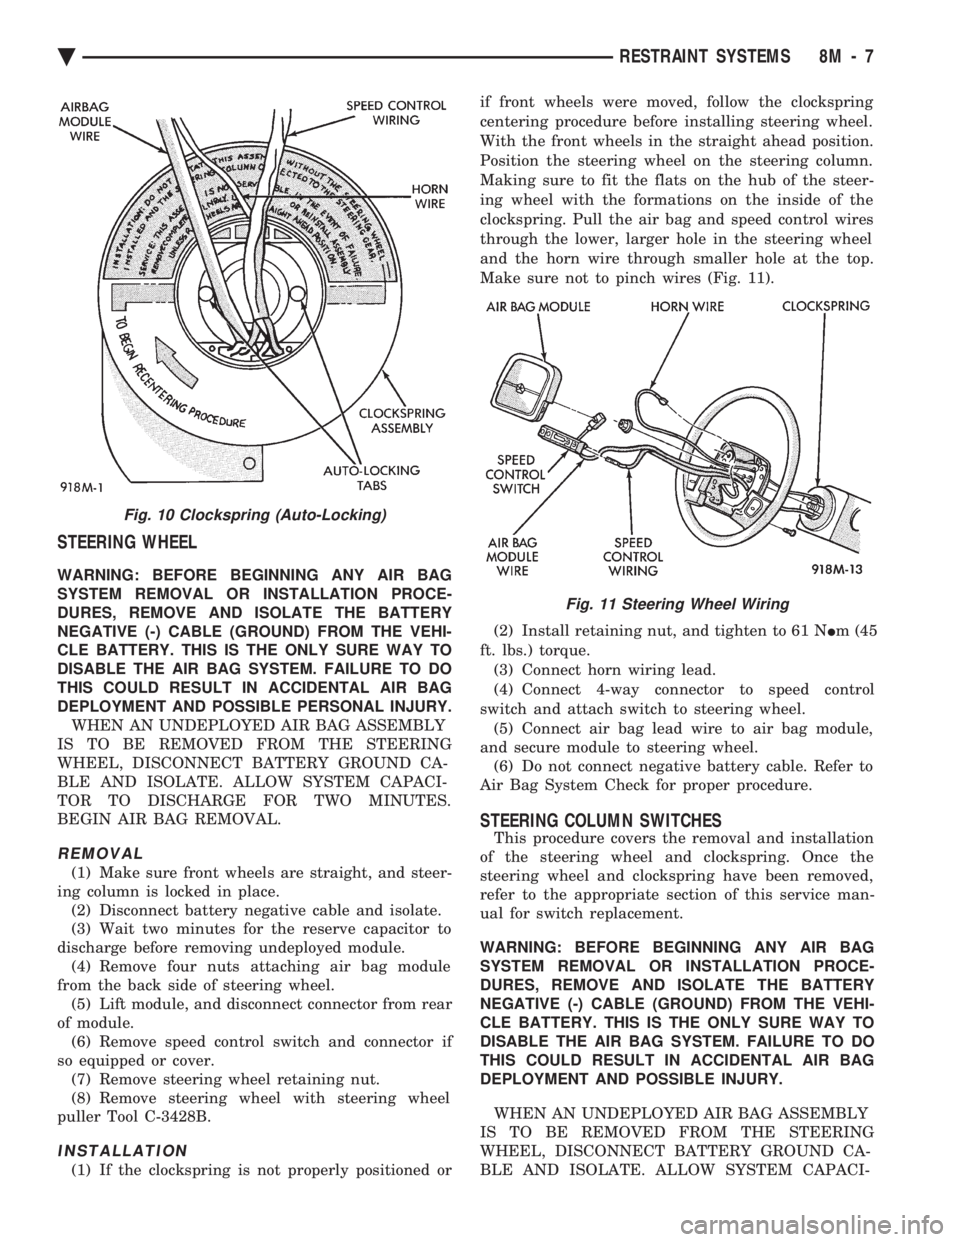
Position the steering wheel on the steering column.
Making sure to fit the flats on the hub of the steer-
ing wheel with the formations on the inside of the
clockspring. Pull the air bag and speed control wires
through the lower, larger hole in the steering wheel
and the horn wire through smaller hole at the top.
Make sure not to pinch wires (Fig. 11).
(2) Install retaining nut, and tighten to 61 N Im (45
ft. lbs.) torque. (3) Connect horn wiring lead.
(4) Connect 4-way connector to speed control
switch and attach switch to steering wheel. (5) Connect air bag lead wire to air bag module,
and secure module to steering wheel. (6) Do not connect negative battery cable. Refer to
Air Bag System Check for proper procedure.
STEERING COLUMN SWITCHES
This procedure covers the removal and installation
of the steering wheel and clockspring. Once the
steering wheel and clockspring have been removed,
refer to the appropriate section of this service man-
ual for switch replacement.
WARNING: BEFORE BEGINNING ANY AIR BAG
SYSTEM REMOVAL OR INSTALLATION PROCE-
DURES, REMOVE AND ISOLATE THE BATTERY
NEGATIVE (-) CABLE (GROUND) FROM THE VEHI-
CLE BATTERY. THIS IS THE ONLY SURE WAY TO
DISABLE THE AIR BAG SYSTEM. FAILURE TO DO
THIS COULD RESULT IN ACCIDENTAL AIR BAG
DEPLOYMENT AND POSSIBLE INJURY.
WHEN AN UNDEPLOYED AIR BAG ASSEMBLY
IS TO BE REMOVED FROM THE STEERING
WHEEL, DISCONNECT BATTERY GROUND CA-
BLE AND ISOLATE. ALLOW SYSTEM CAPACI-
Fig. 10 Clockspring (Auto-Locking)
Fig. 11 Steering Wheel Wiring
Ä RESTRAINT SYSTEMS 8M - 7
Page 690 of 2438

TOR TO DISCHARGE FOR TWO MINUTES.
BEGIN AIR BAG REMOVAL.
REMOVAL
(1) Disconnect battery negative cable, and isolate.
(2) Wait two minutes for the reserve capacitor to
discharge before removing undeployed module. (3) Remove four nuts attaching air bag module
from the back side of steering wheel. (4) Lift module, and disconnect connector from rear
of module. (5) Remove speed control switch and connector if
so equipped or cover. (6) Remove steering wheel.
(7) Unsnap clockspring, and remove it. (8) Refer to the appropriate section for switch re-
placement.
INSTALLATION
(1) Snap clockspring on to steering column. Assure
the 4 way connector is still seated. (2) Install steering wheel.
(3) Install speed control switch and connector or
cover. (4) Connect clockspring wiring connector to the
module. (5) Install four nuts to module, and tighten to 9 to
11 N Im (80 to 100 in. lbs.) torque.
(6) Do not connect negative battery cable. Refer to
Air Bag System Check for proper procedure.
8M - 8 RESTRAINT SYSTEMS Ä
Page 1580 of 2438
CAUTION: Make sure clutch cable has been discon-
nected. (20) Remove front engine mount screw and nut.
(21) Remove manual transmission damper.
(22) Remove left insulator through bolt from inside
wheelhouse or insulator bracket to transmission
screws. (23) Remove engine from vehicle.
INSTALLATION
(1) Install hoist to the engine and lower engine
into the engine compartment. SEE: ENGINE MOUNT RUBBER INSULATORS,
THIS GROUP. (2) Align engine mounts and install but do not
tighten until all mounting bolts have been installed.
(3) Install transmission case to cylinder block
mounting screws. Tighten to 95 N Im (70 ft. lbs.)
torque. (4) Remove engine hoist and transmission holding
fixture. (5) Install ground strap.
(6) Install right inner splash shield.
(7) Connect starter. See Electrical Group 8 for in-
stallation. (8) Connect exhaust system. See Exhaust Systems
Group 11 for installation. (9) Manual Transmission: Install transmission
case lower cover. Automatic Transmission: Remove C clamp from
torque converter housing. Align flexplate to torque
converter and install mounting screws. Tighten to 75
N Im (55 ft. lbs.) torque.
(10) Manual Transmission: Connect clutch cable.
See Clutch Group 6. (11) Install power steering pump. Refer to Cooling
System Group 7, Accessory Drive Section for belt
tension adjustment. (12) Connect fuel line, heater hose, and accelerator
cable. (13) Connect all electrical connections and har-
nesses at throttle body and engine. (14) Install oil filter. Fill engine crankcase with
proper oil to correct level. (15) Install air conditioning compressor (if
equipped). See Heater and Air Conditioning, Group
24 for installation. (16) Install air cleaner and hoses.
(17) Install radiator and shroud assembly . Install
radiator hoses. Fill cooling system. See Cooling Sys-
tem Group 7 for filling procedure. (18) Install hood.
(19) Connect battery.
(20) Start engine and run until operating temper-
ature is reached. (21) Adjust transmission linkage, if necessary.
SOLID MOUNT COMPRESSOR BRACKET SERVICE
When service procedures require solid mount
bracket removal and installation for example: cylin-
der head removal, etc., it is important that bracket
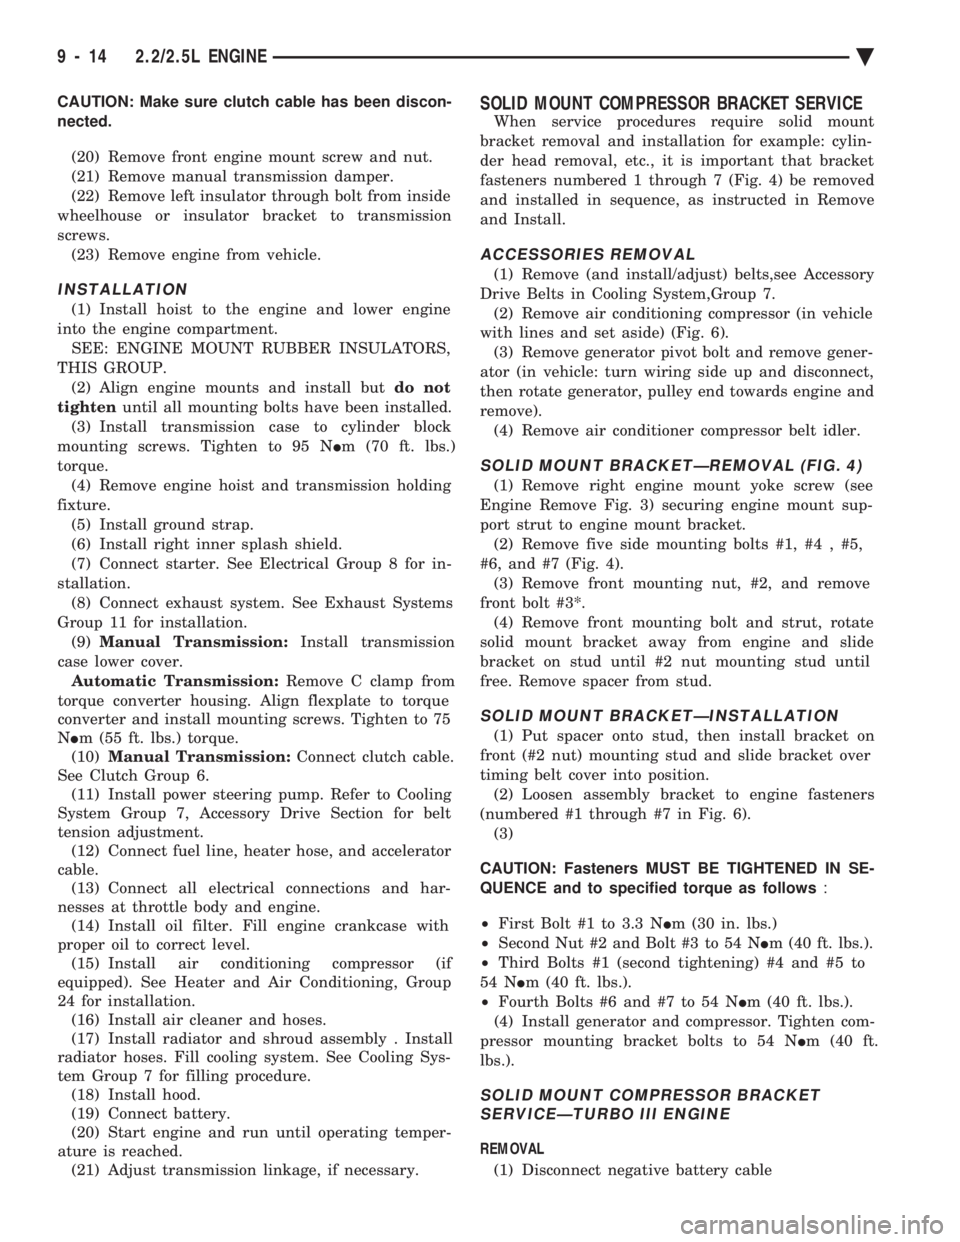
fasteners numbered 1 through 7 (Fig. 4) be removed
and installed in sequence, as instructed in Remove
and Install.
ACCESSORIES REMOVAL
(1) Remove (and install/adjust) belts,see Accessory
Drive Belts in Cooling System,Group 7. (2) Remove air conditioning compressor (in vehicle
with lines and set aside) (Fig. 6). (3) Remove generator pivot bolt and remove gener-
ator (in vehicle: turn wiring side up and disconnect,
then rotate generator, pulley end towards engine and
remove). (4) Remove air conditioner compressor belt idler.
SOLID MOUNT BRACKETÐREMOVAL (FIG. 4)
(1) Remove right engine mount yoke screw (see
Engine Remove Fig. 3) securing engine mount sup-
port strut to engine mount bracket. (2) Remove five side mounting bolts #1, #4 , #5,
#6, and #7 (Fig. 4). (3) Remove front mounting nut, #2, and remove
front bolt #3*. (4) Remove front mounting bolt and strut, rotate
solid mount bracket away from engine and slide
bracket on stud until #2 nut mounting stud until
free. Remove spacer from stud.
SOLID MOUNT BRACKETÐINSTALLATION
(1) Put spacer onto stud, then install bracket on
front (#2 nut) mounting stud and slide bracket over
timing belt cover into position. (2) Loosen assembly bracket to engine fasteners
(numbered #1 through #7 in Fig. 6). (3)
CAUTION: Fasteners MUST BE TIGHTENED IN SE-
QUENCE and to specified torque as follows :
² First Bolt #1 to 3.3 N Im (30 in. lbs.)
² Second Nut #2 and Bolt #3 to 54 N Im (40 ft. lbs.).
² Third Bolts #1 (second tightening) #4 and #5 to
54 N Im (40 ft. lbs.).
² Fourth Bolts #6 and #7 to 54 N Im (40 ft. lbs.).
(4) Install generator and compressor. Tighten com-
pressor mounting bracket bolts to 54 N Im (40 ft.
lbs.).
SOLID MOUNT COMPRESSOR BRACKET SERVICEÐTURBO III ENGINE
REMOVAL
(1) Disconnect negative battery cable
9 - 14 2.2/2.5L ENGINE Ä
Page 1598 of 2438

Before installing the bolts, the threads should be
cleaned and oiled. Tighten the cylinder head bolts in the sequence
shown in (Fig. 5 ). Using the 4 step torque turn
method, tighten according to the following values:
² First All to 61 N Im (45 ft. lbs.)
² Second All to 88 N Im (65 ft. lbs.)
² Third All (again) to 88 N Im (65 ft., lbs.)
² Fourth + 1/4 Turn Do not use torque wrench
for this step.
² Bolt torque after 1/4 turn should be over 90 ft. lbs.
If not, replace the bolt. Refer to Intake and Exhaust Manifold Service in
Exhaust Systems and Intake Manifold Group 11 for
installation procedure. Refer to the Timing Belt and Solid Mount Com-
pressor Mount Bracket service procedures in this
group for installations procedures.
TIMING BELT COVER SERVICEÐTURBO III
ENGINE
REMOVAL
(1) Remove PCV tube and upper timing belt cover
screws (Fig. 1). Remove upper cover. (2) Remove accessory drive belt. Refer to Cooling
System Group 7 for procedure. (3) Raise vehicle on a hoist and remove right
wheel and inner splash shield (Fig. 2).
(4) Remove water pump pulley and crankshaft pul-
ley retaining bolts (Fig. 3), remove pulleys. (5) Remove lower accessory drive belt idler and
tensioner pulley (Fig. 4).
Fig. 1 Timing Belt Cover Screws
Fig. 5 Cylinder Head Tightening Sequence
Fig. 2 Right Inner Splash Shield
Fig. 3 Crankshaft and Water Pump Pulleys
9 - 32 2.2/2.5L ENGINE Ä
Page 1599 of 2438
CAUTION: Do not use a impact wrench to remove
pulley bolts. (6) Remove lower timing belt cover fasteners (Fig.
1). Remove cover.
INSTALLATION (1) Raise vehicle on hoist. Install lower timing belt
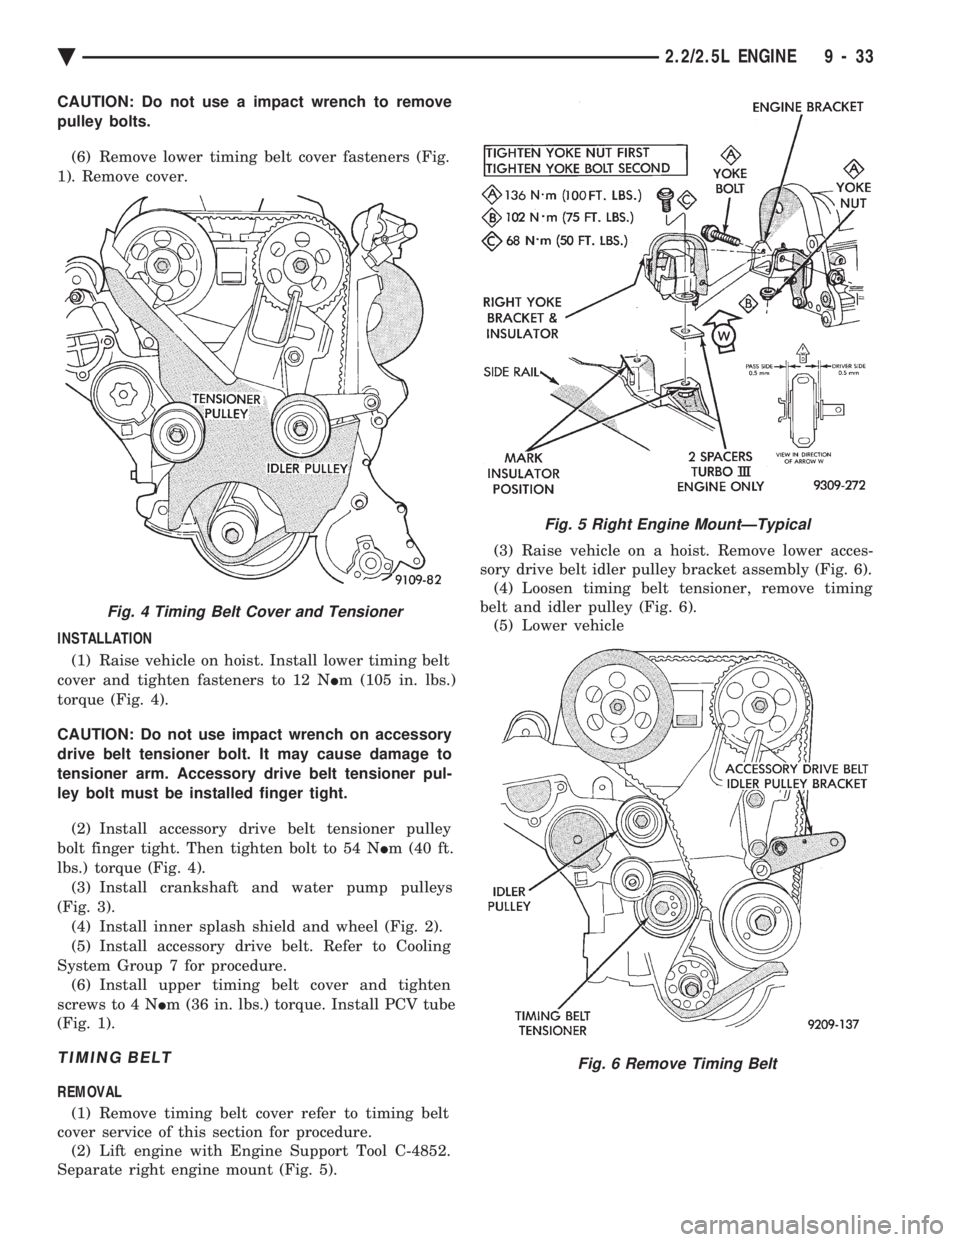
cover and tighten fasteners to 12 N Im (105 in. lbs.)
torque (Fig. 4).
CAUTION: Do not use impact wrench on accessory
drive belt tensioner bolt. It may cause damage to
tensioner arm. Accessory drive belt tensioner pul-
ley bolt must be installed finger tight. (2) Install accessory drive belt tensioner pulley
bolt finger tight. Then tighten bolt to 54 N Im (40 ft.
lbs.) torque (Fig. 4). (3) Install crankshaft and water pump pulleys
(Fig. 3). (4) Install inner splash shield and wheel (Fig. 2).
(5) Install accessory drive belt. Refer to Cooling
System Group 7 for procedure. (6) Install upper timing belt cover and tighten
screws to 4 N Im (36 in. lbs.) torque. Install PCV tube
(Fig. 1).
TIMING BELT
REMOVAL
(1) Remove timing belt cover refer to timing belt
cover service of this section for procedure. (2) Lift engine with Engine Support Tool C-4852.
Separate right engine mount (Fig. 5). (3) Raise vehicle on a hoist. Remove lower acces-
sory drive belt idler pulley bracket assembly (Fig. 6). (4) Loosen timing belt tensioner, remove timing
belt and idler pulley (Fig. 6). (5) Lower vehicle
Fig. 4 Timing Belt Cover and Tensioner
Fig. 5 Right Engine MountÐTypical
Fig. 6 Remove Timing Belt
Ä 2.2/2.5L ENGINE 9 - 33