Page 61 of 370
Downloaded from www.Manualslib.com manuals search engine Features & Controls
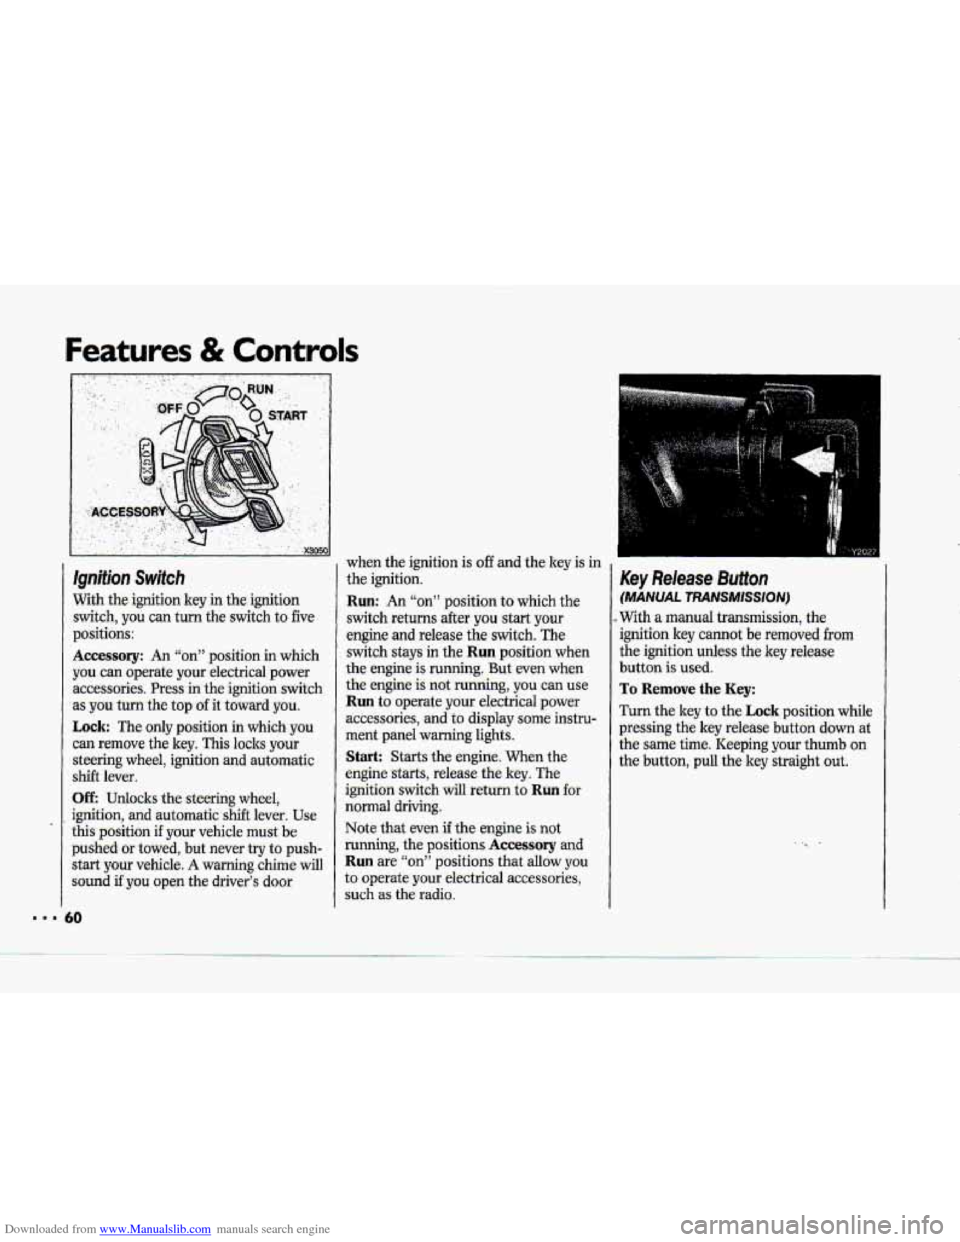
Ignition Switch
With the-ignition key in the ignition
switch, you can turn
the switch to five
p.ositions:
Accessory: An “on” position in which
you
can operate your .electrical power
accessories. Press in the-ignition .switch
as
you turn the top of it toward you.
Lock: The only position in which you
can remove the key. This locks your
steering wheel, ignition. and automatic
shift lever.
UE Udo:cks the steering wheel,
ignition, and automatic shift lever. Use
this pasition if your vehicle must be
pushed or towed, but never try to push-
start your vehicle-.
A warning chime will
sound if you open the driver’s door when
the ignition is
off and the key is in
the ignition.
Run: An “on” position to which the
switch returns after you start your
engine and release the switch. The
switch stays in
the Run position when
the engine is running. But -even when
the engine is-not running, you can use.
Run to operate your electrical power
accessories,
and to display some instru-
ment panel warning lights.
Start: Starts the engine, When the
engine starts, release the key. The
ignition switch will return to
Ruil fot
noma1 driving.
Note
that even if the engine is not
running, the positions
Accessory and
Run are “on” positions that allow y0.u
to operate your electrical accessories,
such
as the radio.
Key Release Button
(MANUAL TRANSMISSION)
..With a manual transmission, the
ignition key c-ot be removed from
the ignition unless the key release
button is used.
To Remove the Key:
Turn the key to the Lock position while
pressing the
key release buttoa down at
the same time. Keeping your thumb on
the button, pull the key straight out.
Page 82 of 370
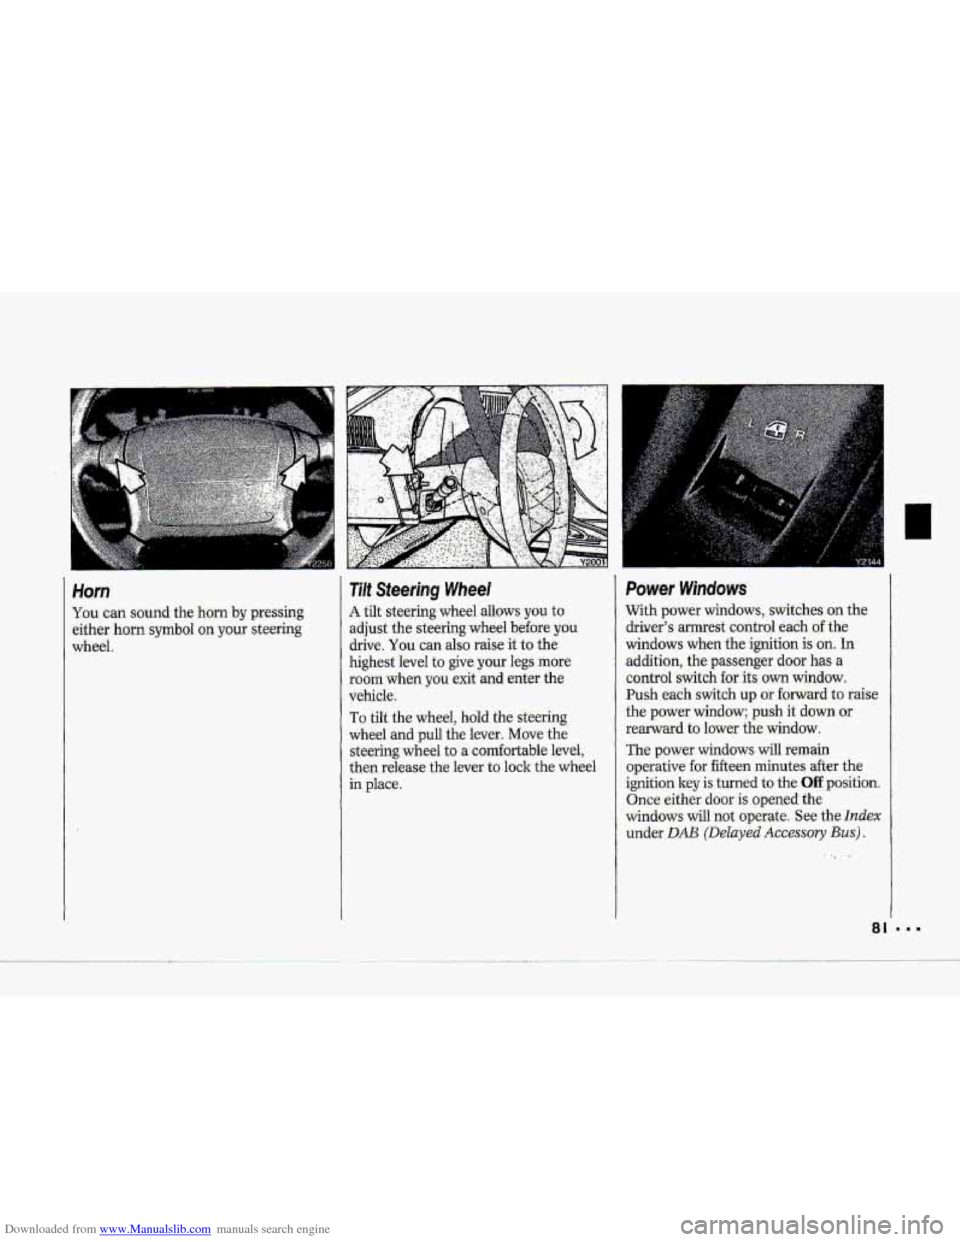
Downloaded from www.Manualslib.com manuals search engine Horn
You can sound the horn by pressing
either horn
symbol on your steering
wheel.
Tilt Steering Wheel
A tilt steering wheel allows you to
adjust the steering wheel before
you
drive, You can also raise it to the.
highest level to give your
legs more.
room when
you exit and enter the
vehicle.
To tilt the wheel, hold the- steering
wheel
and .pull the lever. Move the
steering wheel to a corn€wtable level,
then release the lever to lock: the wheel
in place.
Power Windows
With power windows, switches on the.
driver’s amest control
each of the
windows when the ignition is on. In
addition, the passenger door has a
control switch €or its, own window.
Push each s~tch up
or forward to raise
the power window; push it down or
rearward to lower the window.
The power windows
will remain
.operative
for. fifteen minutes after the
ignitionley is turned to the Off position.
Once eithgr door is opened the
windows will not operate. See the
Index
under DAB (Delayed Accessory Bus).
~. ..
81
Page 100 of 370
Downloaded from www.Manualslib.com manuals search engine i
P
r
F"
i I
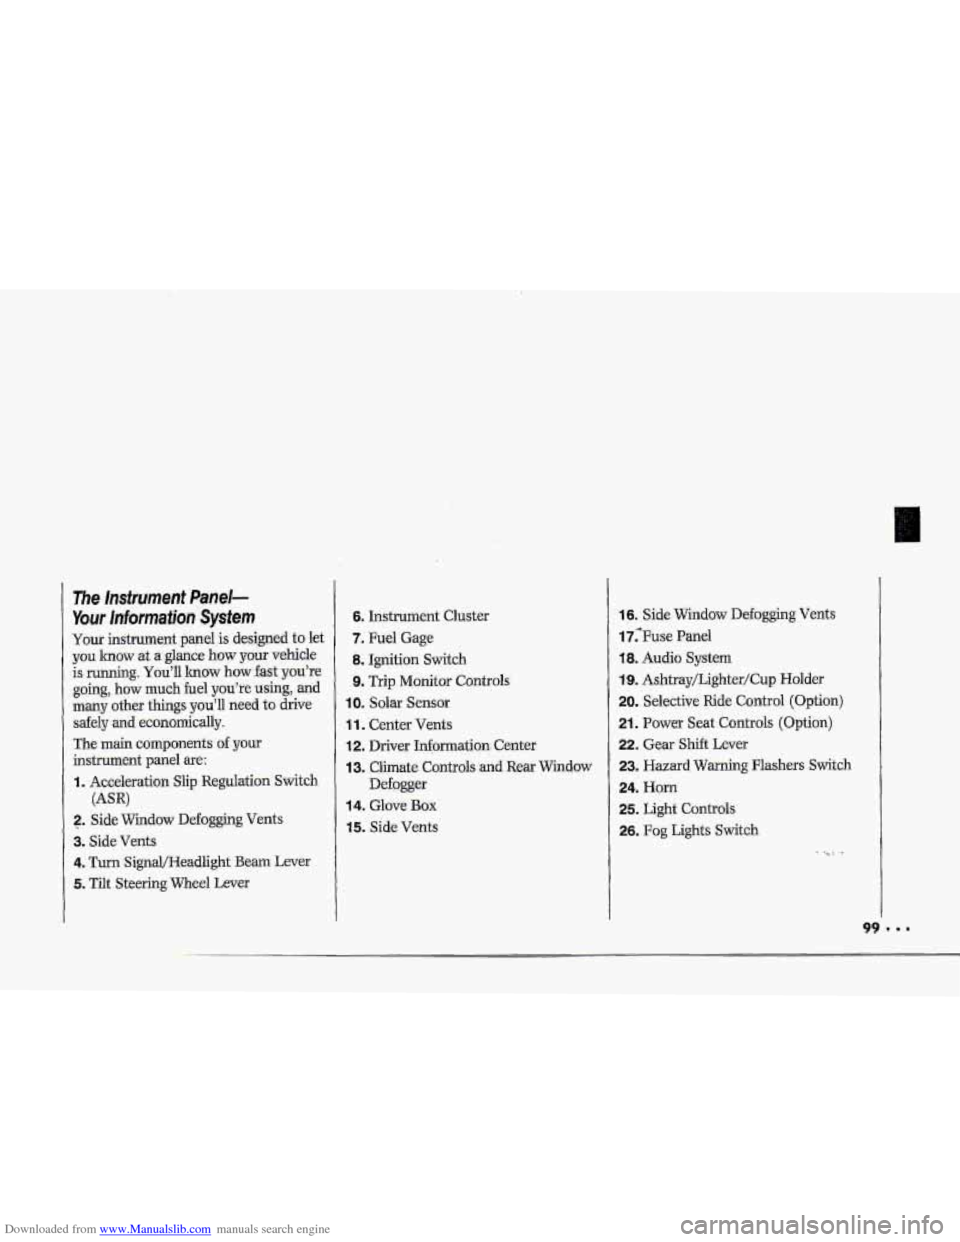
The Insfrument Panel-
Your lnformaiion System
Your instrument panel is designed to let
you lmow at a glance how your vehicle
is running.
You'll lrnow how fast you're
going, how much fuel
you're using, and
many other things you'll need to drive
safely
and economically.
The main components
of your
instrument panel are:
I. Acceleration Slip Regulation Switch
2. ,Side Widow Defogging Vents
3. Side Vents
4. Turn SignQHeadlight Beam Lever
5. Tilt Steering Wheel Lever
(AW
6. Instrument Cluster
7. Fuel Gage
8. Ignition Switch
9. Trip Monitor Controls
IOm Solar Sensor
1 1. Center Vents
12. Driver Information. Center
13. Climate Controls and Rear Window
Defogger
14. Glove Box
15. Side Vents
16. Side Window Defogging Vents
17;Fuse Panel
18. Audio System
19. Ashtray/Lighter/Cup Holder
20. Selective Ride Control (Option)
21. Power Seat Controls (Option)
22. Gear Shift Lever
23. Hazard Warning Flashers Switch
24. Horn
25. Light Controls
26. Fog Lights Switch
-. .
Page 180 of 370
Downloaded from www.Manualslib.com manuals search engine r" i
'4
f
-/_
i
t-
i
Power Steering
If you lose power steering assist
because the engine stops
or the system
fails to function, you c-an steer but it
will take much more effort.
i.
steering Tips-Dtiving on Curves
It's important to tale curves at a
reasonable
speed.
A lot of the "driver lost control"
accidents mentioned
on. the news
happen on .curves. .Here's why:
Experienced driver
or beginner, each of
us is subject to the same laws of physics
when
driving on'curves; The.;traction of
the tixes against the road surface makes
it possible
for the vehicle to change its
path when you turn the front wheels. If
there's no traction, inertia will keep the
vehicle going in the same direction. If
yuu"ve mer tried to steer a vehicle on
wet ice> you:U understand this.
The traction you can get in a curve
depends on the condition of your tizies
and
the road surface, the angle at which
the-curve
is banked, and your speed,
While you're in
a curve, speed is the one
factor you can control.
Suppose you're steering through. a. sharp
a.xve. Then you suddenly acwlerate. If
excess wheel spin is detected, ASR will
reduce erigine torque to the wheels. Lf
your ASR system is off, those two
control systems-steering and
acceleration-can ovGrwhelm those
i places where-the tires meet the road and
~ make you lose control.
1 What should you do if this ever
happens? Let
up on the accelerator
pedal, steer
the vehicle the way you
want it to go, and slow down.
Page 248 of 370
Downloaded from www.Manualslib.com manuals search engine 0 Y6105
LT7 hgine (CODE PI
t a Automatic Transmission Fluid
2. Hydraulic Clutch Fluid Reservoir
3. Battery
4. Brake Fluid Reservoir
5. Air Cleaner
Dipstick
(if equipped)
(if equipped)
6. Coolant Recovery
Tank
7. Power Steering Fluid Reservoir
8. Engine Oil Fill Cap
9. Engine Oil Dipstick
IO. Coolant High Fill Reservoir
11. Windshield Washer Fluid Reser aoir
Page 249 of 370
Downloaded from www.Manualslib.com manuals search engine Service & Appearance Care ..
\!
1 LT5 Engine (CODEJ)
1. Hydraulic Clutch Fluid Reservoir
2. Battery
3. Brake Fluid Reservoir
4. Power Steering Fluid Reservoir
5. Air Cleaner
6. Coolant Recovery Tank
7. Engine Oil Fill Cap
8. Engine Oil Dipstick
9. Coolant High Fill Reservoir
IO. Windshield Washer Fluid Reservoir
.I. 248
Page 270 of 370
Downloaded from www.Manualslib.com manuals search engine Power Steering Fluid
How To Check Power Steering Fluid
Unscrew the cap and wipe the dipstick
with a clean-rag. Replace the cap and
completely tighten
it. Then remove the
cap again and look
at- the fluid level on
the dipstick,
When .the engine imnpartrnent is hot,
the level should be at the HOT or H
mark.
cool, the level should be atthe FULL
COLD or C mark.
When the engine compartment is
What t,o Add:
Refer to the Maintenance Schedule- to
determine what.kind
of fluid to use. 'See.
the
Index under Fluids G Lubricants.
II NOflCE
Windshield Washer Fluid
To Add:
Open t,he.cap labeled WASHER .
FLUID ONLY. Add washer fluid until
the^ bottle is full.
.
Page 337 of 370
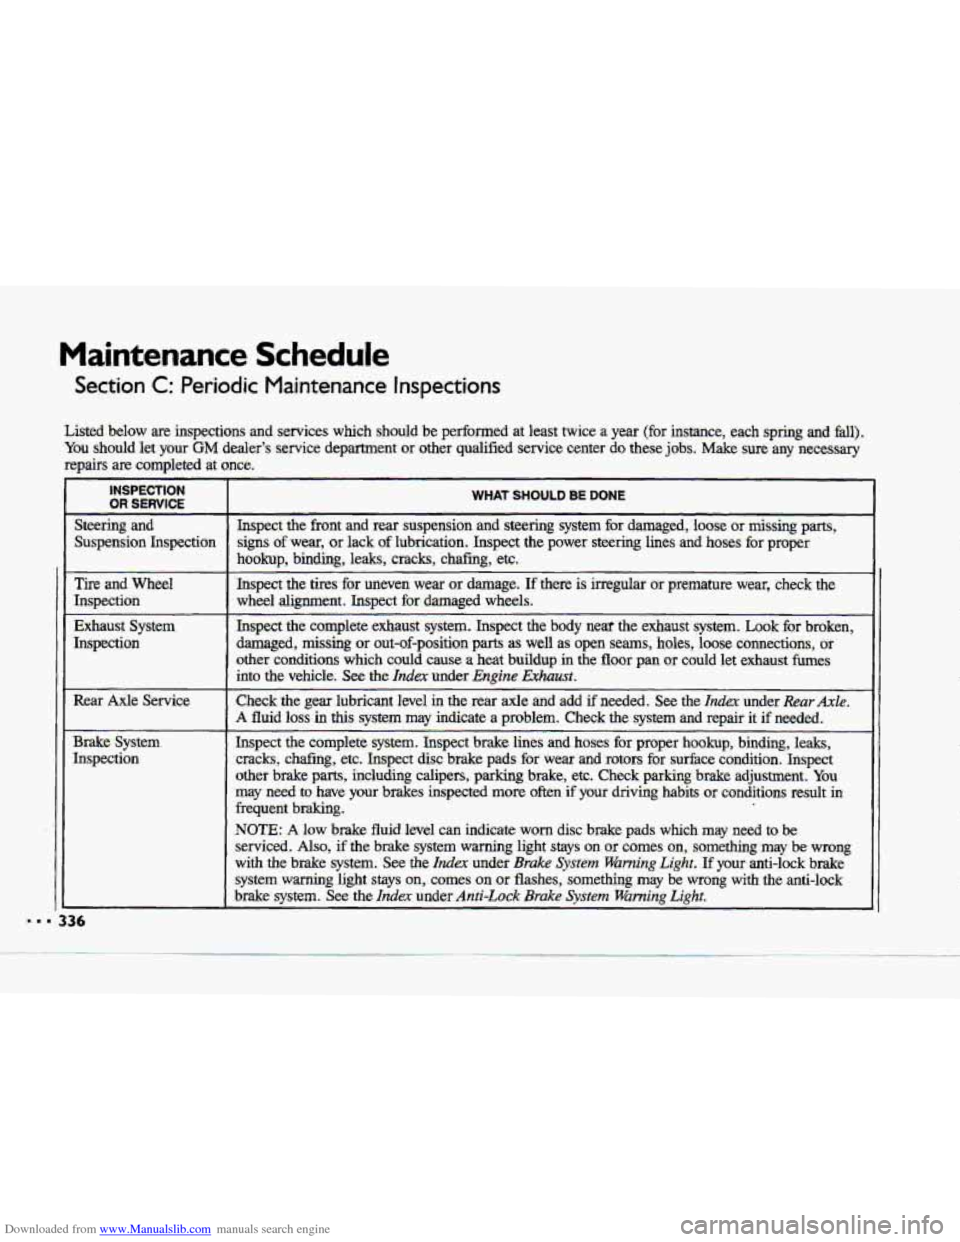
Downloaded from www.Manualslib.com manuals search engine Maintenance Schedule
Section C: Periodic Maintenance Inspections
Listed below are inspections and services which should be performed at least twice a year (for instance, each spring and fall).
You should let your- GM dealer's service department or other qualified ssvj,cg [email protected] do these j-obs. Make sure any necessary
repairs are completed
at once.
INSPECTION
OR SERVICE
Steering and
Suspension Inspection
Tire and Wheel
Inspection
Exhaust System
Inspection
~-
Rear Axle Service
Brake System
Inspection
WHAT SHOULD BE DOME
Inspect. the front and rear susp-ension and steering system for damaged, loose or missing parts,
signs of wear, or lack of lubrication. Inspect the power steering lines and hoses. for proper
hookup,
bindmg-, leaks, cracks, chafing, etc.
Inspect the tires for uneven wear or damage. If there is irregular or premature wear, check the
wheel alignment. Inspect for damaged wheels.
Inspect the complete exhaust system. Inspect the
body neat the exhaust system. Look for broken,
damaged, missing or out-of-position parts as well as open seams, holes, loose connections, or
other conditions which could cause a heat buildup in the floor pan or could let exhaust fumes
into the- vehicle.
See the Index under Engine Exhaust.
Check:the gear lubricant leve1.h the rear axle and add if needed. See the Index: under Rear Axle.
A fluid loss in this system;may indicate a problem. Check the system and repair it if needed.
Inspect the complete system. Inspect brake lines and
hoses for proper hookup, binding, leaks,
cracks, chafing, etc. Inspect disc brake pads for wear and rotors for surface condition. Inspect
-other brake parts, .hcluding calipers, parking brake, etc. Check parking brake adju\
stment. You
may need
to have your brakes inspected more often if your driving habits or conditions result in
frequent braking.
NOTE:. A low brake fluid level can indicate worn disc brake pads which may need to be
serviced.
Also, if 'the brake system warning light stays on or comes on, something may be wrong
with .the brake system. See the Index under Brake System Warning Light. 'If your anti-lock brake
systemwarning light stays on, comes on or flashes, something may be wrong with the anti-lock
brake system. See the Index under Anti-Lock Brake System Warning Light.