Page 173 of 308
Downloaded from www.Manualslib.com manuals search engine Towing from the Front-
Vehicle
Hook-Up
Before hooking up to a tow truck, be
sure to read all the information
in
Towing Your Chevrolet earlier in this
section.
1. Attach T-hook chains into the slots in
the bottom of the floor pan, just
behind the front wheels, on both
sides.
Do not tow with sling-type
equipment or fascia damage will
occur. Use wheel lift
or car carrier
equipment. Additional ramping
may be required for car carrier
equipment. Use safety chains and
wheel straps.
I D m
I
When using wheel-lift equipmen1
towing over rough surfaces can
damage a vehicle.
To help avoid
this, install a towing dolly beneath
the wheels that would otherwise be
on the ground during the tow. This
will increase clearance between the wheel-lift equipment and
the
underbody of the towed vehicle.
I
Page 174 of 308
Downloaded from www.Manualslib.com manuals search engine Problems on the Road
Towing from the Front- Vehicle
Hook-Up (CONT.)
2. Attach a separate safety chain around
the outboard end of each lower
control arm.
I 72
Towing from the Rear-
Vehicle
Hook-Up
Before hooking up to a tow truck, be
sure to read all the information in
Towing Your Chevrolet earlier in this
section. Also be sure to use the proper
hook-up for your particular vehicle.
All Models:
1. Attach T-hook chains on both sides in
the slotted holes in the bottom of the
frame rail just ahead of the rear
wheels.
2. Position lower sling crossbar directly
under the rear bumper.
Page 175 of 308
Downloaded from www.Manualslib.com manuals search engine 2-24 Model: All Models:
NOTICE I
men using.w~&l-lift equipment,
towing
over rough surfices can
damage a vehicle. To help avoid
this, install a towing dolly beneath
the wheels that would otherwise be
on the ground during the tow. This
will increase clearance between the wheel-lift equipment and the
underbody
of the towed vehicle. I
3. Attach a separate safety chain to each
side
of the axle inboard of the spring.
Page 186 of 308

Downloaded from www.Manualslib.com manuals search engine Problems on the Road
Zf a Tire Goes Flat
It’s unusual for a tire to “blow out”
while you’re driving, especially if you
maintain your tires properly.
If air goes
out of a tire, it’s much more likely
to
leak out slowly. But if you should ever
have a “blowout,” here are a few tips
about what to expect and what to do:
If a front tire fails, the flat tire will
create a drag that pulls the vehicle
toward that side. Take your foot off the accelerator pedal and grip the steering
wheel firmly. Steer to maintain lane
position, then gently brake
to a stop well
out of
the traffic lane.
I 84
A rear blowout, particularly on a curve,
acts much like a skid and may require
the same correction you’d use in a skid.
In any rear blowout, remove your foot
from the accelerator pedal. Get the
vehicle under control by steering the
way
you want the vehicle to go. It may
be very bumpy and noisy, but you can
still steer. Gently brake
to a stop, well
off the road
if possible.
If your tire goes flat, the next section
shows how
to use your jacking
equipment to change
a flat tire safely.
Changing a Flat Tire
If a tire goes flat, avoid further tire and
wheel damage by driving slowly to a
level place.
Turn on your hazard
warning flashers.
Page 188 of 308
Downloaded from www.Manualslib.com manuals search engine Problems on the R
Changing a Flat Tire (CONT:)
1 . Pull the carpeting from the floor of
2. Turn the center retainer nut on the
the trunk
or rear area.
compact spare tire housing
counterclockwise to remove it, then
lift the tire cover. You will find the
jacking instructions label on the underside
of the tire cover.
3. If your vehicle is equipped with a spare tire housing lid hook, pull the
front
of the lid up and hook it to the
rear upper edge of the trunk.
4. Remove the wing bolt securing the
compact spare tire, spacer and wheel
wrench
by turning it counterclockwise.
Then lift
off the spacer and remove
the spare tire.
5. Remove the bolt securing the jack by
turning it counterclockwise. Then
remove the jack.
... I a6
Page 189 of 308
Downloaded from www.Manualslib.com manuals search engine 6. Remove the band around the jack.
Turn the jack handle clockwise
to
raise the jack head a few inches.
7. Using the wheel wrench, remove the
plastic cap nuts and loosen all the
wheel nuts. Don’t remove the wheel
nuts
yet.
For 2-24 Models:
On 2-24 models, a cover plate must be
removed to find the wheel nuts. Remove
the cover plate using
the flat end of a
wheel wrench.
I87
Page 190 of 308

Downloaded from www.Manualslib.com manuals search engine Problems on the Road
Changing a Flat Tire (CONT.)
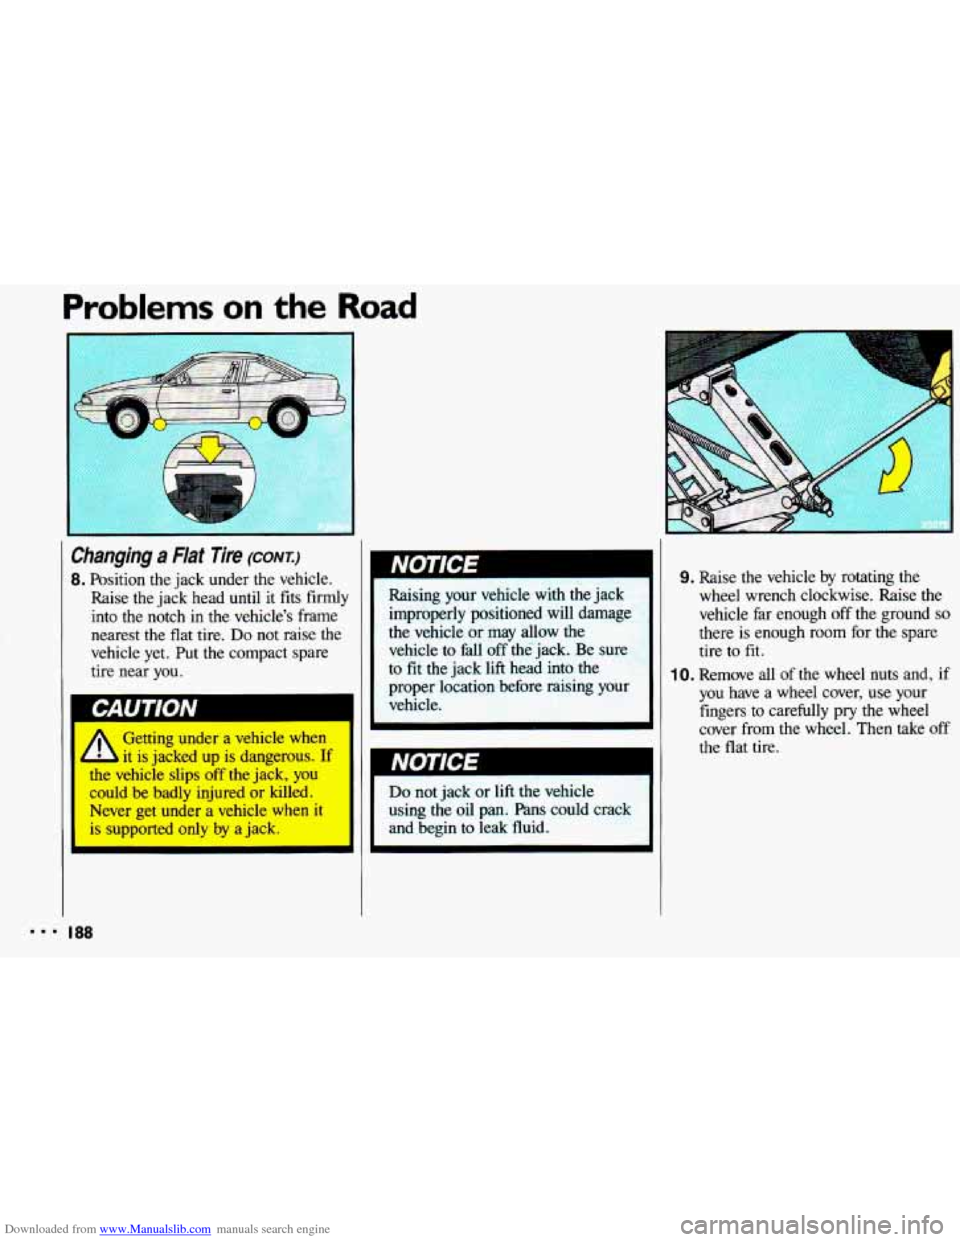
8. Position the jack under the vehicle.
Raise the jack head until it fits firmly
into the notch
in the vehicle’s frame
nearest the flat tire.
Do not raise the
vehicle yet. Put the compact spare
tire near you. Raising your vehicle with
the jack
improperly positioned will damage
the vehicle or may allow the
vehicle to fall off
the jack. Be sure
to fit the jack lift head into the
proper location before raising your
vehicle.
Getting under a vehicle when
it is jacked
up is dangerous. If I II NOTICE the vehicie slips off the jack, you I could be badly injured or killed.
Never get under
a vehicle when it
is supported only by a jack.
I88
9. Raise the vehicle by rotating the
wheel wrench clockwise. Raise the
vehicle far enough off the ground
so
there is enough room for the spare
tire
to fit.
1 0. Remove all of the wheel nuts and, if
you have a wheel cover, use your
fingers to carefully pry the wheel
cover from the wheel. Then
take off
the flat tire.
Page 191 of 308
Downloaded from www.Manualslib.com manuals search engine Ll X5076
Rust or dirt on the wheel, or
on the parts to which it is
fastened, can make the wheel nuts
become loose after a time. The wheel
could come off and cause an
accident. When
you change a
wheel, remove any rust
or dirt from
the places where the wheel attaches
to the vehicle. In an emergency,
you can use a cloth
or a paper towel
to do this; but be sure to use a scraper
or wire brush later, if you need to,
to get all the rust or dirt off.
1 1. Remove any rust or dirt from the
wheel bolts, mounting surfaces or
spare wheel.
mounting surface.
1 2. Place the spare on the wheel
~ CAUTION
13. Replace the wheel nuts with the
rounded end of the nuts toward the
wheel. Tighten each nut by hand
until
the wheel is held against the
hub.
A
Never use oil or grease on
studs or nuts. If
you do, the
nuts might come loose. Your wheel
could fall off, causing a serious
accident.
I89