Page 45 of 308
Top Strap
If your child restraint has a top strap, it should be
anchored. If
you need to have an anchor installed, you can ask
your Buick dealer to put it in for you.
If you want to
install an anchor yourself, your dealer can tell you how
to do it.
Vehicles first sold in Canada have child restraint anchor
bracket hardware in the glove box, along with
instructions for installing it. This should be used only
with a child restraint, and only to secure a child restraint
at a rear seating position. Additional anchor brackets for
child restraints at the rear seating positions are available
at Buick dealerships in Canada.
43
ProCarManuals.com
Page 63 of 308
Power Door Locks
i
’ Push the power door
lock switch to lock or
unlock all the doors at
once.
Leaving Your Vehicle
Automatic
Door Locks
Just close your doors and turn on the. ignition. All of
If you are leaving the vehicle, take your keys, open your
door and set the locks
from inside. Then get out and
close the door.
Remote Trunk Release (Option)
The remote trunk
I release button is in
the glovebox. It works
only
when the
transaxle is
in Park.
your doors
will lock when you move your shift lever out
of “P’ (Park) or “N” (Neutral). Each time you close
your doors and turn on the ignition, the doors
will lock
automatically only once.
If someone needs to get out
while the vehicle is running, have that person use the
manual
or power lock. When the door is closed again, it
will not lock automatically. Just use the manual or
power lock to
lock the door again.
If you have the Remote Keyless Entry System Option, it
will also unlock your trunk.
61
ProCarManuals.com
Page 67 of 308

Parking Lots: If you park in a lot where someone will
be watching your vehicle, it’s best
to lock it up and take
your keys. But what
if you have to leave your ignition
key? What if
you have to leave something valuable in
your vehicle?
0 Put your valuables in a storage area, like your trunk
or glove box.
0 Lock the glove box.
0 Lock all the doors except the driver’s.
0 Then take the door key with you.
New Vehicle ‘LBreak-In99
Your modern Buick doesn’t need an elaborate
“break-in.” But
it will perform better
run if you follow these guidelines:
Don’t drive at any one speed -- fast or sin
-- for the first 500 miles (804. km,)Jon’+ .,,, ii’ ’
make full-throttle starts.
Avoid making hard stops for the
first 200
miles (322 km) or so. During this time your
new brake linings aren’t yet broken
in. Hard
stops with new linings can mean premature
wear and earlier replacement.
Follow this
“breaking-in” guideline every time you get
lew brake linings.
.ti“”.: .-,i- t.,/ +
65
ProCarManuals.com
Page 259 of 308

Fuses and Circuit Breakers
The wiring circuits in your car are protected from short
circuits by a combination
of fuses, circuit breakers, and
fusible themdi links in the wiring itself.
This greatly
reduces the chance
of fires caused by electrical problems.
This fuse panel is inside the
glove box. Pull the cover
down for access. Some
spare fuses and
a fuse
puller are included.
Be sure
to use the correct fuse. If you ever have a problem
on the road and don’t have
a spare fuse, you can “borrow”
one of the correct value. Just pick some feature of your car
that you can get along without
-- like the radio or cigarette
lighter
-- and use its fuse, if it is of the value you need.
Replace
it as soon as you can.
Fuse Usage
Amp Description
1.
2.
3.
10
15
15
4.
5.
6.
7.
8.
9.
10.
11.
12.
13.
14.
1s.
16.
17.
18.
25
10
1s
15
20
15
10
5
25
10
10
Radio & Clock
Radio
& Clock; Instrument Cluster; Passive
Restraint Timer
Courtesy, Glove Box, Underhood, Trunk, Header
Lights; Cigarette Lighter; Lighted Inside Rearview Mirror; Power Door Locks; Power Mirrors
Windshield Wiper
& Washer
Cruise Control: DRL Module; Instrument Cluster;
HVAC
Brake Lights;
ABS Control Module; Chime Module
Engine Control Module
Taillights; DRL Module
Hazard Warning Flasher
Rear Defogger Timer Relay: Instrument Cluster;
Chime Module; Cruise Control; DRL Module; Lamp
Driver
Module; ABS Lamp Driver
Instrument Panel. Console, Switch Lights
Blower Motor
Turn Signals
Not Used ABS Control Module
Not Used Not Used
Not Used
257
ProCarManuals.com
Page 264 of 308

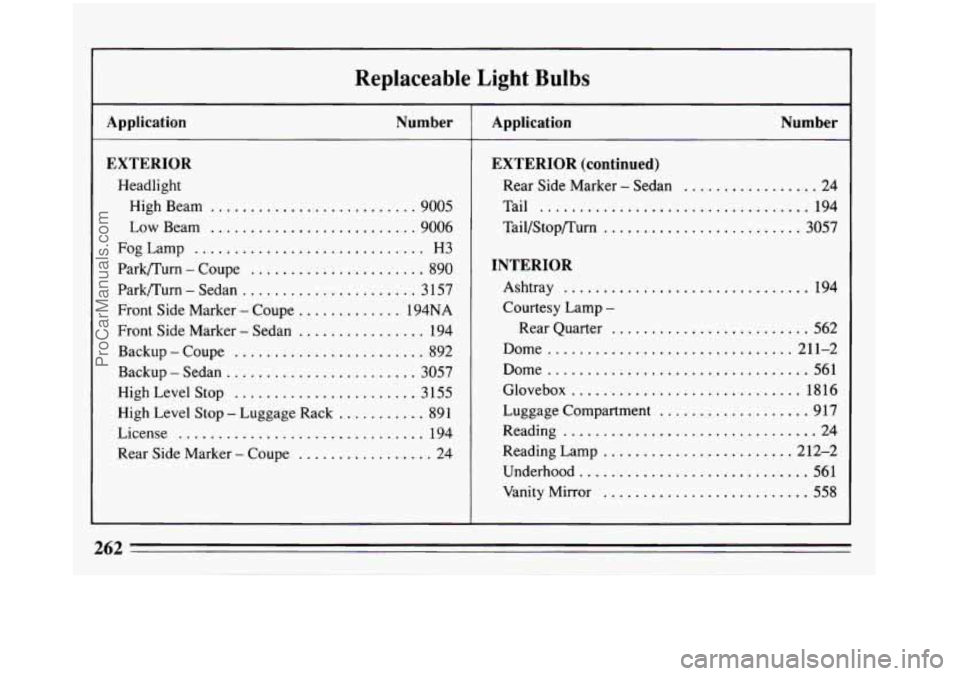
Replaceable Light Bulbs
A nplication Number
.
EXTERIOR
Headlight
High Beam
.......................... 9005
Low Beam .......................... 9006
FogLamp
............................. H3
Park/Turn
. Coupe ...................... 890
Park/Turn
. Sedan ...................... 3 157
Front Side Marker
. Coupe ............. 194NA
Front Side Marker
. Sedan ................ 194
Backup
. Coupe ........................ 892
Backup-Sedan
........................ 3057
~ High Level Stop ....................... 3155
High Level Stop
. Luggage Rack ........... 891
License
............................... 194
Rear Side Marker
. Coupe ................. 24
Application Number
EXTERIOR (continued)
Rear Side Marker . Sedan ................. 24
Tail
.................................. 194
Tail/Stop/Turn
......................... 3057
INTERIOR
Ashtray ............................... 194
Courtesy Lamp
.
Rear Quarter ......................... 562
Dome
............................... 211-2
Dome
................................. 561
Glovebox
............................. 1816
Luggage Compartment
................... 917
Reading
................................ 24
Reading Lamp ........................ 2 12-2
Vanity Mirror
.......................... 558
Underhood ............................. 561
262
. .
ProCarManuals.com
Page 279 of 308

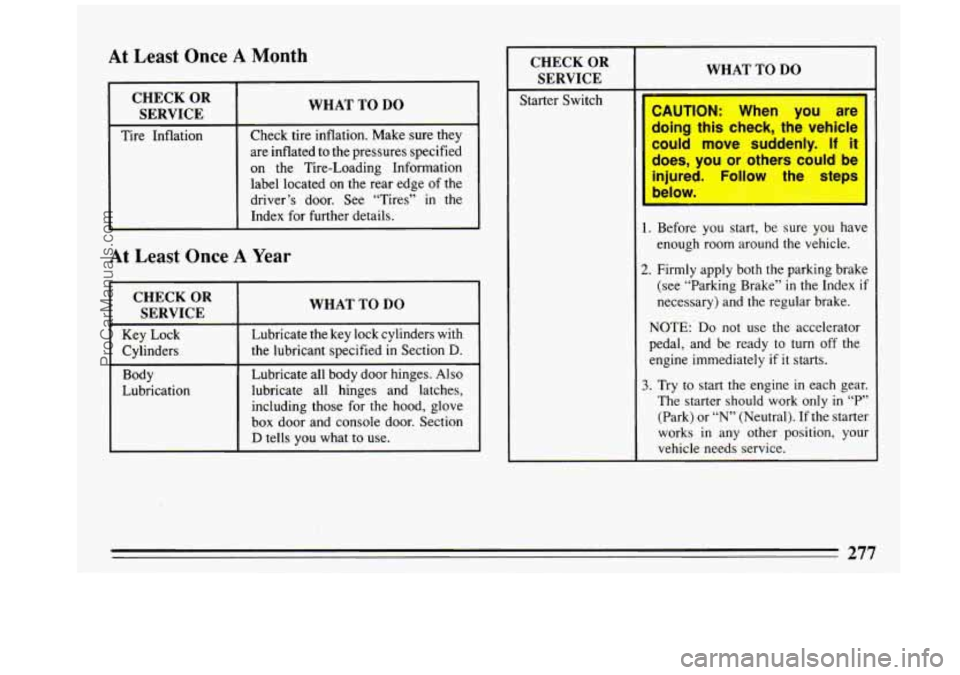
At Least Once A Month
CHECK OR
SERVICE
Tire Inflation
WHAT TO DO
Check tire inflation. Make sure they
are inflated
to the pressures specified
on the Tire-Loading Information
label located on the rear edge of
the
driver’s door. See “Tires” in the
Index for further details.
c!%&lkY 1 --“-+
Starter Switch
At Least Once A Year
I CHECKOR
SERVICE
I WHAT TO DO
Key Lock
the lubricant specified in Section
D. Cylinders Lubricate the
key lock cylinders with
Body
Lubrication Lubricate all
body door hinges.
Also
lubricate all hinges and latches,
including those for the hood, glove
box door and console door. Section
D tells you what to use.
1. Before you start, be sure you have
enough room around the vehicle.
2. Firmly apply both the parking brake
(see “Parking Brake”
in the Index if
necessary) and the regular brake.
NOTE:
Do not use the accelerator
pedal, and
be ready to turn off the
engine immediately if
it starts.
3. Try to start the engine in each gear.
The starter should work only in “P”
(Park) or
“N” (Neutral). If the starter
works
in any other position, your
vehicle needs service.
277
ProCarManuals.com