1993 BUICK PARK AVENUE clock
[x] Cancel search: clockPage 131 of 340
@ Part 3 Comfort Controls & Audio Systems
. I
In this part you’ll find out how to operate the comfort control systems and audio systems offered with your Buick .
Be sure to read about the particular system supplied with your vehicle .
Part 3 includes:
Comfort Control System
............................................................ 130
Heater and Defroster
................................................ 132.136. 138
Airconditioner
........................................................... 132. 137
RearWindowDefogger
........................................................ 136
Ventilation
............................................................... 132. 138
Audiosystems
.................................................................... 139
Setting the Clock
.................................................. 142.145.148. 151
Radio Controls
.................................................. 141.144.147. 150
TapePlayerControls
................................................ 143. 145. 148
CDPlayerControls
............................................................ 151
Understanding Radio Reception
................................................... 139
Care of Cassette Tape Player & Tapes ............................................. 155
CareofCompactDiscs
......................................................... 155
Antennacare
................................................................ 156
ProCarManuals.com
Page 144 of 340
Pushbuttons Clock
The four pushbuttons let you return to favorite stations.
You can set the pushbuttons for up to fourteen stations
(7 AM and 7 FM).
0 Tune in the desired station.
0 Press the SET pushbutton. SET appears in the
display.
0 Within 5 seconds, push one of the four pushbuttons.
Whenever you press that button, the preset station will
return.
Up to three more stations may be preset on each band by
pressing two pushbuttons that are next to each other, at
the same time.
0 Tune in the desired station.
Press the SET pushbutton.
0 Within the 5 seconds, press any two pushbuttons that
are next to each other. (The station will return when
the same two pushbuttons are pressed again.) To
set the clock:
0 Press the SET button.
0 Within 5 seconds, press and hold SCAN until the
correct hour appears on the display.
0 Press and hold SEEK until the correct minute
appears on the display.
TREBLE
Slide the TREBLE lever up to increase the treble
response. If the station is weak or noisy, slide the
TREBLE lever down to reduce the noise.
BASS
Slide the BASS lever up to increase the bass response.
Adjust the BASS lever to give a pleasing sound to your
ear.
DNR@
This is the Dynamic Noise Reduction button, DNR@
helps remove background hiss from
the radio or tape
player.
You may want to leave it pushed in all the time.
ProCarManuals.com
Page 147 of 340
SCAN
When you press SCAN, the radio will go to the next
station and pause and keep doing that until
you press
SCAN again. SC will appear in the display.
Pushbuttons
The five pushbuttons let you return to favorite stations.
You can set the pushbuttons for up to ten stations (5 AM
and 5 FM).
Tune in the desired station.
Push the SET button.
Within 5 seconds, push one of the five pushbuttons.
SET will disappear from the display when the station
is set.
Whenever you press that button, the preset station will
return.
Clock
To set the clock:
Press the SET button.
Within 5 seconds, press and hold SCAN until the
correct hour appears on the display.
Press and hold SEEK until the correct minute
appears
on the display.
To Adjust The Tone
Use the levers next to the display to set the bass,
midrange, and treble until
you get the sound you want.
The
60 and 250 levers adjust the bass; 1K is midrange;
3.5K and 10 K control the treble.
We suggest you start with the center lever
(1K) in the
midpoint position, then move the others up or down
until you get the amount of bass and treble you like.
To Play A Cassette
Your tape player is built to work best with tapes that are
30 to 45 minutes long on each side. Tapes longer than
that are
so thin they may not work well in this player.
With the radio on, press a tape into the slot marked
AUTO REVERSE (the tape side goes in first).
Once the tape is playing, use the upper and lower knobs
for volume, balance, and fade just as you did for the
radio. The arrow
in the graphic display above the word
TAPE indicates which side
of the tape is being played.
When the end of the tape is reached, it
will
automatically reverse and play the other side of the tape.
. -,
145
ProCarManuals.com
Page 150 of 340
SCAN Clock
When you press SCAN, the radio will go to the next
station and pause and keep doing that until
you press
SCAN again. SC will appear in the display.
Pushbuttons
The five pushbuttons let you return to favorite stations.
You can set the pushbuttons for up to ten stations
(5 AM
and
5 FM).
0 Tune in the desired station.
0 Press the SET pushbutton. (Note: The display will
shQw SET for about
5 seconds.)
0 Within 5 seconds, push one of the five pushbuttons.
SET will disappear from the display when the station
is set.
Whenever you press that pushbutton again, the preset
station will return. To
set the clock:
0 Press the SET pushbutton.
Within 5 seconds, press and hold SCAN until the
correct hour appears on the display.
0 Press and hold SEEK 4 or until the correct minute
appears on the display.
To Adjust The Tone
BASS adjusts the bass response up or down. TREB
adjusts the treble response up or down. If the station is
weak or noisy, adjust the TREBLE.down to reduce the
noise. Pressing either button in the center will set the
bass or treble
level to a factory preset level.
To Play A Cassette
Your tape player is built to work best with tapes that are
30 to 45 minutes long on each side. Tapes longer than
that are
so thin they may not work well in this player.
With the radio on, press a tape into the
slot marked
AUTO REVERSE (the tape side goes in first).
ProCarManuals.com
Page 153 of 340
SCAN
When you press SCAN, the radio will go to the next
station and pause and keep doing that until you press
SCAN again. SC will appear in the display.
Pushbuttons
The five pushbuttons let you return to favorite stations.
You can set the pushbuttons for up to ten stations (5 AM
and 5 FM).
Tune in the desired station.
Press the SET pushbutton.
0 Within 5 seconds, push one of the five pushbuttons.
SET will disappear from the display when the station
is set.
Whenever
you press that button, the preset station will
return.
Clock
To set the clock:
0 Press the SET pushbutton.
0 Within 5 seconds, press and hold SCAN until the
correct hour appears on the display.
0 Press and hold SEEK or 4 until the correct minute
appears on the display.
To Adjust The Tone
Use the levers next to the display to set the bass,
midrange, and treble until you get the sound you like.
The
60 and 250 levers adjust the bass; 1K is midrange;
-3.5K and 10 K control the treble.
We suggest
you start with the center lever (1K) in the
midpoint position, then move the others up or down
until you get the amount
of bass and treble you like.
To Play A Compact Disc
Before you begin, please note: DO NOT use mini-discs
that are called singles. They won’t eject.
Use full-size
compact discs only.
If the disc player is very hot or if you’re driving on a
very rough road, the disc may come out, or just not play.
ERR will appear
in the display. As soon as things get
back to normal, the disc should play again.
Press PWR to turn the system on.
ProCarManuals.com
Page 179 of 340
When you drive into a curve at night, it’s harder to see
the road ahead of you because it bends away from the
straight beams of your lights. This is one good reason to
drive slower.
Steering in Emergencies
There are timi% when steering can be more effective
than braking. For example,
you come over a hill and
find a truck stopped in your lane, or a car suddenly pulls
out from nowhere, or a child darts out from between
parked cars and stops right
in front of you. You can
avoid these problems by braking
-- if you can stop in
time. But sometimes you can’t; there isn’t room. That’s
the time for evasive action
-- steering around the
problem.
Your Buick can perform very well
in emergencies like
these. First apply your brakes. It is better to remove as
much speed as you can from a possible collision. Then
steer around the problem, to the left or right depending
on the space available.
An emergency like this requires close attention and a
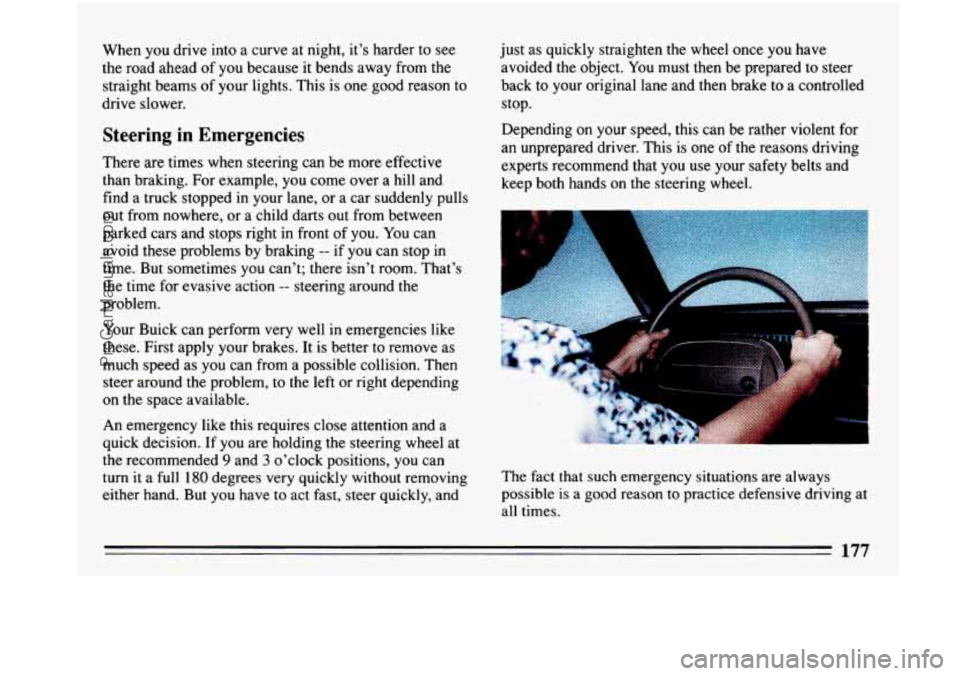
quick decision. If you are holding the steering wheel at
the recommended 9 and 3 o’clock positions, you can
turn it a full 180 degrees very quickly without removing
either hand. But you have
to act fast, steer quickly, and just as
quickly straighten the wheel once you have
avoided the object. You must then be prepared to steer
back
to your original lane and then brake to a controlled
stop.
Depending on your speed, this can be rather violent for
an unprepared driver. This is one of the reasons driving
experts recommend
that you use your safety belts and
keep both hands on the steering wheel.
I
D
The fact that such emergency situations are always
possible
is a good reason to practice defensive driving at
all times.
177
ProCarManuals.com
Page 233 of 340
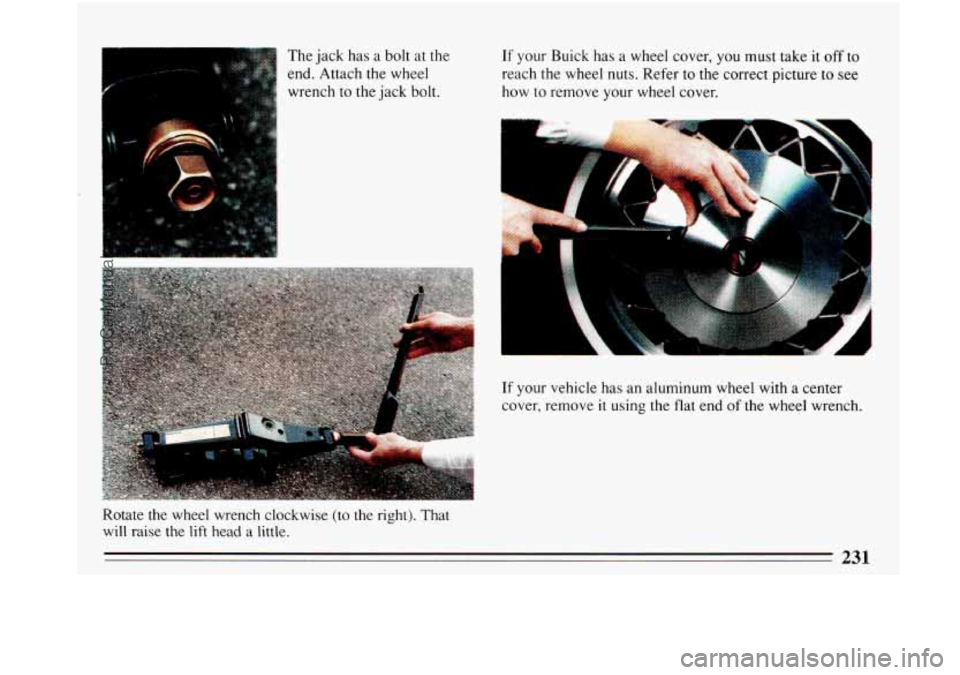
The jack has a bolt at the
end. Attach the wheel
wrench to the jack bolt. If your Buick has a wheel cover, you must take it off to
reach the wheel nuts. Refer to the correct picture to see
how to remove your wheel cover.
If your vehicle has an aluminum wheel with a center
cover, remove
it using the flat end of the wheel wrench.
Rotate the wheel wrench clockwise (to
the right). That
will raise the lift head a little.
231
ProCarManuals.com
Page 235 of 340
.,. . I
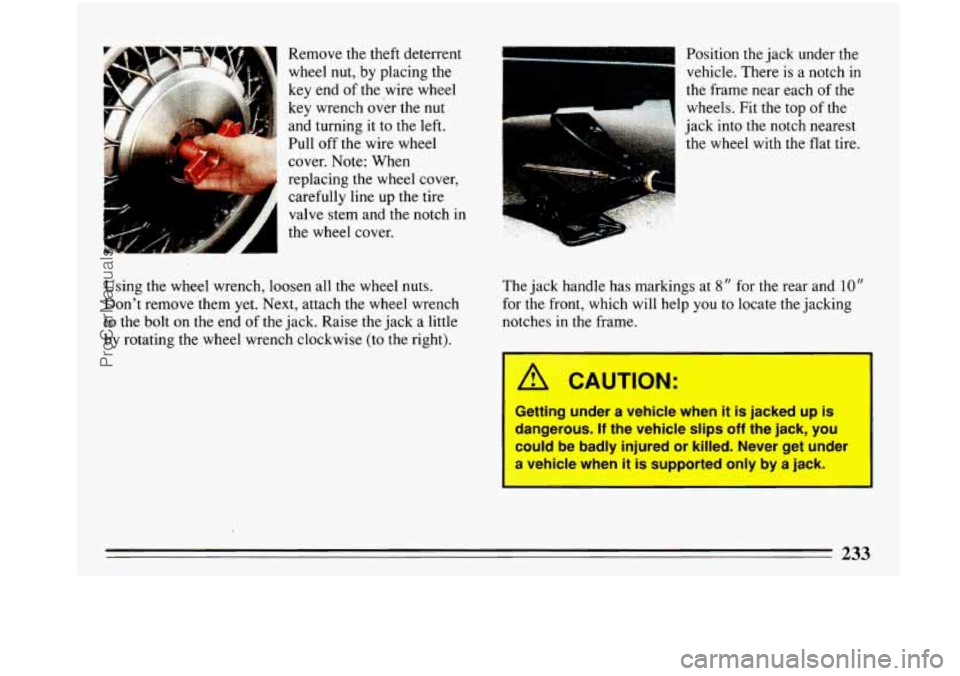
Remove the theft deterrent
wheel nut, by placing the
key end of the wire wheel
key wrench over the nut
and turning it to the left.
Pull off the wire wheel
cover. Note: When
replacing the wheel cover,
carefully line up the tire
valve stem and the notch in
the wheel cover.
I
Using the wheel wrench, loosen all the wheel nuts.
Don’t remove them yet. Next, attach the wheel wrench
to the bolt on the end
of the jack. Raise the jack a little
by rotating the wheel wrench clockwise (to the right). Position the
jack under the
vehicle. There is a notch in
the frame near each
of the
wheels. Fit the top of the
jack into the notch nearest
the wheel with the flat tire.
The jack handle has markings at
8” for the rear and 10”
for the front, which will help you to locate the jacking
notches in the frame.
1 CAUTION:
Getting under a vehicle when it is jacked up is
dangerous.
If the vehicle slips off the jack, you
could be badly injured or killed. Never get under
le when it
is supported only by a jack.
ProCarManuals.com