1993 BUICK CENTURY manual radio set
[x] Cancel search: manual radio setPage 68 of 324

Power Door Locks
Press the power door lock switch
on either front door
to lock or unlock all the
doors at once.
1
Automatic Door Locks
Just close your doors and turn on the ignition. All of the
doors will lock when you move your shift lever out of “P” (Park) or
“N” (Neutral). Each time you close your
doors and
turn on the ignition, the doors will lock
automatically only once. If someone needs to get out
while the vehicle is running, have that person use the
manual or power lock. When the door is closed again, it
will not lock automatically. Just use the manual or power
lock to lock the door again.
Leaving Your Vehicle
If you are leaving the vehicle, open your door and set the
locks from inside. Then get out and close the door.
Remote Keyless Entry System (Option)
If your Buick has this option, you can lock and unlock
your doors or unlock your trunk or wagon liftgate
from
up to 30 feet (9 m) away using the key chain transmitter
supplied with your vehicle.
Your Remote Keyless Entry System operates on’a radio
frequency subject to Federal Communications
Commission (FCC) Rules.
This device complies with
Part 15 of the FCC Rules.
Operation is subject to the following two conditions:
(1) This device may not cause harmful interference, and
(2) This device must accept any interference received,
including interference that may cause undesired operation.
66
ProCarManuals.com
Page 115 of 324

Part 3 Comfort Controls and Audio Systems
In this part you’ll find out how to operate the comfort control systems Ad audio systems offered with your Buick.
Be sure to read about the particular system supplied with your ve\
hicle.
Part 3 includes:
Comfort Control System ............................................................... .114
Airconditioner.. ......................................................................
ventilation ....................................................................... \
.w
Heater and Defroster ................................................................
Rear Wi.ndow Defogger ................................................................ w
Tape Player Contrds. .............................................................. .QO
CDPlayerControls... .................................................,............~3
Care of Cassette Tape Player & Tapes ................................................. .~9
Care of Compact Discs .............................................................. .no
Power Armma Mast Care ........................................................... -131
Audio systems ........................................................................\
. ufj
RadiocOntrOlS.... .....................................,,..............,...........118
ProCarManuals.com
Page 118 of 324

Keep the air path under the front seats clear of objects.
Do not attach a temporary vehicle license across the
defogger grid
on the rear window.
Flow-Through Ventilation System
Your Buick's flow-through .ventilation system supplies outside
air into the vehicle when it is moving. Outside air
will
also enter the vehicle when the heater or the air
conditioning fan is running.
Ventilation Tips
Keep the hood and front air inlet free of ice, snow, or
any other obstruction (such as leaves). The heater and
defroster will work
far better, reducing the chance of
fogging the inside of your windows.
blower fan to
HI for a few moments before driving off.
This helps ,clear the intake ducts of snow and moisture,
and reduces the chance of fogging the inside of your
windows.
When you enter a vehicle in cold weather, turn the This helps
air to circulate throughout your vehicle.
Audio Systems
The
following pages describe the audio systems available
for your Buick, and how to get the best performance
frorr
*hmm Please read about the system in your vehicle.
A CAUTION:
Hearing damage from loud noise is almost
undetectable until
it is too'late. Your hearing
can adapt to higher volumes of sound. Sound
that seems normal can be loud and harmful to
-3ur hearing. Take precautions by adjusting
..re volume control on your radio to a safe
sound level before your hearing adapts to
it.
To help avoid hearing loss or damage:
1. Adjust the volume control to the lowest
-. Increase volume slowly until you hear
setting.
comfortably and clearly.
I
ProCarManuals.com
Page 121 of 324

WAN: Press to listen for a few seconds to the next
station on the
AM or FM band; the scan will continue
every
few seconds until you press SCAN again to stop on
a particular station.
SEEK: Each time you press SEEK, you will tune in the
next station on the
AM or FM radio band.
To Set the Clock:
1. With the radio on or off, press SET. The SET
indicator will appear on the digital display for five
seconds.
2. You must begin to set the clock to the correct hour and
minute during those five seconds. Press and hold
SCAN until the correct hour appears on the display.
3. Press and hold SEEK until the correct minute appears
on the display.
To Preset Radio Stations:
1. Use the lower knob (TUNE) to tune in the station you
want.
2. Press SET. The SET indicator will appear on the
digital screen for five seconds.
3. While the SET indicator is displayed, press one of the
four pushbuttons.
4. Repeat steps 1-3 for each of four AM and four FM
stations.
Up to
three additional stations on each band may be
preset by “pairing” pushbuttons:
1. Tune in the desired station.
2. Press SET, and within five seconds press any two
adjacent pushbuttons at
the same time.
3. The station can be tuned in when the same two
pushbuttons
are pressed at the same time.
ProCarManuals.com
Page 122 of 324

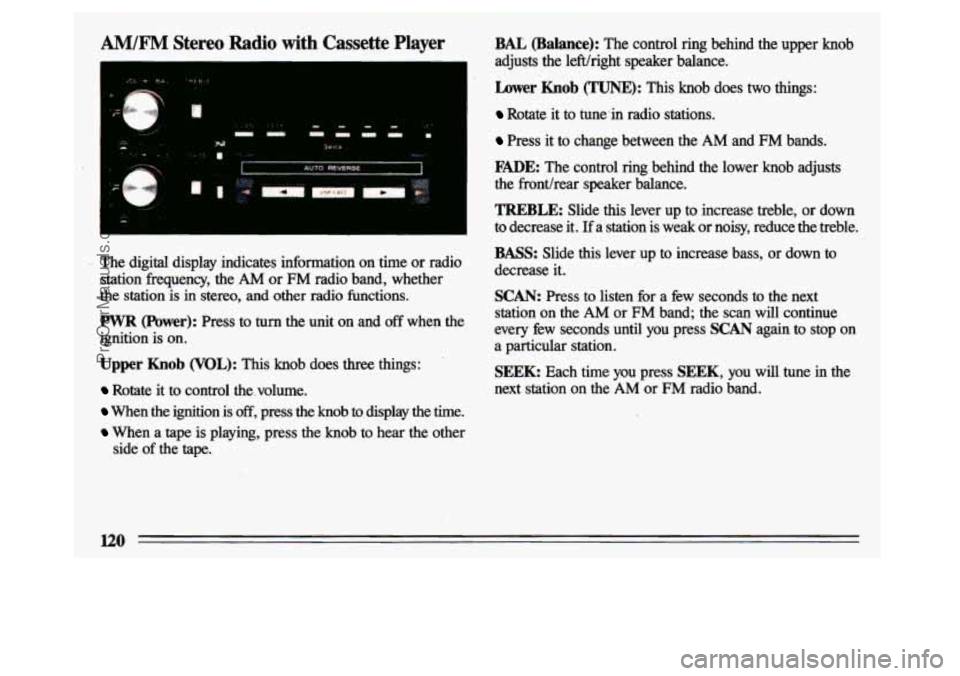
AM/F" Stereo Radio with Cassette Player
L,
The digital display indicates information on time or radio station frequency, the
AM or FM radio band, whether
the station is in stereo, and
other radio functions.
PWR (Power): Press to turn the unit on and off when the
ignition is on.
Upper Knob (VOL): This knob does three things:
Rotate it to control the volume.
When the ignition is off, press the knob to display the time.
When a tape is playing, press the knob to hear the other
side
of the tape.
BAL (Balance): The control ring behind the upper knob
adjusts the 1eWright speaker balance.
hwer Knob (TUNE): This knob does two things:
Rotate it to tune-in radio stations.
Press it to change between the AM and FM bands.
FmE: The control ring behind the lower knob adjusts
the fronthear speaker balance.
TREBLE: Slide this lever up to increase treble, or down
to decrease it.
If a station is weak or noisy, reduce the treble.
BASS: Slide this lever up to increase bass, or down to
decrease it.
SCAN: Press to listen for a few seconds to the next
station on the
AM or FM band; the scan will continue
every few seconds until
you press SCAN again to stop on
a particular station.
SEEK Each time you press SEEK, you will tune in the
next station on the AM or FM radio band.
120
ProCarManuals.com
Page 123 of 324

To Set the Clock:
1. With the radio on or off, press SET. The SET
indicator will appear on the digital display for five
seconds.
2. You must begin to set the clock to the correct hour and
minute during those
five seconds. Press and hold
SCAN until the correct hour appears on the display.
3. Press and hold SEEK until the correct minute appears
on the display.
To Preset Radio Stations:
1. Use the lower knob (TUNE) to tune in the station you
want.
2. Press SET. The SET indicator will appear on the
digital screen for
five seconds.
3. While the SET indicator is displayed, press one of the
4. Repeat steps 1-3 for each of five AM and five FM
Up to three additional stations on each band may be
preset by “pairing” pushbuttons:
five pushbuttons.
stations.
1. Tune in the desired station.
2. Press SET, and within five seconds press any two
adjacent pushbuttons at the same time.
3. The station can be tuned in when the same two
pushbuttons are pressed at the same time.
l21
ProCarManuals.com
Page 124 of 324

DNRB (Dynamic Noise Reduction): Press this button to
select the Dynamic Noise Reduction system that reduces
background
hiss on AM and EM radio broadcasts, as
well as on cassette tapes.
It’s recommended
to keep the DNR@ button depressed
fix all listening situations.
To Play a Cassette npe:
With the power switch on, insert a tape into the cassette
door. Using
tapes that are longer than 90 minutes (45
minutes on each side) is not recommended.
When
the right indicator arrow is lit, selections listed on
the bottom side of the cassette are playing. When the left
arrow is lit, selections listed on the top side of the
cassette
are playing. To change sides of the tape, press
the upper control knob (VOL) while the cassette is
playing.
The tape player automatically begins playing the
other side when
it reaches the end of the tape.
b (Fast Forward): To rapidly advance the tape, press
the button
with the arrow pointing in the same direction
the
tape is playing. To stop %st forward, lightly press the
STOP-EJECT button.
4 (Reverse): To rapidly reverse the tape, press the
button with the arrow pointing
in the opposite direction
the tape is playing. To stop reverse, lightly press the
STOP-EJECT button.
STOP-EJECT To stop playing a tape, fully press this
button. The cassette will be partially ejected, and the
radio will begin playing.
n2
I
ProCarManuals.com
Page 126 of 324

RCL (Recall): Press to alternate the display between the
time and station frequency. When the ignition is off,
press
to display the time.
BASS: Press this button up or down to increase or
decrease the bass level. Press the center of the button for
the hctory preset level.
TREB (Treble): Press this button up or down to increase
or decrease the treble level. Press the center of the button
for the
factory preset level. If a station is weak or noisy,
reduce the treble.
To Set the Clock:
1. With the radio on or off, press SET. The SET
indicator will appear on the digital display for five
seconds.
2. Within those five seconds, press and hold SCAN until
the correct hour appears on the display.
3. Before another five seconds pass, press and hold
4SEEK or SEEK, until the correct minute appears
on the display.
124
ProCarManuals.com