Page 997 of 1164
AIR CONDITIONER U
COMPRESSOR
Removal / Installation
1. Discharge the refrigeration system. (Refer to page U-32.)
2. Remove the undercover.
3. Remove the compressor as shown in the figure, referring to
Removal Note.
4. Install the compressor in the reverse order of removal, referring to Installation Note.
5. Install the undercover.
6. Charge the refrigeration system. (Refer to page U-33.)
u
24-35 (2.4-3.6, 17-26)
N.m (m-kg, ft-it
23UOUX-0
1. Suction hose
2. Discharge hose 3. Compressor
Note
l Immediately plug any open fittings to keep moisture out of the system.
l Apply new compressor oil to the O-rings before connecting the fittings.
l Do not apply compressor oil to the fittings.
l Tightening torque Compressor inlet and outlet: 9.8-l 8 N.m (1.0-l .8 m-kg, 8-l 2 ft-lb)
l Adjust the belt tension to specification.
lb-41
Page 998 of 1164

U AIR CONDITIONER
-0
1 03UOUX-066
23UOUX-02 16
1 13UOUX-027
.ECTION
Removal note
Drive belt
Remove the drive belt as follows.
Vehicle with power steering.
1) Loosen bolt A.
2) Loosen nut C.
3) Loosen nut B.
4) Loosen bolt D.
5) Remove the drive belt.
Vehicle without power steering
1) Loosen nut A.
2) Loosen bolt B.
3) Remove the drive belt.
Installation note
Vehicle with power steering
Drive belt
Adjust the deflection of the drive belt as follows.
Vehicle with power steering
1) Loosen bolt A and nuts B and C.
2) Turn adjusting bolt B and adjust the deflection of the drive
belt to within specification.
Belt Deflection: When applying moderate pressure 98 N (IO kg, 22 lb)
New 8-Qmm (0.31-0.35 in)
Used Q-IOmm (0.35-0.39 in)
3) Tighten bolt A and nuts B and C.
Tightening torque
Bolt A: 36-54 N.m (3.7-5.5 m-kg, 27-40 ft-lb)
Nut B : 19-25 N-m (1.9-2.6 m-kg, 14-19 ft-lb)
Nut C : 32-46 N,m (3.2-4.7 m-kg, 24-34 ft-lb)
Vehicle without power steering
1) Loosen nut A.
2) Turn adjusting bolt B and adjust the deflection of the drive
belt to within specification.
Belt Deflection: When applying moderate pressure 98 N (10 kg, 22 lb)
New 8-Qmm (0.31-0.35 in)
Used Q-10mm (0.35-0.39 in)
3) Tighten nut A. Tightening torque
Nut A: 31-34 N.m (3.2-3.6 m-kg, 23-25 ft-lb)
U-42
Page 1001 of 1164
AIR CONDITIONER U
23UOUX-031 DISCHARGE
VALVE BODY
CYLINDER
1
23UOUX-03
4. Installation of discharge valve body
1) Replace the O-ring and gasket with new ones.
Apply compressor oil to the new O-ring and gasket and
properly assemble them.
Note
l Fit the gasket as shown left while checking that its
top side faces upward.
2) Carefully install the discharge valve body on the com-
pressor and finger tighten the six M6 bolts.
Note
Bolt torquing sequence
l Torque the two socket head bolts (A) to the specifi-
cation.
l Torque the four bolts (B) in a diagonal manner to
the specification.
Tightening torgue: 9.8 N,rn (100 cm-kg, 87 in-lb)
u-45
Page 1002 of 1164

U AIR CONDITIONER
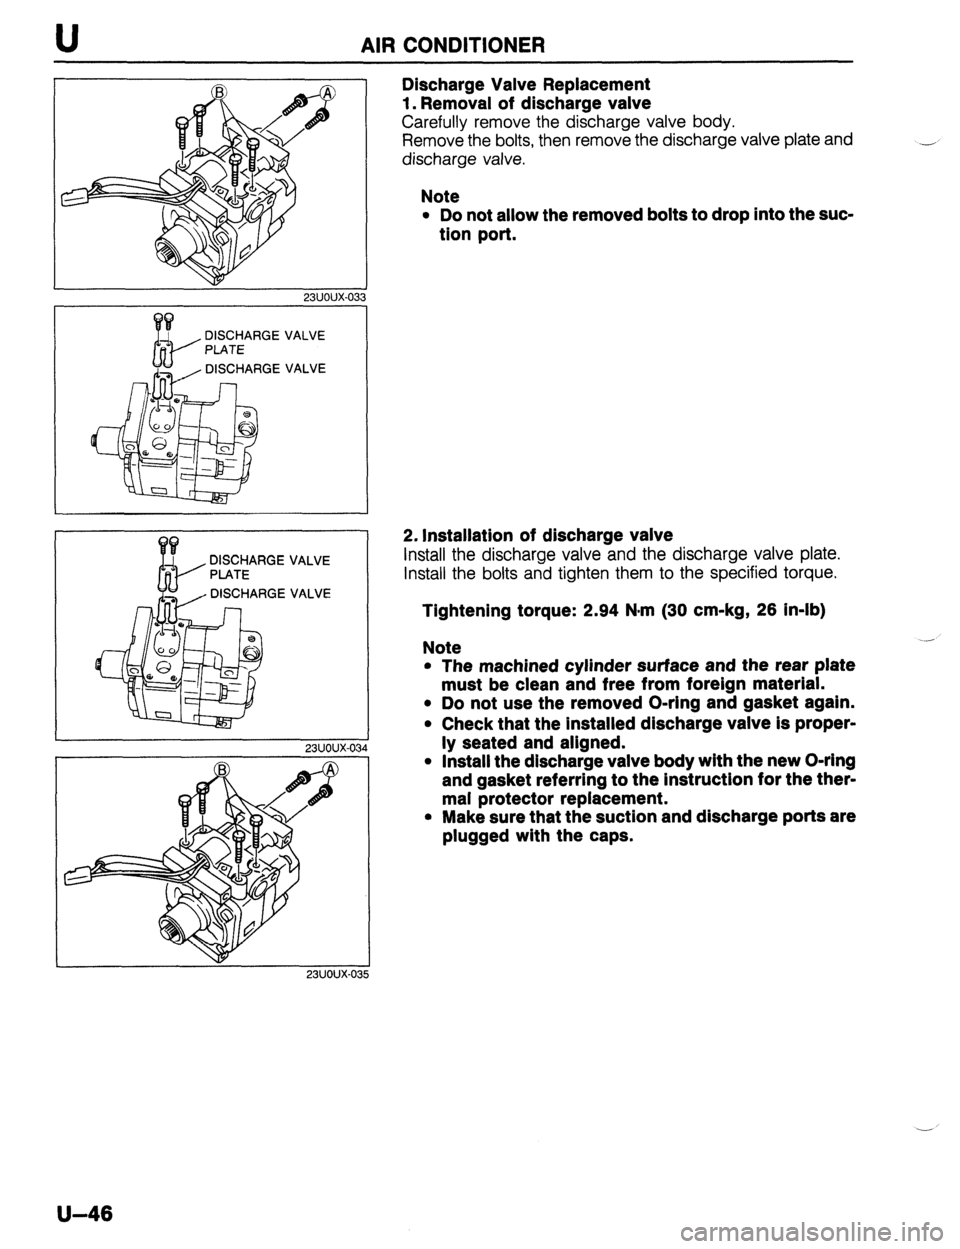
23UOUX-033
DISCHARGE
PLATE
, DISCHARGE VALVE
VALVE
DISCHARGE
PLATE
, DISCHARGE VALVE
VALVE
23UOUX-034
23UOUX-03
Discharge Valve Replacement
1. Removal of discharge valve
Carefully remove the discharge valve body.
Remove the bolts, then remove the discharge valve plate and
discharge valve.
Note
l Do not allow the removed bolts to drop into the suc-
tion port.
2. Installation of discharge valve
Install the discharge valve and the discharge valve plate.
Install the bolts and tighten them to the specified torque.
Tightenlng torque: 2.94 N-m (30 cm-kg, 26 In-lb)
Note
l The machined cylinder surface and the rear plate
must be clean and free from foreign material.
l Do not use the removed O-rlng and gasket again.
l Check that the installed discharge valve is proper-
ly seated and aligned.
l Install the discharge valve body with the new O-ring
and gasket referring to the lnstructlon for the ther-
mal protector replacement.
l Make sure that the suction and discharge ports are
plugged with the caps.
U-46
Page 1006 of 1164
AIR CONDITIONER
Adjustment
Drive belt
Vehicle with power steering
1. Loosen bolt A and nuts B and C.
2. Turn adjusting bolt B and adjust the deflection of the drive
belt to within specification.
23UOUX-045
Belt Deflection: When applying moderate pressure
98 N (IO kg, 22 lb)
New 8-9mm (0.31-0.35 in)
Used 9-l Omm (0.35-0.39 in)
3. Tighten bolt A and nuts B and C.
Tightening torque
Bolt A: 36-54 N-m (3.7-U m-kg, 27-40 ft-lb)
Nut B : 36-51 N-m (3.8-5.3 m-kg, 28-38 ft-lb)
Nut C : 32-46 N-m (3.2-4.7 m-kg, 24-34 ft-lb)
DEFLECTION
03uoux-087
Vehicle without power steering
1. Loosen nut A.
2. Turn adjusting bolt B and adjust the deflection of the drive
belt to within specification.
Belt
New
Used Deflection: When applying moderate pressure
98 N (10 kg, 22 lb)
8-9mm (0.31-0.35 in)
9-l Omm (0.35-0.39 in)
3 *Tighten nut A. .-,
Tightening torque:
32-34 N*m (3.2-3.5 m-kg, 24-25 Mb)
u-50
Page 1008 of 1164
U AIR CONDITIONER
RECEIVER/DRIER
Removal / Installation
1. Discharge the refrigeration system. (Refer to page U-32.)
2. Remove the radiator grille. (Refer to Section S.)
3. Remove the receiver/drier as shown in the figure.
Note
l Immediately plug the open fittings to keep moisture out of the system.
4. Install the receiver/drier in the reverse order of removal.
Note
l Apply clean compressor oil to the O-rings before connecting the fittings.
l Do not apply compressor oil to the fitting nuts.
l When installing a new receiver/drier, add compressor oil through the high-pressure pipe port
of the compressor.
Compressor oil: 10 cc (0.61 cu in)
Tightening torque
Receiver/drier inlet: 9.8-20 N*m (1.0-2.0 m-kg, 7.2-14 ft-lb)
Receiver/drier outlet: 15-25 N-m (1.6-2.6 m-kg, 11-18 ft-lb)
1. Receiver/drier .-
u-52
Page 1009 of 1164

AIR CONDITIONER U
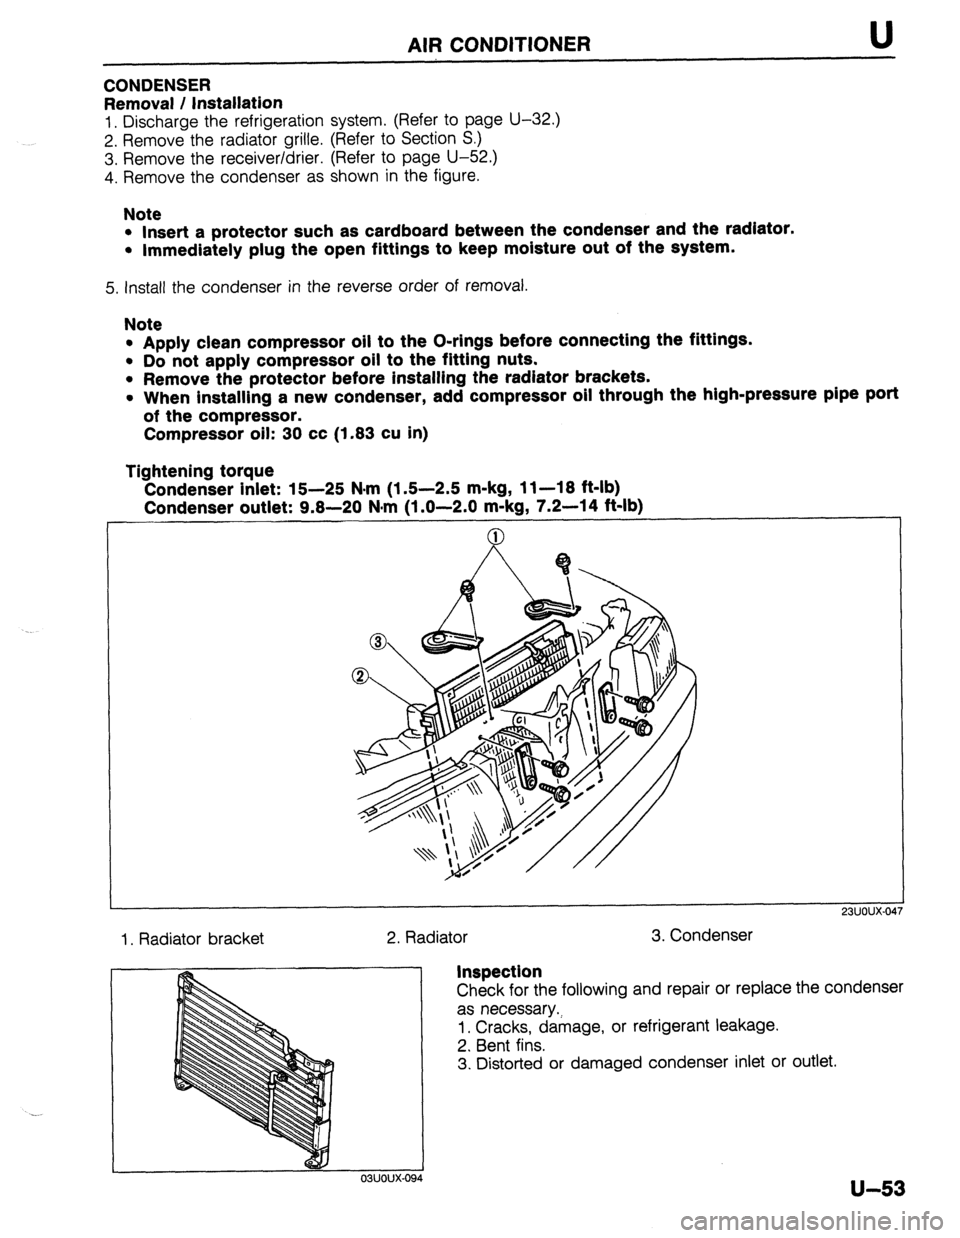
CONDENSER
Removal / Installation
1. Discharge the refrigeration system. (Refer to page U-32.)
2. Remove the radiator grille. (Refer to Section S.)
3. Remove the receiver/drier. (Refer to page U-52.)
4. Remove the condenser as shown in the figure.
Note
l Insert a protector such as cardboard between the condenser and the radiator.
l Immediately plug the open fittings to keep moisture out of the system.
5. install the condenser in the reverse order of removal.
Note
l Apply clean compressor oil to the O-rings before connecting the fittings.
l Do not apply compressor oil to the fitting nuts.
l Remove the protector before installing the radiator brackets.
l When installing a new condenser, add compressor oil through the high-pressure pipe port
of the compressor.
Compressor oil: 30 cc (1.83 cu in)
Tightening torque
Condenser inlet: 15-25 N*rn (1.5-2.5 m-kg, 11-18 ft-lb)
Condenser outlet: 9.8-20 N#m (1 .O-2.0 m-kg, 7.2-14 ft-lb)
1. Radiator bracket
2. Radiator 3. Condenser
23UOUX-01
Inspection
Check for the following and repair or replace the condenser
as necessary.;
1. Cracks, damage, or refrigerant leakage.
2. Bent fins.
3. Distorted or damaged condenser inlet or outlet.
u-53
Page 1010 of 1164
AIR CONDITIONER
REFRIGERANT LINES
On-vehicle Inspection
Check for leakage at connections. (Refer to page U-32.)
Repair or replace as necessary.
Replacement
1. Discharge the refrigeration system. (Refer to page U-32.)
2. Replace the faulty pipe or hose.
Note
l Immediately plug the open fittings to keep moisture out of the system.
l Apply clean compressor oil to the O-rings before connecting the fittings.
l Do not apply compressor oil to the fitting nuts.
Tightening torque (fittings):
Location Tightening torque
0 9.8-20 N.m
(1.0-2.0 m-kg, 7.2-14 ft-lb)
0 15-25 N-m (1.5-2.5 m-kg, 11-18 ft-lb)
0 9.8-16 N.m (1.0-1.6 m-kg, 7.2-12 ft-lb)
fa 20-29 N.m
(2.0-3.0 m-ka 15-21 ft-lb)
3. Evacuate, charge, and test the refrigeration system.
1. High-pressure hose
2. Low-pressure hose
3. Cooler pipe No.1 4. Cooler pipe No.2 6. Cooler pipe No.4
5. Cooler
pipe No.3 7. Cooler pipe No.5
u-54