Page 429 of 4087

Rear Seat Belt
REMOVAL OF REAR SEAT BELT
(See page BO±70)
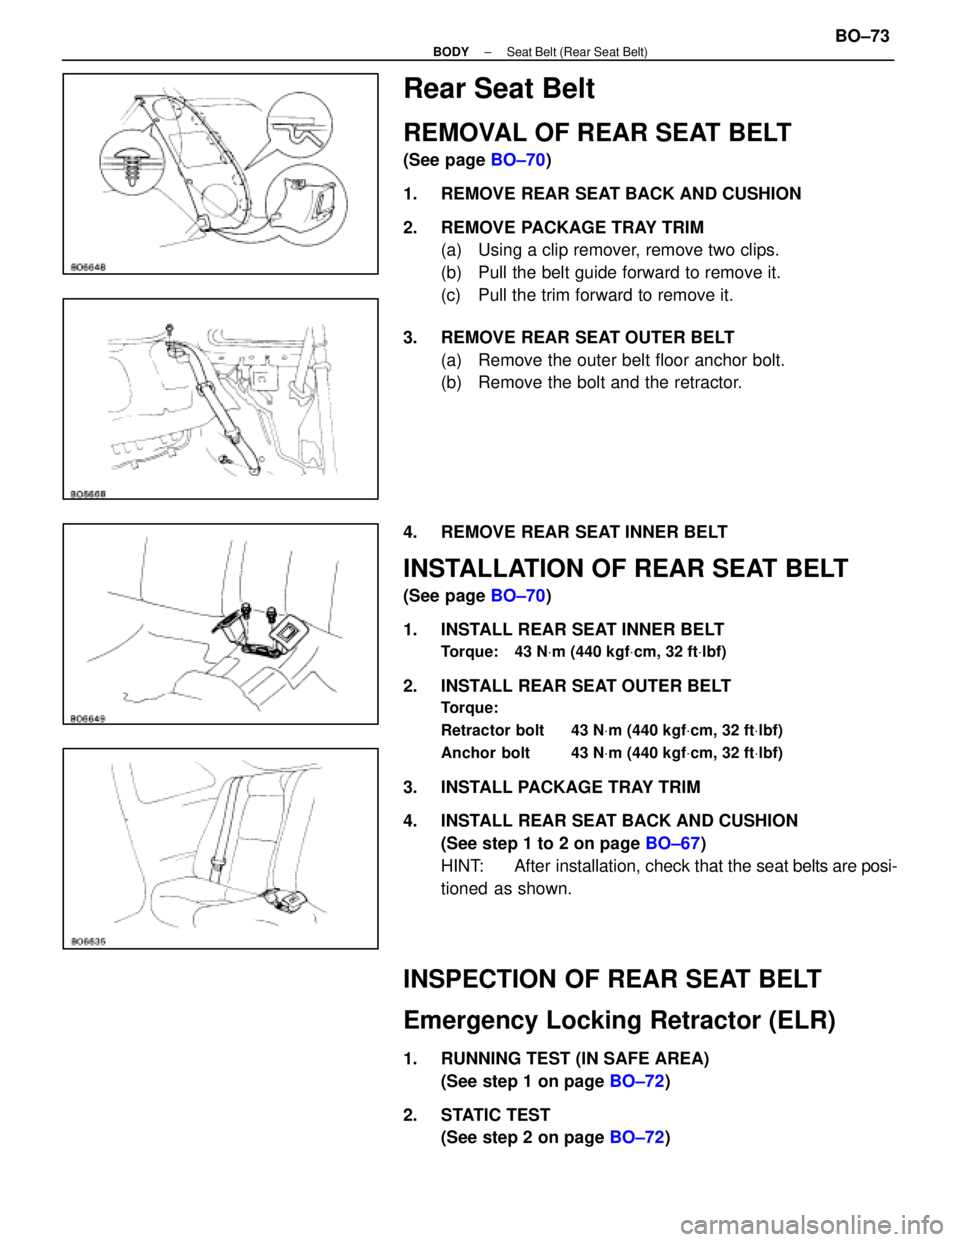
1. REMOVE REAR SEAT BACK AND CUSHION
2. REMOVE PACKAGE TRAY TRIM (a) Using a clip remover, remove two clips.
(b) Pull the belt guide forward to remove it.
(c) Pull the trim forward to remove it.
3. REMOVE REAR SEAT OUTER BELT (a) Remove the outer belt floor anchor bolt.
(b) Remove the bolt and the retractor.
4. REMOVE REAR SEAT INNER BELT
INSTALLATION OF REAR SEAT BELT
(See page BO±70)
1. INSTALL REAR SEAT INNER BELT
Torque: 43 N Vm (440 kgf Vcm, 32 ft Vlbf)
2. INSTALL REAR SEAT OUTER BELT
Torque:
Retractor bolt 43 N Vm (440 kgf Vcm, 32 ft Vlbf)
Anchor bolt 43 N Vm (440 kgf Vcm, 32 ft Vlbf)
3. INSTALL PACKAGE TRAY TRIM
4. INSTALL REAR SEAT BACK AND CUSHION
(See step 1 to 2 on page BO±67)
HINT: After installation, check that the seat belts are posi-
tioned as shown.
INSPECTION OF REAR SEAT BELT
Emergency Locking Retractor (ELR)
1. RUNNING TEST (IN SAFE AREA) (See step 1 on page BO±72)
2. STATIC TEST (See step 2 on page BO±72)
±
BODY Seat Belt (Rear Seat Belt)BO±73
WhereEverybodyKnowsYourName
Page 445 of 4087

REMOVAL OF SLIDING ROOF HOUSING
(See pages BO±85 to 87)
1. REMOVE FOLLOWING PARTS: (a) Interior light (See step 2 on page BO±85)
(b) Front pillar garnish (See step 2 on page BO±122)
(c) Rear seat cushion, rear seat back (See steps 1 to 2 on page BO±66)
(d) Roof side inner garnish (See step 8 on page BO±123)
(e) Center visor (See step 4 on page BO±122)
(f) Shoulder belt anchor (See step 7 on page BO±122)
(g) Sun visor (See step 3 on page BO±122)
(h) Sliding roof garnishes (See step 4 on page BO±85)
(i) Roof headlining (See step 2 on page BO±120)
(j) Sliding roof glass (See step 5 on page BO±85)
(k) Quarter trim (See step 7 on page BO±122)
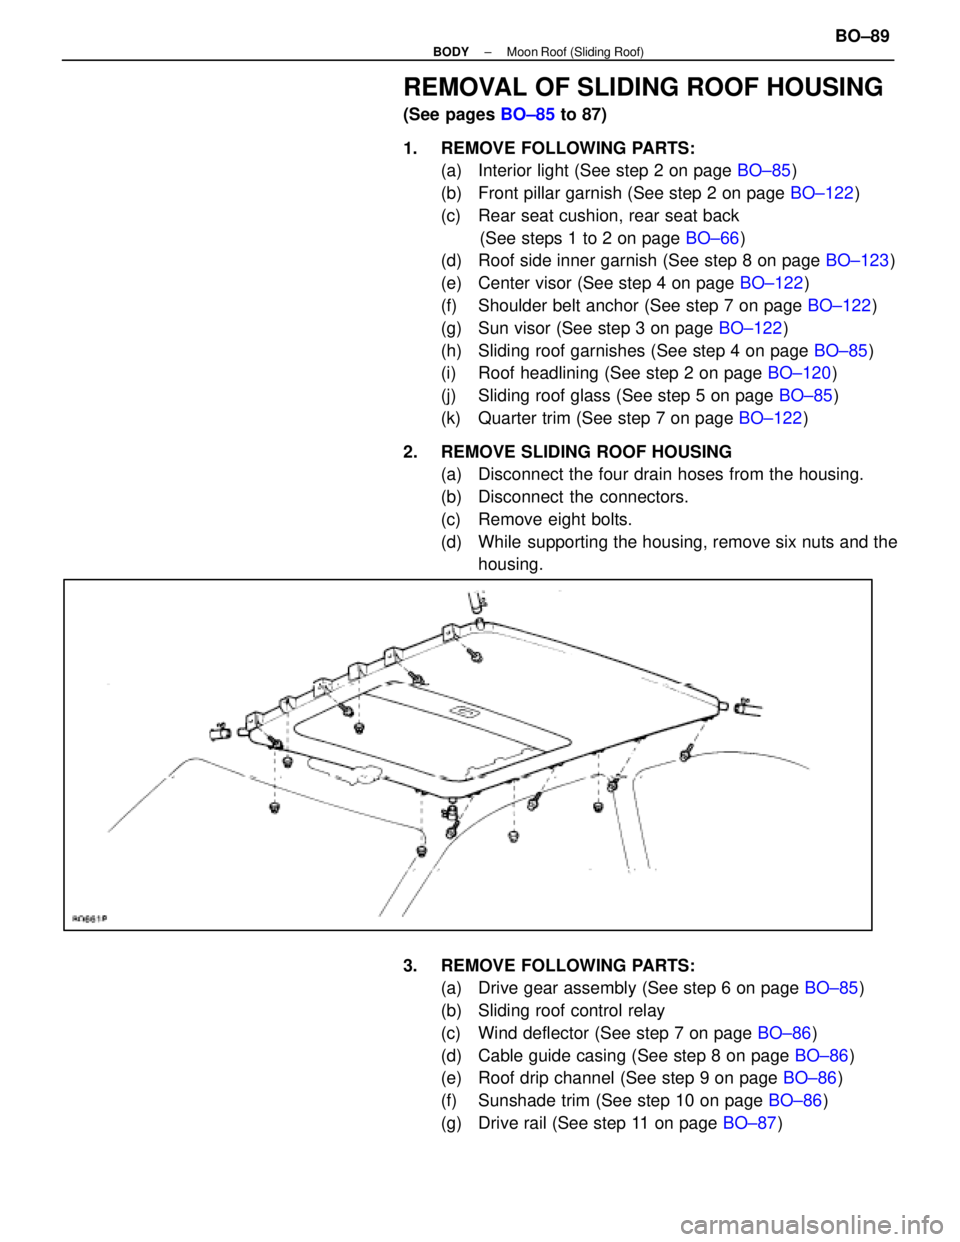
2. REMOVE SLIDING ROOF HOUSING (a) Disconnect the four drain hoses from the housing.
(b) Disconnect the connectors.
(c) Remove eight bolts.
(d) While supporting the housing, remove six nuts and thehousing.
3. REMOVE FOLLOWING PARTS: (a) Drive gear assembly (See step 6 on page BO±85)
(b) Sliding roof control relay
(c) Wind deflector (See step 7 on page BO±86)
(d) Cable guide casing (See step 8 on page BO±86)
(e) Roof drip channel (See step 9 on page BO±86)
(f) Sunshade trim (See step 10 on page BO±86)
(g) Drive rail (See step 11 on page BO±87)
±
BODY Moon Roof (Sliding Roof)BO±89
WhereEverybodyKnowsYourName
Page 446 of 4087
INSTALLATION OF SLIDING ROOF
HOUSING
(See pages BO±85 to 87)
1. INSTALL SLIDING ROOF PARTS BY FOLLOWING REMOVAL SEQUENCE IN REVERSE
HINT: When installing the sliding roof housing weather-
strip, make sure that there is no clearance in either lip of the
weatherstrip.
2. TORQUE FOLLOWING BOLTS: (a) Rear seat back
Torque: 18 N Vm (185 kgf Vcm, 13 ft Vlbf)
(b) Rear seat inner belt
Torque: 43 N Vm (440 kgf Vcm, 32 ft Vlbf)
(c) Front seat belt shoulder anchor bolt
Torque: 43 N Vm (440 kgf Vcm, 32 ft Vlbf)
BO±90±
BODY Moon Roof (Sliding Roof)
WhereEverybodyKnowsYourName
Page 457 of 4087
Body Outside Moulding
COMPONENTS
Front Door Belt Moulding
REMOVAL AND INSTALLATION
1. REMOVE FOLLOWING PARTS:(See steps 1 to 7 on pages BO±33 to 34)
(a) Armrest base panel
(b) Door Trim
(c) Door Speaker Grille
(d) Door Trim Upper Panel
(e) Outside Rear View Mirror
2. REMOVE FRONT DOOR BELT MOULDING
(See step 13 on page BO±35)
3. INSTALL FRONT DOOR BELT MOULDING (See step 8 on page BO±39)
4. INSTALL FOLLOWING PARTS: Install the parts following removal sequence in reverse.
(See steps 14 to 20 on pages BO±40 to 41)
±
BODY Moulding (Body Outside Moulding)BO±101
WhereEverybodyKnowsYourName
Page 458 of 4087

Quarter Window Glass with Moulding
REMOVAL AND INSTALLATION
(See page BO±101)
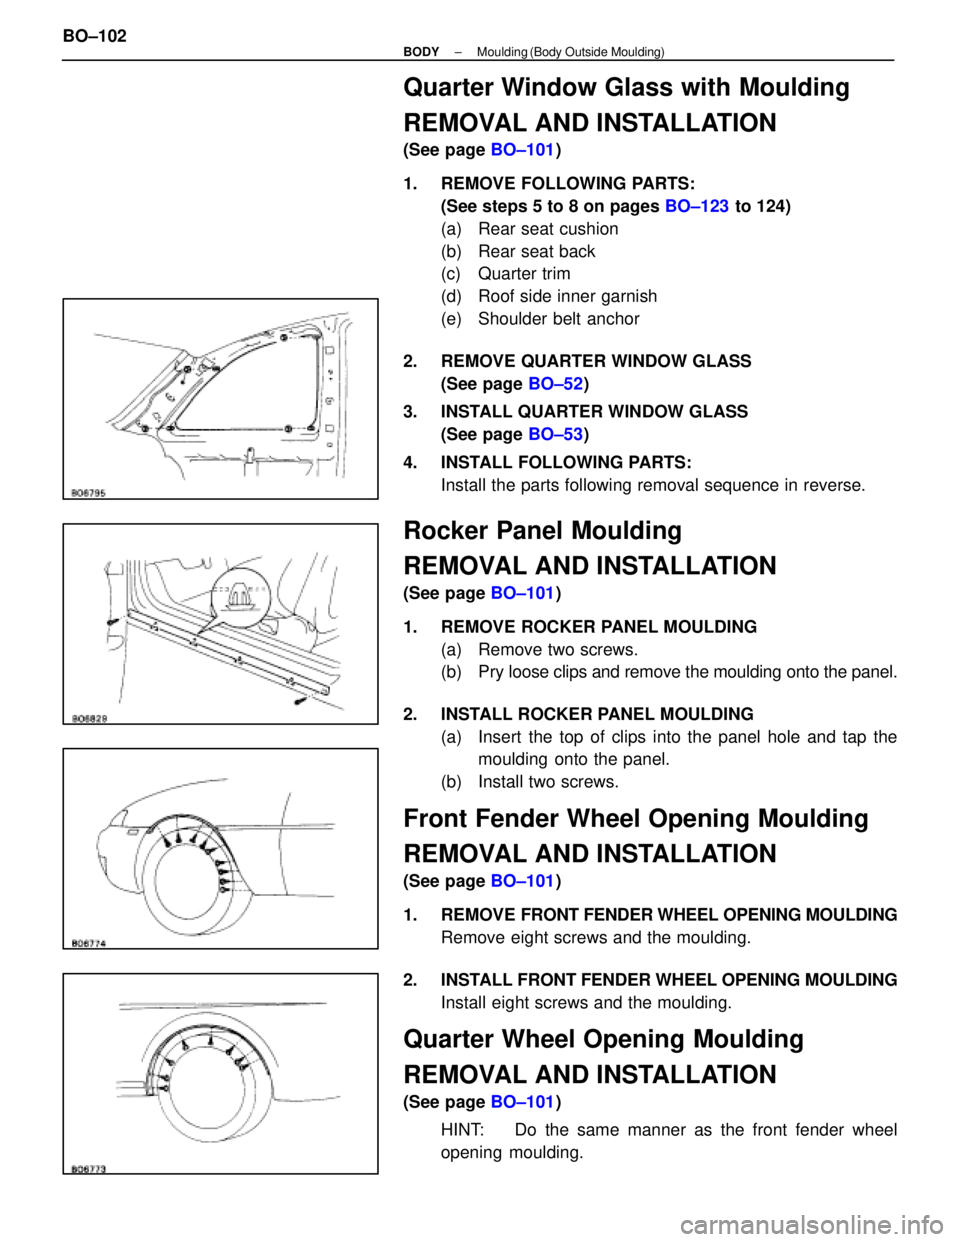
1. REMOVE FOLLOWING PARTS: (See steps 5 to 8 on pages BO±123 to 124)
(a) Rear seat cushion
(b) Rear seat back
(c) Quarter trim
(d) Roof side inner garnish
(e) Shoulder belt anchor
2. REMOVE QUARTER WINDOW GLASS (See page BO±52)
3. INSTALL QUARTER WINDOW GLASS (See page BO±53)
4. INSTALL FOLLOWING PARTS: Install the parts following removal sequence in reverse.
Rocker Panel Moulding
REMOVAL AND INSTALLATION
(See page BO±101)
1. REMOVE ROCKER PANEL MOULDING (a) Remove two screws.
(b) Pry l oose clips and remove the moulding onto the panel.
2. INSTALL ROCKER PANEL MOULDING (a) Insert the top of clips into the panel hole and tap themoulding onto the panel.
(b) Install two screws.
Front Fender Wheel Opening Moulding
REMOVAL AND INSTALLATION
(See page BO±101)
1. REMOVE FRONT FENDER WHEEL OPENING MOULDING
Remove eight screws and the moulding.
2. INSTALL FRONT FENDER WHEEL OPENING MOULDING Install eight screws and the moulding.
Quarter Wheel Opening Moulding
REMOVAL AND INSTALLATION
(See page BO±101)
HINT: Do the same manner as the front fender wheel
opening moulding.
BO±102
±
BODY Moulding (Body Outside Moulding)
WhereEverybodyKnowsYourName
Page 472 of 4087
REMOVAL OF FLOOR CARPET
1. REMOVE FOLLOWING PARTS:
wFront seat (See step 3 on page BO±58)
wRear seat (See steps 1 to 2 on page BO±66)
wRoof side inner garnish (See step 8 on page BO±123)
wFront pillar garnish (See step 2 on page BO±122)
wFront scuff plate (See step 11 on page BO±123)
wConsole box (See step 14 on page BO±111)
2. REMOVE FLOOR CARPET (a) Using a clip remover, remove the clips.
(b) Remove the front seat belt lower bolt.
[Driver 's Side]
(c) Raise the end of the carpet and disconnect the hook.
[Passenger 's Side]
(d) Raise the end of the carpet and disconnect the hook.
(e) Slide the carpet backward and remove it.
±
BODY Floor CarpetBO±117
WhereEverybodyKnowsYourName
Page 473 of 4087
INSTALLATION OF FLOOR CARPET
(See page BO±117)
INSTALL FLOOR CARPET PARTS BY FOLLOWING REMOVAL
SEQUENCE IN REVERSE HINT: Torque following parts.
(a) Front seat belt lower anchor bolt
Torque: 43 N Vm (440 kgf Vcm, 32 ft Vlbf)
(b) Front Seat
Torque: 37 N Vm (375 kgf Vcm, 27 ft Vlbf)
BO±118±
BODY Floor Carpet
WhereEverybodyKnowsYourName
Page 475 of 4087
REMOVAL OF ROOF HEADLINING
(See page BO±119)
1. REMOVE FOLLOWING PARTS:
wFront pillar garnish
wSun visor
wRear seat back and cushion
wRoof side inner garnish
wQuarter trim
wInterior Light
wCenter visor
2. REMOVE ROOF HEADLINING (a) Disconnect four clips from the roof panel rear end.
(b) Using a clip remover, remove six clips.
(c) R e l e a s e t h e f a s t ener tapes, then remove the
headlining.
(d) Fully recline the front seat back.
(e) Bring out the headlining as shown.
NOTICE: Do not fold down the headlining.
INSTALLATION OF ROOF HEADLINING
(See page BO±119)
INSTALL ROOF HEADLINING PARTS BY FOLLOWING RE-
MOVAL SEQUENCE IN REVERSE HINT: Torque following parts:
(a) Rear seat back
Torque: 18 N Vm (185 kgf Vcm, 13 ft Vlbf)
(b) Rear seat belt inner belt
Torque: 43 N Vm (440 kgf Vcm, 32 ft Vlbf)
(c) Front seat belt shoulder anchor bolt
Torque: 43 N Vm (440 kgf Vcm, 32 ft Vlbf)
BO±120±
BODY Roof Headlining
WhereEverybodyKnowsYourName