Page 542 of 4087
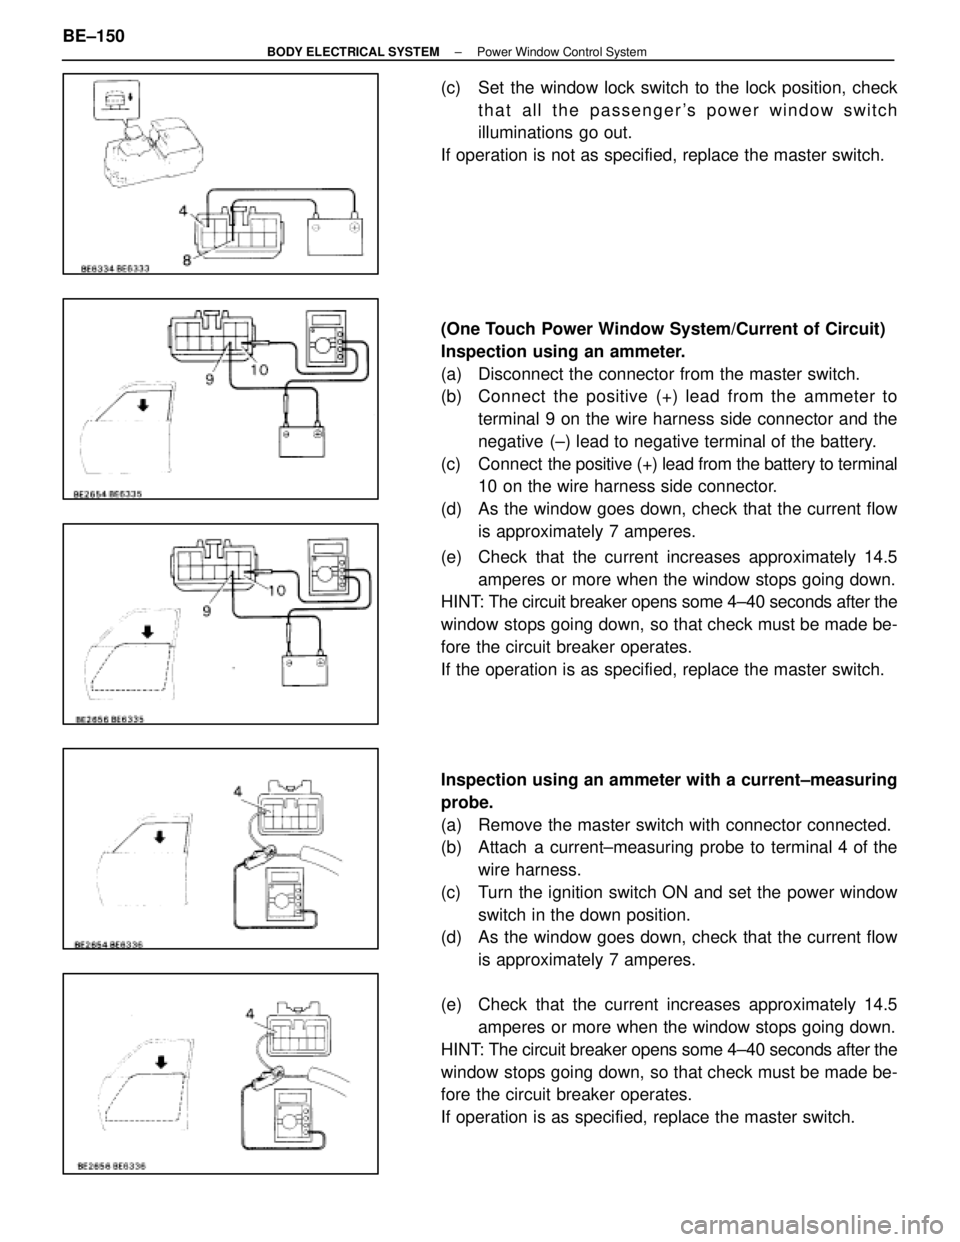
(c) Set the window lock switch to the lock position, checkthat all the passenger's power window switch
illuminations go out.
If operation is not as specified, replace the master switch.
(One Touch Power Window System/Current of Circuit)
Inspection using an ammeter.
(a) Disconnect the connector from the master switch.
(b) C onnect the positive (+) lead from the ammeter to
terminal 9 on the wire harness side connector and the
negative (±) lead to negative terminal of the battery.
(c) Connect the positive (+) lead from the battery to terminal
10 on the wire harness side connector.
(d) As the window goes down, check that the current flow is approximately 7 amperes.
(e) Check that the current increases approximately 14.5 amperes or more when the window stops going down.
HINT: The circuit breaker opens some 4±40 seconds after the
window stops going down, so that check must be made be-
fore the circuit breaker operates.
If the operation is as specified, replace the master switch.
Inspection using an ammeter with a current±measuring
probe.
(a) Remove the master switch with connector connected.
(b) Attach a current±measuring probe to terminal 4 of the
wire harness.
(c) Turn the ignition switch ON and set the power window switch in the down position.
(d) As the window goes down, check that the current flow
is approximately 7 amperes.
(e) Check that the current increases approximately 14.5 amperes or more when the window stops going down.
HINT: The circuit breaker opens some 4±40 seconds after the
window stops going down, so that check must be made be-
fore the circuit breaker operates.
If operation is as specified, replace the master switch.
BE±150
±
BODY ELECTRICAL SYSTEM Power Window Control System
WhereEverybodyKnowsYourName
Page 543 of 4087
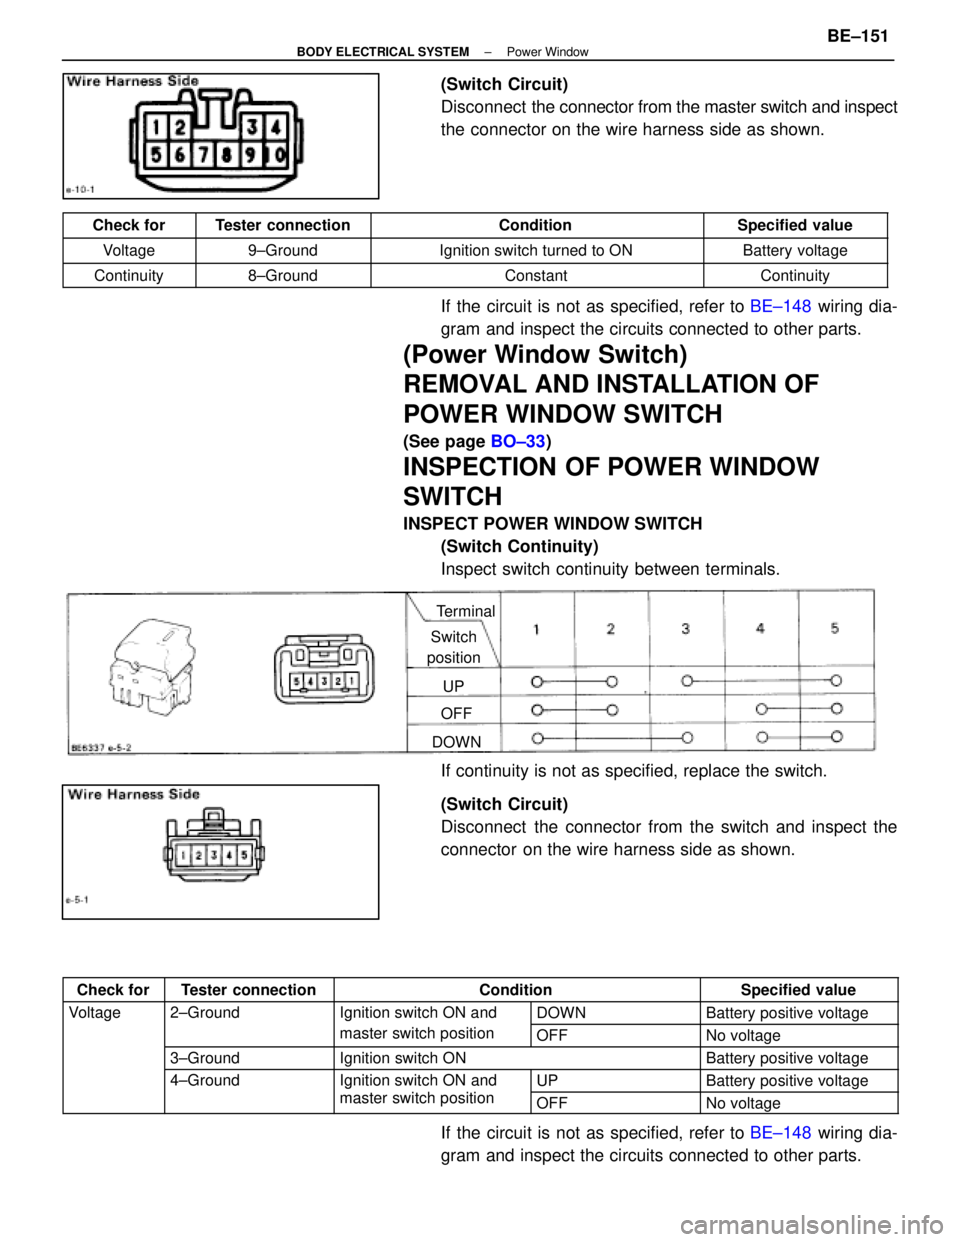
(Switch Circuit)
Disconnect the connector from the master switch and inspect
the connector on the wire harness side as shown.
Check forTester connectionConditionSpecified value
Voltage9±GroundIgnition switch turned to ONBattery voltage
Continuity8±GroundConstantContinuity
If the circuit is not as specified, refer to BE±148 wiring dia-
gram and inspect the circuits connected to other parts.
(Power Window Switch)
REMOVAL AND INSTALLATION OF
POWER WINDOW SWITCH
(See page BO±33)
INSPECTION OF POWER WINDOW
SWITCH
INSPECT POWER WINDOW SWITCH
(Switch Continuity)
Inspect switch continuity between terminals.
Terminal
Switch
position
UP
OFF
DOWN
If continuity is not as specified, replace the switch.
(Switch Circuit)
Disconnect the connector from the switch and inspect the
connector on the wire harness side as shown.
Check forTester connectionConditionSpecified value
Voltage2±GroundIgnition switch ON andDOWNBattery positive voltagegg
master switch positionOFFNo voltage
3±GroundIgnition switch ONBattery positive voltage
4±GroundIgnition switch ON and UPBattery positive voltageg
master switch positionOFFNo voltage
If the circuit is not as specified, refer to BE±148 wiring dia-
gram and inspect the circuits connected to other parts.
±
BODY ELECTRICAL SYSTEM Power WindowBE±151
WhereEverybodyKnowsYourName
Page 547 of 4087
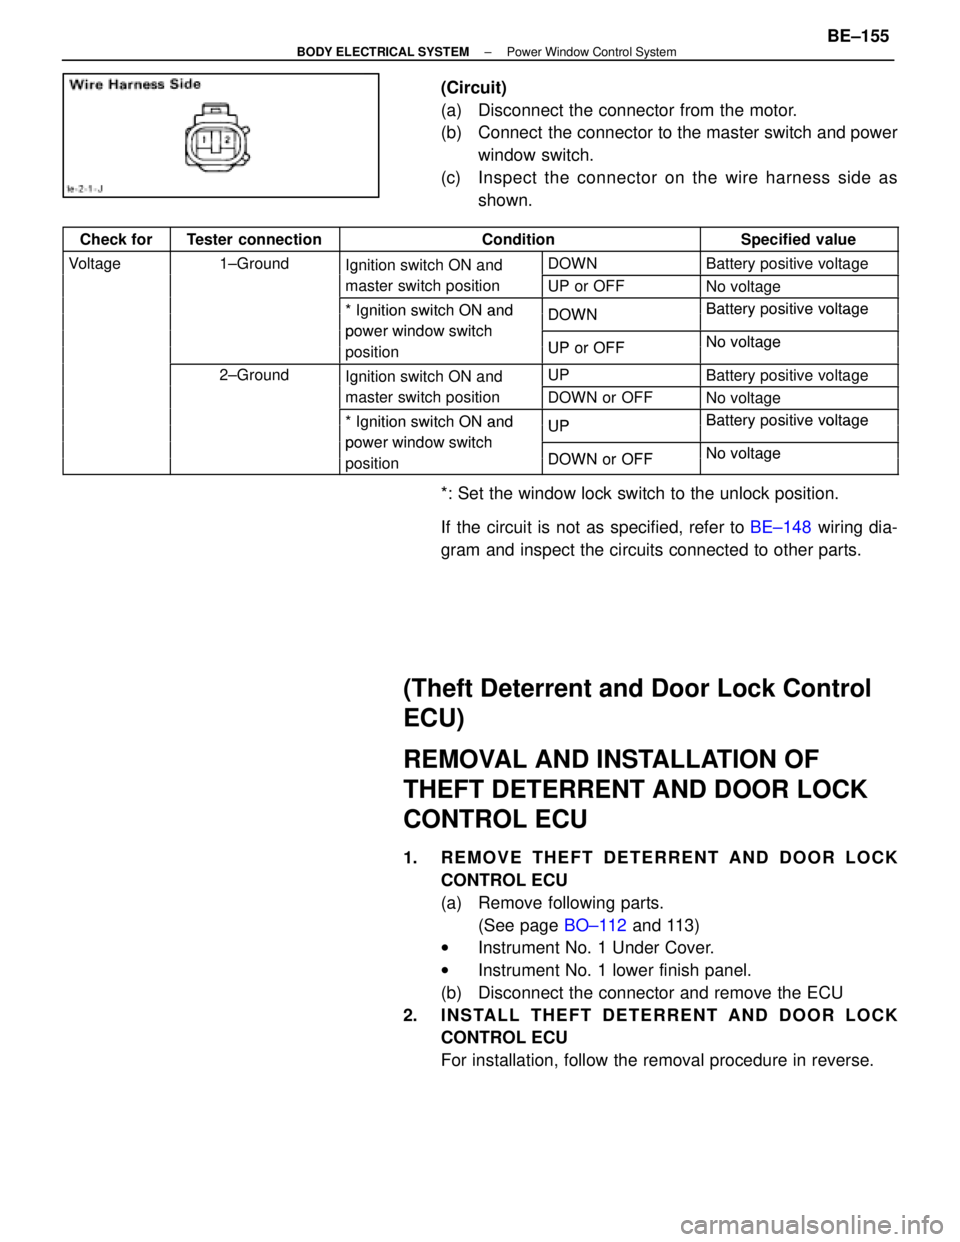
(Circuit)
(a) Disconnect the connector from the motor.
(b) Connect the connector to the master switch and powerwindow switch.
(c) Inspect the c onnector on the wire harness side as
shown.
Check forTester connectionConditionSpecified value
Voltage1±GroundIgnition switch ON andDOWNBattery positive voltagegIgnition switch ON and
master switch positionUP or OFFNo voltage
*Ignition switch ON andDOWNBatterypositive voltage* Ignition switch ON and
power window switch
DOWNBattery ositive voltage
power window switch
iti
UP or OFFNo voltagepositionUP or OFFNo voltage
2±GroundIgnition switch ON andUPBattery positive voltageIgnition switch ON and
master switch positionDOWN or OFFNo voltage
*Ignition switch ON andUPBatterypositive voltage* Ignition switch ON and
power window switch
UPBattery ositive voltage
power window switch
iti
DOWN or OFFNo voltagepositionDOWN or OFFNo voltage
*: Set the window lock switch to the unlock position.
If the circuit is not as specified, refer to BE±148 wiring dia-
gram and inspect the circuits connected to other parts.
(Theft Deterrent and Door Lock Control
ECU)
REMOVAL AND INSTALLATION OF
THEFT DETERRENT AND DOOR LOCK
CONTROL ECU
1. REMOVE THEFT DETERRENT AND DOOR LOCK CONTROL ECU
(a) Remove following parts.(See page BO±112 and 113)
w Instrument No. 1 Under Cover.
w Instrument No. 1 lower finish panel.
(b) Disconnect the connector and remove the ECU
2. INSTALL THEFT DETERRENT AND DOOR LOCK CONTROL ECU
For installation, follow the removal procedure in reverse.
±
BODY ELECTRICAL SYSTEM Power Window Control SystemBE±155
WhereEverybodyKnowsYourName
Page 548 of 4087
INSPECTION OF THEFT DETERRENT
AND DOOR LOCK CONTROL ECU
INSPECT THEFT DETERRENT AND DOOR LOCK CONTROL
ECU(Circuit)
(a) Inspect ECU Power Source Circuit.(See page BE±376)
(b) Inspect Actuator Power Source Circuit.
(See page BE±378)
(c) Inspect Ignition Switch Circuit. (See page BE±25)
(d) Inspect Door Open Detection Switch Circuit.
(See page BE±392)
If circuit is as specified, inspect ECU operation.
(Operation)
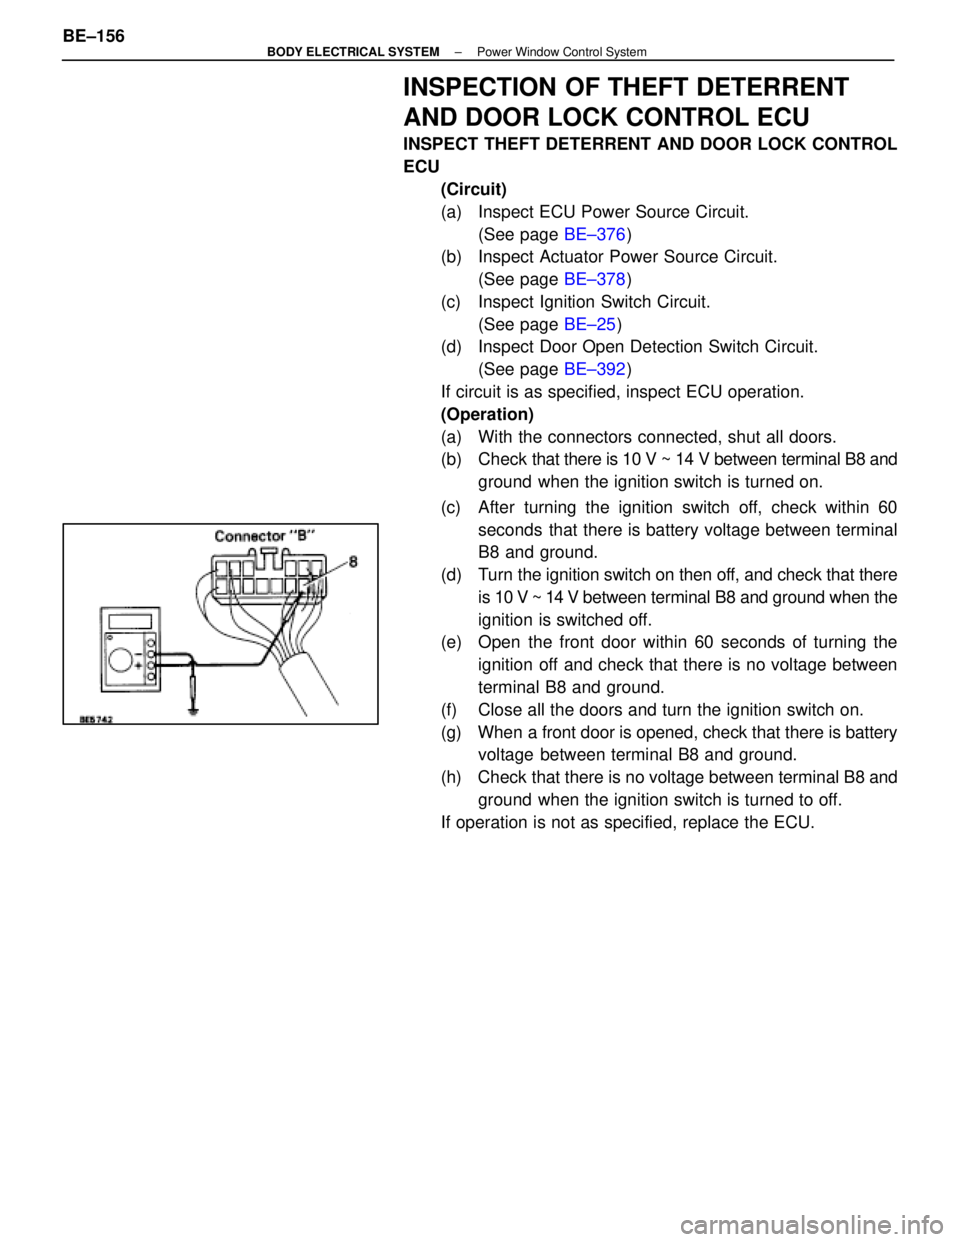
(a) With the connectors connected, shut all doors.
(b) Check that there is 10 V ~ 14 V between terminal B8 and
ground when the ignition switch is turned on.
(c) After turning the ignition switch off, check within 60 seconds that there is battery voltage between terminal
B8 and ground.
(d) Turn the ignition switch on then off, and check that there
is 10 V ~ 14 V between terminal B8 and ground when the
ignition is switched off.
(e) Open the front door within 60 seconds of turning the
ignition off and check that there is no voltage between
terminal B8 and ground.
(f) Close all the doors and turn the ignition switch on.
(g) When a front door is opened, check that there is battery voltage between terminal B8 and ground.
(h) Check that there is no voltage between terminal B8 and ground when the ignition switch is turned to off.
If operation is not as specified, replace the ECU.
BE±156
±
BODY ELECTRICAL SYSTEM Power Window Control System
WhereEverybodyKnowsYourName
Page 549 of 4087

Troubleshooting
You will find the cause of trouble more easily by properly using the table \
shown below. In this table, the
numbers indicate the order of priority of the causes of trouble. Check each part in \
the order shown. If neces-
sary, replace the part.
See page
BE±4 ,21BE±4,21BE±4,20BE±4,20BE±156BE±152BE±149BE±151BE±152BE±26BE±392BE±4,20 ±±
Part
name
Trouble
AM1 FuseDOME FuseDOOR FusePOWER FuseTheft Deterrent and Door Lock Control ECUPower Window Main RelayPower Window Master SwitchPower Window SwitchPower Window MotorIgnition SwitchDoor Open Detection SwitchECU±IG FuseWire Harness
*1 Power window does not operate.1234
*2 Power window does not operate.35467218
ªOne Touch Power Window Systemº does
not operate.1
Only one window glass does not move.1234
ªWindow Lock Systemº does not operate1
ªWindow Lock Illuminationº does not light
up.1
Key±off power window does not operate124536
*1: Dook Lock does not operate.
*2: Dook Lock is normal.
±
BODY ELECTRICAL SYSTEM Power Window Control SystemBE±157
WhereEverybodyKnowsYourName
Page 552 of 4087
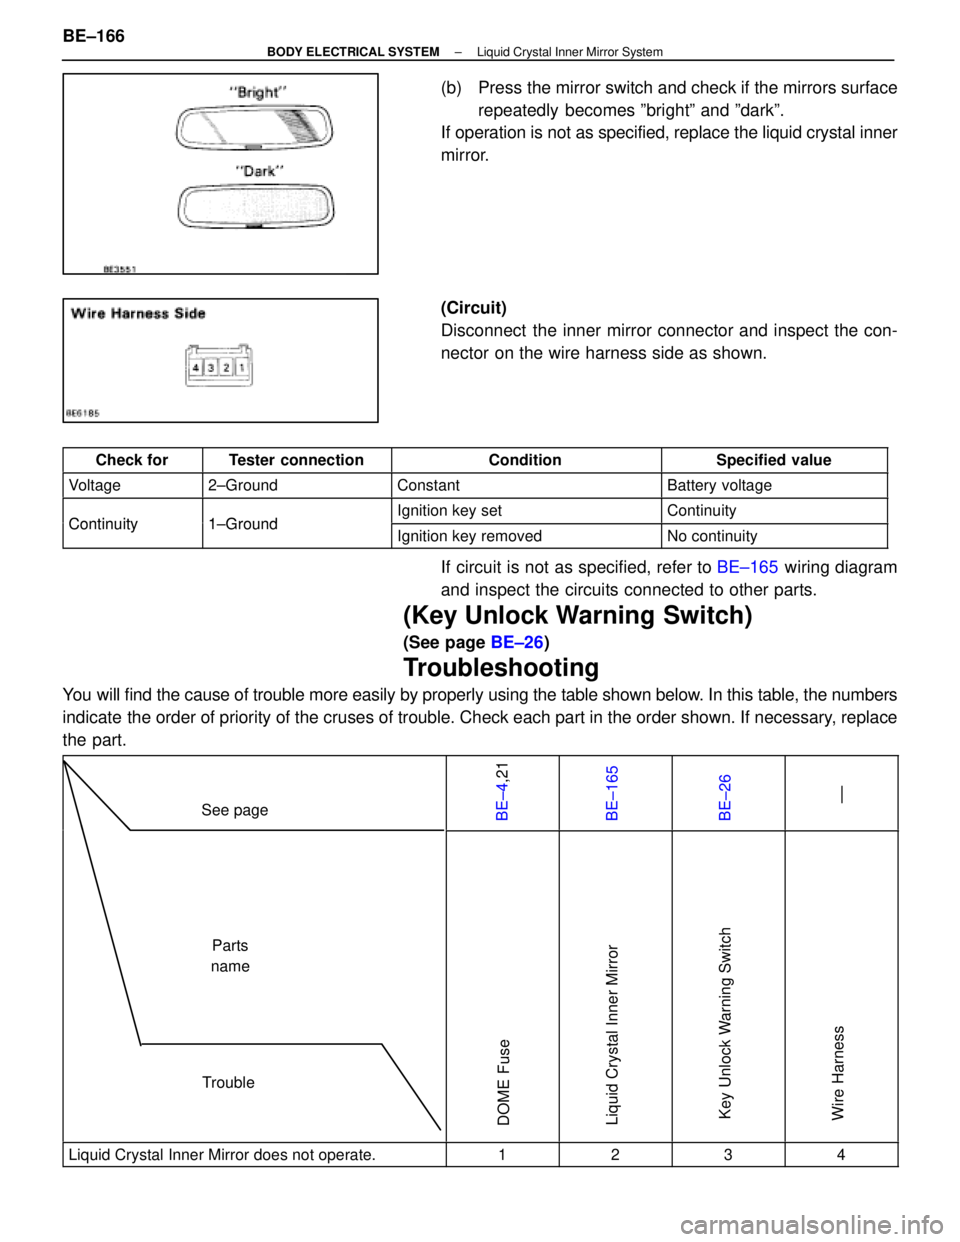
(b) Press the mirror switch and check if the mirrors surfacerepeatedly becomes ºbrightº and ºdarkº.
If operation is not as specified, replace the liquid crystal inner
mirror.
(Circuit)
Disconnect the inner mirror connector and inspect the con-
nector on the wire harness side as shown.
Check forTester connectionConditionSpecified value
Voltage2±GroundConstantBattery voltage
Continuity1 GroundIgnition key setContinuityContinuity1±GroundIgnition key removedNo continuity
If circuit is not as specified, refer to BE±165 wiring diagram
and inspect the circuits connected to other parts.
(Key Unlock Warning Switch)
(See page BE±26)
Troubleshooting
You will find the cause of trouble more easily by properly using the table \
shown below. In this table, the numbers
indicate the order of priority of the cruses of trouble. Check each part in the \
order shown. If necessary, replace
the part.
See pageBE±4,21BE±165BE±26 ±±
TroubleParts
name
DOME FuseLiquid Crystal Inner MirrorKey Unlock Warning SwitchWire Harness
Liquid Crystal Inner Mirror does not operate.1234
BE±166±
BODY ELECTRICAL SYSTEM Liquid Crystal Inner Mirror System
WhereEverybodyKnowsYourName
Page 554 of 4087
Parts Inspection
(Tension Reducer Solenoid)
REMOVAL AND INSTALLATION OF
TENSION REDUCER SOLENOID
(See page BO±71)
INSPECTION OF TENSION REDUCER
SOLENOID
INSPECT TENSION REDUCER SOLENOID
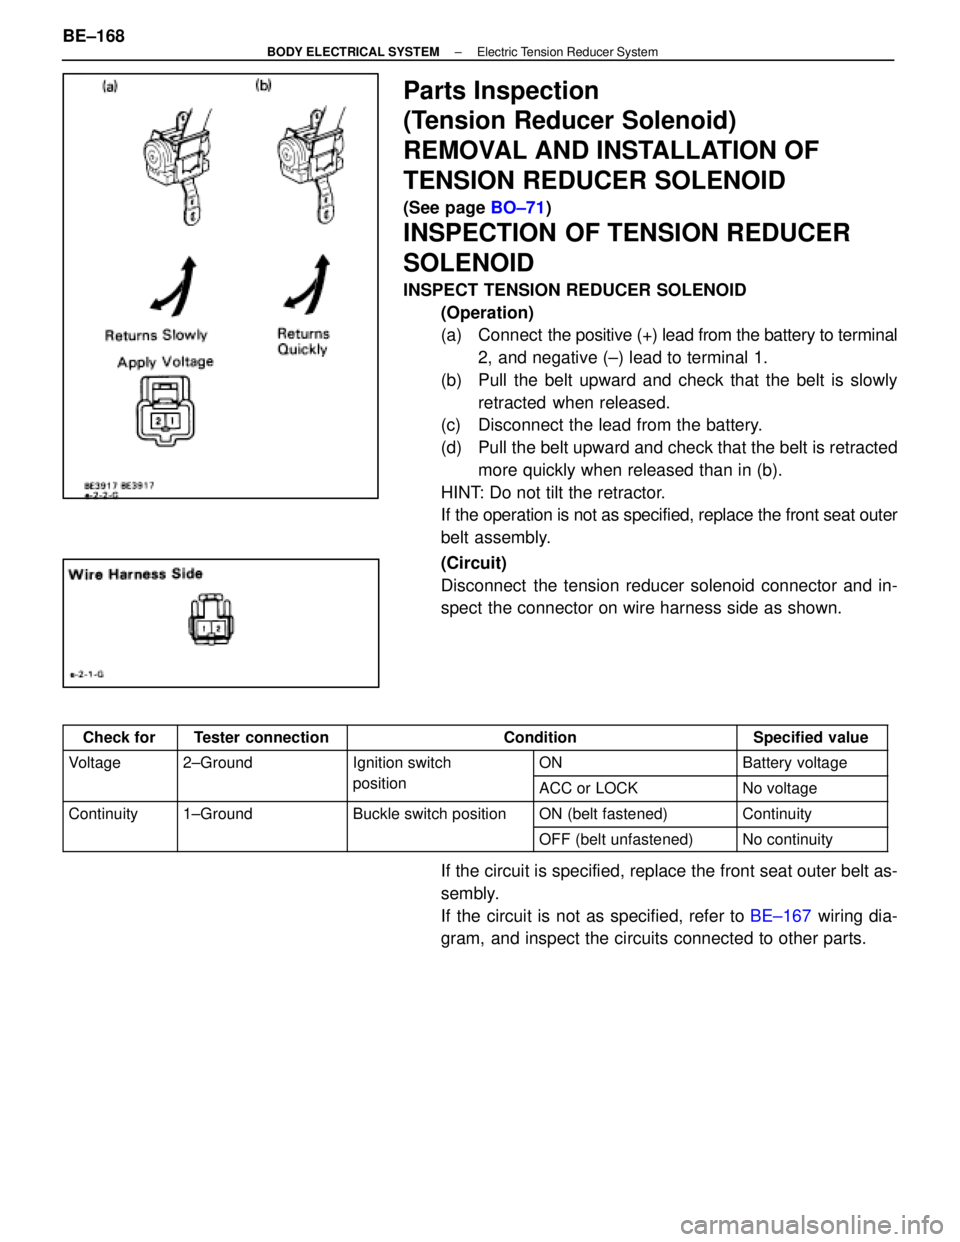
(Operation)
(a) Connect the positive (+) lead from the battery to terminal
2, and negative (±) lead to terminal 1.
(b) Pull the belt upward and check that the belt is slowly retracted when released.
(c) Disconnect the lead from the battery.
(d) Pull the belt upward and check that the belt is retracted
more quickly when released than in (b).
HINT: Do not tilt the retractor.
If the operation is not as specified, replace the front seat outer
belt assembly.
(Circuit)
Disconnect the tension reducer solenoid connector and in-
spect the connector on wire harness side as shown.
Check forTester connectionConditionSpecified value
Voltage2±GroundIgnition switchONBattery voltagegg
positionACC or LOCKNo voltage
Continuity1±GroundBuckle switch positionON (belt fastened)Continuityy
OFF (belt unfastened)No continuity
If the circuit is specified, replace the front seat outer belt as-
sembly.
If the circuit is not as specified, refer to BE±167 wiring dia-
gram, and inspect the circuits connected to other parts.
BE±168
±
BODY ELECTRICAL SYSTEM Electric Tension Reducer System
WhereEverybodyKnowsYourName
Page 555 of 4087
(Buckle Switch)
REMOVAL AND INSTALLATION OF
BUCKLE SWITCH
1. REMOVE BUCKLE SWITCH(a) Remove the driver or front passenger's seat.
(b) Disconnect buckle switch connector.
(c) Remove seat belt inner with buckle switch.
2. INSTALL BUCKLE SWITCH For installation follow the removal procedure in reverse.
INSPECTION OF BUCKLE SWITCH
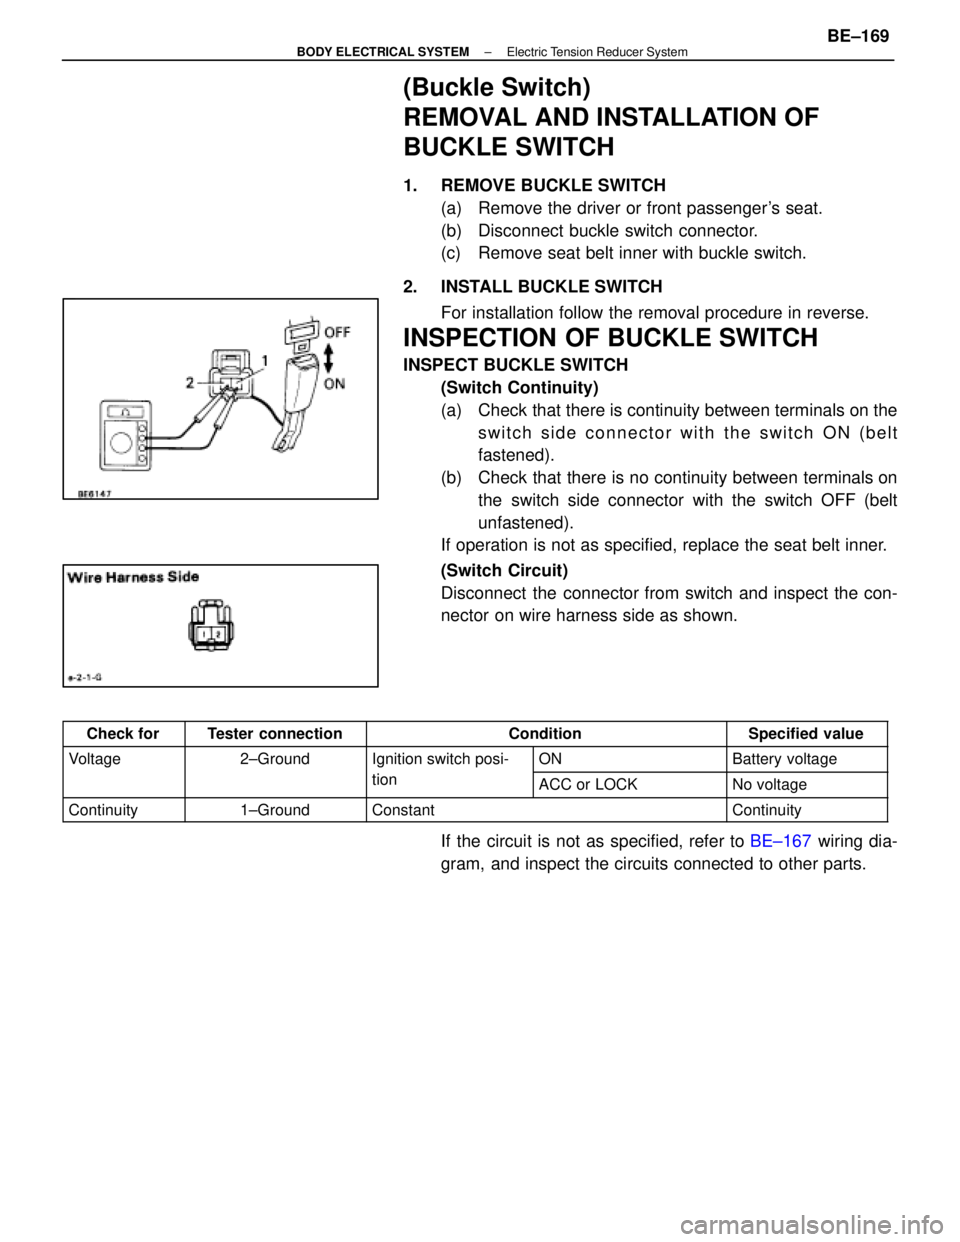
INSPECT BUCKLE SWITCH(Switch Continuity)
(a) Check that there is continuity between terminals on theswitch side connector with the switch ON (belt
fastened).
(b) Check that there is no continuity between terminals on the switch side connector with the switch OFF (belt
unfastened).
If operation is not as specified, replace the seat belt inner.
(Switch Circuit)
Disconnect the connector from switch and inspect the con-
nector on wire harness side as shown.
Check forTester connectionConditionSpecified value
Voltage2±GroundIgnition switch posi-ONBattery voltagegg
tionACC or LOCKNo voltage
Continuity1±GroundConstantContinuity
If the circuit is not as specified, refer to BE±167 wiring dia-
gram, and inspect the circuits connected to other parts.
±
BODY ELECTRICAL SYSTEM Electric Tension Reducer SystemBE±169
WhereEverybodyKnowsYourName