Page 1524 of 4087
31. REMOVE TAILPIPE
(a) Remove the 4 nuts holding the tailpipes to the center exhaust
pipe.
(b) Disconnect the hook from the ring on tailpipe bracket, and remove the tailpipe and gasket. Remove the 2 tailpipes.
32. REMOVE CENTER EXHAUST PIPE Disconnect the 2 hooks of the exhaust pipe from the rings on
exhaust pipe brackets, and remove the exhaust pipe.
33. REMOVE HEAT INSULATOR FOR FRONT EXHAUST PIPE
Remove the 4 nuts and heat insulator.
34. REMOVE CENTER FLOOR CROSSMEMBER BRACE Remove the 4 bolts and crossmember brace.
35. REMOVE PROPELLER SHAFT (See page PR±6)
EG±148
±
1UZ±FE ENGINE ENGINE MECHANICAL
WhereEverybodyKnowsYourName
Page 1569 of 4087
2. CONNECT TRANSMISSION CONTROL ROD FROMSHIFT LEVER
Connect the control rod to the shift lever with the nut.
3. INSTALL PROPELLER SHAFT (See page PR±12)
4. INSTALL CENTER FLOOR CROSSMEMBER BRACE Install the crossmember brace with the 4 nuts.
Torque: 13 N Vm (130 kgf Vcm, 9 ft Vlbf)
5. INSTALL HEAT INSULATOR FOR FRONT EXHAUST PIPE
Install the heat insulator with the 4 bolts.
6. INSTALL CENTER EXHAUST PIPE Install the 2 hooks of the exhaust pipe to the rings on the ex-
haust pipe brackets.
±
1UZ±FE ENGINE ENGINE MECHANICALEG±193
WhereEverybodyKnowsYourName
Page 1570 of 4087

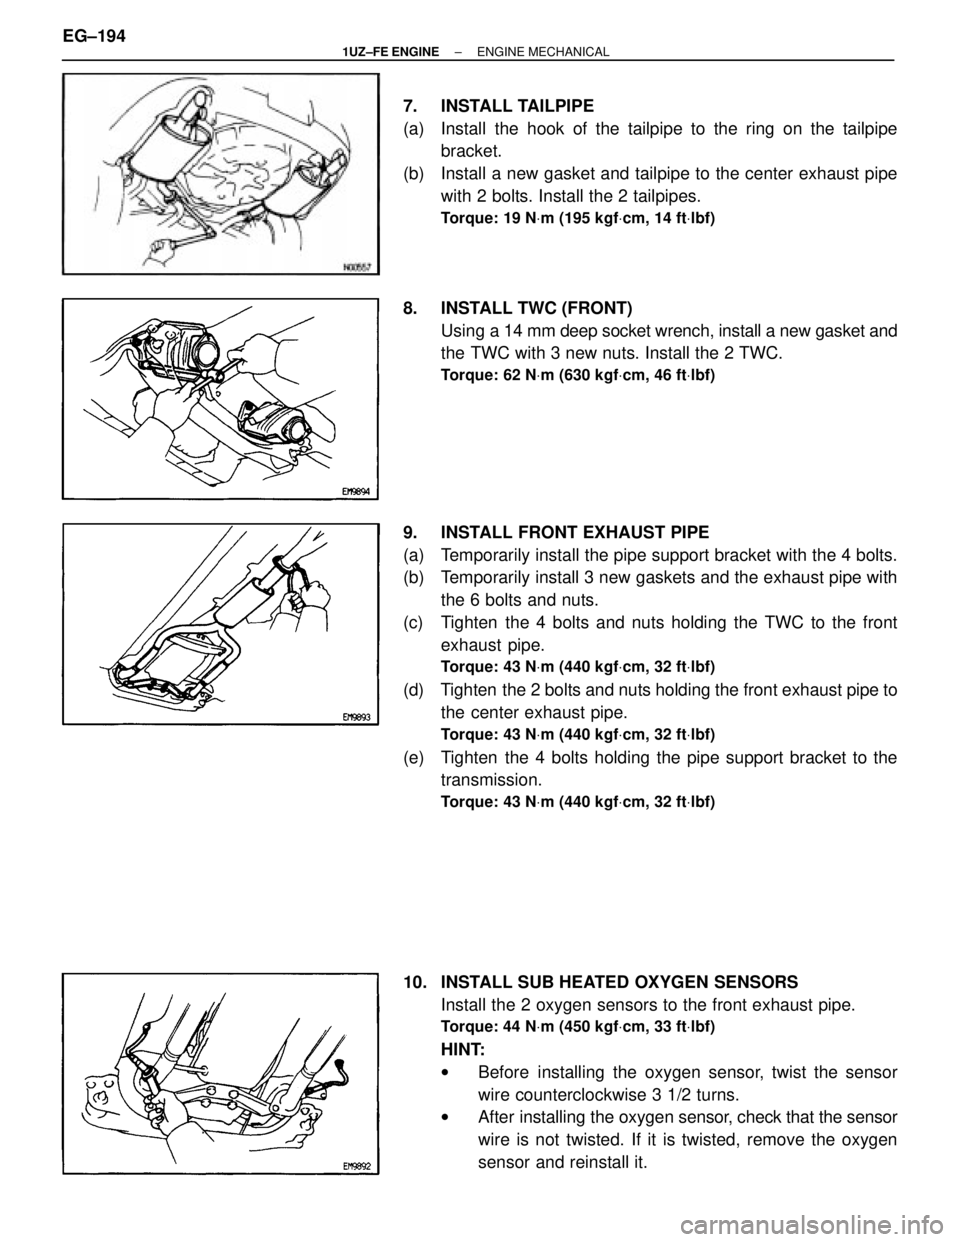
7. INSTALL TAILPIPE
(a) Install the hook of the tailpipe to the ring on the tailpipebracket.
(b) Install a new gasket and tailpipe to the center exhaust pipe with 2 bolts. Install the 2 tailpipes.
Torque: 19 N Vm (195 kgf Vcm, 14 ft Vlbf)
8. INSTALL TWC (FRONT)
Using a 14 mm deep socket wrench, install a new gasket and
the TWC with 3 new nuts. Install the 2 TWC.
Torque: 62 N Vm (630 kgf Vcm, 46 ft Vlbf)
9. INSTALL FRONT EXHAUST PIPE
(a) Temporarily install the pipe support bracket with the 4 bolts.
(b) Temporarily install 3 new gaskets and the exhaust pipe with
the 6 bolts and nuts.
(c) Tighten the 4 bolts and nuts holding the TWC to the front exhaust pipe.
Torque: 43 N Vm (440 kgf Vcm, 32 ft Vlbf)
(d) Tighten the 2 bolts and nuts holding the front exhaust pipe to
the center exhaust pipe.
Torque: 43 N Vm (440 kgf Vcm, 32 ft Vlbf)
(e) Tighten the 4 bolts holding the pipe support bracket to the
transmission.
Torque: 43 N Vm (440 kgf Vcm, 32 ft Vlbf)
10. INSTALL SUB HEATED OXYGEN SENSORS
Install the 2 oxygen sensors to the front exhaust pipe.
Torque: 44 N Vm (450 kgf Vcm, 33 ft Vlbf)
HINT:
w Before installing the oxygen sensor, twist the sensor
wire counterclockwise 3 1/2 turns.
w After installing the oxygen sensor, check that the sensor
wire is not twisted. If it is twisted, remove the oxygen
sensor and reinstall it.
EG±194
±
1UZ±FE ENGINE ENGINE MECHANICAL
WhereEverybodyKnowsYourName
Page 1580 of 4087
EXHAUST SYSTEM
COMPONENTS
EG24S±01
EG±204±
1UZ ± FE ENGINE ENGINE MECHANICAL
WhereEverybodyKnowsYourName
Page 1591 of 4087
(i) Remove the bolt holding the engine wire clamp to theheater water valve bracket.
(j) Remove the two bolts holding the engine wire clamp to the body.
(k) Pull out the engine wire from the cabin.
28. REMOVE FRONT EXHAUST PIPE (a) Disconnect the grommet from the floor, and disconnectthe sub±oxygen sensor from the exhaust pipe.
Disconnect the two sub±oxygen sensors.
(b) Remove the four bolts holding the front exhaust pipe to the transmission.
(c) Remove the two bolts and nuts holding the front exhaust
pipe to the center exhaust pipe.
(d) Re mo ve th e fo u r bo lts an d nu ts ho ld in g th e fro n t
exhaust pipe to the catalytic converter. Remove the pipe
support stay, front exhaust pipe and three gaskets.
29. REMOVE CATALYTIC CONVERTERS (MAIN) Remove the three nuts, catalytic converter and gasket. Re-
move the two catalytic converters.
EM±126
±
ENGINE MECHANICAL Cylinder Block
WhereEverybodyKnowsYourName
Page 1592 of 4087
30. REMOVE TAILPIPES(a) Remove the four bolts holding the tailpipes to the centerexhaust pipe.
(b) Disconnect the tailpipe hook from the ring on tailpipe
bracket, and remove the tailpipe and gasket. Remove
the two tailpipes.
31. REMOVE CENTER EXHAUST PIPE Disconnect the two hooks of the exhaust pipe from the rings
on exhaust pipe brackets, and remove the center exhaust
pipe.
32. REMOVE EXHAUST PIPE HEAT INSULATOR Remove the four nuts and heat insulator.
33. REMOVE CENTER FLOOR BRACE Remove the four bolts and brace.
34. REMOVE PROPELLER SHAFT (See PR section)
±
ENGINE MECHANICAL Cylinder BlockEM±127
WhereEverybodyKnowsYourName
Page 1633 of 4087
4. INSTALL PROPELLER SHAFT(See PR section)
5. INSTALL CENTER FLOOR BRACE Install the brace with the four nuts.
Torque: 13 N Vm (130 kgf Vcm, 9 ft Vlbf)
6. INSTALL EXHAUST PIPE HEAT INSULATOR
Install the heat insulator with the four nuts.
7. INSTALL CENTER EXHAUST PIPE Install the two hooks of the exhaust pipe to the rings on the
exhaust pipe brackets.
8. INSTALL TAILPIPE (a) Install the tailpipe hook to the ring on the tailpipebrackets.
(b) Install a new gasket and the tailpipe to the center exhaust pipe with the two bolts. Install the two tailpipe.
Torque: 19 N Vm (195 kgf Vcm, 14 ft Vlbf)
EM±168±
ENGINE MECHANICAL Cylinder Block
WhereEverybodyKnowsYourName
Page 1634 of 4087

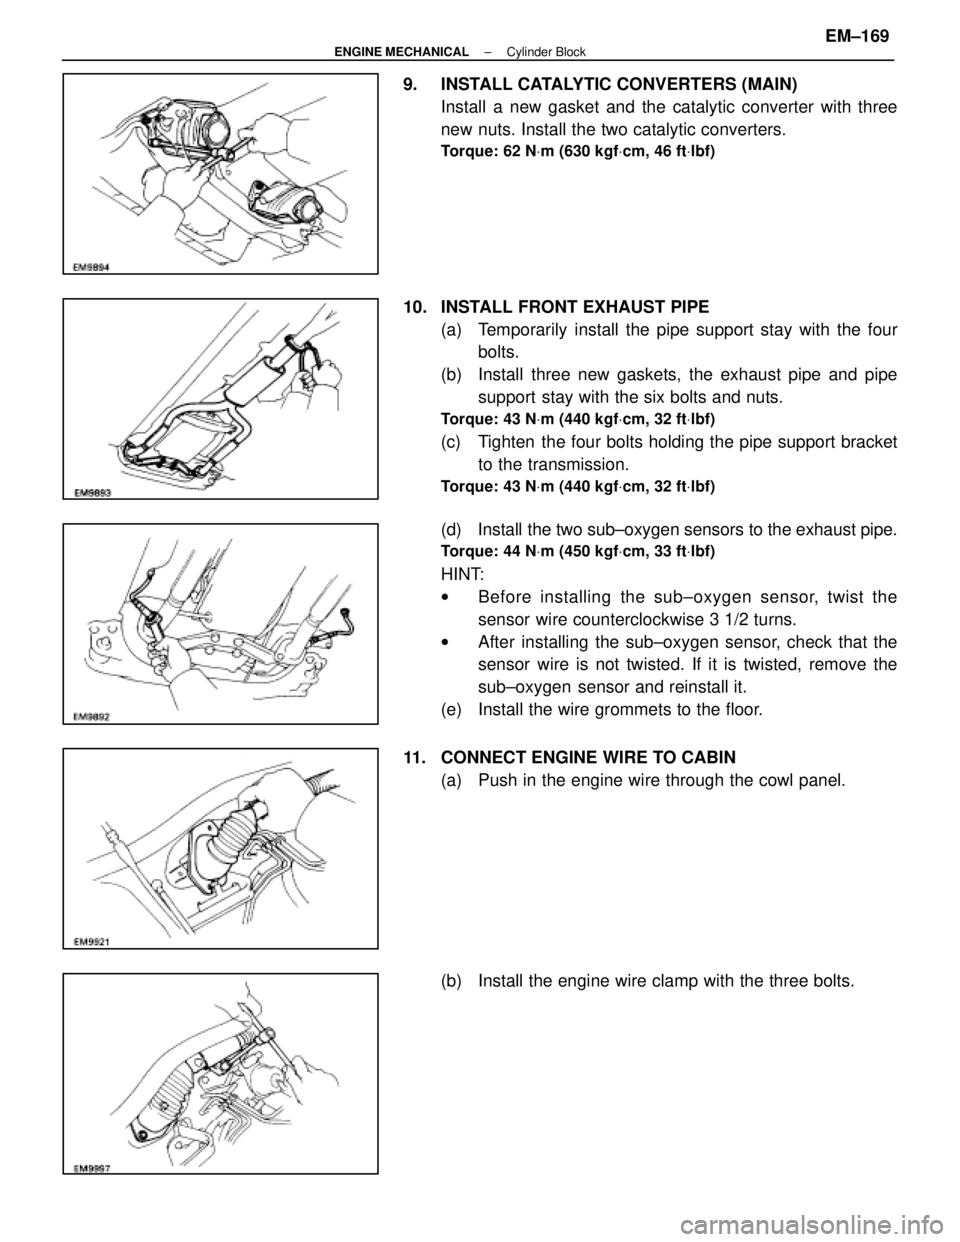
9. INSTALL CATALYTIC CONVERTERS (MAIN)Install a new gasket and the catalytic converter with three
new nuts. Install the two catalytic converters.
Torque: 62 N Vm (630 kgf Vcm, 46 ft Vlbf)
10. INSTALL FRONT EXHAUST PIPE
(a) Temporarily install the pipe support stay with the fourbolts.
(b) Install three new gaskets, the exhaust pipe and pipe support stay with the six bolts and nuts.
Torque: 43 N Vm (440 kgf Vcm, 32 ft Vlbf)
(c) Tighten the four bolts holding the pipe support bracket
to the transmission.
Torque: 43 N Vm (440 kgf Vcm, 32 ft Vlbf)
(d) Install the two sub±oxygen sensors to the exhaust pipe.
Torque: 44 N Vm (450 kgf Vcm, 33 ft Vlbf)
HINT:
w Before installing the s ub±oxygen sensor, twist the
sensor wire counterclockwise 3 1/2 turns.
w After installing the sub±oxygen sensor, check that the
sensor wire is not twisted. If it is twisted, remove the
sub±oxygen sensor and reinstall it.
(e) Install the wire grommets to the floor.
11. CONNECT ENGINE WIRE TO CABIN (a) Push in the engine wire through the cowl panel.
(b) Install the engine wire clamp with the three bolts.
±
ENGINE MECHANICAL Cylinder BlockEM±169
WhereEverybodyKnowsYourName