Page 12 of 136
![HONDA CIVIC 1991 Owners Manual [Sedan]
Wearing the Front Seat Belts
The front seats have automatic ("passive") restraint systems consisting of shoulder belts and knee bolsters. For your safety, the manual lap belts must be HONDA CIVIC 1991 Owners Manual [Sedan]
Wearing the Front Seat Belts
The front seats have automatic ("passive") restraint systems consisting of shoulder belts and knee bolsters. For your safety, the manual lap belts must be](/manual-img/13/57901/w960_57901-11.png)
[Sedan]
Wearing the Front Seat Belts
The front seats have automatic ("passive") restraint systems consisting of shoulder belts and knee bolsters. For your safety, the manual lap belts must be worn together with the automatic
shoulder belts. The shoulder belts must remain permanently latched.
The automatic and manual belts have emergency locking retractors
designed to lock only during a sudden stop or impact. Otherwise,
they allow some freedom of movement in the seat.
Operation
1.Enter the car and close the door
completely. Move the seat a
comfortable distance from the
steering wheel, sit straight up and
well back in the seat.
Never drive the car with the doors
ajar. The front doors must be
closed completely for the front
seat belts to function properly.
2. Turn the ignition ON. The shoulder belt buckle will move to its rear locked position. The length of the shoulder belt will adjust
automatically to your body and seating position.
Make sure the shoulder belt goes over your shoulder and across
your body to evenly distribute the belt's restraining force.
If the belt is too near your neck and throat, move toward the
center of the seat.
Normal movement of the shoulder belt buckle may cause injury. Be sure all parts of your body, especially fingers and hands, are
clear of the shoulder buckle while it is moving.
(cont'd)ProCarManuals.comMain Menu s t
Page 16 of 136
![HONDA CIVIC 1991 Owners Manual [Hatchback]
Wearing the Front Seat Berts The automatic ("passive") lap/shoulder belt systems with emer-
gency locking retractors are designed to lock only during a suddenstop or impact. Other HONDA CIVIC 1991 Owners Manual [Hatchback]
Wearing the Front Seat Berts The automatic ("passive") lap/shoulder belt systems with emer-
gency locking retractors are designed to lock only during a suddenstop or impact. Other](/manual-img/13/57901/w960_57901-15.png)
[Hatchback]
Wearing the Front Seat Berts The automatic ("passive") lap/shoulder belt systems with emer-
gency locking retractors are designed to lock only during a suddenstop or impact. Otherwise, they allow you some freedom of move-ment in the seat. The lap/shoulder belt must remain permanently
latched.
NOTE:
The motion sensing lock mechanisms for the front belts are located in each door. Therefore, if a door is opened too quickly, the belt may
lock and the door cannot be opened further. If this happens, close
the door and open it again more slowly. Enter the car and close the door completely.
If a door is not completely closed, the warning lights in the ceiling
and in the instrument panel will come on and the beeper will
sound when the ignition switch is turned on (see page 17).
The driver's seat should be moved to a comfortable distance from
the steering wheel. Sit straight up and well back in the seat.
The seat belt should fit snugly against your body. The shoulder portion of the belt should go over your shoulder and across your
body to evenly distribute the belt's restraining force. Check that the lap portion of the belt is positioned low on your
hipbone and below your abdomen. This way, if the car is involved
in an accident, you will be less likely to slide under the seat belts.
If the belt is too near your neck and throat, move toward the
center of the seat.
Never drive the car with the doors ajar. The front doors must be
closed completely for the front seat belts to function properly.
(cont'd)ProCarManuals.comMain Menu s t
Page 33 of 136
Tilt Steering
Tilt Steering (DX/Si Hatchback and Sedan)
The steering wheel position can be adjusted to suit the driver
preference.
1. Push the lever located on the left side of the steering column all the
way down and hold it while ad-
justing the steering wheel to the desired position.
2. Hold the steering wheel in the desired position and pull the lever
all the way up to lock it in place.
Do not adjust the steering wheel position while driving. After adjusting the steering wheel position, make sure it is
securely locked in place by "rocking" it up and down slightly.
Pull up
Push downProCarManuals.comMain Menu s t
Page 37 of 136

Lights
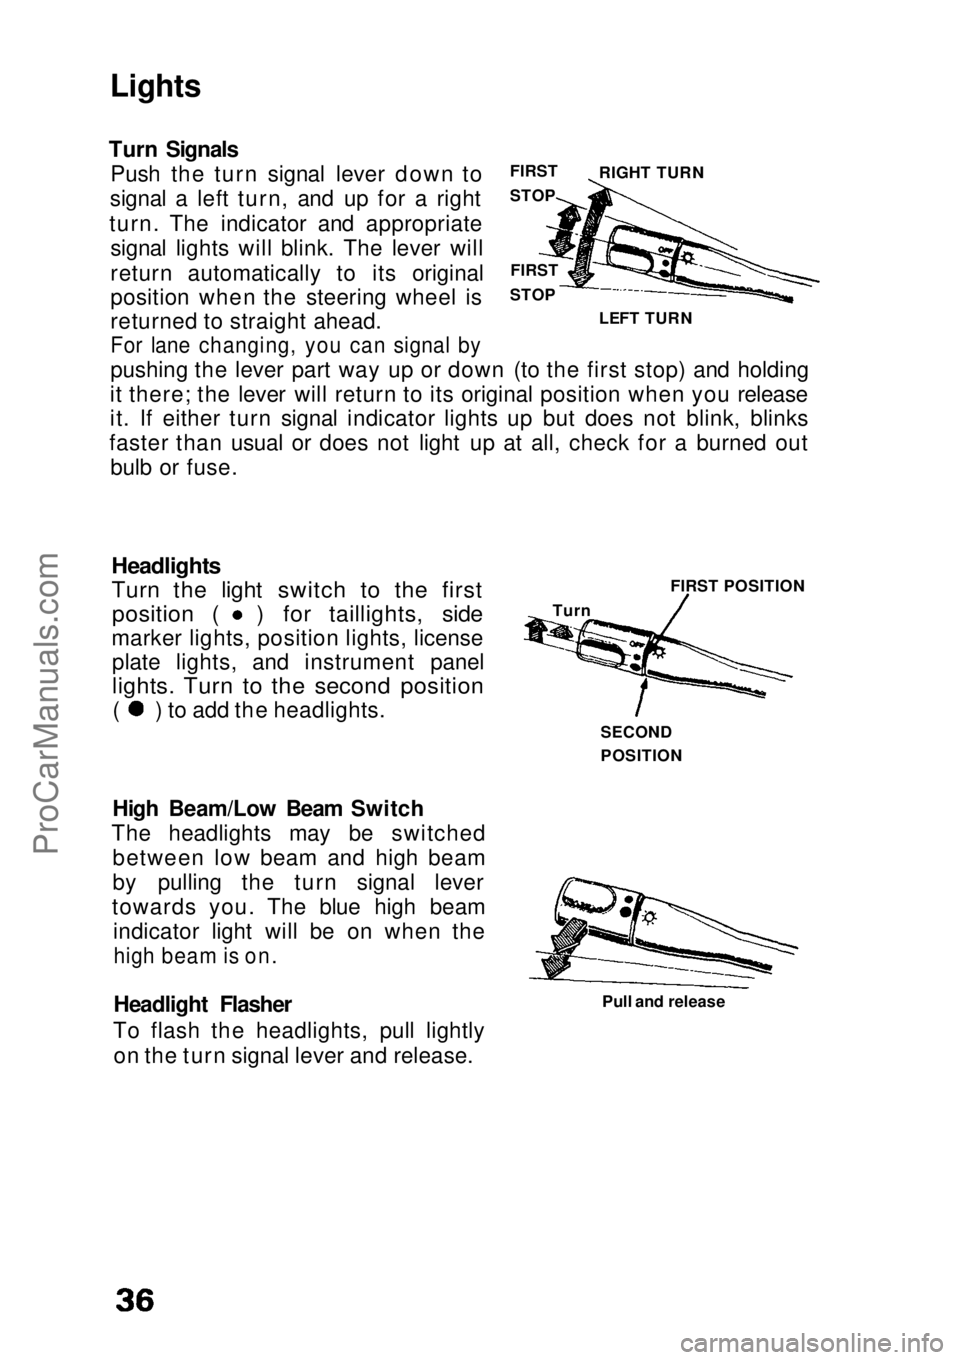
Turn Signals Push the turn signal lever down to
signal a left turn, and up for a right
turn. The indicator and appropriate signal lights will blink. The lever will
return automatically to its original
position when the steering wheel is
returned to straight ahead.
For lane changing, you can signal by
pushing the lever part way up or down (to the first stop) and holding
it there; the lever will return to its original position when you release
it. If either turn signal indicator lights up but does not blink, blinks
faster than usual or does not light up at all, check for a burned out bulb or fuse.
Headlights
Turn the light switch to the first
position ( ) for taillights, side
marker lights, position lights, license plate lights, and instrument panel
lights. Turn to the second position
( ) to add the headlights.
High Beam/Low Beam Switch
The headlights may be switched between low beam and high beam
by pulling the turn signal lever
towards you. The blue high beam indicator light will be on when the
high beam is on.
Headlight Flasher
To flash the headlights, pull lightly on the turn signal lever and release. Pull and release
FIRST
STOP
FIRST
STOP LEFT TURN RIGHT TURN
Turn FIRST POSITION
SECOND
POSITIONProCarManuals.comMain Menu s t
Page 40 of 136

Cruise Control (LX/EX Sedan)
Cruise Control
The Cruise Control system allows you to set and automatically maintain any speed above 25 mph (40 km/h) without keeping your
foot on the accelerator. As its name implies, it is meant for cruising
on straight, uncongested highways or freeways. It is not
recommended to be used in traffic, on winding roads or in bad
weather conditions where the driver should have total control.
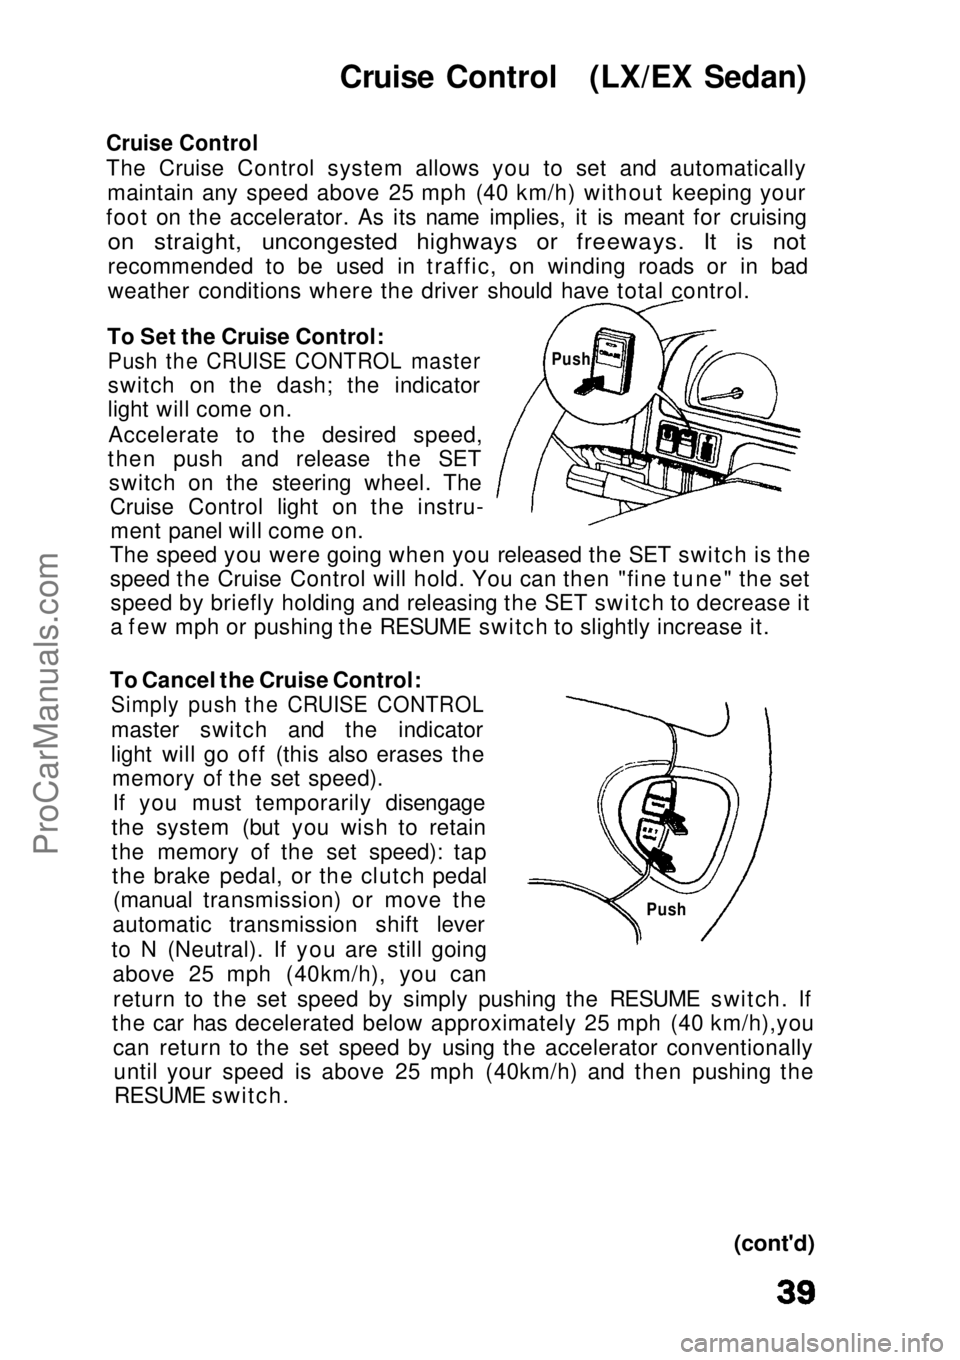
To Set the Cruise Control:
Push the CRUISE CONTROL master
switch on the dash; the indicator
light will come on.
Accelerate to the desired speed,
then push and release the SET switch on the steering wheel. TheCruise Control light on the instru-ment panel will come on.
The speed you were going when you released the SET switch is the
speed the Cruise Control will hold. You can then "fine tune" the set speed by briefly holding and releasing the SET switch to decrease it
a few mph or pushing the RESUME switch to slightly increase it.
To Cancel the Cruise Control:
Simply push the CRUISE CONTROL
master switch and the indicator
light will go off (this also erases thememory of the set speed).
If you must temporarily disengage
the system (but you wish to retain
the memory of the set speed): tap the brake pedal, or the clutch pedal (manual transmission) or move the
automatic transmission shift lever
to N (Neutral). If you are still going above 25 mph (40km/h), you can
return to the set speed by simply pushing the RESUME switch. If
the car has decelerated below approximately 25 mph (40 km/h),you
can return to the set speed by using the accelerator conventionallyuntil your speed is above 25 mph (40km/h) and then pushing theRESUME switch.
(cont'd)
Push
PushProCarManuals.comMain Menu s t
Page 58 of 136

Ignition Switch
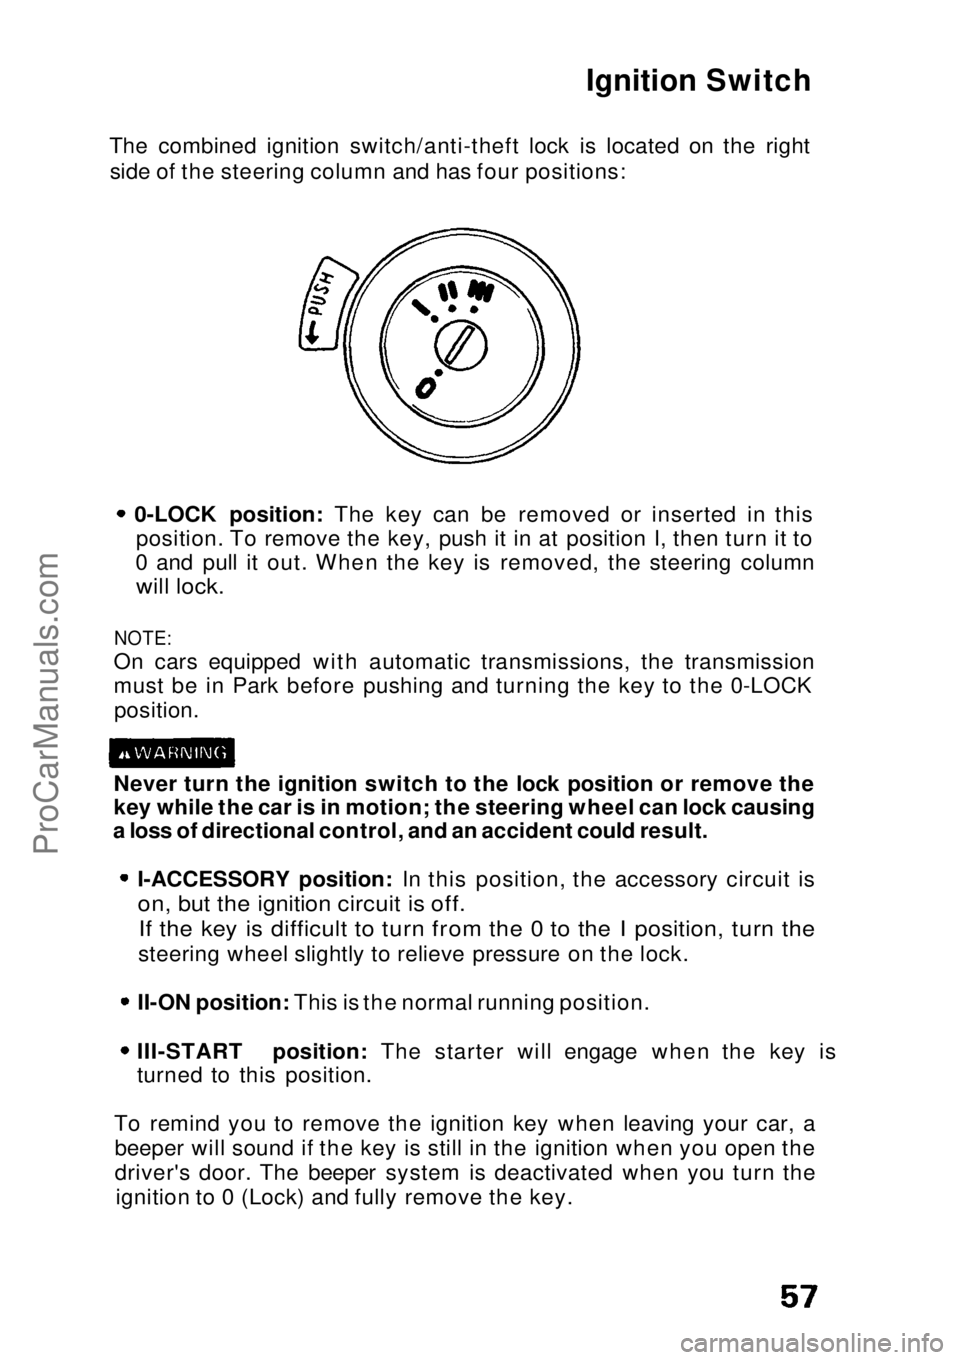
The combined ignition switch/anti-theft lock is located on the right side of the steering column and has four positions: 0-LOCK position: The key can be removed or inserted in this
position. To remove the key, push it in at position I, then turn it to
0 and pull it out. When the key is removed, the steering column
will lock.
NOTE:
On cars equipped with automatic transmissions, the transmission
must be in Park before pushing and turning the key to the 0-LOCK
position.
Never turn the ignition switch to the lock position or remove the
key while the car is in motion; the steering wheel can lock causing
a loss of directional control, and an accident could result. I-ACCESSORY position: In this position, the accessory circuit is
on, but the ignition circuit is off.
If the key is difficult to turn from the 0 to the I position, turn the
steering wheel slightly to relieve pressure on the lock. II-ON position: This is the normal running position.
III-START position: The starter will engage when the key is
turned to this position.
To remind you to remove the ignition key when leaving your car, a beeper will sound if the key is still in the ignition when you open the
driver's door. The beeper system is deactivated when you turn the ignition to 0 (Lock) and fully remove the key.ProCarManuals.comMain Menu s t
Page 69 of 136
Check the following items at each fuel stop:
1. Engine oil level.
2. Radiator coolant level.
Check the following items periodically: 1. Brakes: for braking efficiency, brake pedal travel and hydraulic
fluid level.
2. Lights: for operation of headlights, taillights, side marker lights, stoplights, turn signals and back-up lights.
3. Tires: for correct pressures (including spare); inspect for cuts and uneven or excessive wear. Rotate every 7,500 miles (12,000 km)
in the pattern shown on page 97.
4. Steering: for excessive play or vibration while driving. 5. Exhaust system: for leaks or loose mounts.
6. Wipers: for operation of windshield wipers and washer, and condition of wiper blades.
7. Seat belts: for condition of fabric and buckles, and operation of the restraint mechanism.
8. Battery condition.
9. Clutch adjustment (clutch pedal free travel).
(cont'd)ProCarManuals.comMain Menu s t
Page 74 of 136
Fluid Locations
AUTOMATIC TRANSMISSION
FLUID DIPSTICK ENGINE OILFILLER CAP
POWER STEERING
FLUID RESERVOIR
RADIATOR
CAP WASHER FLUID
RESERVOIR CAP
RADIATOR RESERVE
TANK CAP BRAKE FLUID
RESERVOIR
ENGINE OIL
DIPSTICKProCarManuals.comMain Menu s t