1990 VOLKSWAGEN TRANSPORTER service
[x] Cancel search: servicePage 137 of 165
Downloaded from www.Manualslib.com manuals search engine
DO-IT-YOURSELF-SERVICE
IB25-325I
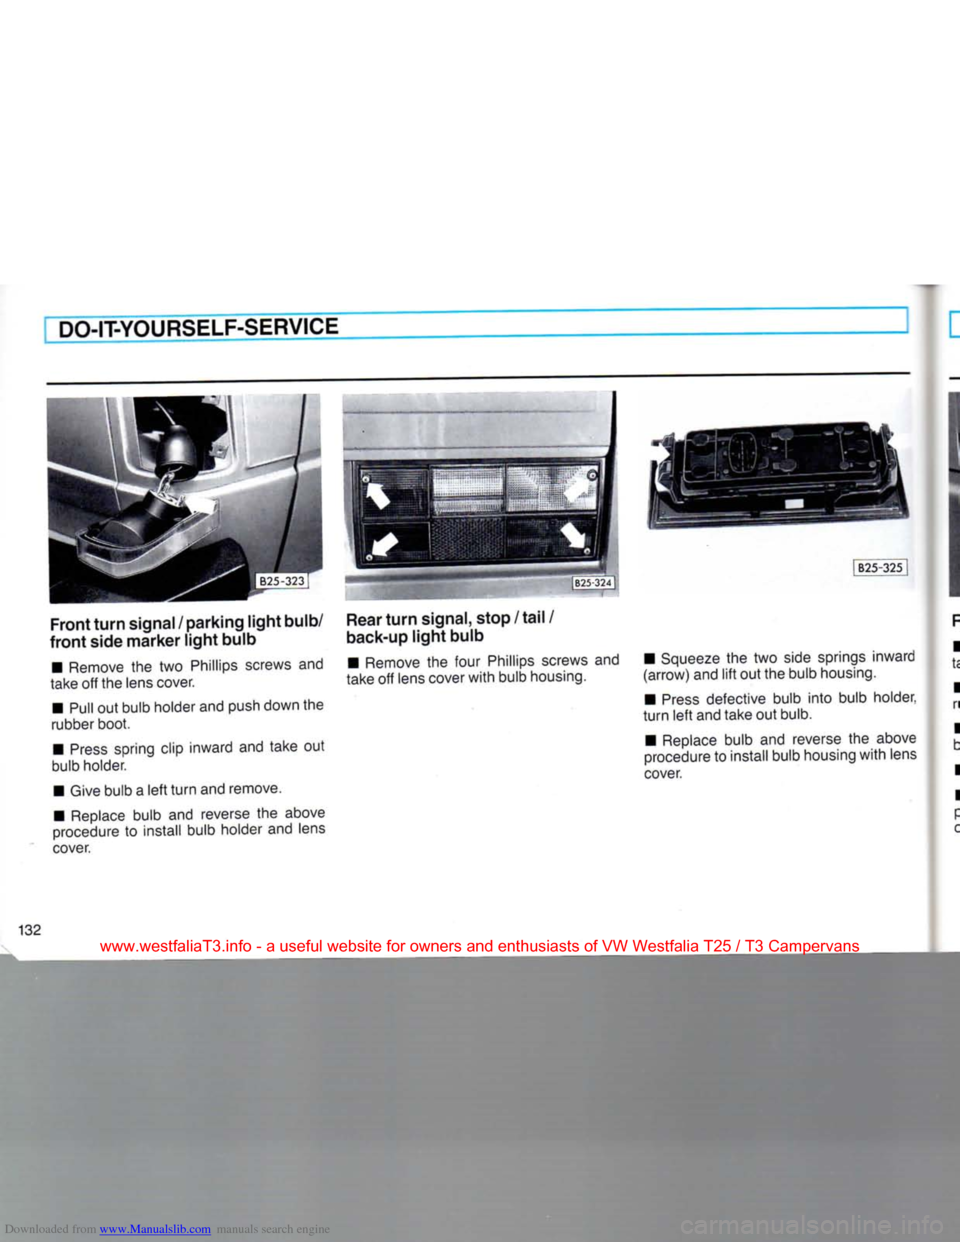
Front
turn
signal / parking
light
bulb/
front
side
marker
light
bulb
• Remove
the two
Phillips screws
and
take
off
the lens cover.
• Pull
out
bulb holder and push down
the
rubber boot.
•
Press
spring clip inward
and
take
out
bulb holder.
• Give bulb
a
left
turn
and remove.
• Replace bulb
and
reverse
the
above
procedure
to
install bulb holder
and
lens
cover.
Rear
turn
signal, stop /
tail
/
back-up
light
bulb
• Remove
the
four Phillips screws
and
take
off
lens cover
with
bulb housing. • Squeeze
the two
side springs inward
(arrow)
and
lift
out
the bulb housing.
•
Press
defective bulb
into
bulb holder
turn
left
and take
out
bulb.
• Replace bulb
and
reverse
the
above
procedure
to
install bulb housing
with
lens
cover.
132
www.westfaliaT3.info - a useful website for owners and enthusiasts of VW Westfalia T25 / T3 Campervans
Page 138 of 165
Downloaded from www.Manualslib.com manuals search engine
DO-IT-YOURSELF-SERVICE
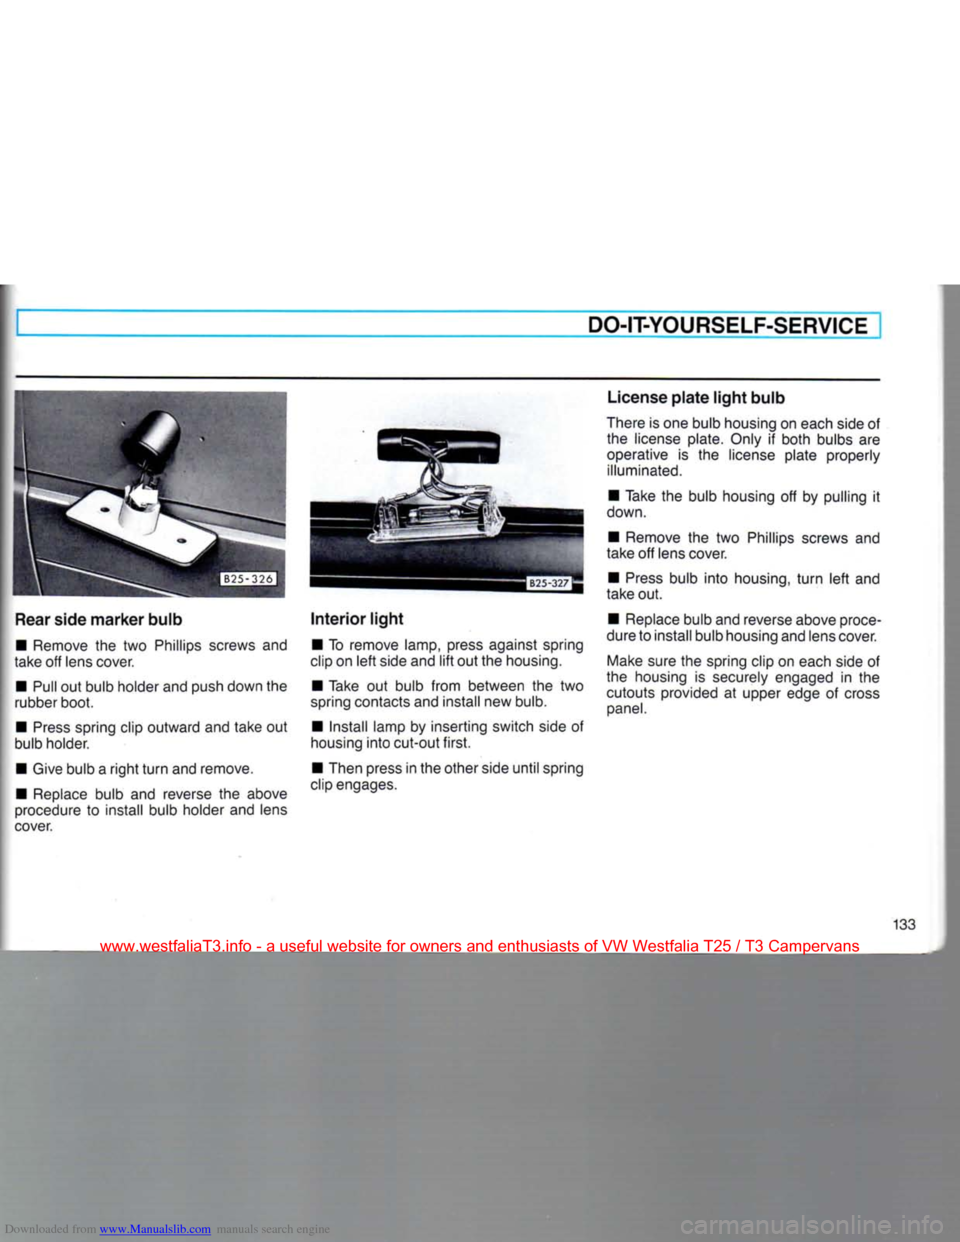
Rear
side
marker
bulb
• Remove the two Phillips screws and
take off lens cover.
• Pull out bulb holder and push down the
rubber boot.
•
Press
spring clip outward and take out
bulb holder.
• Give bulb a
right
turn
and remove. • Replace bulb and reverse the above
procedure to install bulb holder and lens
cover.
Interior
light
• To remove lamp, press against spring
clip on
left
side and
lift
out the housing.
• Take out bulb from between the two
spring contacts and install new bulb.
• Install lamp by inserting switch side of
housing
into
cut-out
first.
• Then press in the other side
until
spring
clip engages. License
plate
light
bulb
There is one bulb housing on each side of the license plate. Only if both bulbs are
operative is the license plate properly illuminated.
• Take the bulb housing off by pulling it
down.
• Remove the two Phillips screws and
take off lens cover.
•
Press
bulb
into
housing,
turn
left
and
take out.
• Replace bulb and reverse above proce
dure to install bulb housing and lens cover.
Make
sure the spring clip on each side of
the housing is securely engaged in the
cutouts provided at upper edge of cross
panel.
133
www.westfaliaT3.info - a useful website for owners and enthusiasts of VW Westfalia T25 / T3 Campervans
Page 139 of 165
Downloaded from www.Manualslib.com manuals search engine
I DO-IT-YOURSELF-SERVICE
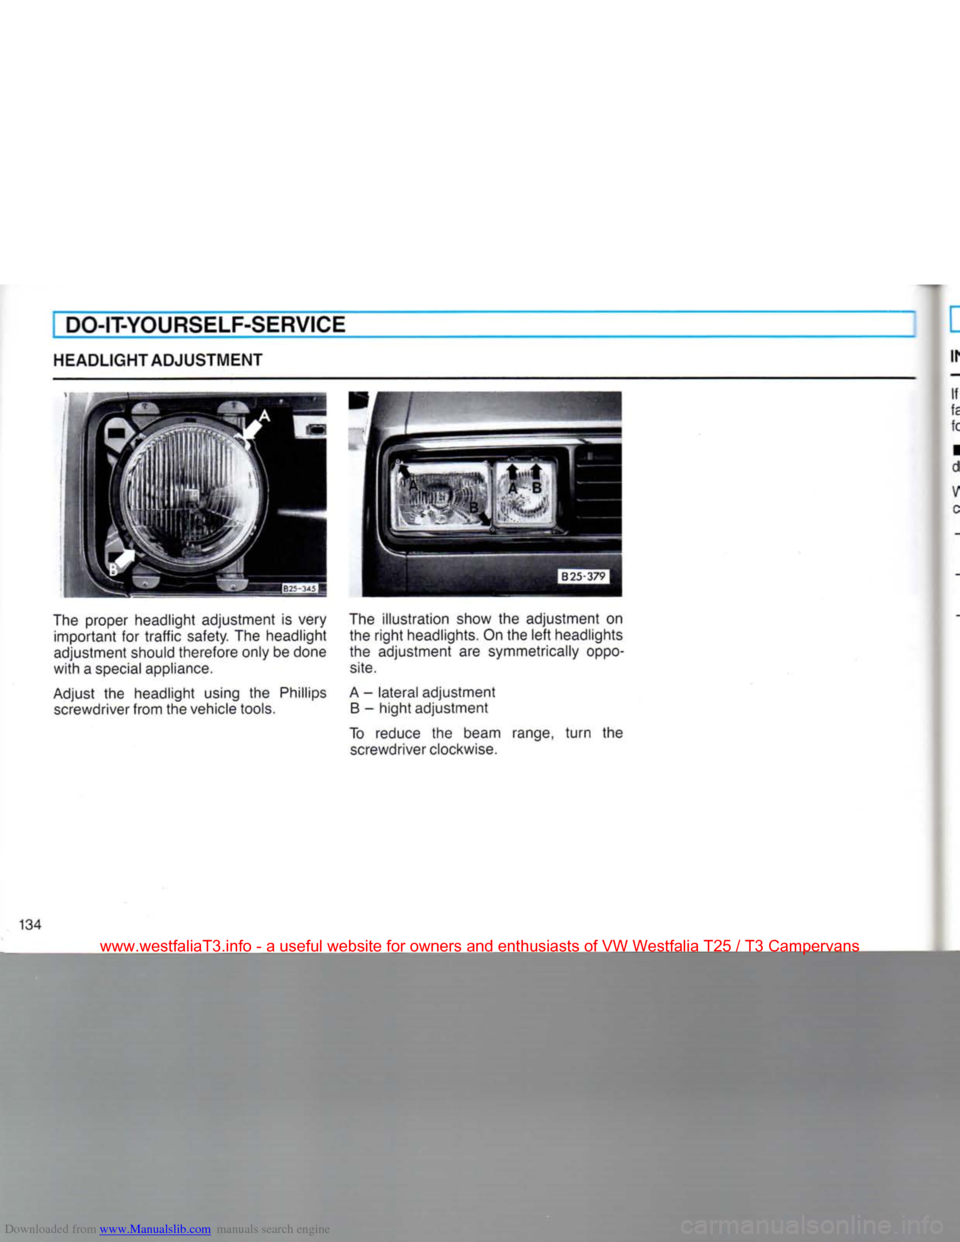
HEADLIGHT ADJUSTMENT
The proper headlight adjustment is very important for
traffic
safety. The headlight
adjustment should therefore only be done
with
a special appliance.
Adjust the headlight using the Phillips screwdriver from the vehicle tools. The illustration show the adjustment on
the
right
headlights. On the
left
headlights the adjustment are symmetrically oppo
site.
A
- lateral adjustment
B
- hight adjustment
To
reduce the beam range,
turn
the screwdriver clockwise.
134
www.westfaliaT3.info - a useful website for owners and enthusiasts of VW Westfalia T25 / T3 Campervans
Page 140 of 165
Downloaded from www.Manualslib.com manuals search engine
DO-IT-YOURSELF-SERVICEI
INSTALLING
/
REPLACING
A
RADIO
If
you wish
to
install
a
radio
or
replace
the
factory installed radio*, please note
the
following:
• The factory installed connectors*
are
designed
for
Original Volkswagen
Radios.
When
installing
a
different
radio, diffi culties could arise such as:
-
the
radio
may not fit
into
the
provided
space
-
the
electrical connections
may not be
compatible
-
different
connector terminals
may be
needed.
• Therefore,
we
recommend
that
you
have
your authorized Volkswagen dealer
install
or
replace
the
radio. They
are the
most familiar
with
the technical features
of
your vehicle. They also offer Original
Volkswagen
Radios
with
the
necessary installation components and instructions.
WARNING
Improperly
installing a radio
could
risk
a short circuit. This could result in an
electrical fire.
'where
applicable
www.westfaliaT3.info - a useful website for owners and enthusiasts of VW Westfalia T25 / T3 Campervans
Page 141 of 165
Downloaded from www.Manualslib.com manuals search engine
DO-IT-YOURSELF-SERVICE
EMERGENCY
STARTING
Starting by
pushing
or towing
Vehicles
with
Automatic Transmission
cannot
be started by
pushing
or
towing.
Vehicles
with
Manual
Transmission
must
not
be started by
pushing
or
towing.
Damage to the catalytic converter and/or
other parts of the vehicle may result. Starting
with
jumper
cables
WARNING
•
Always shield your eyes and avoid
leaning over the battery whenever
pos
sible.
•
Do not allow battery acid to contact
eyes
or
skin.
Flush any contacted area
with
water
immediately.
•
Improper use of booster battery to
start a vehicle may
cause
an
explosion.
•
Vehicles batteries generate explo
sive
gases.
Keep sparks, flame and lighted cigarettes away from batteries.
•
Do not charge a frozen battery; allow
it to thaw out first. Gas trapped
in the ice may cause an explosion.
•
Do not try to jump start any vehicle
with
a low electrolyte level in the bat tery.
•
The voltage of the booster battery
must also have a 12-volt rating. The
capacity
(Ah) of the booster battery
should
not be lower than
that
of the
dis
charged
battery. Use of batteries of dif
ferent voltage or substantially different
Ah
rating may cause an explosion and
personal
injury.
•
Applying
a
higher
voltage
booster
battery
will
cause
expensive
damage
tc
sensitive
electronic
components,
such
as
relays,
radio,
etc...
•
Vehicle
with
discharged
battery: turn off
lights
and
accessories,
move
lever
to N or
P
(Automatic
transmission)
or into
Neutra
(Manual
transmission)
and set
parking
brake.
Always
heed WARNINGS on page 97.
www.westfaliaT3.info - a useful website for owners and enthusiasts of VW Westfalia T25 / T3 Campervans
Page 142 of 165
Downloaded from www.Manualslib.com manuals search engine
DO-IT-YOURSELF-SERVICE
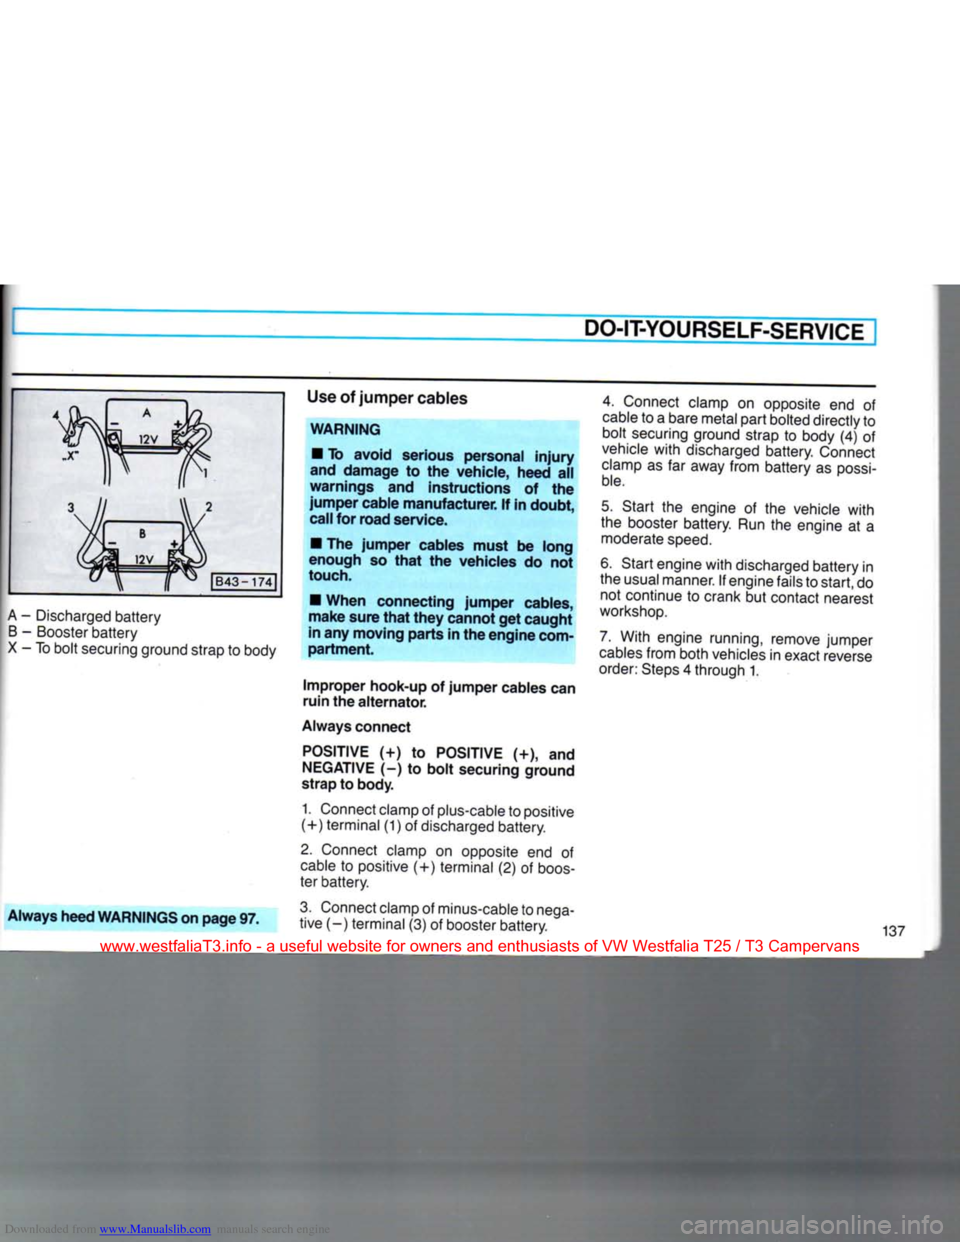
A
-
Discharged battery
B
-
Booster battery
X
-
To bolt securing ground strap
to
body Use
of jumper cables
WARNING
•
To avoid serious personal
injury
and damage to the vehicle, heed all
warnings and instructions of the
jumper cable manufacturer. If in doubt, call for road service.
•
The jumper cables must be long
enough so
that
the vehicles do not
touch.
•
When connecting jumper cables,
make sure
that
they
cannot get caught
in any moving parts in the engine
com
partment.
Improper
hook-up of jumper cables can
ruin the
alternator.
Always connect
POSITIVE (+) to POSITIVE (+), and
NEGATIVE
(-) to bolt securing ground
strap to body.
1. Connect clamp
of
plus-cable
to
positive
(+)
terminal
(1) of
discharged battery.
2.
Connect clamp
on
opposite
end of
cable
to
positive
(+)
terminal
(2) of
boos
ter battery.
4.
Connect clamp
on
opposite
end of
cable
to a
bare metal part bolted directly
to
bolt securing ground strap
to
body
(4) of
vehicle
with
discharged battery. Connect
clamp
as far
away from battery
as
possi
ble.
5.
Start
the
engine
of the
vehicle
with
the booster battery. Run
the
engine
at a
moderate
speed.
6. Start engine
with
discharged battery
in
the usual manner.
If
engine fails to start,
do
not continue
to
crank
but
contact nearest
workshop.
7. With engine running, remove jumper
cables
from both vehicles
in
exact reverse
order: Steps
4
through
1.
Always heed WARNINGS on page 97.
3.
Connect clamp
of
minus-cable
to
nega
tive
(-)
terminal
(3) of
booster battery. 137
www.westfaliaT3.info - a useful website for owners and enthusiasts of VW Westfalia T25 / T3 Campervans
Page 145 of 165
Downloaded from www.Manualslib.com manuals search engine
DO-IT-YOURSELF-SERVICE
LIFTING
VEHICLE
The vehicle should
never
be lifted or
jacked
up from underneath the engine
oil
pan, the transmission housing, or the
front
or rear axle.
This
could lead to serious damage.
The same lifting points as illustrated for the hoist also apply when using a floor jack. To
avoid damage to the underbody or chassis
frame,
it is necessary to insert a rubber pad between the floor jack and the lift
points.
Lifting
with workshop hoist
and with floor jack
Make
sure there is sufficient clearance
between pads and vehicle before driving
vehicle on to hoist.
WARNING
When removing components such as engine block, transmission housing,
fuel
tank, wheels,
front
or rear axle, anchor vehicle to hoist or add corre
sponding weights to maintain the cen
ter of
gravity.
Otherwise the vehicle
might tilt or slip off the hoist, causing
serious damage or personal
injury.
•
To reduce the risk of serious perso
nal
injury
and vehicle damage, lift
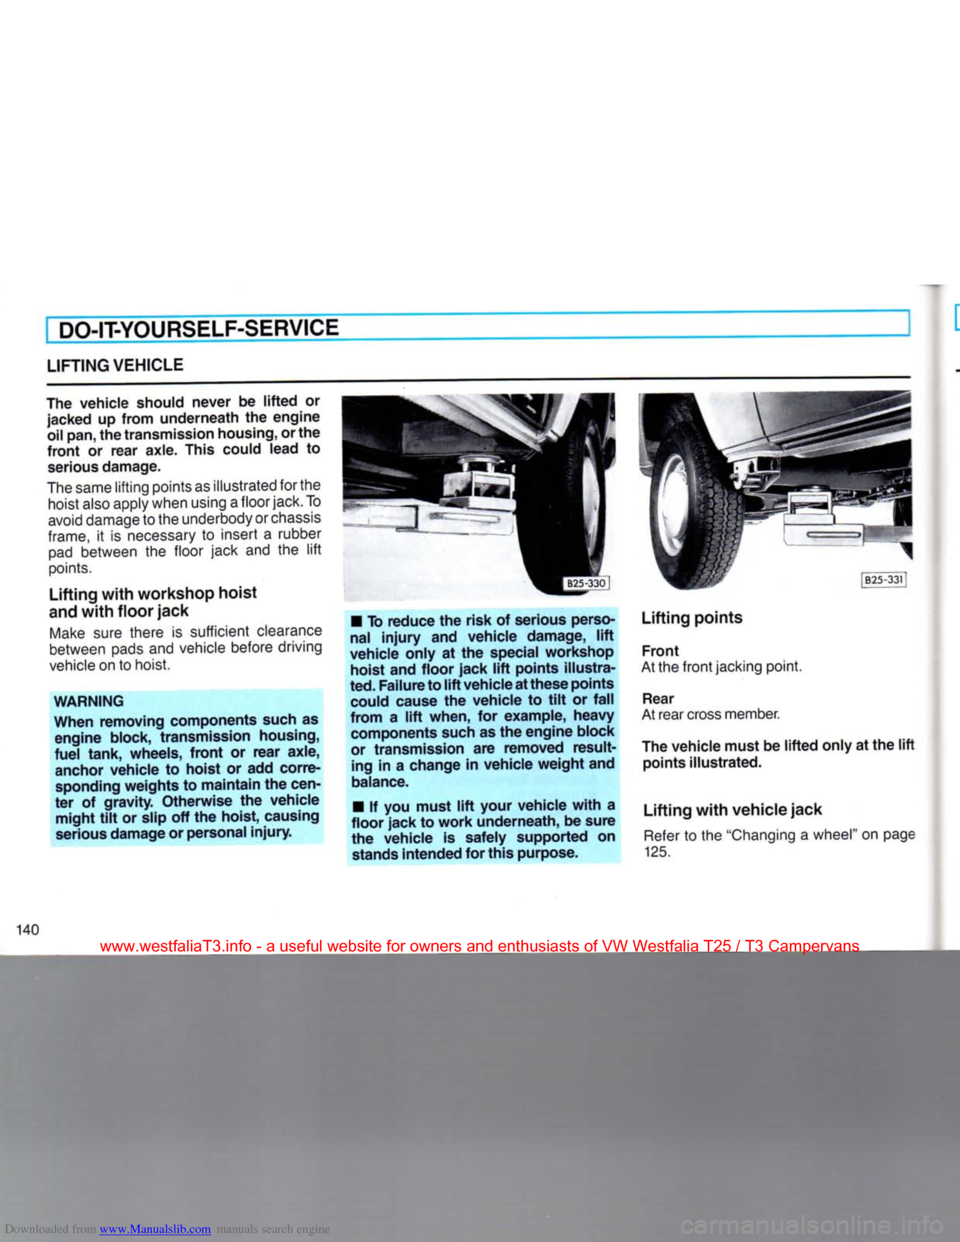
vehicle only at the special workshop hoist and floor jack lift points illustra
ted.
Failure to lift vehicle at these points could cause the vehicle to tilt or
fall
from a lift when, for example,
heavy
components such as the engine block
or transmission are removed result
ing
in a change in vehicle weight and
balance.
•
If you must lift
your
vehicle with a
floor jack to work underneath, be sure
the vehicle is safely supported on
stands
intended for this purpose.
Lifting
points
Front
At the
front
jacking point.
Rear
At rear cross member.
The vehicle must be lifted only at the lift
points illustrated.
Lifting
with vehicle jack Refer to the "Changing a wheel" on page
125.
140
www.westfaliaT3.info - a useful website for owners and enthusiasts of VW Westfalia T25 / T3 Campervans
Page 151 of 165

Downloaded from www.Manualslib.com manuals search engine
TECHNICAL DATA
ENGINE
DATA/SPARK PLUGS
Engine Maximum
output
SAE net 90 hp at 4800 rpm
Maximum torque SAE net 117,3 ft lb at 3200 rpm
No.
of cylinders 4
Displacement 129 CID (2109 cm3)
Stroke 2.99 in (76 mm)
Bore
3.70 in (94 mm)
Compression
ratio
Fuelf)
9.0:1
Compression
ratio
Fuelf)
Regular
unleaded
Sparkplugs
Bosch
W7CC0
Beru
14L-7CU/14L-7C
Champion
N288
1) Minimum octane rating and
further
details see page 86.
Notes
Spark
plugs are replaced during the Volks
wagen scheduled Maintenance service. If
you replace the spark plugs between the
Volkswagen
Maintenance services, the
following should be noted: • Engine, spark plugs and the ignition
system are matched. To avoid faulty opera
tion
or engine damage, use only Original
Volkswagen
spark plugs. It is especially important to note the number of electrodes
and heat value. • Since spark plug specifications may
change
for technical reasons during a cur
rent
model year, we recommend
that
you
obtain your spark plugs from a Volks
wagen dealer who has the latest informa
tion.
146
www.westfaliaT3.info - a useful website for owners and enthusiasts of VW Westfalia T25 / T3 Campervans