1990 VOLKSWAGEN CORRADO battery
[x] Cancel search: batteryPage 735 of 906

STEERING COLUMN
Article Text
1990 Volkswagen Corrado
For Volkswagen Technical Site: http://vw.belcom.ru
Copyright © 1998 Mitchell Repair Information Company, LLC
Thursday, March 23, 2000 09:51PM
ARTICLE BEGINNING
1990-92 STEERING
Volkswagen Steering Columns
Cabriolet, Corrado, Fox, Golf, GTI, Jetta, Passat
WARNING: To aviod injury from accidental AIR BAG deployment, read and
carefully follow all WARNINGS and SERVICE PRECAUTIONS.
NOTE: For information on air bag DIAGNOSIS & TESTING or DISPOSAL
PROCEDURES, See appropriate AIR BAG article in the
ACCESSORIES/SAFETY EQUIPMENT Section
DESCRIPTION
Swing-away steering column is held by a clamp and leaf
spring. On impact, the "U" joint shaft pushes steering column against
the leaf spring. The spring allows the column to disengage and swing
away.
CAUTION: Applying excessive pressure or causing impact to mainshaft
during service may cause the column to disengage.
REMOVAL & INSTALLATION
AIR BAG
WARNING: On Cabriolet with Supplemental Restraint System (air bag),
remove air bag from vehicle before working on steering
column. Follow all WARNINGS and SERVICE PRECAUTIONS to
prevent injury from accidental air bag deployment. See AIR
BAG article in the ACCESSORY/SAFETY EQUIPMENT.
Removal & Installation (Cabriolet)
1) Disconnect negative battery cable. Wait at least 20
minutes for air bag capacitor to discharge. Remove 2 Torx screws (No.
30) from back of steering wheel.
2) Carefully tilt air bag down away from steering wheel.
Disconnect electrical wire from back of air bag unit. Remove air bag
unit from vehicle. DO NOT store air bag unit on its vinyl side. Store
air bag unit on its metal housing.
3) To install, reverse removal procedure. Install new Torx
screws to hold air bag unit in steering wheel. Tighten Torx screws to
89 INCH lbs. (10 N.m).
STEERING WHEEL & HORN PAD
Removal & Installation
1) Disconnect negative battery cable. On Corrado and Passat,
lift cover from bottom, then pull cover away from steering wheel. On
Page 737 of 906

STEERING COLUMN
Article Text (p. 3)
1990 Volkswagen Corrado
For Volkswagen Technical Site: http://vw.belcom.ru
Copyright © 1998 Mitchell Repair Information Company, LLC
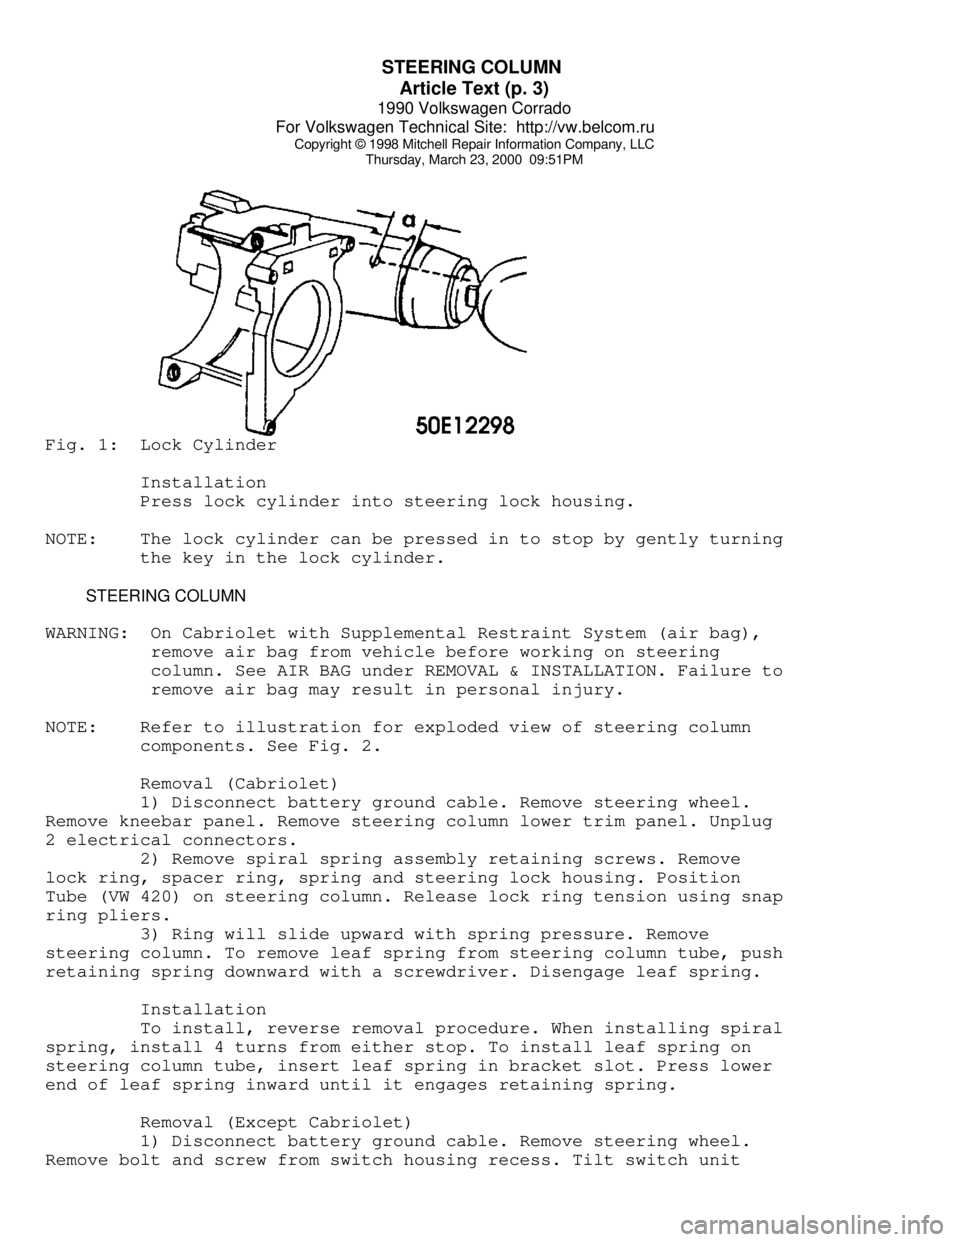
Thursday, March 23, 2000 09:51PMFig. 1: Lock Cylinder
Installation
Press lock cylinder into steering lock housing.
NOTE: The lock cylinder can be pressed in to stop by gently turning
the key in the lock cylinder.
STEERING COLUMN
WARNING: On Cabriolet with Supplemental Restraint System (air bag),
remove air bag from vehicle before working on steering
column. See AIR BAG under REMOVAL & INSTALLATION. Failure to
remove air bag may result in personal injury.
NOTE: Refer to illustration for exploded view of steering column
components. See Fig. 2.
Removal (Cabriolet)
1) Disconnect battery ground cable. Remove steering wheel.
Remove kneebar panel. Remove steering column lower trim panel. Unplug
2 electrical connectors.
2) Remove spiral spring assembly retaining screws. Remove
lock ring, spacer ring, spring and steering lock housing. Position
Tube (VW 420) on steering column. Release lock ring tension using snap
ring pliers.
3) Ring will slide upward with spring pressure. Remove
steering column. To remove leaf spring from steering column tube, push
retaining spring downward with a screwdriver. Disengage leaf spring.
Installation
To install, reverse removal procedure. When installing spiral
spring, install 4 turns from either stop. To install leaf spring on
steering column tube, insert leaf spring in bracket slot. Press lower
end of leaf spring inward until it engages retaining spring.
Removal (Except Cabriolet)
1) Disconnect battery ground cable. Remove steering wheel.
Remove bolt and screw from switch housing recess. Tilt switch unit
Page 741 of 906

STEERING COLUMN SWITCHES
Article Text (p. 2)
1990 Volkswagen Corrado
For Volkswagen Technical Site: http://vw.belcom.ru
Copyright © 1998 Mitchell Repair Information Company, LLC
Thursday, March 23, 2000 09:51PM
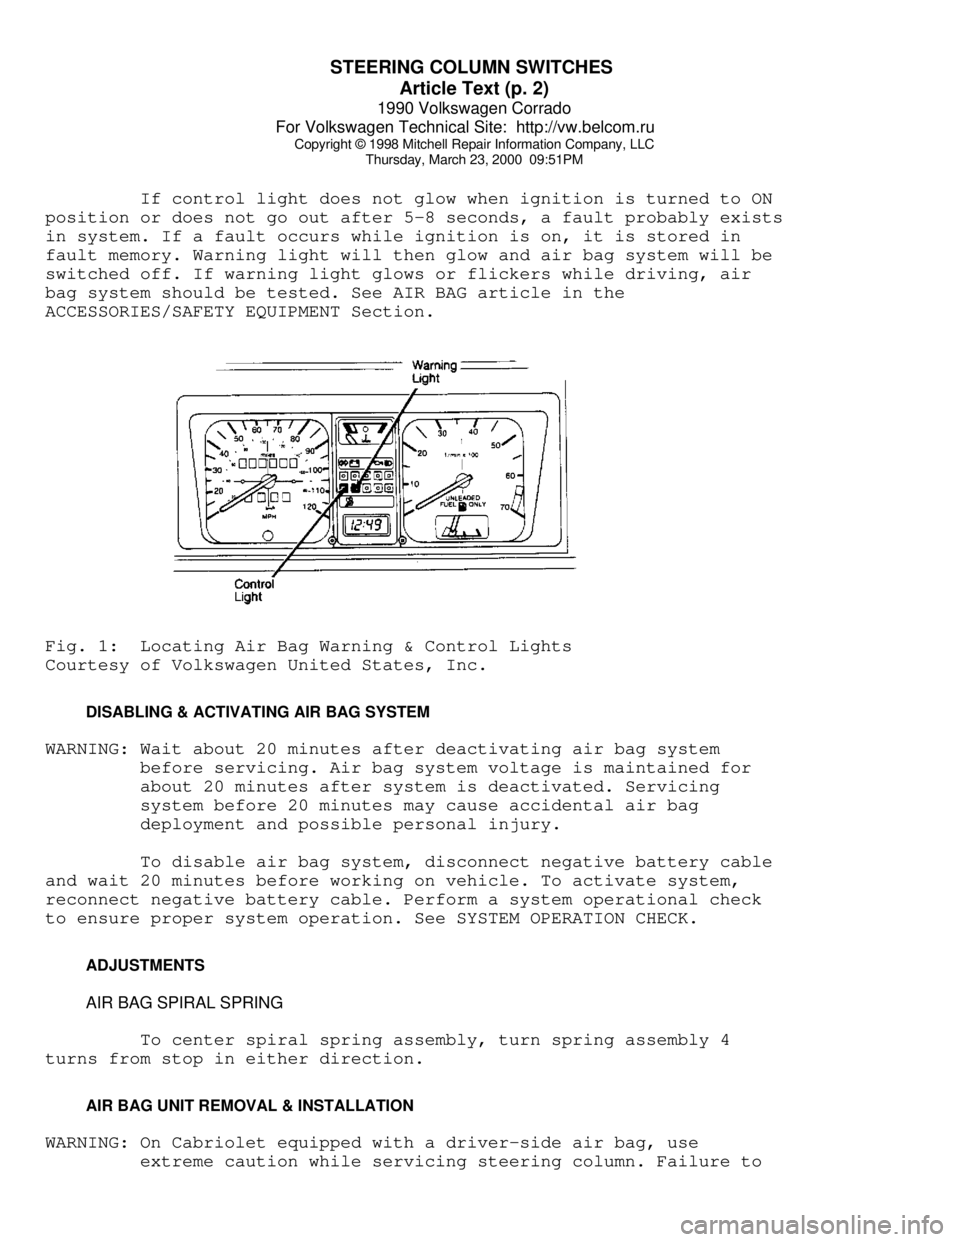
If control light does not glow when ignition is turned to ON
position or does not go out after 5-8 seconds, a fault probably exists
in system. If a fault occurs while ignition is on, it is stored in
fault memory. Warning light will then glow and air bag system will be
switched off. If warning light glows or flickers while driving, air
bag system should be tested. See AIR BAG article in the
ACCESSORIES/SAFETY EQUIPMENT Section.Fig. 1: Locating Air Bag Warning & Control Lights
Courtesy of Volkswagen United States, Inc.
DISABLING & ACTIVATING AIR BAG SYSTEM
WARNING: Wait about 20 minutes after deactivating air bag system
before servicing. Air bag system voltage is maintained for
about 20 minutes after system is deactivated. Servicing
system before 20 minutes may cause accidental air bag
deployment and possible personal injury.
To disable air bag system, disconnect negative battery cable
and wait 20 minutes before working on vehicle. To activate system,
reconnect negative battery cable. Perform a system operational check
to ensure proper system operation. See SYSTEM OPERATION CHECK.
ADJUSTMENTS
AIR BAG SPIRAL SPRING
To center spiral spring assembly, turn spring assembly 4
turns from stop in either direction.
AIR BAG UNIT REMOVAL & INSTALLATION
WARNING: On Cabriolet equipped with a driver-side air bag, use
extreme caution while servicing steering column. Failure to
Page 744 of 906

STEERING COLUMN SWITCHES
Article Text (p. 5)
1990 Volkswagen Corrado
For Volkswagen Technical Site: http://vw.belcom.ru
Copyright © 1998 Mitchell Repair Information Company, LLC
Thursday, March 23, 2000 09:51PM
Removal (Except Cabriolet)
1) Disconnect negative battery cable. Remove screws attaching
horn button assembly/center pad to steering wheel from behind steering
wheel (if equipped).
2) Pull horn button assembly/center pad from steering wheel.
Use a cloth covered screwdriver to pry off horn button assembly/center
pad (if necessary). Disassemble horn button assembly (if necessary).
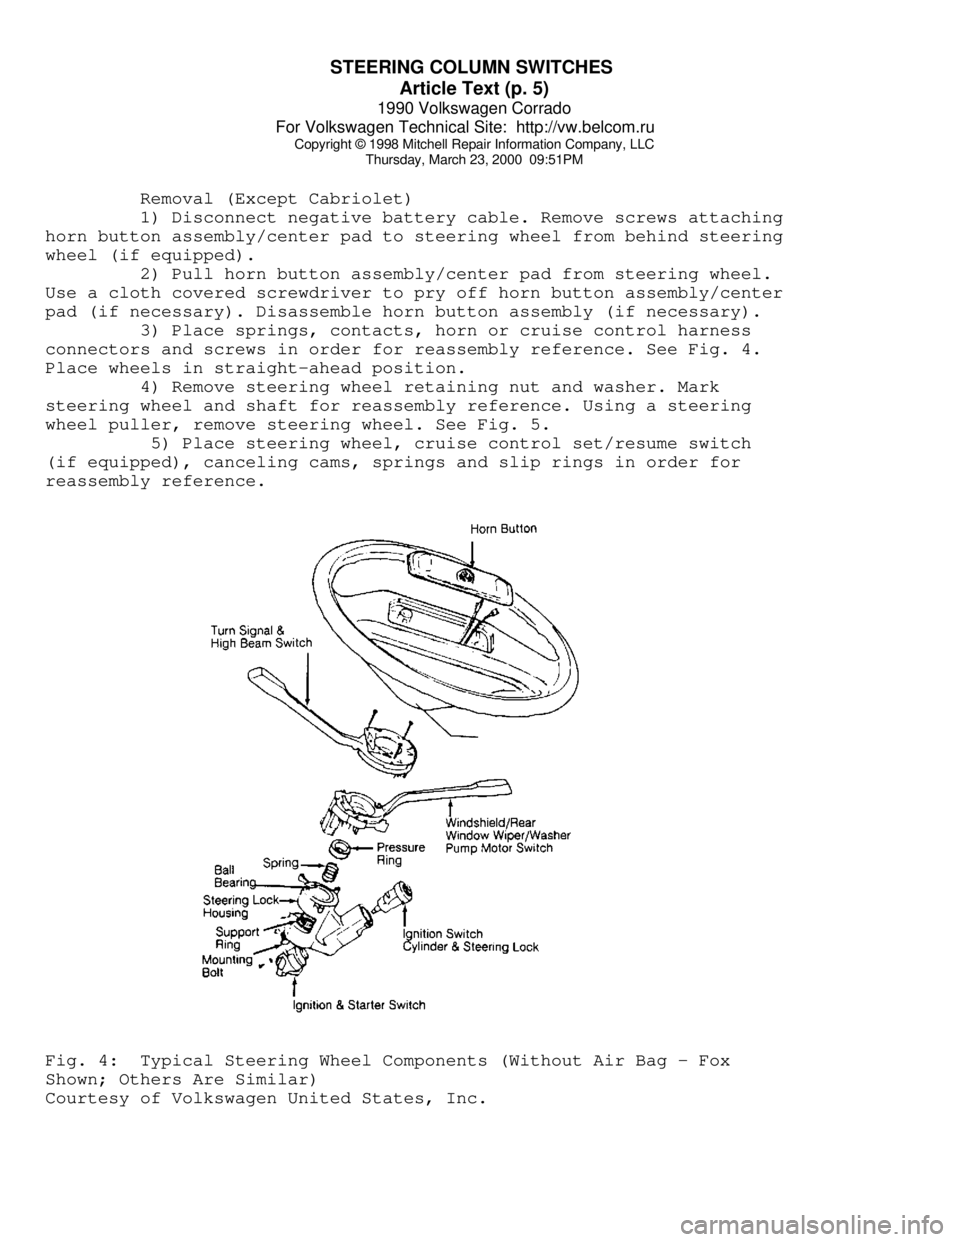
3) Place springs, contacts, horn or cruise control harness
connectors and screws in order for reassembly reference. See Fig. 4.
Place wheels in straight-ahead position.
4) Remove steering wheel retaining nut and washer. Mark
steering wheel and shaft for reassembly reference. Using a steering
wheel puller, remove steering wheel. See Fig. 5.
5) Place steering wheel, cruise control set/resume switch
(if equipped), canceling cams, springs and slip rings in order for
reassembly reference.Fig. 4: Typical Steering Wheel Components (Without Air Bag - Fox
Shown; Others Are Similar)
Courtesy of Volkswagen United States, Inc.
Page 764 of 906

TRANSMISSION REMOVAL & INSTALLATION - A/T
Article Text
1990 Volkswagen Corrado
For Volkswagen Technical Site: http://vw.belcom.ru
Copyright © 1998 Mitchell Repair Information Company, LLC
Thursday, March 23, 2000 09:51PM
ARTICLE BEGINNING
1990-91 TRANSMISSION SERVICING
Automatic Transmission Removal & Installation
Cabriolet, Corrado, Fox, Golf GTI, Jetta, Passat
CABRIOLET, GOLF, GTI & JETTA
NOTE: For manual transaxle replacement procedures, see appropriate
CLUTCH article in the CLUTCHES Section.
REMOVAL & INSTALLATION
1) Disconnect battery ground cable. Disconnect speedometer
cable from transaxle. Raise and support vehicle. Remove left front
wheel.
2) Support engine from above. Remove left rear transaxle
mount and support. Remove upper transaxle-to-engine bolts. Remove
upper bolts from front engine/transaxle mount.
3) Remove lower bolts on front mount and remove mount. Remove
protective plate from transaxle. Remove torque converter-to-drive
plate bolts.
4) Disconnect accelerator and selector cables from transaxle.
Place mating marks on drive axle flanges and remove left and right
axle shaft flange bolts.
NOTE: If clearance is needed to remove transaxle, separate ball
joint from left side steering knuckle and move axle shaft
away from transaxle.
5) Remove left rear engine mount. Remove starter. Remove
subframe mounting bolts and allow subframe to hang free. Support
transaxle with jack. Remove lower mounting bolt. Lower transaxle. To
install, reverse removal procedure. Adjust accelerator and selector
cables.
CORRADO & PASSAT
NOTE: For manual transaxle replacement procedures, see appropriate
CLUTCH article in the CLUTCHES Section.
REMOVAL & INSTALLATION
1) Disconnect battery ground cable. Remove air ducts to brake
caliper and engine air intake. Disconnect speedometer cable from
transaxle. Remove upper transaxle-to-engine bolts.
2) Disconnect and plug transaxle cooler lines. Support engine
from above. Remove starter. Disconnect accelerator and selector cables
from transaxle. Remove left transaxle mount and support.
3) Remove electrical wiring from transaxle. Remove lower
Page 784 of 906

TROUBLE SHOOTING - BASIC PROCEDURES
Article Text (p. 8)
1990 Volkswagen Corrado
For Volkswagen Technical Site: http://vw.belcom.ru
Copyright © 1998 Mitchell Repair Information Company, LLC
Thursday, March 23, 2000 09:52PM
FUEL SYSTEMS
Carburetor idle or transfer Inspect system and
system plugged remove restriction
Frozen or binding heated air Inspect heated air
inlet door for bindingÄÄÄÄÄÄÄÄÄÄÄÄÄÄÄÄÄÄÄÄÄÄÄÄÄÄÄÄÄÄÄÄÄÄÄÄÄÄÄÄÄÄÄÄÄÄÄÄÄÄÄÄÄÄÄÄÄÄÄÄÄÄÄÄÄÄÄÄÄÄHesitation With Defective accelerator pump Replace pump, see
Heavy Gas Pedal FUEL SYSTEMS
Movement
Metering rod carrier Remove restriction
sticking or binding
Large vacuum leak Inspect vacuum
system and repair
leak
Float level setting too Reset float level,
low see FUEL SYSTEMS
Defective fuel pump, lines Inspect pump, lines
or filter and filter
Air door setting incorrect Adjust air door
setting, see FUEL
ÄÄÄÄÄÄÄÄÄÄÄÄÄÄÄÄÄÄÄÄÄÄÄÄÄÄÄÄÄÄÄÄÄÄÄÄÄÄÄÄÄÄÄÄÄÄÄÄÄÄÄÄÄÄÄÄÄÄÄÄÄÄÄÄÄÄÄÄÄÄ CHARGING SYSTEM TROUBLE SHOOTING
WARNING: This is GENERAL information. This article is not intended
to be specific to any unique situation or individual vehicle
configuration. The purpose of this Trouble Shooting
information is to provide a list of common causes to
problem symptoms. For model-specific Trouble Shooting,
refer to SUBJECT, DIAGNOSTIC, or TESTING articles available
in the section(s) you are accessing.
BASIC CHARGING SYSTEM TROUBLE SHOOTING CHART
ÄÄÄÄÄÄÄÄÄÄÄÄÄÄÄÄÄÄÄÄÄÄÄÄÄÄÄÄÄÄÄÄÄÄÄÄÄÄÄÄÄÄÄÄÄÄÄÄÄÄÄÄÄÄÄÄÄÄÄÄÄÄÄÄÄÄÄÄÄÄCONDITION POSSIBLE CAUSE CORRECTION
ÄÄÄÄÄÄÄÄÄÄÄÄÄÄÄÄÄÄÄÄÄÄÄÄÄÄÄÄÄÄÄÄÄÄÄÄÄÄÄÄÄÄÄÄÄÄÄÄÄÄÄÄÄÄÄÄÄÄÄÄÄÄÄÄÄÄÄÄÄÄVehicle Will Not Dead battery Check battery cells,
Start alternator belt
tension and alternator
output
Loose or corroded battery Check all charging
connections system connections
Ignition circuit or switch Check and replace as
Page 786 of 906

TROUBLE SHOOTING - BASIC PROCEDURES
Article Text (p. 10)
1990 Volkswagen Corrado
For Volkswagen Technical Site: http://vw.belcom.ru
Copyright © 1998 Mitchell Repair Information Company, LLC
Thursday, March 23, 2000 09:52PM
Defective battery Check and replace as
necessaryÄÄÄÄÄÄÄÄÄÄÄÄÄÄÄÄÄÄÄÄÄÄÄÄÄÄÄÄÄÄÄÄÄÄÄÄÄÄÄÄÄÄÄÄÄÄÄÄÄÄÄÄÄÄÄÄÄÄÄÄÄÄÄÄÄÄÄÄÄÄAmmeter Gauge Loose or worn drive belt Check alternator drive
Shows Discharge belt tension and
condition. See Belt
Adjustment in TUNE-UP
article in the
TUNE-UP section
Defective wiring Check all wires and
wire connections
Defective alternator or See Bench Tests and
regulator On-Vehicle Tests in
ALTERNATOR article
Defective ammeter, or See Testing in
improper ammeter wiring STANDARD INSTRUMENTS
connection in the ACCESSORIES &
EQUIPMENT section
ÄÄÄÄÄÄÄÄÄÄÄÄÄÄÄÄÄÄÄÄÄÄÄÄÄÄÄÄÄÄÄÄÄÄÄÄÄÄÄÄÄÄÄÄÄÄÄÄÄÄÄÄÄÄÄÄÄÄÄÄÄÄÄÄÄÄÄÄÄÄNoisy Loose drive pulley Tighten drive pulley
Alternator attaching nut
Loose mounting bolts Tighten all alternator
mounting bolts
Worn or dirty bearings See Bearing
Replacement
ALTERNATOR article
Defective diodes or stator See Bench Test in
ALTERNATOR article
ÄÄÄÄÄÄÄÄÄÄÄÄÄÄÄÄÄÄÄÄÄÄÄÄÄÄÄÄÄÄÄÄÄÄÄÄÄÄÄÄÄÄÄÄÄÄÄÄÄÄÄÄÄÄÄÄÄÄÄÄÄÄÄÄÄÄÄÄÄÄBattery Does Loose or worn drive belt Check alternator drive
Stay Charged belt tension and
condition. See
Belt Adjustment in
appropriate TUNE-UP
article in the
TUNE-UP section
Loose or corroded battery Check all charging
connections system connections
Loose alternator connections Check all charging
system connections
Defective alternator or See On-Vehicle Tests
battery and Bench Tests in
Page 787 of 906

TROUBLE SHOOTING - BASIC PROCEDURES
Article Text (p. 11)
1990 Volkswagen Corrado
For Volkswagen Technical Site: http://vw.belcom.ru
Copyright © 1998 Mitchell Repair Information Company, LLC
Thursday, March 23, 2000 09:52PM
ALTERNATOR article
Add-on electrical accessories Install larger
exceeding alternator capacity alternatorÄÄÄÄÄÄÄÄÄÄÄÄÄÄÄÄÄÄÄÄÄÄÄÄÄÄÄÄÄÄÄÄÄÄÄÄÄÄÄÄÄÄÄÄÄÄÄÄÄÄÄÄÄÄÄÄÄÄÄÄÄÄÄÄÄÄÄÄÄÄBattery Defective battery Check alternator
Overcharged- output and repair as
Uses Too Much necessary
Water
Defective alternator See On-Vehicle Test and
Bench Tests in
ALTERNATOR article
Excessive alternator voltage Check alternator output
and repair as necessary
ÄÄÄÄÄÄÄÄÄÄÄÄÄÄÄÄÄÄÄÄÄÄÄÄÄÄÄÄÄÄÄÄÄÄÄÄÄÄÄÄÄÄÄÄÄÄÄÄÄÄÄÄÄÄÄÄÄÄÄÄÄÄÄÄÄÄÄÄÄÄ CLUTCH TROUBLE SHOOTING
WARNING: This is GENERAL information. This article is not intended
to be specific to any unique situation or individual vehicle
configuration. The purpose of this Trouble Shooting
information is to provide a list of common causes to
problem symptoms. For model-specific Trouble Shooting,
refer to SUBJECT, DIAGNOSTIC, or TESTING articles available
in the section(s) you are accessing.
BASIC CLUTCH TROUBLE SHOOTING CHART
ÄÄÄÄÄÄÄÄÄÄÄÄÄÄÄÄÄÄÄÄÄÄÄÄÄÄÄÄÄÄÄÄÄÄÄÄÄÄÄÄÄÄÄÄÄÄÄÄÄÄÄÄÄÄÄÄÄÄÄÄÄÄÄÄÄÄÄÄÄÄCONDITION POSSIBLE CAUSE CORRECTION
ÄÄÄÄÄÄÄÄÄÄÄÄÄÄÄÄÄÄÄÄÄÄÄÄÄÄÄÄÄÄÄÄÄÄÄÄÄÄÄÄÄÄÄÄÄÄÄÄÄÄÄÄÄÄÄÄÄÄÄÄÄÄÄÄÄÄÄÄÄÄChattering or Incorrect clutch adjustment Adjust clutch
Grabbing
Oil, grease or glaze on Disassemble and clean
facings or replace
Loose "U" joint flange See DRIVE AXLES
article
Worn input shaft spline Replace input shaft
Binding pressure plate Replace pressure plate
Binding release lever See CLUTCH article
Binding clutch disc hub Replace clutch disc
Unequal pressure plate Replace worn/misaligned
contact components
Loose/bent clutch disc Replace clutch disc