Page 1574 of 2103

REAR AXLE Differential Carrier
Fe gauge
Bearing cap
Al
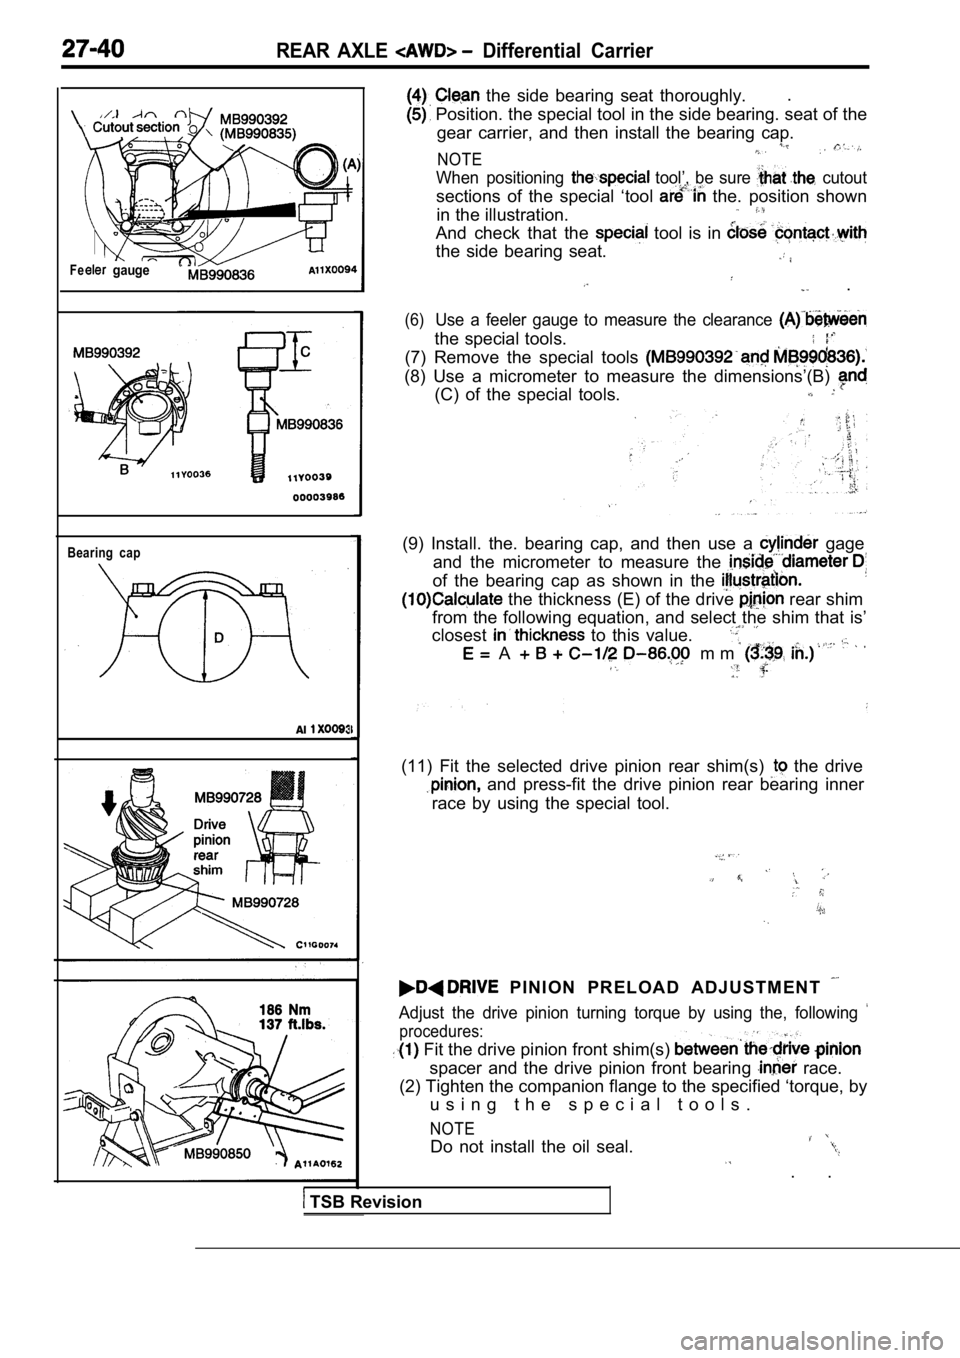
the side bearing seat thoroughly..
Position. the special tool in the side bearing. se
at of the
gear carrier, and then install the bearing cap.
NOTE
When positioning tool’, be sure cutout
sections of the special ‘tool the. position shown
in the illustration.
And check that the tool is in
the side bearing seat.
.
(6)Use a feeler gauge to measure the clearance
the special tools.
(7) Remove the special tools
(8) Use a micrometer to measure the dimensions’(B)
(C) of the special tools.
(9) Install. the. bearing cap, and then use a gage
and the micrometer to measure the
of the bearing cap as shown in the
the thickness (E) of the drive rear shim
from the following equation, and select the shim th at is’
closest
to this value.
A m m
(11) Fit the selected drive pinion rear shim(s) the drive
and press-fit the drive pinion rear bearing inner
race by using the special tool.
P I N I O N P R E L O A D A D J U S T M E N T
Adjust the drive pinion turning torque by using the , following
procedures:
Fit the drive pinion front shim(s)
spacer and the drive pinion front bearing race.
(2) Tighten the companion flange to the specified ‘ torque, by
u s i n g t h e s p e c i a l t o o l s .
NOTE
Do not install the oil seal.
. .
TSB Revision
Page 1575 of 2103

REAR AXLE Differential Carrier
or
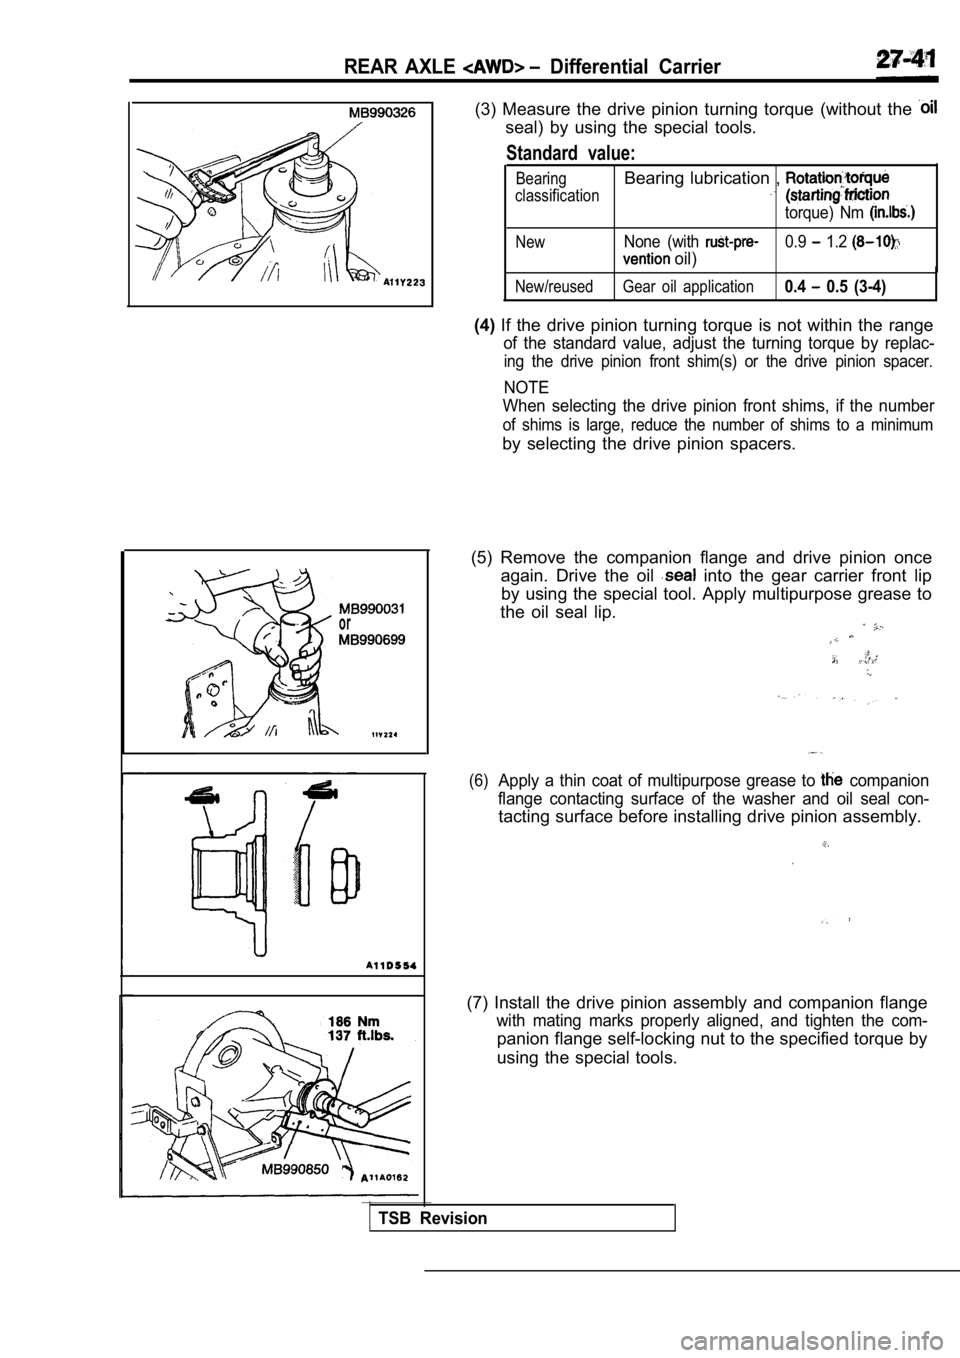
(3) Measure the drive pinion turning torque (without the
seal) by using the special tools.
Standard value:
BearingBearing lubrication ,
classification
torque) Nm
NewNone (with 0.9 1.2
oil)
New/reused Gear oil application0.4 0.5 (3-4)
(4)If the drive pinion turning torque is not within th e range
of the standard value, adjust the turning torque by replac-
ing the drive pinion front shim(s) or the drive pinion spacer.
NOTE
When selecting the drive pinion front shims, if the number
of shims is large, reduce the number of shims to a minimum
by selecting the drive pinion spacers.
(5) Remove the companion flange and drive pinion on ce
again. Drive the oil
into the gear carrier front lip
by using the special tool. Apply multipurpose greas e to
the oil seal lip.
(6)Apply a thin coat of multipurpose grease to companion
flange contacting surface of the washer and oil sea l con-
tacting surface before installing drive pinion assembly.
(7) Install the drive pinion assembly and companion flange
with mating marks properly aligned, and tighten the com-
panion flange self-locking nut to the specified torque by
using the special tools.
TSB Revision
Page 1576 of 2103

REAR AXLE Differential Carrier
(8) Measure the drive pinion turning torque (with oil seal)
by using the special tools to verify that the drive pinion
turning torque complies with the standard value.
Standard value:
BearingBearing lubrication Rotation torque
classification (starting friction
torque)
NewNone (with
oil)
New/reusedGear oil application0.5 0.8 (4-5)
there is a deviation from the standard value, chec
k
whether or not there is incorrect tightening torque of the
companion flange tightening self-lock nut, or incor rect
fitting of the oil seal.
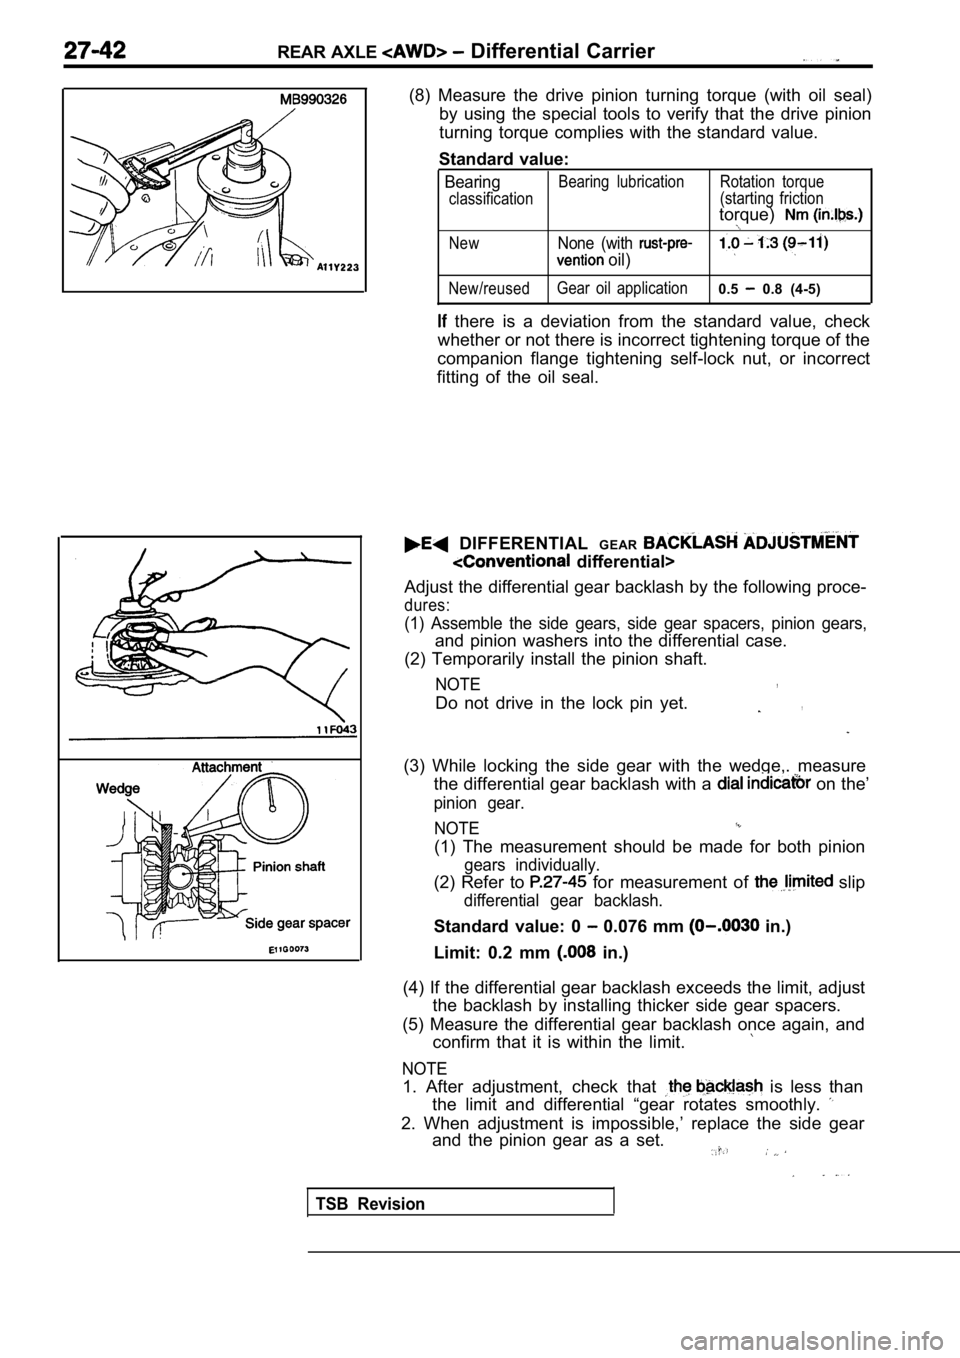
DIFFERENTIAL GEAR
differential>
Adjust the differential gear backlash by the follow ing proce-
dures:
(1) Assemble the side gears, side gear spacers, pin ion gears,
and pinion washers into the differential case.
(2) Temporarily install the pinion shaft.
NOTE,
Do not drive in the lock pin yet.,
(3) While locking the side gear with the wedge,. me asure
the differential gear backlash with a
on the’
pinion gear.
NOTE
(1) The measurement should be made for both pinion
gears individually.
(2) Refer to for measurement of slip
differential gear backlash.
Standard value: 0 0.076 mm in.)
Limit: 0.2 mm
in.)
(4) If the differential gear backlash exceeds the l imit, adjust
the backlash by installing thicker side gear spacer s.
(5) Measure the differential gear backlash once aga in, and
confirm that it is within the limit.
NOTE
1. After adjustment, check that is less than
the limit and differential “gear rotates smoothly.
2. When adjustment is impossible,’ replace the side gear
and the pinion gear as a set.
TSB Revision
Page 1577 of 2103

REAR AXLE Differential Carrier
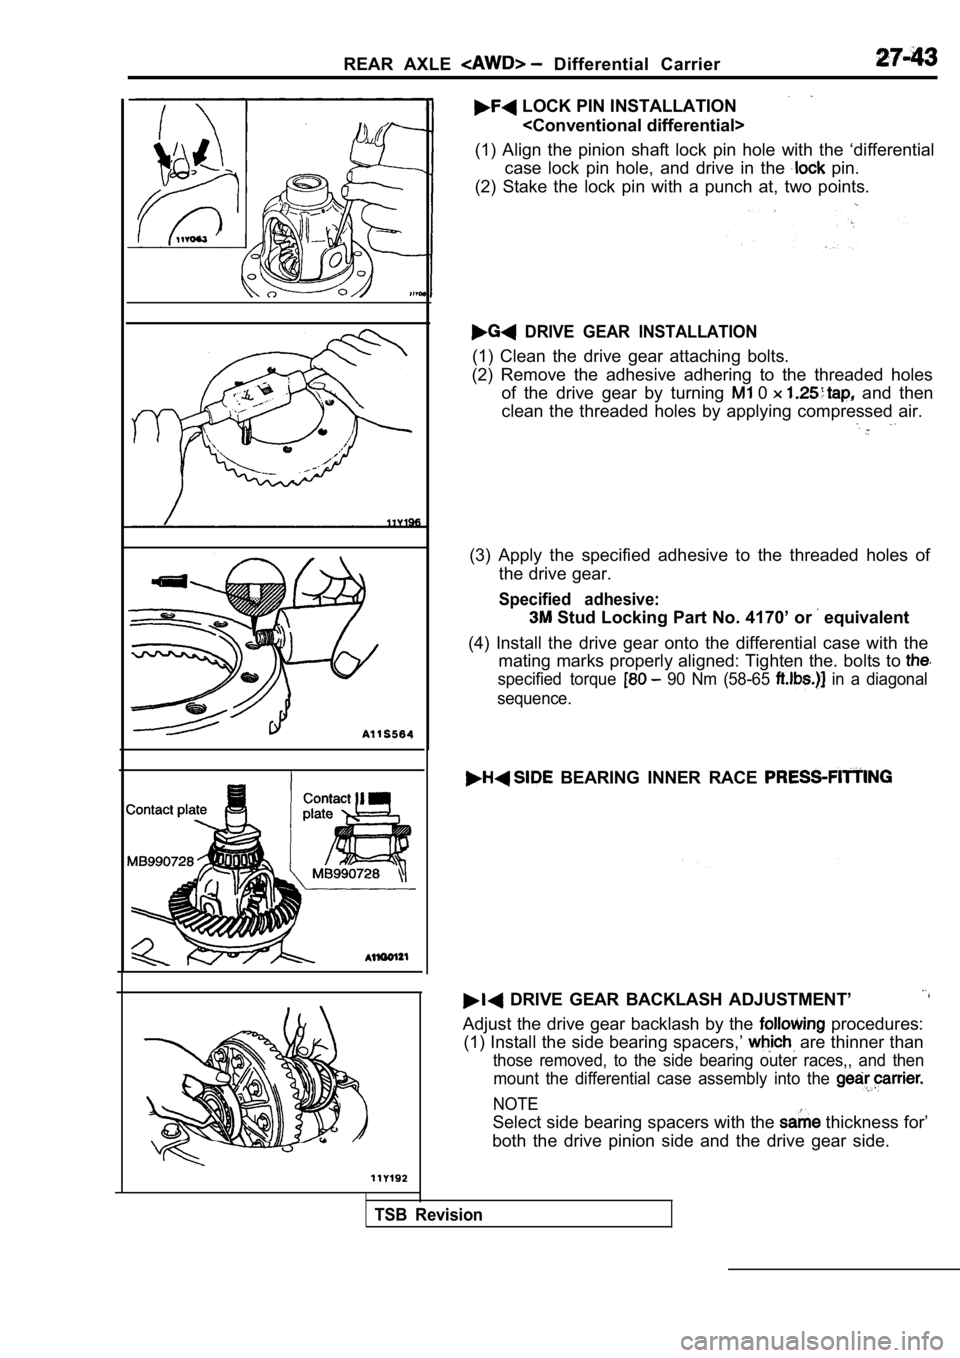
LOCK PIN INSTALLATION
(1) Align the pinion shaft lock pin hole with the ‘ differential
case lock pin hole, and drive in the
pin.
(2) Stake the lock pin with a punch at, two points.
DRIVE GEAR INSTALLATION
(1) Clean the drive gear attaching bolts.
(2) Remove the adhesive adhering to the threaded ho les
of the drive gear by turning
0 and then
clean the threaded holes by applying compressed air .
(3) Apply the specified adhesive to the threaded holes of
the drive gear.
Specified adhesive:
Stud Locking Part No. 4170’ or equivalent
(4) Install the drive gear onto the differential ca se with the
mating marks properly aligned: Tighten the. bolts t o
specified torque 90 Nm (58-65 in a diagonal
sequence.
BEARING INNER RACE .
DRIVE GEAR BACKLASH ADJUSTMENT’
Adjust the drive gear backlash by the procedures:
(1) Install the side bearing spacers,’
are thinner than
those removed, to the side bearing outer races,, an d then
mount the differential case assembly into the
NOTE
Select side bearing spacers with the thickness for’
both the drive pinion side and the drive gear side.
TSB Revision
Page 1589 of 2103
WHEEL AND TIRE On-vehicle Service/Wheel and Tire
Wear indicator
TIRE INFLATION PRESSURE CHECK
NOTERefer to the inflation pressure label on the driver ’s side door.
TIRE WEAR CHECK
Measure the tread depth of tires.
Limit: 1.6 mm
in.)
If the remaining tread depth is less than the limit , replace
the tire.
NOTE
When the tread depth of tires is reduced to 1.6 mm
or less, wear indicators will appear.
WHEEL
CHECK
Jack up the vehicle so that the wheels are clear of the floor.
While slowly turning the wheel, measure wheel with
a dial indicator.
Limit:
Radial
Steel wheel; 1.2 mm in.) or less
Aluminum wheel; 1.0 mm
in.) or less
Lateral
Steel wheel; 1.2 mm in.) or less
Aluminum wheel; 1.0 mm
in.) or less
If wheel
exceeds the limit, replace the wheel.
INSTALLATION SERVICE POINT
Tighten the wheel nut to the specified torque.
Tightening torque:
Nm
TSB Revision
Page 1603 of 2103
FRONT Service
SERVICE SPECIFICATIONS
Standard value
Toe-in mm (in.)Steering angle Inner wheel (0 .
Camber
Outer wheelI
AWD
FWD (Vehicles with wheels)
FWD (Vehicles with wheels), AWD
CasterUpper arm ball joint breakaway torque Nm
0.3 2.5 (3 22)
Compression lower arm ball joint breakaway torque Nm
0.5 2.5 (4 22)
Lateral lower arm ball joint breakaway torque Nm
Stabilizer link ball joint breakaway torque Nm
1.5 (13) or less
SPECIAL TOOLS
Spring compressor
cover installation”
0Ball joint remover and
installer
TSB Revision
Page 1605 of 2103
FRONT SUSPENSION On-vehicle Service
NOTE .
1.If the toe-in is not standard value, adjust the
toe-in by undoing, the and the left arid
tie rod by the same amount (in opposite direc-
tions).
2. The toe will move out as the is turned
toward the front of the vehicle and the
is turned toward the rear of the vehicle.
STEERING ANGLE
Standard value:
Inner wheel
(AWD)
Outer wheel
(FWD)
(AWD)
CAMBER
Standard value:
(Vehicles with lbinch wheels)
(Vehicles with wheels),AWD
CASTER
Standard value:
NOTE
1.Camber and caster are preset at the’factory and can not
be adjusted.
2. If camber is not within the standard value, chec k
replace bent or damaged parts.
3. For vehicles with aluminum type’ wheels, attach the
camber/caster/kingpin gauge to the drive shaft by ‘using
the special tool. Tighten the special tool, to the same
torque
Nm as drive shaft
nut.
Caution
Never subject the wheel bearings to the load
when the drive shaft nuts are loosened.
TSB Revision
Page 1607 of 2103
FRONT SUSPENSION Upper Arm Assembly
A 299.9 mm (11.8 in.)
234.0 mm (9.2 in.)
Ball joint case
00000009
INSPECTION
lCheck the bushings for wear and deterioration.
lCheck the upper arm for bends or damage.
lCheck all bolts for condition and straightness.
IBALL JOINT BREAKAWAY TORQUE CHECK
(1) After shaking the ball joint stud times, install the
nut to the stud and use the special tool to measure the
breakaway torque of the ball joint.
Standard value: Nm (3-22
(2) When the measured value exceeds the standard va lue,
replace the upper arm assembly.
(3) When the measured value is lower than the stand ard
value, check that the ball joint turns smoothly wit hout
excessive play. If so, it is possible to use that b all joint.
BALL DUST COVER CHECK
If there are any cracks in or damage to the dust co ver, replace
the arm assembly.
TSB Revision