Page 10 of 143

Seat Belts
Your Honda is provided with seat belts to minimize the chance ofinjury to yourself and your passengers in a sudden stop or accident.
For precautions on using seat belts for children, babies and pregnantwomen, see pages 14 through 16.
Seat belts are most effective when the driver and passengers are
sitting up straight and well back in the seat.
In the event of a collision, occupants not wearing seat belts could
be seriously or fatally injured. Make sure you and all your passengers ALWAYS put on the seat belts before driving away.
CAUTION:
Be careful the seat belts are not damaged by catching or
entangling in the door or seat mechanism.
Wearing the Front Seat Belts The automatic ("passive") lap/shoulder belt system with emergency locking retractors are designed to lock only during a sudden stop or
impact. Otherwise, they allow you some freedom of movement in
the seat.
NOTE:
The motion-sensing lock mechanisms for the front belts are located in the doors, therefore, if you open the door too quickly, the belt
may lock and the door cannot be opened further. If this happens,
close the door and open it again more slowly.
1. Enter the car and close the door completely. If the door is not closed completely, the belt will not function properly, the warning
light on the instrument panel will come on and the beeper will
sound when the ignition switch is in the ON position. See page
13
Never drive the car with the doors ajar. The doors must be closed
completely for the front seat belts to function properly.
2. Move the seat a comfortable distance from the steering wheel, sit as straight up as possible and well back in the seat.
3. Position the belt across your lap, not your abdomen, as low on your hips as possible. Be sure the belt is not twisted.ProCarManuals.comMain Menu t s
Page 13 of 143

Do not wear the shoulder portion of the belt under your arm or
out of position. Such use could increase the chance and amount of injury in an accident.
Never use one belt for more than one person, child or adult.
Comfort clips sold on the open market are not recommended
since they could impair the function and safety of the belts.
Front Seat Belt Warning Light and Warning Beeper
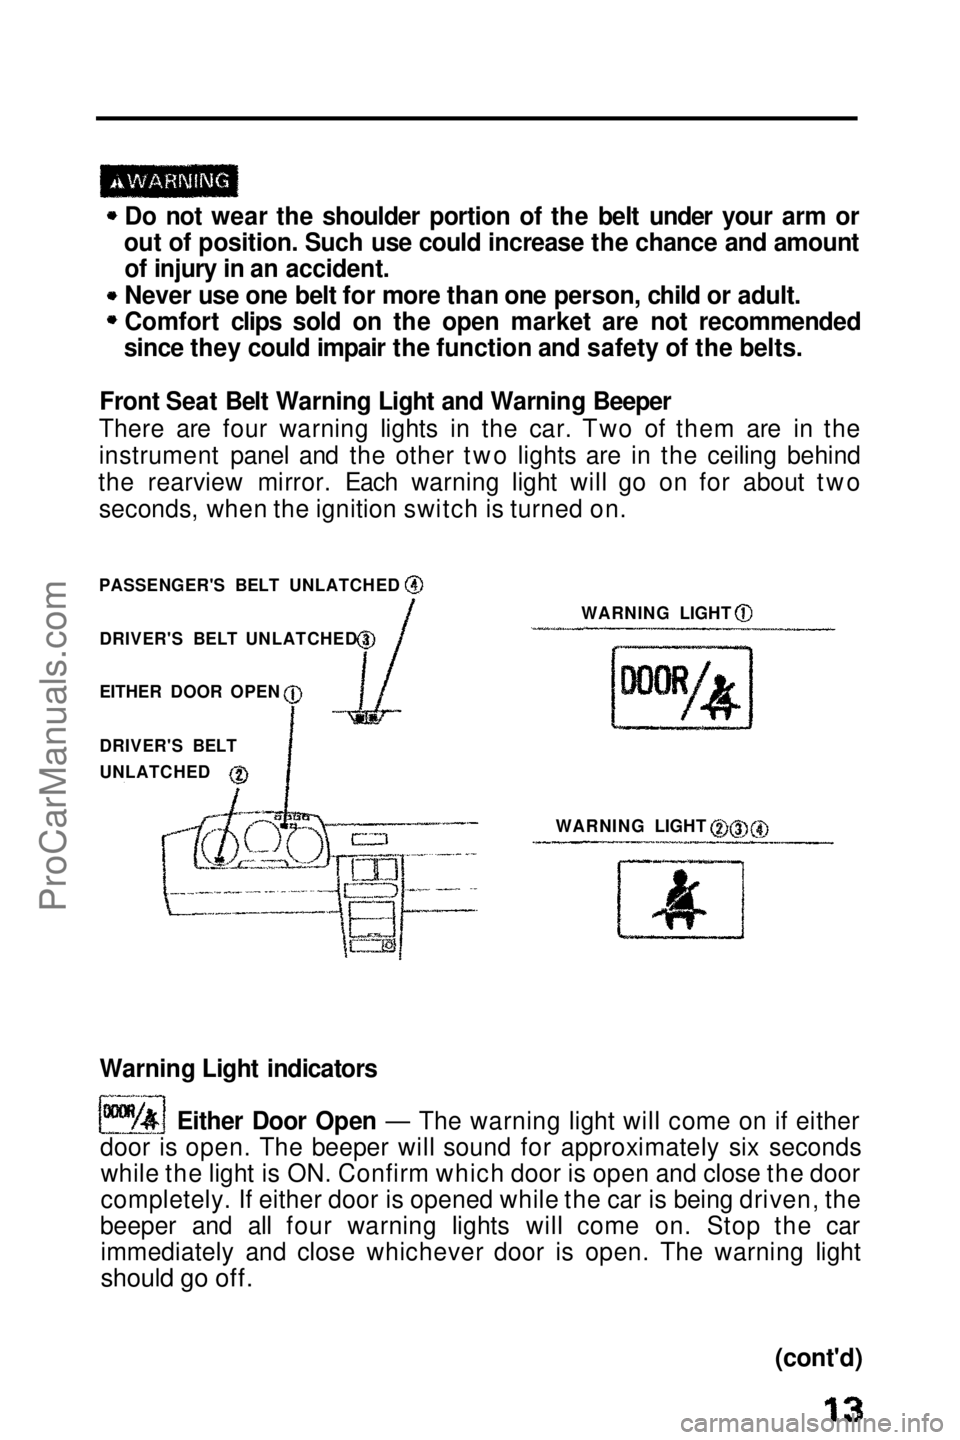
There are four warning lights in the car. Two of them are in the
instrument panel and the other two lights are in the ceiling behind
the rearview mirror. Each warning light will go on for about two seconds, when the ignition switch is turned on.
WARNING LIGHT
WARNING LIGHT
Warning Light indicators Either Door Open — The warning light will come on if either
door is open. The beeper will sound for approximately six seconds while the light is ON. Confirm which door is open and close the door
completely. If either door is opened while the car is being driven, the
beeper and all four warning lights will come on. Stop the car immediately and close whichever door is open. The warning light
should go off.
(cont'd)
PASSENGER'S BELT UNLATCHED
DRIVER'S BELT UNLATCHED
EITHER DOOR OPEN
DRIVER'S BELT
UNLATCHEDProCarManuals.comMain Menu t s
Page 19 of 143
Instrument Panel
TURN SIGNAL/ LIGHT SWITCH/
DIMMER SWITCH
SUNROOFSWITCH
HEADLIGHT
MOTOR
SWITCH PANEL BRIGHTNESS
CONTROL KNOB HAZARD WARNING
LIGHT SWITCH
FOG LAMP
SWITCH REAR WINDOW
DEFOGGER
SWITCH
DIGITAL
CLOCK
CENTER
VENTS
CRUISE
CONTROL
MASTER
SWITCH
FUSE BOX COIN BOX
HORN
BUTTON WINDSHIELD
WIPER/WASHER
SWITCH LEVER
IGNITION SWITCH CIGARETTE
LIGHTER
HEATING/
COOLING
CONTROL
PANEL
TACHOMETER SPEEDOMETER
FUEL GAUGESHIFT LEVER
POSITION
INDICATOR
(AUTOMATIC)
ODOMETER TRIP METER
TRIP METERRESET BUTTON SAFETY
INDICATOR
LIGHT
COOLANT
TEMPERATURE
GAUGEProCarManuals.comMain Menu t s
Page 21 of 143

Warning and Indicator Lights
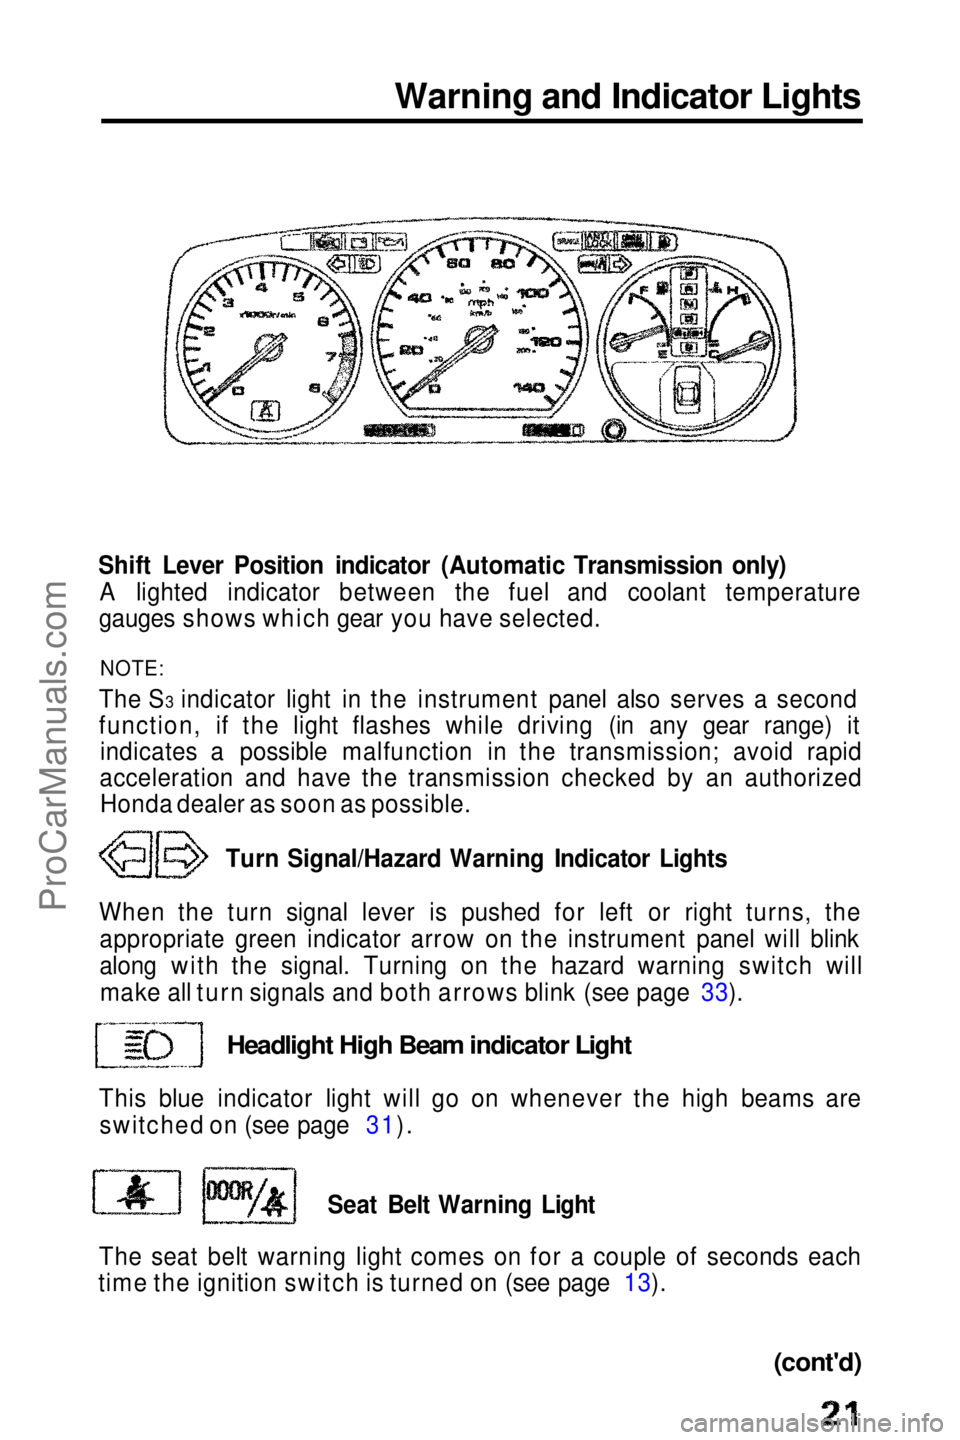
Shift Lever Position indicator (Automatic Transmission only) A lighted indicator between the fuel and coolant temperature
gauges shows which gear you have selected.
NOTE:
The S3 indicator light in the instrument panel also serves a second
function, if the light flashes while driving (in any gear range) it indicates a possible malfunction in the transmission; avoid rapid
acceleration and have the transmission checked by an authorized Honda dealer as soon as possible.
Turn Signal/Hazard Warning Indicator Lights
When the turn signal lever is pushed for left or right turns, the appropriate green indicator arrow on the instrument panel will blink
along with the signal. Turning on the hazard warning switch willmake all turn signals and both arrows blink (see page 33).
Headlight High Beam indicator Light
This blue indicator light will go on whenever the high beams are switched on (see page 31).
Seat Belt Warning Light
The seat belt warning light comes on for a couple of seconds each
time the ignition switch is turned on (see page 13).
(cont'd)ProCarManuals.comMain Menu t s
Page 30 of 143

Lights
FIRST
STOP
Turn Signals
Push the turn signal lever down to
signal a left turn, and up for a right
turn. The indicator and
appropriate signal lights will blink.
The lever will return automatically
to its original position when the
steering wheel is returned to
straight ahead.
For lane changing, you can signal by pushing the lever part way up
or down (to the first stop) and holding it there; the lever will return
to its original position when you release it. If either turn signal
indicator lights up but does not blink, blinks faster than usual, or
does not light up at all, check for a burned out bulb or fuse.
FIRST POSITION
Turn
SECOND
POSITION
Headlights
Turn the light switch to the first position ( ) for taillights, side
marker lights, position lights,
license plate lights, and
instrument panel lights. Turn to the second position ( ) to raise
and add the headlights.
When the switch is returned from the second to the first position,
the headlights will go off but will not retract; they retract when the light switch is turned to OFF.
If the driver's door is opened when the light switch is turned to
either "on" position, a chime will sound to remind you to turn off
your lights.
If you wish to raise or retract the headlights when the light switch is
off (to use them as a passing signal for example), you may do so bypushing the headlight motor switch, located on the left side of the
instrument panel; see page 32 for instructions on its use.
CAUTION:
Do not operate the headlight switch or headlight motor switch if
anyone's hands are near the headlights. FIRST
STOP
RIGHT
TURN
LEFT TURNProCarManuals.comMain Menu t s
Page 33 of 143
Hazard Warning System
This system should be used only when your car is stopped underemergency or hazardous
conditions. To activate, push the hazard warning switch The
front and rear turn signals will
blink simultaneously and both indicator lights will flash. Push the switch again to turn the
system off.
Panel Brightness Control
When the light switch is in either
of the two "ON" positions, the intensity of the instrument lights
can be adjusted by turning the panel brightness control dial.
Interior Light
The interior light has a three position switch. The light is off all
the time in the OFF position. In
the middle position, it goes on only when a door is opened. In theON position, it is on all the time.
(cont'd)
ON
OFF
DOOR
ACTIVATED
Bright
DarkProCarManuals.comMain Menu t s
Page 35 of 143

Cruise Control
Cruise Control
The Cruise Control system allows you to set and automatically maintain any speed above 30 mph (45 km/h) without keeping your
foot on the accelerator. As its name implies, it is meant for cruising
on straight, uncongested highways or freeways. It is not
recommended to be used in traffic, on winding roads or in bad weather conditions where the driver should have total control.
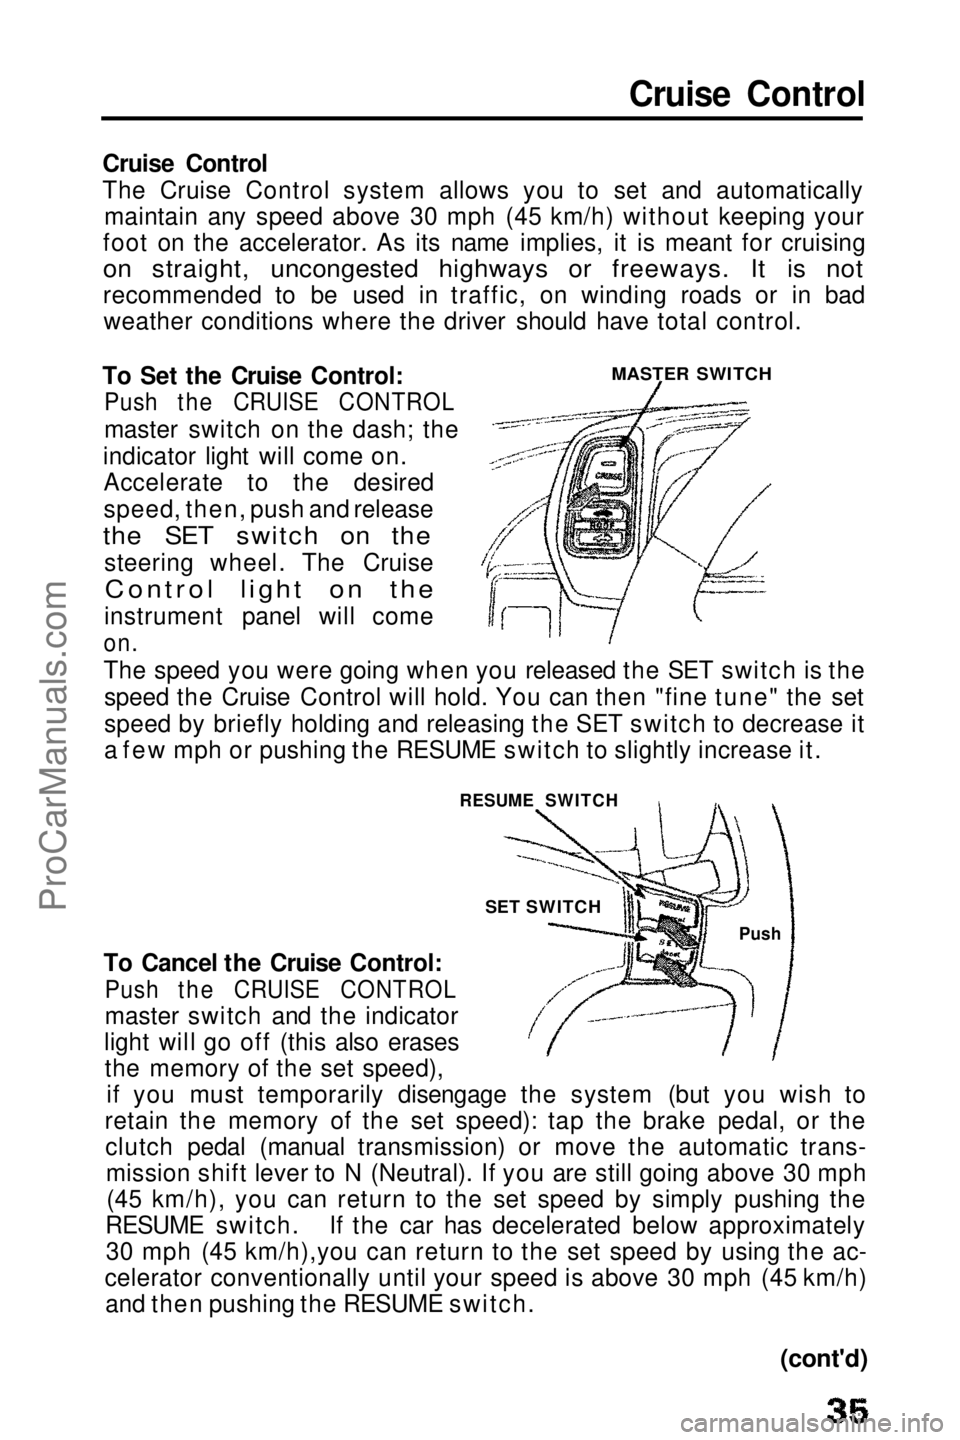
To Set the Cruise Control:
Push the CRUISE CONTROL
master switch on the dash; the
indicator light will come on. Accelerate to the desired
speed, then, push and release
the SET switch on the
steering wheel. The Cruise
Control light on the
instrument panel will come
on.
The speed you were going when you released the SET switch is the speed the Cruise Control will hold. You can then "fine tune" the set
speed by briefly holding and releasing the SET switch to decrease it
a few mph or pushing the RESUME switch to slightly increase it.
To Cancel the Cruise Control:
Push the CRUISE CONTROL
master switch and the indicator
light will go off (this also erases the memory of the set speed), if you must temporarily disengage the system (but you wish to
retain the memory of the set speed): tap the brake pedal, or the clutch pedal (manual transmission) or move the automatic trans-mission shift lever to N (Neutral). If you are still going above 30 mph(45 km/h), you can return to the set speed by simply pushing the
RESUME switch. If the car has decelerated below approximately 30 mph (45 km/h),you can return to the set speed by using the ac-
celerator conventionally until your speed is above 30 mph (45 km/h) and then pushing the RESUME switch.
MASTER SWITCH
RESUME SWITCH Push
SET SWITCH
(cont'd)ProCarManuals.comMain Menu t s
Page 69 of 143

While driving in the "S" range, you can select 4th gear by pushing
the "S4"
switch. Depending upon vehicle speed and throttle pedal
position, the transmission will shift to 4th gear when the switch is
pressed; the "S4" indicator light in the instrument panel will come
on. Pushing the "S4" switch again will cause the transmission to
downshift to 3rd gear In the "S3" mode. The "S4" indicator light in
the instrument panel will go out, and the "S3" light on the instrument panel will come on.
If the shift lever is moved to any other driving range, the "S4"
switch will be cancelled automatically.
NOTE:
In both the D and S modes, the transmission holds in
2nd while
you are
stopped in gear. When you start moving again, the
transmission shifts to 1st, then 2nd and so on. If rapid acceleration is necessary, depress the accelerator to the
floor; the transmission will automatically shift down according to
load and engine speed. This applies to both D and S ranges.
(cont'd)
S4 SWITCHProCarManuals.comMain Menu t s