Page 10 of 143

Seat Belts
Your Honda is provided with seat belts to minimize the chance ofinjury to yourself and your passengers in a sudden stop or accident.
For precautions on using seat belts for children, babies and pregnantwomen, see pages 14 through 16.
Seat belts are most effective when the driver and passengers are
sitting up straight and well back in the seat.
In the event of a collision, occupants not wearing seat belts could
be seriously or fatally injured. Make sure you and all your passengers ALWAYS put on the seat belts before driving away.
CAUTION:
Be careful the seat belts are not damaged by catching or
entangling in the door or seat mechanism.
Wearing the Front Seat Belts The automatic ("passive") lap/shoulder belt system with emergency locking retractors are designed to lock only during a sudden stop or
impact. Otherwise, they allow you some freedom of movement in
the seat.
NOTE:
The motion-sensing lock mechanisms for the front belts are located in the doors, therefore, if you open the door too quickly, the belt
may lock and the door cannot be opened further. If this happens,
close the door and open it again more slowly.
1. Enter the car and close the door completely. If the door is not closed completely, the belt will not function properly, the warning
light on the instrument panel will come on and the beeper will
sound when the ignition switch is in the ON position. See page
13
Never drive the car with the doors ajar. The doors must be closed
completely for the front seat belts to function properly.
2. Move the seat a comfortable distance from the steering wheel, sit as straight up as possible and well back in the seat.
3. Position the belt across your lap, not your abdomen, as low on your hips as possible. Be sure the belt is not twisted.ProCarManuals.comMain Menu t s
Page 26 of 143
Tilt Steering
The steering wheel position can be adjusted to suit driver preference.
1.Pull toward you and hold the
lever at the bottom left of the
steering column, and adjust the
steering wheel to the desired position.
2. To lock the steering wheel, hold it in the desired position
and release the lever. TILT STEERING
ADJUSTMENT
LEVER
Do not adjust the steering wheel position while driving. After adjusting the steering wheel position, make sure it is
securely locked in place by "rocking" it up and down sightly.ProCarManuals.comMain Menu s t
Page 30 of 143

Lights
FIRST
STOP
Turn Signals
Push the turn signal lever down to
signal a left turn, and up for a right
turn. The indicator and
appropriate signal lights will blink.
The lever will return automatically
to its original position when the
steering wheel is returned to
straight ahead.
For lane changing, you can signal by pushing the lever part way up
or down (to the first stop) and holding it there; the lever will return
to its original position when you release it. If either turn signal
indicator lights up but does not blink, blinks faster than usual, or
does not light up at all, check for a burned out bulb or fuse.
FIRST POSITION
Turn
SECOND
POSITION
Headlights
Turn the light switch to the first position ( ) for taillights, side
marker lights, position lights,
license plate lights, and
instrument panel lights. Turn to the second position ( ) to raise
and add the headlights.
When the switch is returned from the second to the first position,
the headlights will go off but will not retract; they retract when the light switch is turned to OFF.
If the driver's door is opened when the light switch is turned to
either "on" position, a chime will sound to remind you to turn off
your lights.
If you wish to raise or retract the headlights when the light switch is
off (to use them as a passing signal for example), you may do so bypushing the headlight motor switch, located on the left side of the
instrument panel; see page 32 for instructions on its use.
CAUTION:
Do not operate the headlight switch or headlight motor switch if
anyone's hands are near the headlights. FIRST
STOP
RIGHT
TURN
LEFT TURNProCarManuals.comMain Menu t s
Page 35 of 143

Cruise Control
Cruise Control
The Cruise Control system allows you to set and automatically maintain any speed above 30 mph (45 km/h) without keeping your
foot on the accelerator. As its name implies, it is meant for cruising
on straight, uncongested highways or freeways. It is not
recommended to be used in traffic, on winding roads or in bad weather conditions where the driver should have total control.
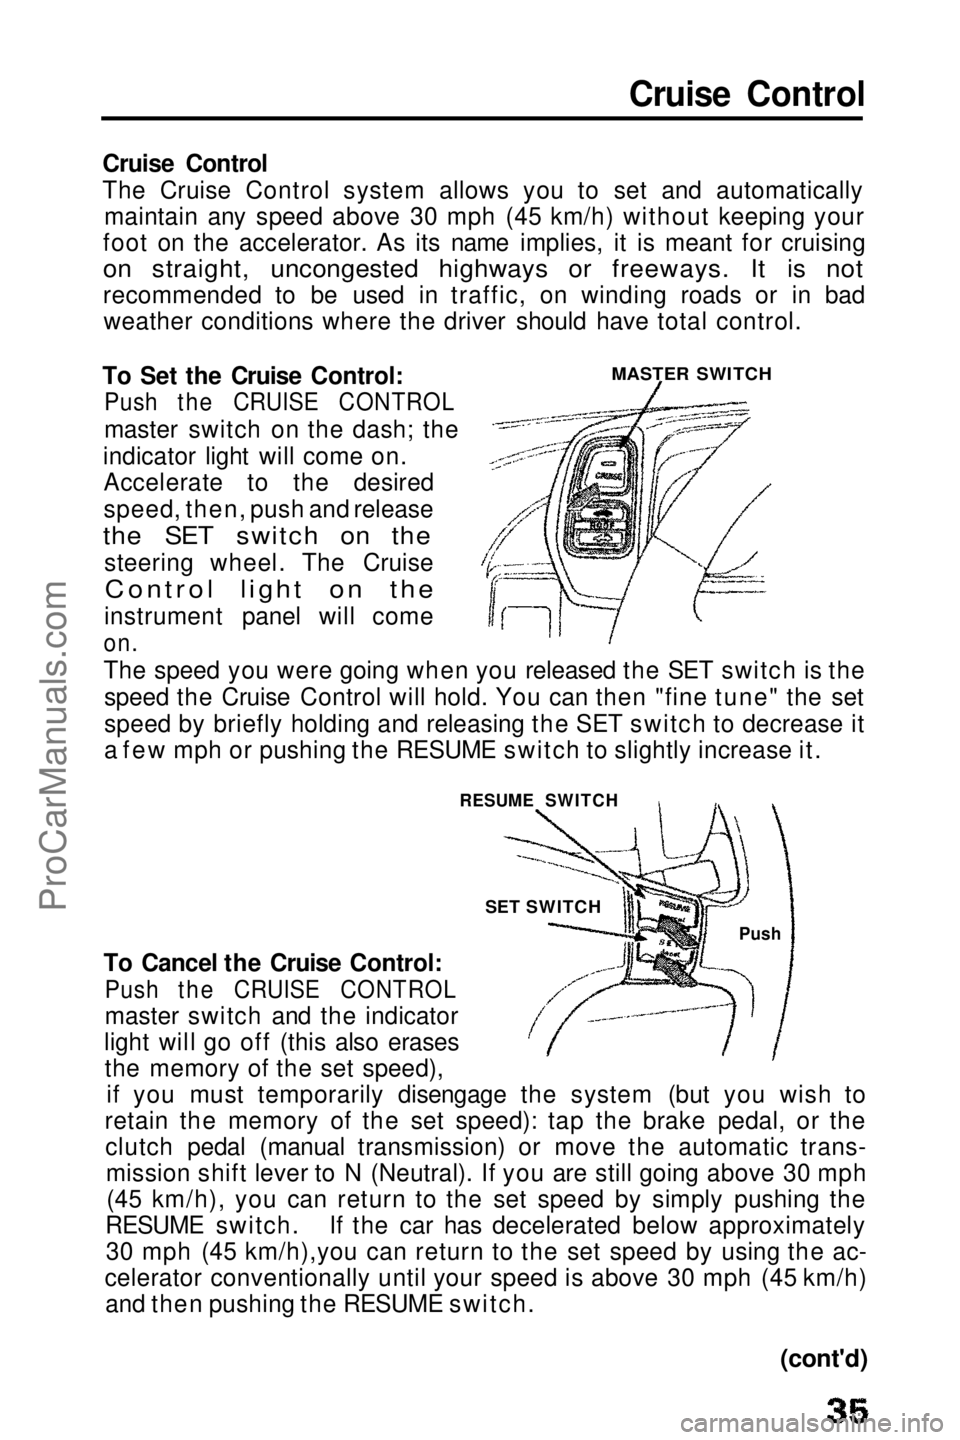
To Set the Cruise Control:
Push the CRUISE CONTROL
master switch on the dash; the
indicator light will come on. Accelerate to the desired
speed, then, push and release
the SET switch on the
steering wheel. The Cruise
Control light on the
instrument panel will come
on.
The speed you were going when you released the SET switch is the speed the Cruise Control will hold. You can then "fine tune" the set
speed by briefly holding and releasing the SET switch to decrease it
a few mph or pushing the RESUME switch to slightly increase it.
To Cancel the Cruise Control:
Push the CRUISE CONTROL
master switch and the indicator
light will go off (this also erases the memory of the set speed), if you must temporarily disengage the system (but you wish to
retain the memory of the set speed): tap the brake pedal, or the clutch pedal (manual transmission) or move the automatic trans-mission shift lever to N (Neutral). If you are still going above 30 mph(45 km/h), you can return to the set speed by simply pushing the
RESUME switch. If the car has decelerated below approximately 30 mph (45 km/h),you can return to the set speed by using the ac-
celerator conventionally until your speed is above 30 mph (45 km/h) and then pushing the RESUME switch.
MASTER SWITCH
RESUME SWITCH Push
SET SWITCH
(cont'd)ProCarManuals.comMain Menu t s
Page 58 of 143

Ignition Switch
The combined ignition switch/anti-theft lock is located on the right side of the steering column and has four positions:
0-LOCK position: The key can be removed or inserted in thisposition. To remove the key, push it in at position I, then turn it to
0 and pull it out. When the key is removed, the steering column
will lock.
NOTE:
On cars equipped with automatic transmissions, the transmission
must be in Park before pushing and turning the key to the O-LOCK position.
Never turn the ignition switch to the lock position or remove the
key while the car is in motion; the steering wheel can lock causing
a loss of directional control, and an accident could result. I-ACCESSORY position: In this position, the accessory circuit is
on, but the ignition circuit is off.
If the key is difficult to turn from the 0 to the I position, turn the
steering wheel slightly to relieve pressure on the lock.
II-ON position: This Is the normal running position.
III-START position: The starter will engage when the key is
turned to this position.
To remind you to remove the ignition key when leaving your car, a beeper will sound if the key is still in the ignition when you open the
driver's door. The beeper system is deactivated when you turn the ignition to 0 (Lock) and fully remove the key.ProCarManuals.comMain Menu t s
Page 59 of 143

Four Wheel Steering (Si with 4WS)
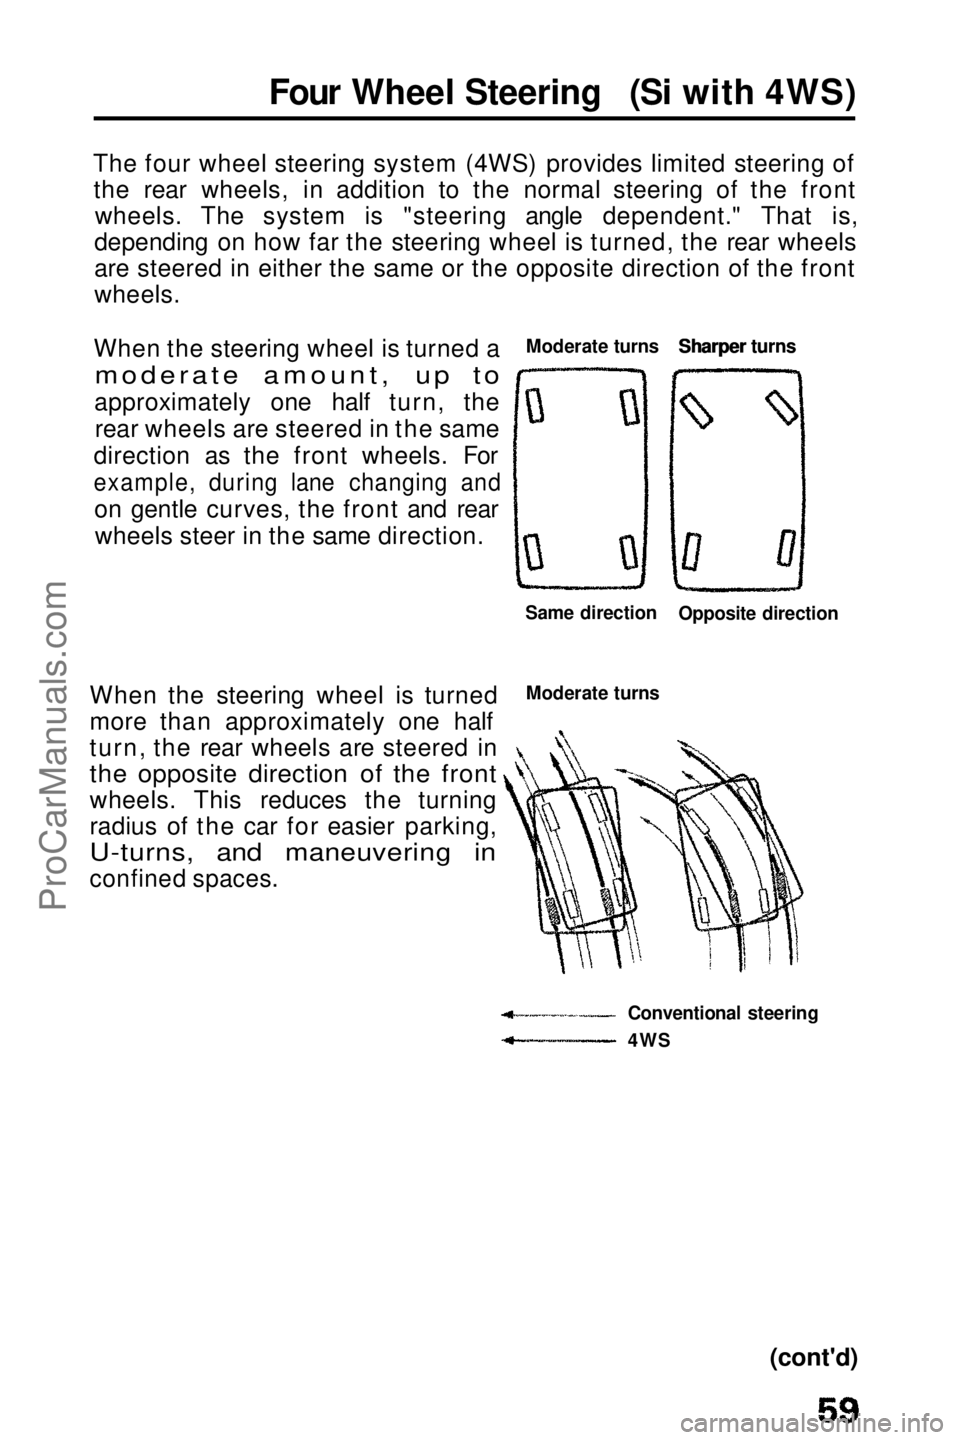
The four wheel steering system (4WS) provides limited steering of the rear wheels, in addition to the normal steering of the front wheels. The system is "steering angle dependent." That is,
depending on how far the steering wheel is turned, the rear wheels
are steered in either the same or the opposite direction of the front
wheels.
When the steering wheel is turned a
moderate amount, up to
approximately one half turn, the rear wheels are steered in the same
direction as the front wheels. For
example, during lane changing and
on gentle curves, the front and rearwheels steer in the same direction. Moderate turns Sharper turns
When the steering wheel is turned
more than approximately one half
turn, the rear wheels are steered in
the opposite direction of the front
wheels. This reduces the turning
radius of the car for easier parking,
U-turns, and maneuvering in
confined spaces.
Moderate turns
Conventional steering
(cont'd)
Same direction
Opposite direction
4WS Sharper turnsProCarManuals.comMain Menu t s
Page 60 of 143
Four Wheel Steering (cont'd)
CAUTION:
If the car is very close to a wall or other obstacle, the rear of the
body can swing enough to contact the obstacle when turning very sharply. Go slowly, and use both outside mirrors.
Conventional steering
4WSProCarManuals.comMain Menu t s
Page 74 of 143

Towing a Trailer (cont'd)
Towing Safety
Stopping distance will be increased when towing a trailer. For
each 10 mph (16 km/h) of speed, allow at least two car lengths between you and the vehicle ahead. Avoid sudden braking
which may cause trailer jackknifing and loss of control.
Avoid jerky starts and sudden acceleration. If your car has amanual transmission, always start out in first gear and release
the clutch at moderate engine rpm.
Avoid rapid lane changing and sharp turns. The trailer could hit your car in a tight turn. Slow down before making a turn.
Remember, the total length of your car plus trailer will require a
wider turning circle.
Crosswinds may adversely affect handling of your car and
trailer, Use the rearview mirrors frequently to warn you of approaching large vehicles that may pass you causing your car
and trailer to sway. When being passed, firmly grip the steering wheel and be prepared to reduce speed immediately but
gradually. Never increase speed. Steer straight ahead.
Towing a trailer in bad weather will magnify any difficulty in
controlling the car caused by the weather itself. Avoid sudden maneuvers: slow down and use extra caution.
Be careful when passing other vehicles. Passing requires
considerable distance because of the added weight and length
of your trailer.ProCarManuals.comMain Menu t s