1988 PONTIAC FIERO oil filter
[x] Cancel search: oil filterPage 1058 of 1825
1 SOME MODELS 1 ILL.
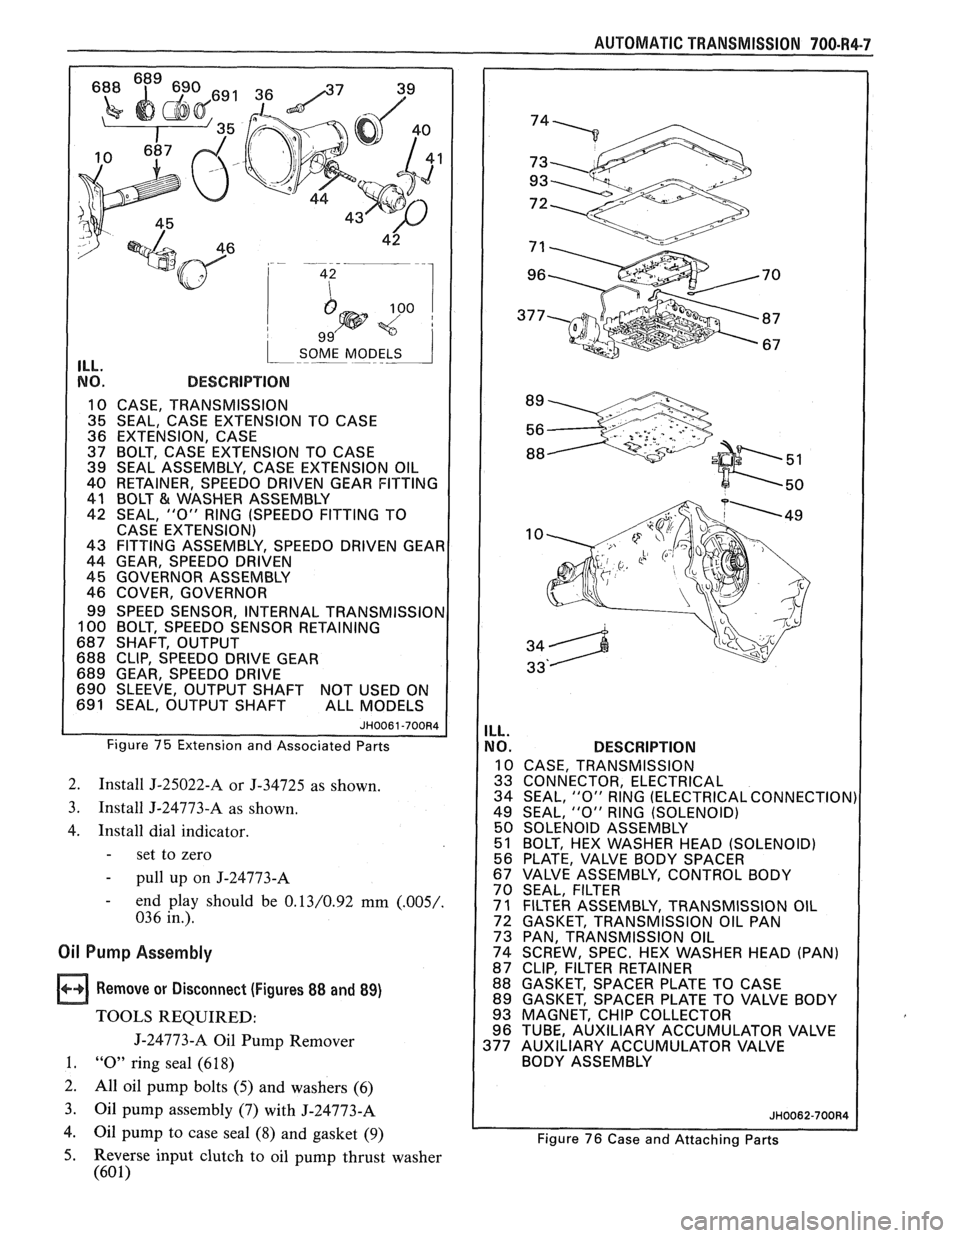
NO. DESCRIPTION
10 CASE, TRANSMISSION
1 35 SEAL, CASE EXTENSION TO CASE
36 EXTENSION, CASE
37 BOLT,
CASE EXTENSION TO CASE
39 SEAL ASSEMBLY, CASE EXTENSION OIL
40 RETAINER, SPEEDO
DRIVEN GEAR FITTING
41 BOLT
& WASHER ASSEMBLY
42 SEAL,
"0" RlNG (SPEEDO FITTING TO
CASE EXTENSION)
43 FITTING ASSEMBLY, SPEEDO DRIVEN GEAI
44 GEAR, SPEEDO DRIVEN
45 GOVERNOR ASSEMBLY
46 COVER, GOVERNOR
99 SPEED SENSOR, INTERNAL
TRANSMISSIOI 100 BOLT, SPEEDO SENSOR RETAINING
687 SHAFT, OUTPUT
688 CLIP, SPEEDO DRIVE GEAR
689 GEAR, SPEEDO DRIVE
690 SLEEVE, OUTPUT SHAFT NOT USED ON
691 SEAL, OUTPUT SHAFT ALL MODELS
Figure 75 Extension and Associated Parts
2. Install J-25022-A or J-34725 as shown.
3. Install J-24773-A as shown.
4. Install dial indicator.
- set to zero
- pull up on J-24773-A
- end play should be 0.13/0.92 mm (.005/.
036 in.).
Oil Pump Assembly
Remove or Disconnect (Figures 88 and 89)
TOOLS REQUIRED:
J-24773-A Oil Pump Remover
1. "0" ring seal (6 18)
2.
All oil pump bolts (5) and washers (6)
3.
Oil pump assembly (7) with J-24773-A
4. Oil pump to case seal (8) and gasket (9)
AUTOMATIC TRANSMISSION 700-R4-7
ILL.
NO. DESCRIPTION
10 CASE, TRANSMISSION
33 CONNECTOR, ELECTRICAL
34 SEAL,
"0" RlNG (ELECTRICAL CONNECTION)
49 SEAL,
"0" RlNG (SOLENOID)
50 SOLENOID ASSEMBLY
51 BOLT, HEX WASHER HEAD (SOLENOID)
56 PLATE. VALVE BODY SPACER
/ 67 VALVE' ASSEMBLY, CONTROL BODY
70 SEAL, FILTER
1 71 FILTER ASSEMBLY, TRANSMISSION OIL
72 GASKET, TRANSMISSION OIL PAN
73 PAN, TRANSMISSION OIL
74 SCREW, SPEC. HEX WASHER HEAD (PAN)
87 CLIP, FILTER RETAINER
88 GASKET, SPACER PLATE TO CASE
89 GASKET, SPACER PLATE TO VALVE BODY
93 MAGNET, CHIP COLLECTOR
96 TUBE, AUXILIARY ACCUMULATOR VALVE
377 AUXILIARY ACCUMULATOR VALVE
BODY ASSEMBLY
Figure 76 Case and Attaching Parts
5. Reverse input clutch to oil pump thrust washer
(60 1)
Page 1059 of 1825
700-R4-8 AUTOMATIC TRANSMISSION
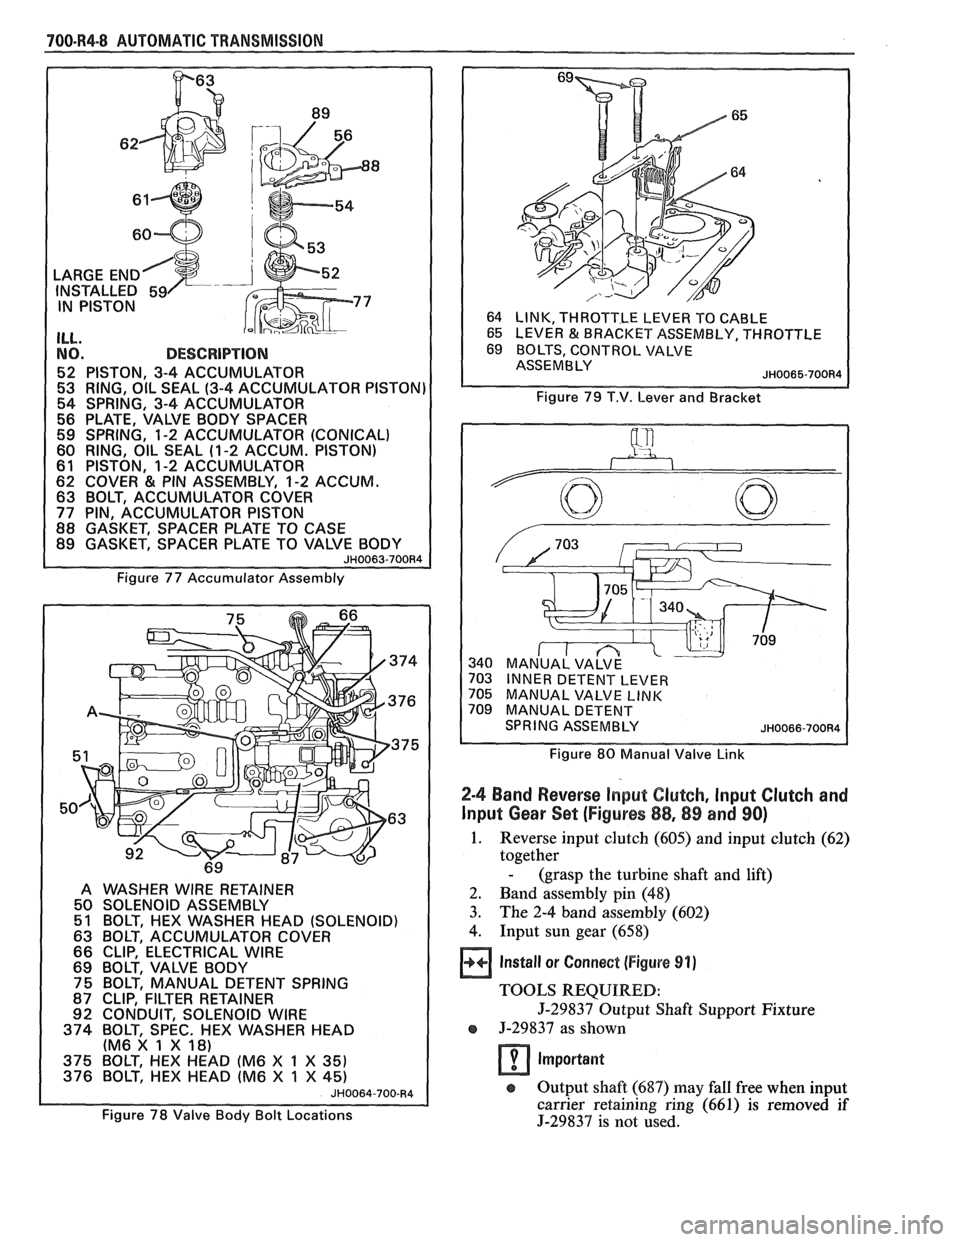
DESCRIPTION
52 PISTON, 3-4 ACCUMULATOR
53 RING,
OIL SEAL (3-4 ACCUMULATOR PISTON)
54 SPRING, 3-4 ACCUMULATOR
56 PLATE, VALVE BODY SPACER
59 SPRING, 1-2 ACCUMULATOR (CONICAL) 60 RING, OIL SEAL (1-2 ACCUM. PISTON) 61 PISTON, 1-2 ACCUMULATOR
Figure 77 Accumulator Assembly
A WASHER WlRE RETAINER
50 SOLENOID ASSEMBLY
51 BOLT, HEX WASHER HEAD (SOLENOID)
63 BOLT, ACCUMULATOR COVER
66 CLIP, ELECTRICAL WlRE
69 BOLT, VALVE BODY
75 BOLT, MANUAL DETENT SPRING
87 CLIP, FILTER RETAINER
92 CONDUIT, SOLENOID WlRE
374 BOLT, SPEC. HEX WASHER HEAD
(M6
X 1 X 18)
375 BOLT, HEX HEAD (M6 X 1 X 35) 376 BOLT, HEX HEAD (M6 X 1 X 45) JH0064-700-R4
Figure 78 Valve Body Bolt Locations 64
LINK, THROTTLE LEVER
TO CABLE
65 LEVER & BRACKET ASSEMBLY, THROTTLE
69 BOLTS, CONTROL VALVE
ASSEMBLY
JH0065-700R4
Figure 79 T.V. Lever and Bracket
MANUAL VALVE
INNER DETENT LEVER
MANUAL VALVE
LINK MANUAL DETENT
SPRING ASSEMBLY JHOO66-7OOR4
Figure 80 Manual Valve Link
2-4 Band Reverse input Clutch, lnput Clutch and
lnput Gear Set (Figures
88,89 and 90)
1. Reverse input clutch (605) and input clutch (62)
together
- (grasp the turbine shaft and lift)
2. Band assembly pin (48)
3. The 2-4 band assembly (602)
4. Input sun gear (658)
Install or Connect (Figure 91)
TOOLS REQUIRED:
J-29837 Output Shaft Support Fixture
e J-29837 as shown
Important
e Output shaft (687) may fall free when input
carrier retaining ring (661) is removed if
J-2983'7 is not used.
Page 1094 of 1825
AUTOMATIC TRANSMISSION 700-R4-43
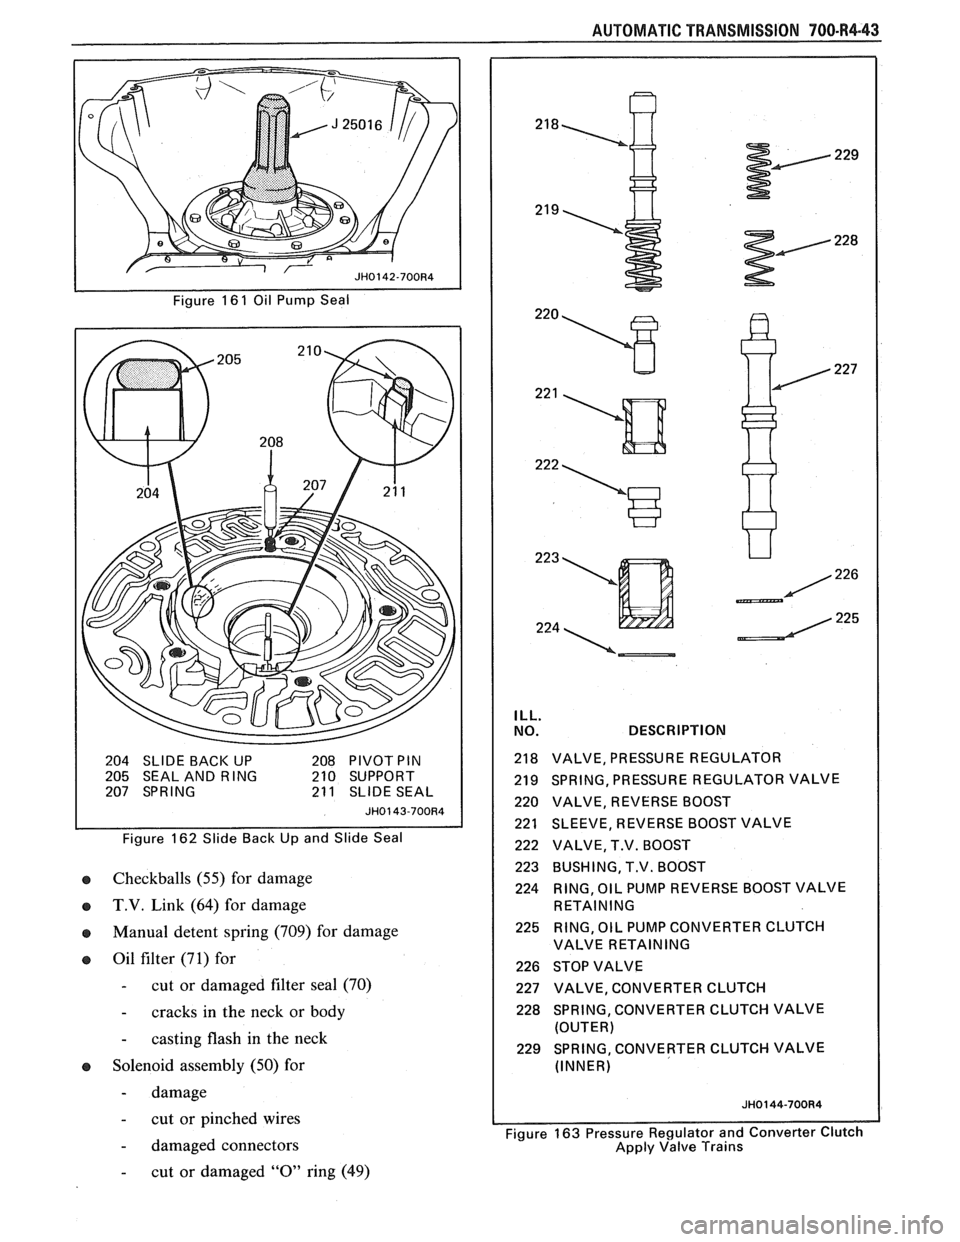
Figure 16 1 Oil Pump Seal
204 SLIDE
BACI< UP 208 PIVOT PIN 205 SEAL AND RING 210 SUPPORT
207 SPRING 21 1 SLIDE SEAL
JH0143-700R4
Figure 162 Slide Back Up and Slide Seal
o Checkballs (55) for damage
IB T.V. Link (64) for damage
IB Manual detent spring (709) for damage
o Oil filter (71) for
- cut or damaged filter seal (70)
- cracks in the neck or body
- casting flash in the neck
IB Solenoid assembly (50) for
- damage
- cut or pinched wires
- damaged connectors
ILL.
NO. DESCRIPTION
218 VALVE, PRESSURE REGULATOR
219 SPRING, PRESSURE REGULATOR VALVE
220 VALVE, REVERSE BOOST
221 SLEEVE, REVERSE BOOST VALVE
222 VALVE, T.V. BOOST
223 BUSHING, T.V. BOOST
224 RING,
OIL PUMP REVERSE BOOST VALVE
RETAINING
225 RING, OIL PUMP CONVERTER CLUTCH
VALVE RETAINING
226 STOP VALVE
227 VALVE, CONVERTER CLUTCH
228 SPRING, CONVERTER CLUTCH VALVE
(OUTER)
229 SPRING, CONVERTER CLUTCH VALVE
(INNER)
I Figure 163 Pressure Regulator and Converter Clutch
Apply Valve Trains
- cut or damaged "0" ring (49)
Page 1098 of 1825
AUTOMATIC TRANSMISSION 700-R4-47
Auxiliary Accumulator Valve Body Assembly
Clean (Figure 181)
e Auxiliary valve assembly (377) thoroughly in
clean solvent
- move the valves with a pick or small
screwdriver to dislodge any dirt or debris
that may have accumulated
e Air dry
+*+ Disassemble (Figure 181) m
1. (3) Bolts (373)
- Cover (371) is under spring pressure
2. Cover (371) and accumulator piston spring (370)
3. Piston (367)
4. Piston oil seal ring (53)
Disassemble (Figure 181)
e Position the auxiliary accumulator valve body on
a clean surface. Remove valve trains beginning
with the lower left hand corner. NOTE; valves
are under pressure-cover bores while removing
the roll pin.
e Valves and springs must be laid out on a clean
surface in the exact sequence as they are remvoed
Clean
a All valves and springs in clean solvent
e Air dry
Inspect
e Piston (367) for:
- cracks
- porosity
- damage
e Valves for:
- scoring
- nicks
- scratches
e Springs for damaged or distorted coils
a Auxiliary valve body (377) for:
- porosity
- damaged machined surfaces
e Orifice cup plug (359)
- remove only if damaged
Remove or Disconnect
Tools Required
#3 Screw Extractor
e Orifice cup plug (359). Use modified #3 screw
extractor.
Install or Connect
Tools Required
3/8" Rod
e Orifice cup plug (359). Use 3/8" rod.
- seat flush
Assemble (Figure 181)
e Auxiliary accumulator valve train exactly as
shown. Notice the valve lands
Assemble (Figure 181)
1. Piston oil seal ring (369) onto piston (367)
- lubricate with petrolatum
2. Piston (367)
3. Accumulator spring (370)
4. Cover
(371) and (3) bolts (373)
Install or Connect (Figures 181,184 and 185)
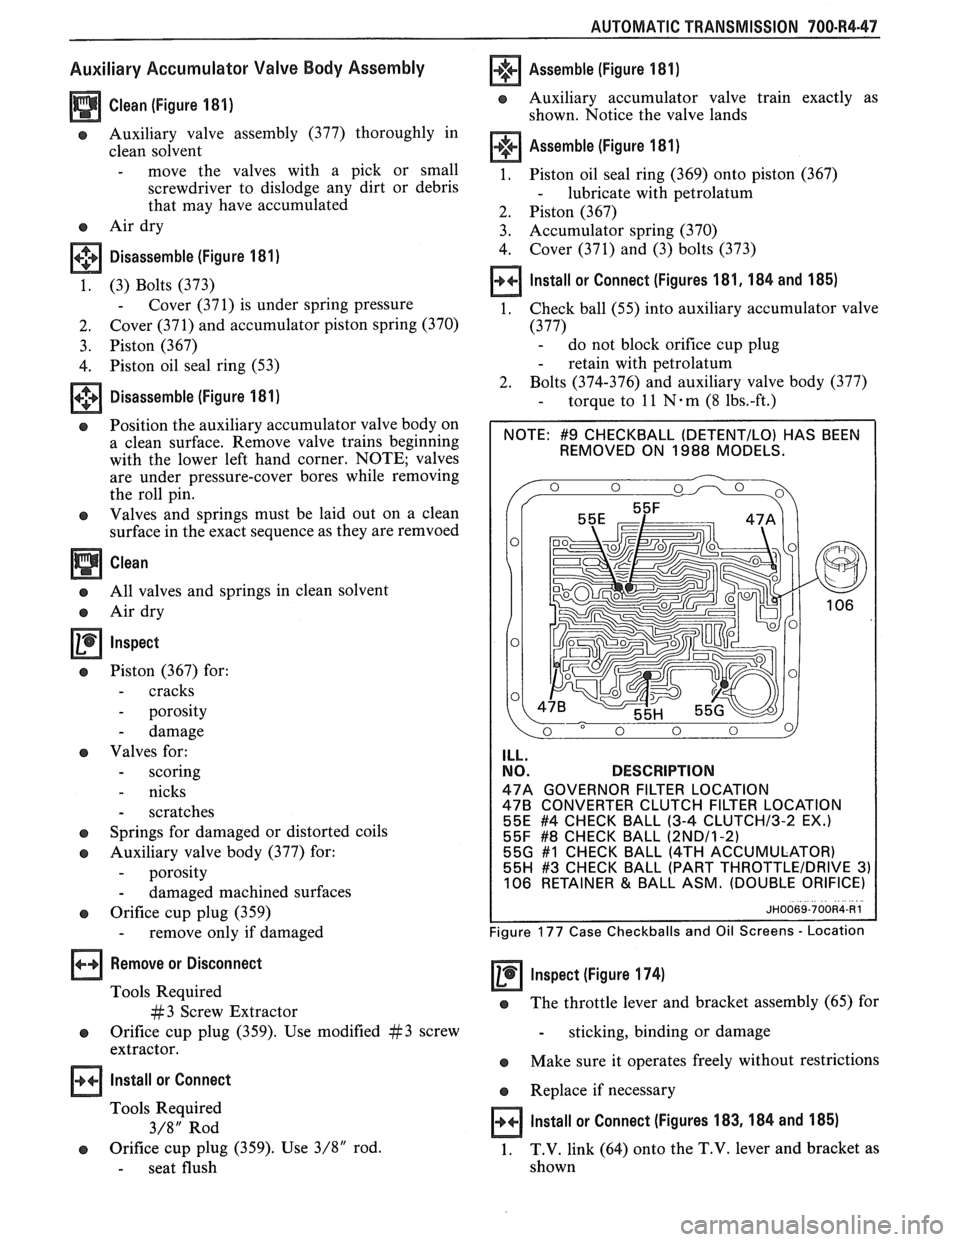
1. Check ball (55) into auxiliary accumulator valve
(377) - do not block orifice cup plug
- retain with petrolatum
2. Bolts (374-376) and auxiliary valve body (377)
- torque to 11 N-m (8 1bs.-ft.)
(DETENTILO) HAS BEEN
REMOVED ON 1988 MODELS.
ILL.
NO. DESCRIPTION
47A GOVERNOR FILTER LOCATION 478 CONVERTER CLUTCH FILTER LOCATION
55E #4 CHECK BALL (3-4 CLUTCHl3-2 EX.) 55F #8 CHECK BALL (2NDl1-2) 55G #I CHECK BALL (4TH ACCUMULATOR)
55H #3 CHECK BALL (PART THROTTLEIDRIVE 3) 106 RETAINER & BALL ASM. (DOUBLE ORIFICE)
Figure 177 Case Checkballs and Oil Screens - Location
Inspect (Figure 174) -
e The throttle lever and bracket assembly (65) for
- sticking, binding or damage
e Make sure it operates freely without restrictions
e Replace if necessary
Install or Connect (Figures 183,184 and 185)
1. T.V. link
(64) onto the T.V. lever and bracket as
shown
Page 1100 of 1825
AUTOMATIC TRANSMISSION 700-R4-49
--
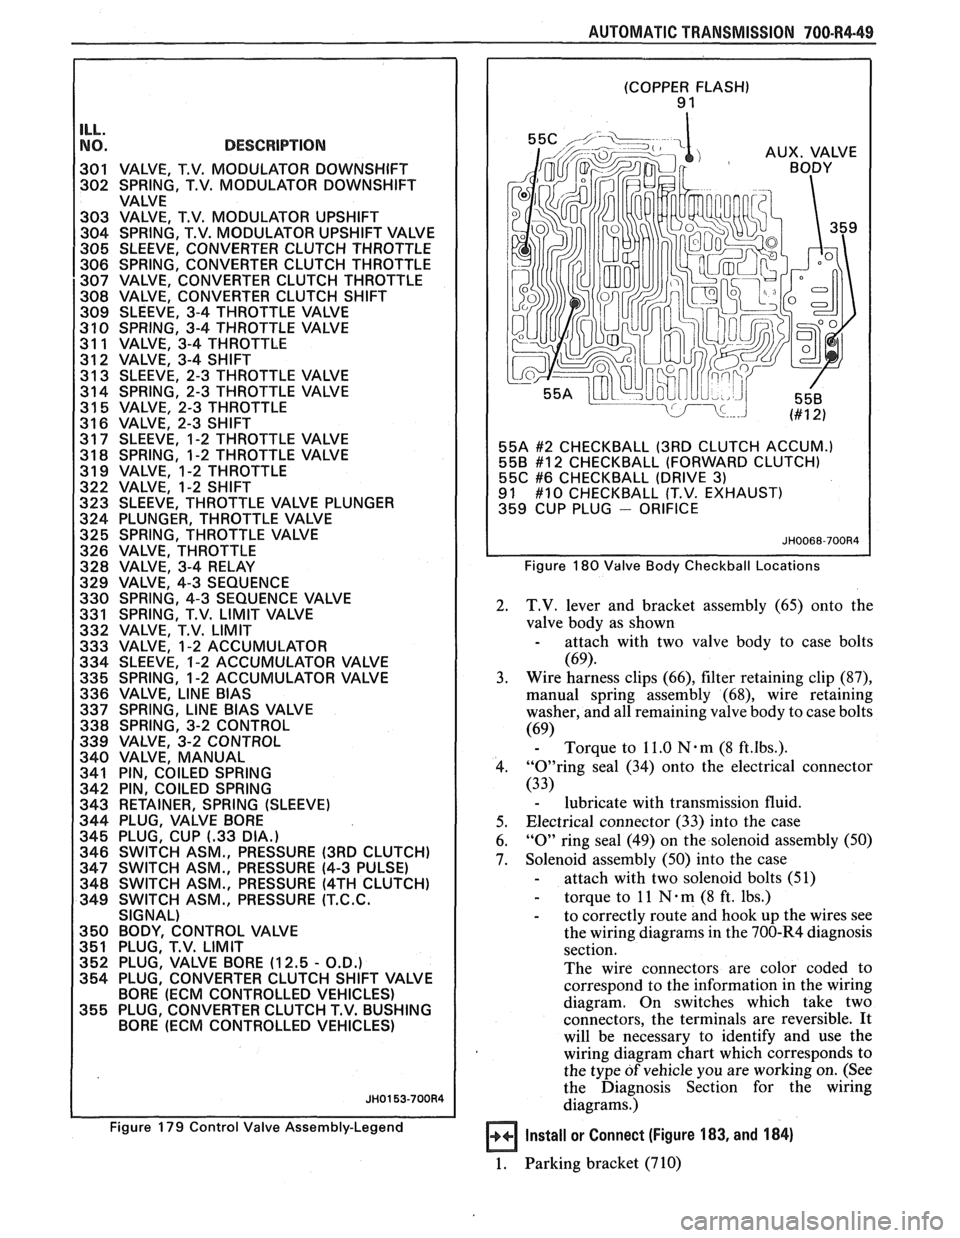
NO. DESCRIPTION I 301 VALVE, T.V. MODULATOR DOWNSHIFT
302 SPRING, T.V. MODULATOR DOWNSHIFT
VALVE
303 VALVE, T.V. MODULATOR UPSHIFT
304 SPRING, T.V. MODULATOR UPSHIFT VALVE
305 SLEEVE, CONVERTER CLUTCH THROTTLE
306 SPRING, CONVERTER CLUTCH THROTTLE
307 VALVE, CONVERTER CLUTCH THROTTLE
308 VALVE, CONVERTER CLUTCH SHlFT
309 SLEEVE, 3-4 THROTTLE VALVE
3 10 SPRING, 3-4 THROTTLE VALVE
31 1 VALVE, 3-4 THROTTLE
312 VALVE, 3-4 SHlFT
31 3 SLEEVE, 2-3 THROTTLE VALVE
314 SPRING, 2-3 THROTTLE VALVE
31
5 VALVE, 2-3 THROTTLE
31 6 VALVE, 2-3 SHlFT
31 7 SLEEVE, 1-2 THROTTLE VALVE
31
8 SPRING, 1-2 THROTTLE VALVE
31 9 VALVE, 1-2 THROTTLE
322 VALVE, 1-2 SHlFT
323 SLEEVE, THROTTLE VALVE PLUNGER
324 PLUNGER, THROTTLE VALVE
325 SPRING, THROTTLE VALVE
326 VALVE, THROTTLE
328 VALVE, 3-4 RELAY
329 VALVE, 4-3 SEQUENCE
330 SPRING, 4-3 SEQUENCE VALVE
331 SPRING, T.V.
LIMIT VALVE
332 VALVE, T.V.
LIMIT
333 VALVE, 1-2 ACCUMULATOR
334 SLEEVE, 1-2 ACCUMULATOR VALVE
335 SPRING, 1-2 ACCUMULATOR VALVE
336 VALVE,
LlNE BlAS
337 SPRING, LlNE BlAS VALVE
338 SPRING, 3-2 CONTROL
339 VALVE, 3-2 CONTROL
340 VALVE, MANUAL
341 PIN, COILED SPRING
342 PIN, COILED SPRING
343 RETAINER, SPRING (SLEEVE)
344 PLUG, VALVE BORE
345 PLUG, CUP
(-33 DIA.)
346 SWITCH ASM., PRESSURE (3RD CLUTCH)
347 SWITCH ASM., PRESSURE (4-3 PULSE)
348 SWITCH ASM., PRESSURE
(4TH CLUTCH)
349 SWITCH ASM., PRESSURE
(T.C.C.
SIGNAL)
350 BODY, CONTROL VALVE
351 PLUG, T.V. LIMIT
352 PLUG, VALVE BORE (12.5
- O.D.)
354 PLUG, CONVERTER CLUTCH SHlFT VALVE
BORE
(ECM CONTROLLED VEHICLES)
355 PLUG, CONVERTER CLUTCH T.V. BUSHING
BORE
(ECM CONTROLLED VEHICLES)
Figure 179 Control Valve Assembly-Legend
(COPPER FLASH) 9 1
55A
#2 CHECKBALL (3RD CLUTCH ACCUM.)
558 #12 CHECKBALL (FORWARD CLUTCH)
55C #6 CHECKBALL (DRIVE 3) 91 #10 CHECKBALL (T.V. EXHAUST)
359 CUP PLUG - ORIFICE
Figure 180 Valve Body Checkball Locations
2. T.V. lever and bracket assembly (65) onto the
valve body as shown
- attach with two valve body to case bolts
(69).
3. Wire harness
clips (66), filter retaining clip (87),
manual spring assembly (68), wire retaining
washer, and all remaining valve body to case bolts
(69) - Torque to 11.0 Nam (8 ft.lbs.).
4. "0"ring seal (34) onto the electrical connector
(33)
- lubricate with transmission fluid.
5. Electrical connector
(33) into the case
6.
"0" ring seal (49) on the solenoid assembly (50)
7. Solenoid assembly (50) into the case
- attach with two solenoid bolts (51)
- torque to 11 N . m (8 ft. lbs.)
- to correctly route and hook up the wires see
the wiring diagrams in the 700-R4 diagnosis
section.
The wire connectors are color coded to
correspond to the information in the wiring
diagram. On switches which take two
connectors, the terminals are reversible.
It
will be necessary to identify and use the
wiring diagram chart which corresponds to
the type
of vehicle you are working on. (See
the Diagnosis Section for the wiring
diagrams.)
Install or Connect (Figure 183, and 184)
1. Parking bracket (710)
Page 1101 of 1825
700.R4-50 AUTOMATIC TRANSMISSION
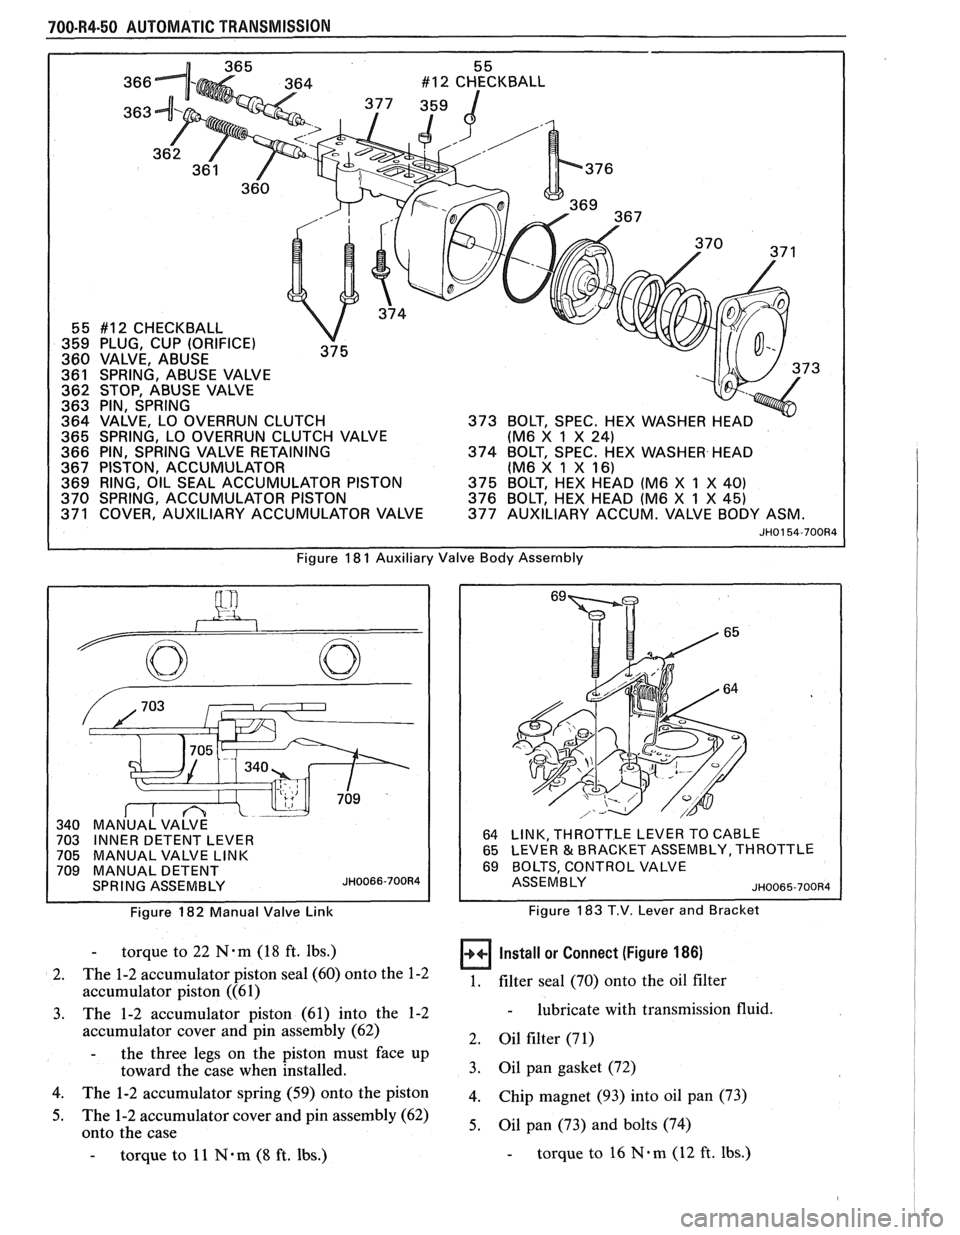
366
363
55 #12 CHECKBALL
359 PLUG, CUP (ORIFICE)
360 VALVE, ABUSE
361 SPRING, ABUSE VALVE 73
362 STOP, ABUSE VALVE
363 PIN, SPRING
364 VALVE, LO OVERRUN CLUTCH
365 SPRING, LO OVERRUN CLUTCH VALVE (M6
X
1 X 24)
366 PIN, SPRING VALVE RETAINING
374 BOLT, SPEC. HEX WASHER HEAD
367 PISTON, ACCUMULATOR (M6 X 1 X
16) 369 RING, OIL SEAL ACCUMULATOR PISTON
375 BOLT, HEX HEAD (M6 X 1 X 40)
370 SPRING, ACCUMULATOR PISTON 376 BOLT, HEX HEAD (M6 X 1 X 45) 371 COVER, AUXILIARY ACCUMULATOR VALVE 377 AUXILIARY ACCUM. VALVE BODY ASM.
JH0154-700R4
Figure 18 1 Auxiliary Valve Body Assernbly
Figure 182 Manual Valve Link
64 LINK, THROTTLE LEVER TO CABLE
65 LEVER & BRACKET ASSEMBLY, THROTTLE
69 BOLTS, CONTROL VALVE
ASSEMBLY ~H0065-700R4
Figure 183 T.V. Lever and Bracket
- torque to 22 N.m (18 ft. lbs.)
2. The
1-2 accumulator piston seal (60) onto the 1-2
accumulator piston ((61)
3. The 1-2 accumulator piston (61) into the 1-2
accumulator cover and pin assembly (62)
- the three legs on the piston must face up
toward the case when installed.
4. The 1-2 accumulator spring (59) onto the piston
5. The 1-2 accumulator cover and pin assembly (62)
onto the case
- torque to 11 N*m (8 ft. lbs.)
Install or Connect (Figure 186)
1. filter seal (70)
onto the oil filter
- lubricate with transmission fluid.
2. Oil filter (71)
3. Oil pan gasket (72)
4. Chip magnet (93) into oil pan (73)
5. Oil pan (73) and bolts (74)
- torque to 16 N.m (12 ft. Ibs.)
Page 1102 of 1825
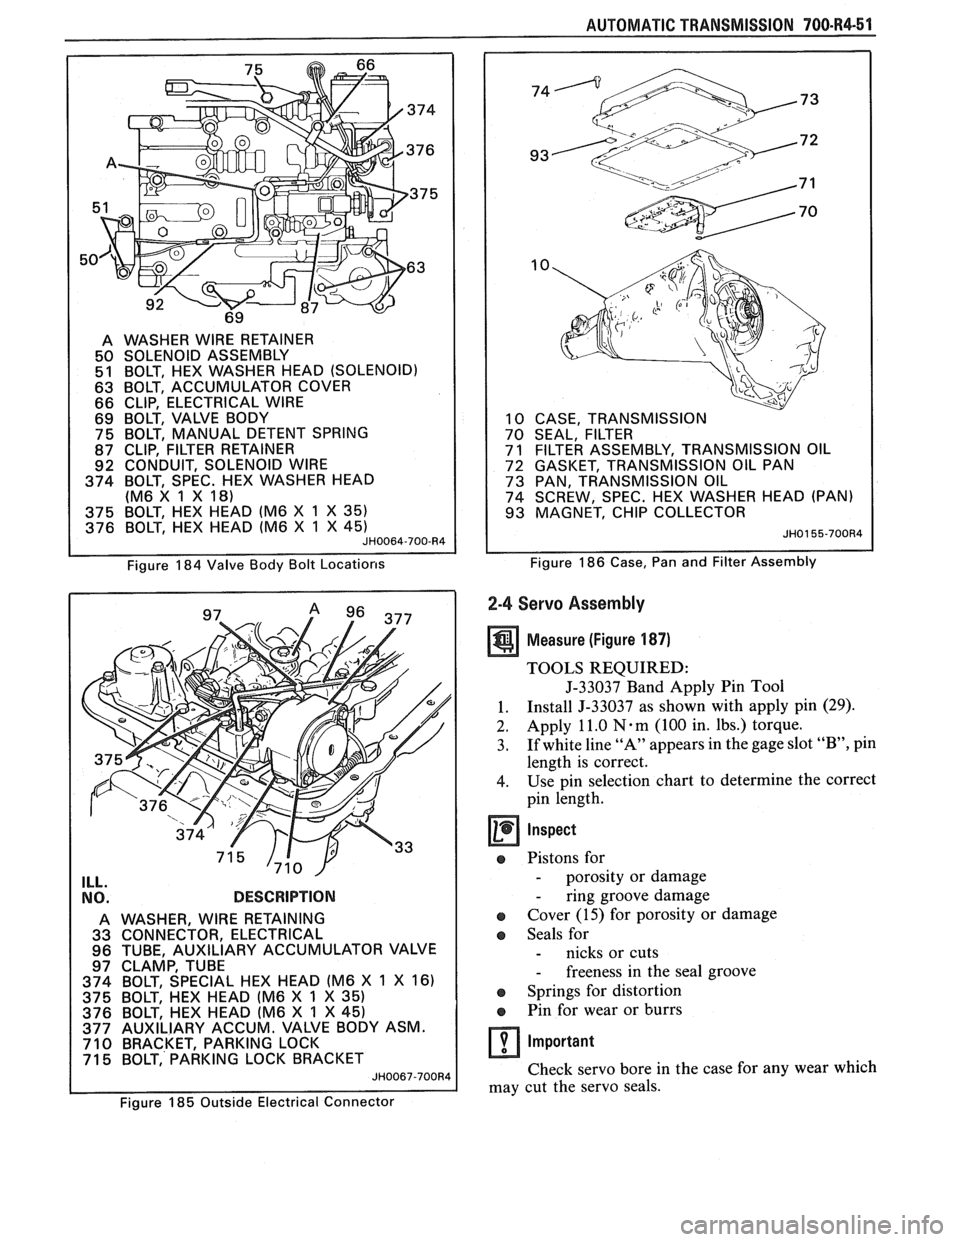
A WASHER WlRE RETAINER
50 SOLENOID ASSEMBLY
51 BOLT, HEX WASHER HEAD (SOLENOID)
63 BOLT, ACCUMULATOR COVER
66 CLIP, ELECTRICAL WlRE
69 BOLT, VALVE BODY
75 BOLT, MANUAL DETENT SPRING
87 CLIP, FILTER RETAINER
92 CONDUIT, SOLENOID WlRE
374 BOLT, SPEC. HEX WASHER HEAD
(M6 X 1 X
18)
375 BOLT, HEX HEAD (M6 X 1 X 35)
376 BOLT, HEX HEAD (M6 X 1 X 45) JH0064-700-R4
Figure 184 Valve Body Bolt Locations
ILL. .
NO. DESCRIPTION
A WASHER, WlRE RETAINING
33 CONNECTOR, ELECTRICAL
96 TUBE, AUXILIARY ACCUMULATOR VALVE
97 CLAMP, TUBE
374 BOLT, SPECIAL HEX HEAD (M6 X
1 X 16)
375 BOLT, HEX HEAD (M6 X 1 X 35)
376 BOLT, HEX HEAD (M6 X 1 X 45)
377 AUXILIARY ACCUM. VALVE BODY ASM.
710 BRACKET, PARKING LOCK
71 5 BOLT, PARKING LOCK BRACKET
JH0067-700R4
AUTOMATIC TRANSMISSION 700-R4-51
10 CASE, TRANSMISSION
70 SEAL, FILTER
7
1 FILTER ASSEMBLY, TRANSMISSION OIL
72 GASKET, TRANSMISSION OIL PAN
73 PAN, TRANSMISSION OIL
74 SCREW, SPEC. HEX WASHER HEAD (PAN)
93 MAGNET, CHIP COLLECTOR
JH0155-700R4
Figure 186 Case, Pan and Filter Assembly
2-4 Servo Assembly
Measure (Figure 187)
TOOLS REQUIRED:
J-33037 Band Apply Pin Tool
1. Install
J-33037 as
shown with apply pin (29).
2.
Apply 11.0 N-m (100 in. Ibs.) torque.
3. If
white line "A" appears in the gage slot
"B", pin
length is correct.
4. Use pin selection chart to determine the correct
pin length.
Inspect
a Pistons for
- porosity or damage
- ring groove damage
Cover (15) for porosity or damage
Seals for
- nicks or cuts
- freeness in the seal groove
a Springs for distortion
e Pin for wear or burrs
Important
Check servo bore in the case for any wear which
may cut the servo seals.
~'~ure 185 Outside Electrical Connector
Page 1108 of 1825
AUTOMATIC TRANSMISSION 700-R4-57
If:
e
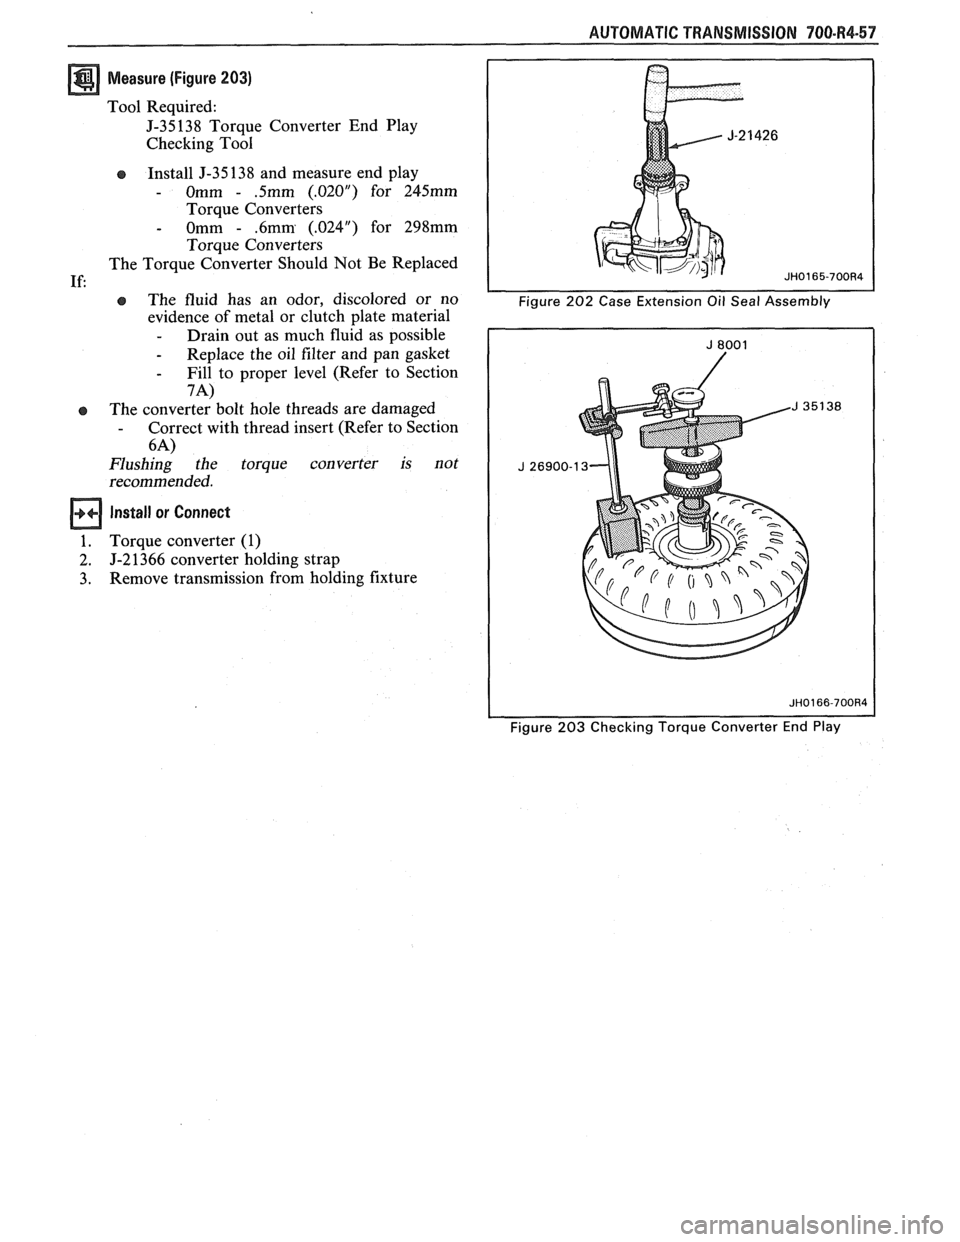
Measure (Figure 203)
Tool Required:
J-35138 Torque Converter End Play
Checking Tool
Install J-35 138 and measure end play
- Omm - .5mm (.02OU) for 245mm
Torque Converters
- Omm - .6mm (.024") for 298mm
Torque Converters
The Torque Converter Should Not Be Replaced
e The fluid has an odor, discolored or no
evidence of metal or clutch plate material
- Drain out as much fluid as possible
- Replace the oil filter and pan gasket
- Fill to proper level (Refer to Section
7A)
The converter bolt hole threads are damaged - Correct with thread insert (Refer to Section
6-4)
Flushing the torque converter is not
recommended.
Install or Connect
Torque converter (1)
J-2 1366 converter holding strap
Remove transmission from holding fixture
Figure 203 Checking Torque Converter End Play