1988 OPEL VECTRA brake
[x] Cancel search: brakePage 128 of 525
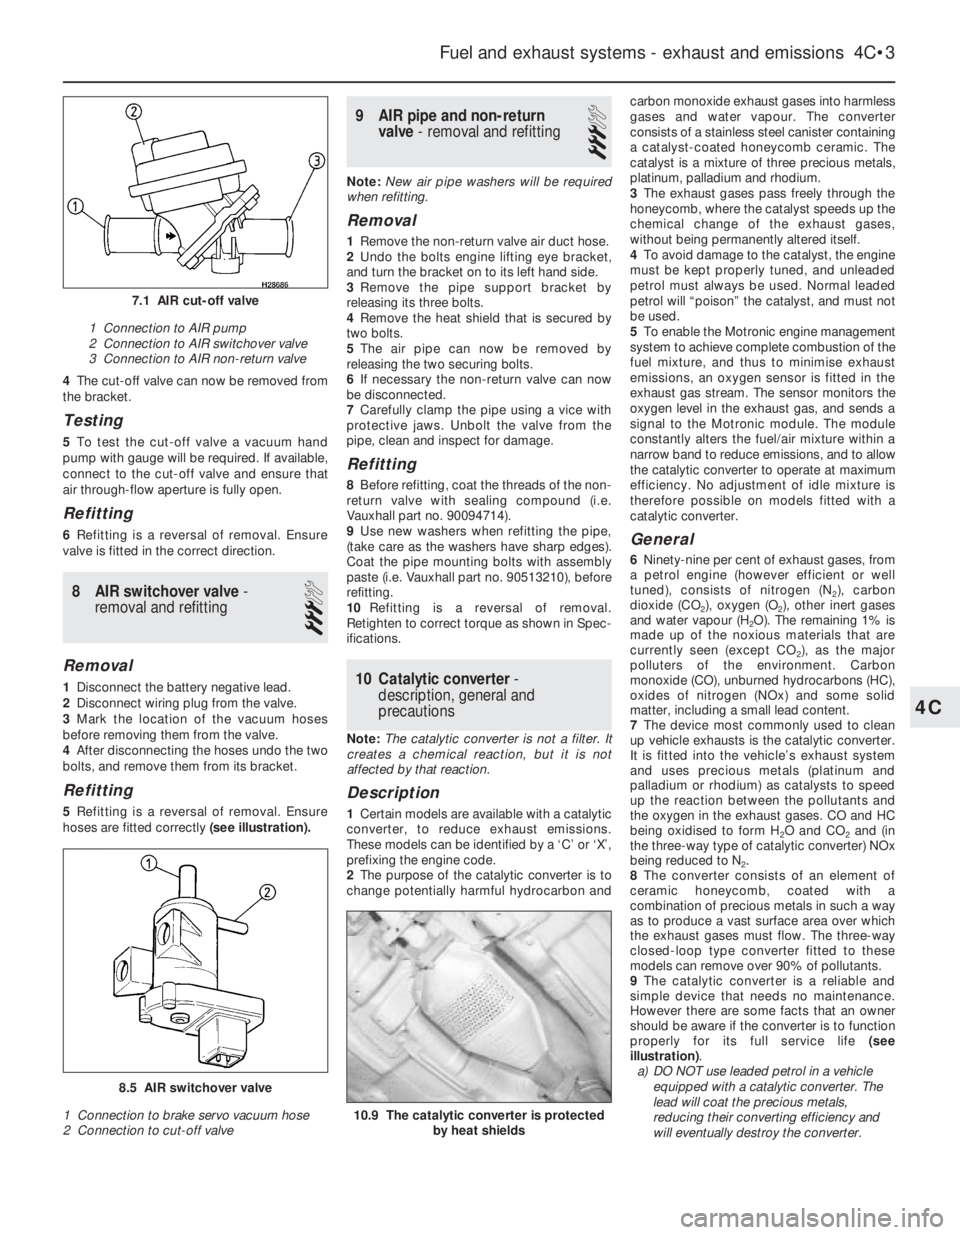
4The cut-off valve can now be removed from
the bracket.
Testing
5To test the cut-off valve a vacuum hand
pump with gauge will be required. If available,
connect to the cut-off valve and ensure that
air through-flow aperture is fully open.
Refitting
6Refitting is a reversal of removal. Ensure
valve is fitted in the correct direction.
8AIR switchover valve -
removal and refitting
3
Removal
1Disconnect the battery negative lead.
2Disconnect wiring plug from the valve.
3Mark the location of the vacuum hoses
before removing them from the valve.
4After disconnecting the hoses undo the two
bolts, and remove them from its bracket.
Refitting
5Refitting is a reversal of removal. Ensure
hoses are fitted correctly (see illustration).
9AIR pipe and non-return
valve - removal and refitting
3
Note:New air pipe washers will be required
when refitting.
Removal
1Remove the non-return valve air duct hose.
2Undo the bolts engine lifting eye bracket,
and turn the bracket on to its left hand side.
3Remove the pipe support bracket by
releasing its three bolts.
4Remove the heat shield that is secured by
two bolts.
5The air pipe can now be removed by
releasing the two securing bolts.
6If necessary the non-return valve can now
be disconnected.
7Carefully clamp the pipe using a vice with
protective jaws. Unbolt the valve from the
pipe, clean and inspect for damage.
Refitting
8Before refitting, coat the threads of the non-
return valve with sealing compound (i.e.
Vauxhall part no. 90094714).
9Use new washers when refitting the pipe,
(take care as the washers have sharp edges).
Coat the pipe mounting bolts with assembly
paste (i.e. Vauxhall part no. 90513210), before
refitting.
10Refitting is a reversal of removal.
Retighten to correct torque as shown in Spec-
ifications.
10Catalytic converter -
description, general and
precautions
Note: The catalytic converter is not a filter. It
creates a chemical reaction, but it is not
affected by that reaction.
Description
1Certain models are available with a catalytic
converter, to reduce exhaust emissions.
These models can be identified by a ‘C’ or ‘X’,
prefixing the engine code.
2The purpose of the catalytic converter is to
change potentially harmful hydrocarbon andcarbon monoxide exhaust gases into harmless
gases and water vapour. The converter
consists of a stainless steel canister containing
a catalyst-coated honeycomb ceramic. The
catalyst is a mixture of three precious metals,
platinum, palladium and rhodium.
3The exhaust gases pass freely through the
honeycomb, where the catalyst speeds up the
chemical change of the exhaust gases,
without being permanently altered itself.
4To avoid damage to the catalyst, the engine
must be kept properly tuned, and unleaded
petrol must always be used. Normal leaded
petrol will “poison” the catalyst, and must not
be used.
5To enable the Motronic engine management
system to achieve complete combustion of the
fuel mixture, and thus to minimise exhaust
emissions, an oxygen sensor is fitted in the
exhaust gas stream. The sensor monitors the
oxygen level in the exhaust gas, and sends a
signal to the Motronic module. The module
constantly alters the fuel/air mixture within a
narrow band to reduce emissions, and to allow
the catalytic converter to operate at maximum
efficiency. No adjustment of idle mixture is
therefore possible on models fitted with a
catalytic converter.
General
6Ninety-nine per cent of exhaust gases, from
a petrol engine (however efficient or well
tuned), consists of nitrogen (N
2), carbon
dioxide (CO
2), oxygen (O2), other inert gases
and water vapour (H
2O). The remaining 1% is
made up of the noxious materials that are
currently seen (except CO
2), as the major
polluters of the environment. Carbon
monoxide (CO), unburned hydrocarbons (HC),
oxides of nitrogen (NOx) and some solid
matter, including a small lead content.
7The device most commonly used to clean
up vehicle exhausts is the catalytic converter.
It is fitted into the vehicle’s exhaust system
and uses precious metals (platinum and
palladium or rhodium) as catalysts to speed
up the reaction between the pollutants and
the oxygen in the exhaust gases. CO and HC
being oxidised to form H
2O and CO2and (in
the three-way type of catalytic converter) NOx
being reduced to N
2.
8The converter consists of an element of
ceramic honeycomb, coated with a
combination of precious metals in such a way
as to produce a vast surface area over which
the exhaust gases must flow. The three-way
closed-loop type converter fitted to these
models can remove over 90% of pollutants.
9The catalytic converter is a reliable and
simple device that needs no maintenance.
However there are some facts that an owner
should be aware if the converter is to function
properly for its full service life (see
illustration).
a)DO NOT use leaded petrol in a vehicle
equipped with a catalytic converter. The
lead will coat the precious metals,
reducing their converting efficiency and
will eventually destroy the converter.
Fuel and exhaust systems - exhaust and emissions 4C•3
10.9 The catalytic converter is protected
by heat shields
8.5 AIR switchover valve
1 Connection to brake servo vacuum hose
2 Connection to cut-off valve
7.1 AIR cut-off valve
1 Connection to AIR pump
2 Connection to AIR switchover valve
3 Connection to AIR non-return valve
4C
Page 129 of 525
b)Always keep the ignition and fuel systems
well maintained according to the
manufacturers schedule (see “Routine
maintenance” and the relevant Chapter).
In particular, ensure that the air cleaner
filter element, the fuel filter and the spark
plugs are renewed at the correct intervals.
If the inlet air/fuel mixture is allowed to
become too rich due to neglect, the
unburned surplus will enter and burn in
the catalytic converter, overheating the
element and eventually destroying the
converter.
c)If the engine develops a misfire, do not
drive the vehicle at all (or at least as little
as possible) until the fault is cured. The
misfire will allow unburned fuel to enter
the converter, which will result in its
overheating, as noted above.
d)The engine control indicator (the outline
of an engine with a lightning symbol
superimposed), will light when the ignition
is switched on and the engine is started,
then it will go out. While it may light briefly
while the engine is running, it should go
out again immediately and stays unlit. If it
lights and stays on while the engine is
running, seek the advice of a Vauxhall
dealer as soon as possible. A fault has
occurred in the fuel injection/ignition
system that, apart from increasing fuel
consumption and impairing the engine’s
performance, may damage the catalytic
converter.
e)DO NOT push or tow-start the vehicle.
This will soak the catalytic converter in
unburned fuel causing it to overheat when
the engine does start see (b) above.
f)DO NOT switch off the ignition at high
engine speeds. If the ignition is switched
off at anything above idle speed,
unburned fuel will enter the (very hot)
catalytic converter, with the possible risk
of its igniting on the element and
damaging the converter.
g)DO NOT use fuel or engine oil additives.
These may contain substances harmful to
the catalytic converter.
h)DO NOT continue to use the vehicle if the
engine burns oil to the extent of leaving a
visible trail of blue smoke. The unburned
carbon deposits will clog the converter
passages and reduce its efficiency; in
severe cases the element will overheat.
i)Remember that the catalytic converter
operates at very high temperatures hence
the heat shields on the vehicle’s under-
body and the casing will become hot
enough to ignite combustible materials
that brush against it. DO NOT, therefore,
park the vehicle in dry undergrowth, over
long grass or over piles of dead leaves.
j)Remember that the catalytic converter is
FRAGlLE. Do not strike it with tools during
servicing work. Take great care when
working on the exhaust system. Ensure
that the converter is well clear of any
jacks or other lifting gear used to raise thevehicle. Do not drive the vehicle over
rough ground, road humps, etc., in such a
way as to ground the exhaust system.
k)In some cases, particularly when the
vehicle is new and/or is used for
stop/start driving, a sulphurous smell (like
that of rotten eggs) may be noticed from
the exhaust. This is common to many
catalytic converter-equipped vehicles and
seems to be due to the small amount of
sulphur found in some petrol’s reacting
with hydrogen in the exhaust to produce
hydrogen sulphide (CS) gas. While this
gas is toxic, it is not produced in sufficient
amounts to be a problem. Once the
vehicle has covered a few thousand miles
the problem should disappear. In the
meanwhile a change of driving style or of
the brand of petrol may effect a solution.
l)The catalytic converter, used on a
well-maintained and well-driven vehicle,
should last for between 50 000 and 100
000 miles. From this point on, careful
checks should be made at all specified
service intervals of the CO level to ensure
that the converter is still operating
efficiently. If the converter is no longer
effective it must be renewed.
11Carbon canister - removal
and refitting
3
Removal
1Apply the handbrake, then jack up the front
of the vehicle, and support securely on axle
stands placed under the body side members
(see “Jacking and Vehicle Support”).
2Remove the front right hand wheel and
wheel arch liner.
3Note the hose and pipe connections to the
canister, or label them, to ensure that they are
reconnected to their original unions, then
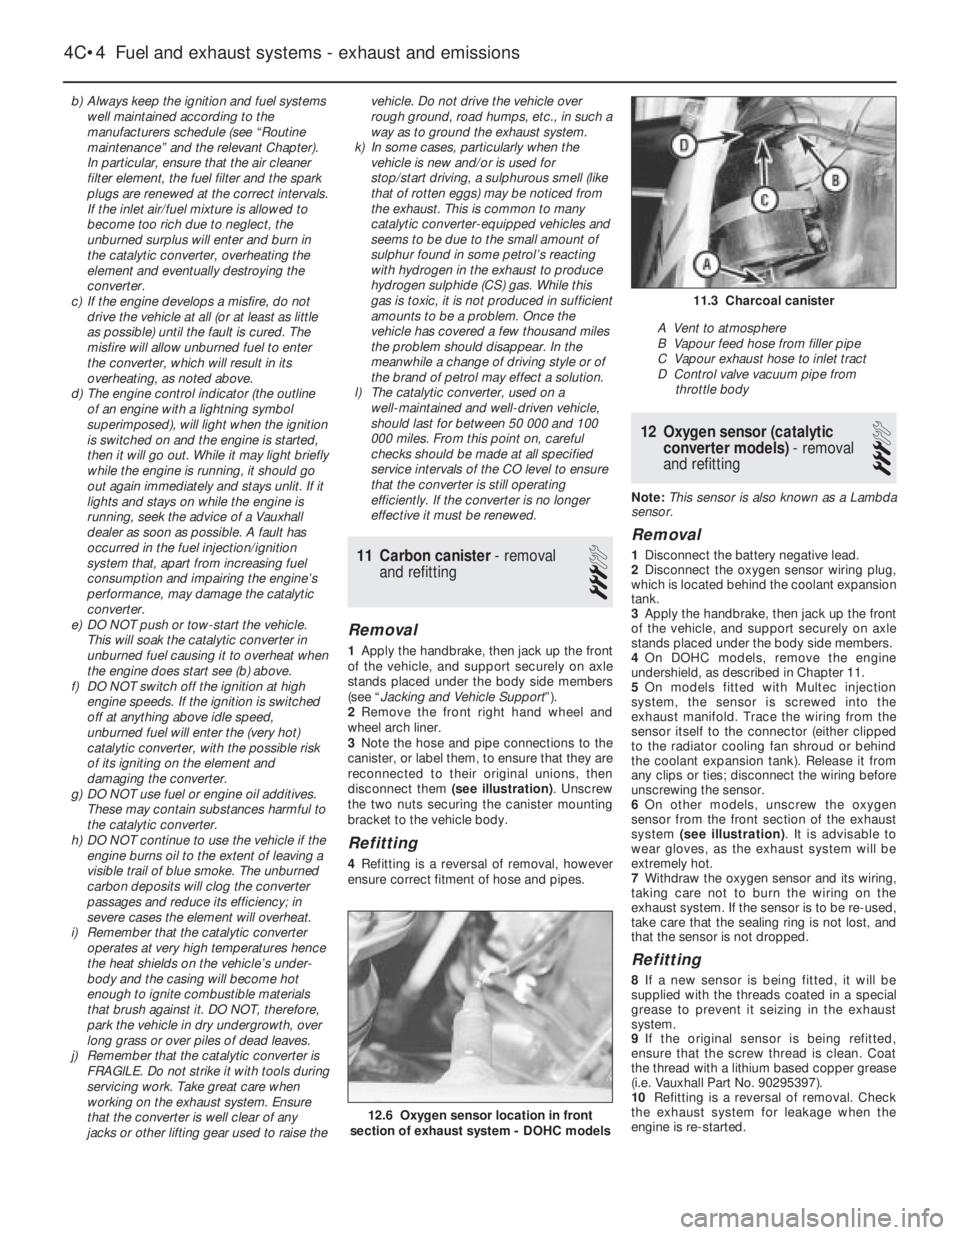
disconnect them (see illustration). Unscrew
the two nuts securing the canister mounting
bracket to the vehicle body.
Refitting
4Refitting is a reversal of removal, however
ensure correct fitment of hose and pipes.
12Oxygen sensor (catalytic
converter models) - removal
and refitting
3
Note: This sensor is also known as a Lambda
sensor.
Removal
1Disconnect the battery negative lead.
2Disconnect the oxygen sensor wiring plug,
which is located behind the coolant expansion
tank.
3Apply the handbrake, then jack up the front
of the vehicle, and support securely on axle
stands placed under the body side members.
4On DOHC models, remove the engine
undershield, as described in Chapter 11.
5On models fitted with Multec injection
system, the sensor is screwed into the
exhaust manifold. Trace the wiring from the
sensor itself to the connector (either clipped
to the radiator cooling fan shroud or behind
the coolant expansion tank). Release it from
any clips or ties; disconnect the wiring before
unscrewing the sensor.
6On other models, unscrew the oxygen
sensor from the front section of the exhaust
system (see illustration). It is advisable to
wear gloves, as the exhaust system will be
extremely hot.
7Withdraw the oxygen sensor and its wiring,
taking care not to burn the wiring on the
exhaust system. If the sensor is to be re-used,
take care that the sealing ring is not lost, and
that the sensor is not dropped.
Refitting
8If a new sensor is being fitted, it will be
supplied with the threads coated in a special
grease to prevent it seizing in the exhaust
system.
9If the original sensor is being refitted,
ensure that the screw thread is clean. Coat
the thread with a lithium based copper grease
(i.e. Vauxhall Part No. 90295397).
10Refitting is a reversal of removal. Check
the exhaust system for leakage when the
engine is re-started.
4C•4Fuel and exhaust systems - exhaust and emissions
12.6 Oxygen sensor location in front
section of exhaust system - DOHC models
11.3 Charcoal canister
A Vent to atmosphere
B Vapour feed hose from filler pipe
C Vapour exhaust hose to inlet tract
D Control valve vacuum pipe from
throttle body
Page 132 of 525

9
System type
Models without ABS:
1.4, 1.6 and 1.8 litre models . . . . . . . . . . . . . . . . . . . . . . . . . . . . . . . . Front discs and rear drums, with vacuum servo assistance, dual
hydraulic circuit split diagonally, pressure-proportioning valves in rear
hydraulic circuit. Cable-operated handbrake on rear wheels
2.0 litre models . . . . . . . . . . . . . . . . . . . . . . . . . . . . . . . . . . . . . . . . . . Front and rear discs, with vacuum servo assistance, dual hydraulic
circuit split diagonally, pressure-proportioning valves in rear hydraulic
circuit. Cable-operated handbrake on rear wheels
All models with Anti-lock Braking System (ABS) . . . . . . . . . . . . . . . . . . Front and rear discs, with vacuum servo assistance, operated via
hydraulic modulator, dual hydraulic circuit split front/rear, pressure-
proportioning valves in rear hydraulic circuit. Cable-operated
handbrake on rear wheels
Front discs
Type:
1.4, 1.6 and 1.8 litre models . . . . . . . . . . . . . . . . . . . . . . . . . . . . . . . . Solid or ventilated (as from 10/91)
2.0 litre models . . . . . . . . . . . . . . . . . . . . . . . . . . . . . . . . . . . . . . . . . . Ventilated
Diameter:
1.4, 1.6 and early 1.8 litre models . . . . . . . . . . . . . . . . . . . . . . . . . . . . 236 mm
Late (as from 10/91) 1.8 and 2.0 litre models . . . . . . . . . . . . . . . . . . . 256 mm
Maximum disc run-out (all models) . . . . . . . . . . . . . . . . . . . . . . . . . . . . 0.1 mm
Minimum pad friction material thickness (including backing plate):
All models . . . . . . . . . . . . . . . . . . . . . . . . . . . . . . . . . . . . . . . . . . . . . . 7.0 mm
Minimum disc thickness after machining: *
1.4, 1.6 and 1.8 litre models (with solid discs) . . . . . . . . . . . . . . . . . . 10.7 mm
1.4, 1.6 and 1.8 litre models (with vented discs) . . . . . . . . . . . . . . . . 18.0 mm
2.0 litre models . . . . . . . . . . . . . . . . . . . . . . . . . . . . . . . . . . . . . . . . . . 22.0 mm
* When this dimension is reached, only one further new set of brake pads is permissible, then renew the discs
Chapter 9
Braking system
ABS electronic control module - removal and refitting . . . . . . . . . . .22
ABS hydraulic modulator - removal and refitting . . . . . . . . . . . . . . . .20
ABS relays (ABS-2E systems only) - removal and refitting . . . . . . . .23
ABS wheel sensors - removal and refitting . . . . . . . . . . . . . . . . . . . .21
Anti-lock braking system (ABS) - general . . . . . . . . . . . . . . . . . . . . . . .2
Brake disc - inspection, removal and refitting . . . . . . . . . . . . . . . . . .10
Brake drum - removal, inspection and refitting . . . . . . . . . . . . . . . . .11
Brake fluid pipes and hoses - general, removal and refitting . . . . . . .25
Brake pedal - removal and refitting . . . . . . . . . . . . . . . . . . . . . . . . . .29
Front brake disc shield - removal and refitting . . . . . . . . . . . . . . . . . .14
Front disc caliper - removal, overhaul and refitting . . . . . . . . . . . . . . .8
Front disc pads - inspection, removal and refitting . . . . . . . . . . . . . . .4
General description . . . . . . . . . . . . . . . . . . . . . . . . . . . . . . . . . . . . . . .1
Handbrake - adjustment . . . . . . . . . . . . . . . . . . . . . . . . . . . . . . . . . . .26
Handbrake cable - removal and refitting . . . . . . . . . . . . . . . . . . . . . .27Handbrake lever - removal and refitting . . . . . . . . . . . . . . . . . . . . . . .28
Handbrake shoes (rear disc brakes) - inspection, removal and
refitting . . . . . . . . . . . . . . . . . . . . . . . . . . . . . . . . . . . . . . . . . . . . . . .7
Hydraulic system - bleeding . . . . . . . . . . . . . . . . . . . . . . . . . . . . . . . . .3
Master cylinder - removal and refitting . . . . . . . . . . . . . . . . . . . . . . . .15
Master cylinder (ABS) - general . . . . . . . . . . . . . . . . . . . . . . . . . . . . .17
Master cylinder (non-ABS) - overhaul . . . . . . . . . . . . . . . . . . . . . . . . .16
Rear brake backplate - removal and refitting . . . . . . . . . . . . . . . . . . .13
Rear brake pressure-proportioning valves - removal and refitting . . .24
Rear brake shoes (drum brakes) - inspection, removal and refitting . .6
Rear disc caliper - removal, overhaul and refitting . . . . . . . . . . . . . . . .9
Rear disc pads - inspection, removal and refitting . . . . . . . . . . . . . . . .5
Rear wheel cylinder (drum brakes) - removal, overhaul and refitting .12
Vacuum servo - description and testing . . . . . . . . . . . . . . . . . . . . . . .18
Vacuum servo - removal and refitting . . . . . . . . . . . . . . . . . . . . . . . . .19
9•1
Specifications Contents
Easy,suitable for
novice with little
experienceFairly easy,suitable
for beginner with
some experienceFairly difficult,
suitable for competent
DIY mechanic
Difficult,suitable for
experienced DIY
mechanicVery difficult,
suitable for expert DIY
or professional
Degrees of difficulty
54321
Page 133 of 525

Rear discs
Type (all models) . . . . . . . . . . . . . . . . . . . . . . . . . . . . . . . . . . . . . . . . . . .Solid
Diameter (all models) . . . . . . . . . . . . . . . . . . . . . . . . . . . . . . . . . . . . . . .260 mm
Maximum disc run-out (all models) . . . . . . . . . . . . . . . . . . . . . . . . . . . .0.1 mm
Minimum pad friction material thickness (including backing plate):
All models . . . . . . . . . . . . . . . . . . . . . . . . . . . . . . . . . . . . . . . . . . . . . .7.0 mm
Minimum disc thickness after machining (all models) * . . . . . . . . . . . . .8.0 mm
* When this dimension is reached, only one further new set of disc pads is permissible, then renew the discs
Minimum handbrake shoe friction material thickness (lining only)
All models . . . . . . . . . . . . . . . . . . . . . . . . . . . . . . . . . . . . . . . . . . . . . .1.0 mm
Rear drums
Internal diameter (all models) . . . . . . . . . . . . . . . . . . . . . . . . . . . . . . . . .200 mm
Minimum shoe friction material thickness (all models) . . . . . . . . . . . . . .0.5 mm above rivet heads
Brake fluid type/specification:
All models . . . . . . . . . . . . . . . . . . . . . . . . . . . . . . . . . . . . . . . . . . . . . .See Lubricants and fluidsin “Weekly checks”
Torque wrench settingsNmlbf ft
ABS hydraulic modulator mounting . . . . . . . . . . . . . . . . . . . . . . . . . . . .86
ABS wheel sensor mounting . . . . . . . . . . . . . . . . . . . . . . . . . . . . . . . . .86
ABS control unit . . . . . . . . . . . . . . . . . . . . . . . . . . . . . . . . . . . . . . . . . . .1.51
Brake fluid line unions . . . . . . . . . . . . . . . . . . . . . . . . . . . . . . . . . . . . . .1612
Caliper and wheel cylinder bleed screws . . . . . . . . . . . . . . . . . . . . . . . .97
Front brake disc securing screw . . . . . . . . . . . . . . . . . . . . . . . . . . . . . .43
Front brake fluid hose to caliper union . . . . . . . . . . . . . . . . . . . . . . . . . .4030
Front caliper bracket to hub carrier . . . . . . . . . . . . . . . . . . . . . . . . . . . .9570
Front caliper guide . . . . . . . . . . . . . . . . . . . . . . . . . . . . . . . . . . . . . . . . .3022
Front caliper mounting (solid disc models) . . . . . . . . . . . . . . . . . . . . . . .9570
Front caliper to mounting bracket (vented disc models) . . . . . . . . . . . .3022
Handbrake lever securing . . . . . . . . . . . . . . . . . . . . . . . . . . . . . . . . . . . .2015
Master cylinder mounting . . . . . . . . . . . . . . . . . . . . . . . . . . . . . . . . . . . .2216
Master cylinder stop screw (ATE type) . . . . . . . . . . . . . . . . . . . . . . . . . .64
Pressure proportioning valve to master cylinder:
ATE type . . . . . . . . . . . . . . . . . . . . . . . . . . . . . . . . . . . . . . . . . . . . . . .129
GMF type . . . . . . . . . . . . . . . . . . . . . . . . . . . . . . . . . . . . . . . . . . . . . .4030
Rear brake backplate/stub axle spring:
Stage 1 . . . . . . . . . . . . . . . . . . . . . . . . . . . . . . . . . . . . . . . . . . . . . . . .5037
Stage 2 . . . . . . . . . . . . . . . . . . . . . . . . . . . . . . . . . . . . . . . . . . . . . . . .Angle-tighten a further 30º
Stage 3 . . . . . . . . . . . . . . . . . . . . . . . . . . . . . . . . . . . . . . . . . . . . . . . .Angle-tighten a further 15º
Rear brake disc securing screw . . . . . . . . . . . . . . . . . . . . . . . . . . . . . . .86
Rear caliper mounting . . . . . . . . . . . . . . . . . . . . . . . . . . . . . . . . . . . . . .8059
Rear drum securing screw . . . . . . . . . . . . . . . . . . . . . . . . . . . . . . . . . . .43
Rear wheel cylinder mounting . . . . . . . . . . . . . . . . . . . . . . . . . . . . . . . .97
Vacuum servo support bracket to bulkhead . . . . . . . . . . . . . . . . . . . . .2216
Vacuum servo to support bracket . . . . . . . . . . . . . . . . . . . . . . . . . . . . .2015
1General description
The foot brake operates on all four wheels.
Solid or ventilated disc brakes are fitted at the
front, and self-adjusting drum or solid disc
brakes are fitted at the rear, depending on
model. Actuation is hydraulic, with vacuum
servo assistance. The handbrake is cable-
operated, and acts on the rear wheels only.
The hydraulic system is split into two
circuits. On non-ABS models, the system is
split diagonally, and on ABS models, the
system is split front and rear. If there is a
hydraulic fluid leak in one circuit, the
remaining circuit will still function, so that
some braking capability remains.
The hydraulic fluid supply to the rear brakes
is regulated so that the front brakes alwayslock first under heavy braking. The fluid
pressure to the rear brakes is controlled by
two valves, one for each brake, which are
either screwed into the master cylinder or
mounted on the rear underbody of the vehicle,
depending on model.
The brake servo is of the direct-acting type,
fitted between the pedal and the master
cylinder. The servo is powered by vacuum
developed in the inlet manifold. Should the
servo fail, the brakes will still operate, but
increased pedal pressure will be required.
2Anti-lock braking system
(ABS) - general
1ABS is available as an option for all models.
When the ignition is switched on, an ‘ABS’
symbol illuminates in the instrument panel for
a short time. 2The system comprises an electronic control
unit, roadwheel sensors, hydraulic modulator,
and the necessary valves and relays. Disc
brakes are fitted to all four wheels. The
purpose of the system is to stop wheel(s)
locking during heavy brake applications. This
is achieved by automatic release of the brake
on the locked wheel, followed by re-
application of the brake. This procedure is
carried out several times a second by the
hydraulic modulator.
3The modulator is controlled by the
electronic control unit, which itself receives
signals from the wheel sensors, which monitor
the locked or unlocked state of the wheels.
The two front brakes are modulated
separately, but the two rear brakes are
modulated together.
4The ABS unit is fitted between the brake
master cylinder and the brakes, the vacuum
servo and master cylinder being of similar
type for both non-ABS and ABS models.
9•2Braking system
Page 134 of 525

5If the ‘ABS’ symbol, in the instrument panel
stays lit after approximately 4 seconds, or if it
comes on sporadically or stays on whilst
driving, there is a fault in the system. Should
this occur, it is recommended that a complete
test is carried out by a Vauxhall dealer, who
will have the necessary specialist diagnostic
equipment. Due to the special equipment
required, it is not practical for the DIY
mechanic to carry out the test procedure.
6To prevent possible damage to the
electronic control unit, always disconnect the
control unit wiring plug before carrying out
electrical welding work.
7It is recommended that the control unit is
removed if the vehicle is being subjected to
high temperatures, like for instance, during
certain paint-drying processes.
8If using steam cleaning equipment, do not
aim the water/steam jet directly at the control
unit.
9Do not disconnect the control unit wiring
plug with the ignition switched on.
10Do not use a battery booster to start the
engine.
11After working on the ABS components,
ensure that all wiring plugs are correctly
reconnected, and have the complete system
tested by a Vauxhall dealer, at the earliest
opportunity.
12All models up to 1991 that were fitted with
ABS, used the ABS-2E system. From 1992
onwards an ABS-2EH system was fitted,
which can be identified by the location of the
electronic control module, which is bolted to
the hydraulic modulator.
13The main differences between the two
systems are in the electrical components and
circuits, the most obvious of these being
omission of the surge arrester relay on the
2EH system.
3Hydraulic system - bleeding
2
General
1If any of the hydraulic components in the
braking system have been removed or
disconnected, or if the fluid level in the
reservoir has been allowed to fall appreciably,
it is certain that air will have entered into the
system. The removal of all this air from the
hydraulic system is essential if the brakes are
to function correctly, and the process of
removing it is known as bleeding.
2Where an operation has only affected one
circuit of the hydraulic system (the system issplit diagonally on non-ABS models, and front
and rear on ABS models), then it will only be
necessary to bleed the relevant circuit. If the
master cylinder has been disconnected and
reconnected, or the fluid level has been
allowed to fall appreciably, then the complete
system must be bled.
3One of three methods can be used to bleed
the system, although Vauxhall recommend
the use of a pressure bleeding kit.
Bleeding - two-man method
4Obtain a clean jar, and a length of rubber or
plastic bleed tubing that will fit the bleed
screws tightly. The help of an assistant will be
required.
5Remove the dust cap and clean around the
bleed screw on the relevant caliper of wheel
cylinder (see illustration), then attach the
bleed tube to the screw. If the complete
system is being bled, start at the front of the
vehicle. When bleeding the complete system
on models with ABS, the front brakes must be
bled before the rears.
6Check that the fluid reservoir is topped up,
and then destroy the vacuum in the brake
servo by giving several applications of the
brake pedal.
7Immerse the open end of the bleed tube in
the jar, which should contain two or three
inches of hydraulic fluid. The jar should be
positioned about 300 mm (12.0 in) above the
bleed screw to prevent any possibility of air
entering the system down the threads of the
bleed screw when it is slackened.
8Open the bleed screw half a turn, and have
the assistant depress the brake pedal slowly
to the floor. With the brake pedal still
depressed, retighten the bleed screw, and
then have the assistant quickly release the
pedal. Repeat the procedure.
9Observe the submerged end of the tube in
the jar. When air bubbles cease to appear,
tighten the bleed screw when the pedal is
being held fully down by the assistant.
10Top-up the fluid reservoir. It must be kept
topped up throughout the bleeding
operations. If the connecting holes to the
master cylinder are exposed at any time due
to low fluid level, the air will be drawn into the
system, and the whole bleeding process will
have to start again.
11If the complete system is being bled, the
procedure should be repeated on the
diagonally opposite rear brake. Then on the
front and rear brakes of the other circuit on
non-ABS models, or on the remaining front
brake and then on the rear brakes on ABS
models.
12On completion, remove the bleed tube,
and discard the fluid that has been bled from
the system, unless it is required to make up
the level in the bleed jar. Never re-use old fluid.
13On completion of bleeding, top-up the
fluid level in the reservoir. Check the action ofthe brake pedal, which should be firm, and
free from any “sponginess” that would
indicate that air is still present in the system.
Bleeding - with one-way valve
14There are a number of one-man brake
bleeding kits currently available from motor
accessory shops. It is recommended that one
of these kits should be used whenever
possible, as they greatly simplify the bleeding
operations. They also reduce the risk of
expelled air or fluid being drawn back into the
system.
15Proceed as described in paragraphs 5
and 6.
16Open the bleed screw half a turn, then
depress the brake pedal to the floor, and
slowly release it. The one-way valve in the
bleeder device will prevent expelled air from
returning to the system at the completion of
each stroke. Repeat the operation until clear
hydraulic fluid, free from air bubbles, can be
seen coming through the tube. Tighten the
bleed screw.
17Proceed as described in paragraphs 11
to 13 inclusive.
Bleeding - with pressure
bleeding kit
18These are also available from motor
accessory shops, and are usually operated by
air pressure from the spare tyre.
19By connecting a pressurised container to
the master cylinder fluid reservoir, bleeding is
then carried out by simply opening each bleed
screw in turn and allowing the fluid to run out.
Like turning on a tap, until no air bubbles are
visible in the fluid being expelled.
20Using this method, the large reserve of
fluid provides a safeguard against air being
drawn into the master cylinder during the
bleeding operations.
21This method of bleeding is recommended
by Vauxhall.
22Begin bleeding with reference to
paragraphs 5 and 6, and continue as
described in paragraphs 11 to 13 inclusive.
Braking system 9•3
3.5 Removing the dust cap from a rear
caliper bleed screw - models with
ventilated discs
9
If brake fluid is spilt on the
paintwork, the affected area
must be washed down with
cold water immediately.
Brake fluid is an effective paint
stripper!
Page 135 of 525
4Front disc pads - inspection,
removal and refitting
3
Note: When working on the brake
components, take care not to disperse brake
dust into the air, or to inhale it, since it may
contain asbestos, which can damage your
health.
Inspection
1Where applicable, remove the wheel trims,
then loosen the front roadwheel bolts and
apply the handbrake. Jack up the front of the
vehicle, and support on axle stands (see
“Jacking and Vehicle Support”) positioned
under the body side members.
2Remove the roadwheels. Turn the steering to
full right-hand lock, and check the wear of the
friction material on the right-hand brake pads.
Check that the thickness of the friction material
(including the backing plate) is not less than the
minimum given in the Specifications.
3Turn the steering to full left-hand lock, and
check the left-hand brake pads in the same
way.
4If any brake pad is worn below the specified
minimum thickness, renew all the front pads
as a set.
5If the pads require renewal, continue as
follows according to model.
Removal
1.4, 1.6 and 1.8 litre models
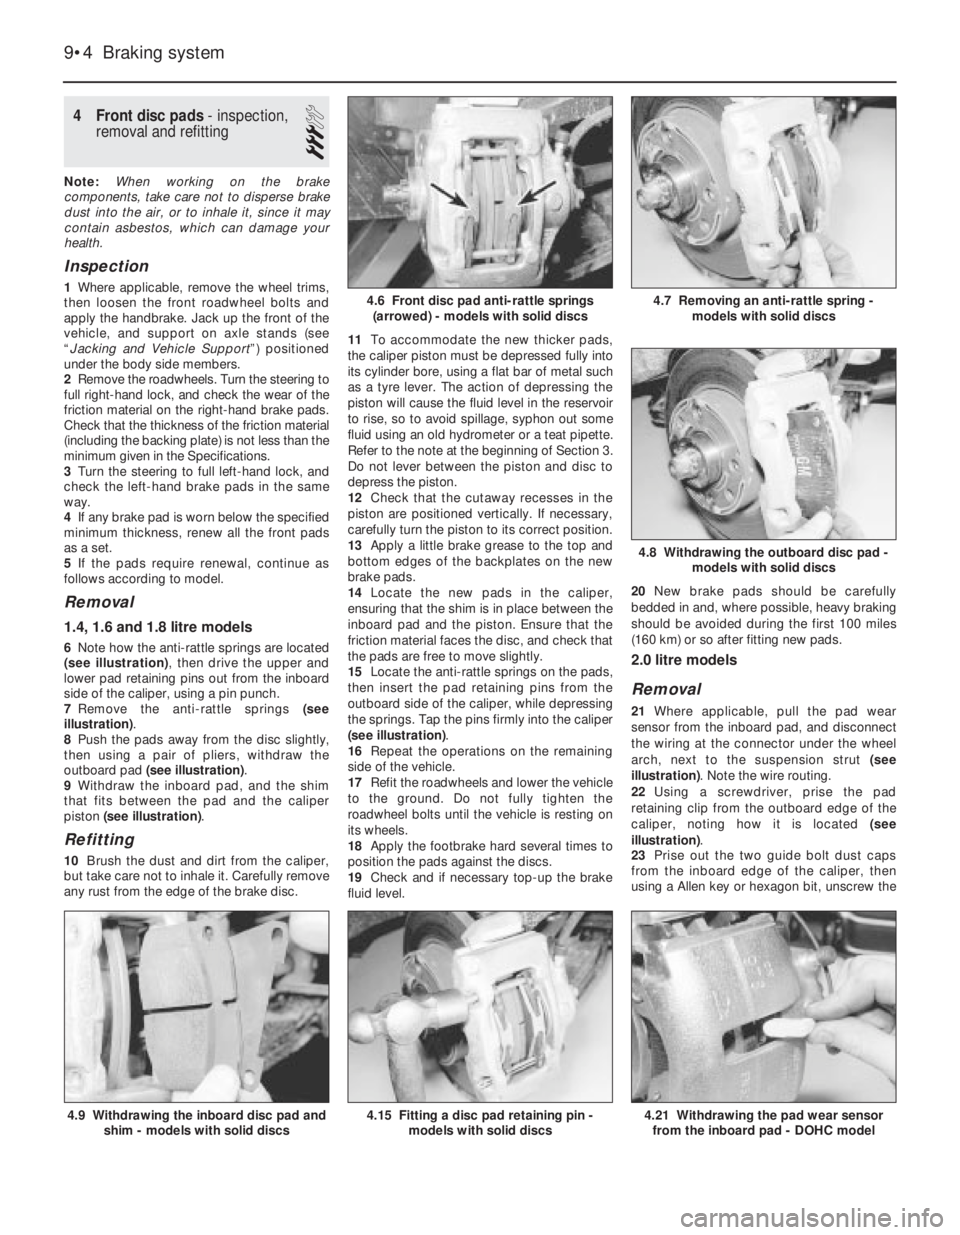
6Note how the anti-rattle springs are located
(see illustration), then drive the upper and
lower pad retaining pins out from the inboard
side of the caliper, using a pin punch.
7Remove the anti-rattle springs (see
illustration).
8Push the pads away from the disc slightly,
then using a pair of pliers, withdraw the
outboard pad (see illustration).
9Withdraw the inboard pad, and the shim
that fits between the pad and the caliper
piston (see illustration).
Refitting
10Brush the dust and dirt from the caliper,
but take care not to inhale it. Carefully remove
any rust from the edge of the brake disc.11To accommodate the new thicker pads,
the caliper piston must be depressed fully into
its cylinder bore, using a flat bar of metal such
as a tyre lever. The action of depressing the
piston will cause the fluid level in the reservoir
to rise, so to avoid spillage, syphon out some
fluid using an old hydrometer or a teat pipette.
Refer to the note at the beginning of Section 3.
Do not lever between the piston and disc to
depress the piston.
12Check that the cutaway recesses in the
piston are positioned vertically. If necessary,
carefully turn the piston to its correct position.
13Apply a little brake grease to the top and
bottom edges of the backplates on the new
brake pads.
14Locate the new pads in the caliper,
ensuring that the shim is in place between the
inboard pad and the piston. Ensure that the
friction material faces the disc, and check that
the pads are free to move slightly.
15Locate the anti-rattle springs on the pads,
then insert the pad retaining pins from the
outboard side of the caliper, while depressing
the springs. Tap the pins firmly into the caliper
(see illustration).
16Repeat the operations on the remaining
side of the vehicle.
17Refit the roadwheels and lower the vehicle
to the ground. Do not fully tighten the
roadwheel bolts until the vehicle is resting on
its wheels.
18Apply the footbrake hard several times to
position the pads against the discs.
19Check and if necessary top-up the brake
fluid level.20New brake pads should be carefully
bedded in and, where possible, heavy braking
should be avoided during the first 100 miles
(160 km) or so after fitting new pads.
2.0 litre models
Removal
21Where applicable, pull the pad wear
sensor from the inboard pad, and disconnect
the wiring at the connector under the wheel
arch, next to the suspension strut (see
illustration). Note the wire routing.
22Using a screwdriver, prise the pad
retaining clip from the outboard edge of the
caliper, noting how it is located (see
illustration).
23Prise out the two guide bolt dust caps
from the inboard edge of the caliper, then
using a Allen key or hexagon bit, unscrew the
9•4Braking system
4.6 Front disc pad anti-rattle springs
(arrowed) - models with solid discs
4.8 Withdrawing the outboard disc pad -
models with solid discs
4.21 Withdrawing the pad wear sensor
from the inboard pad - DOHC model4.15 Fitting a disc pad retaining pin -
models with solid discs4.9 Withdrawing the inboard disc pad and
shim - models with solid discs
4.7 Removing an anti-rattle spring -
models with solid discs
Page 136 of 525
guide bolts, and lift the caliper and inboard
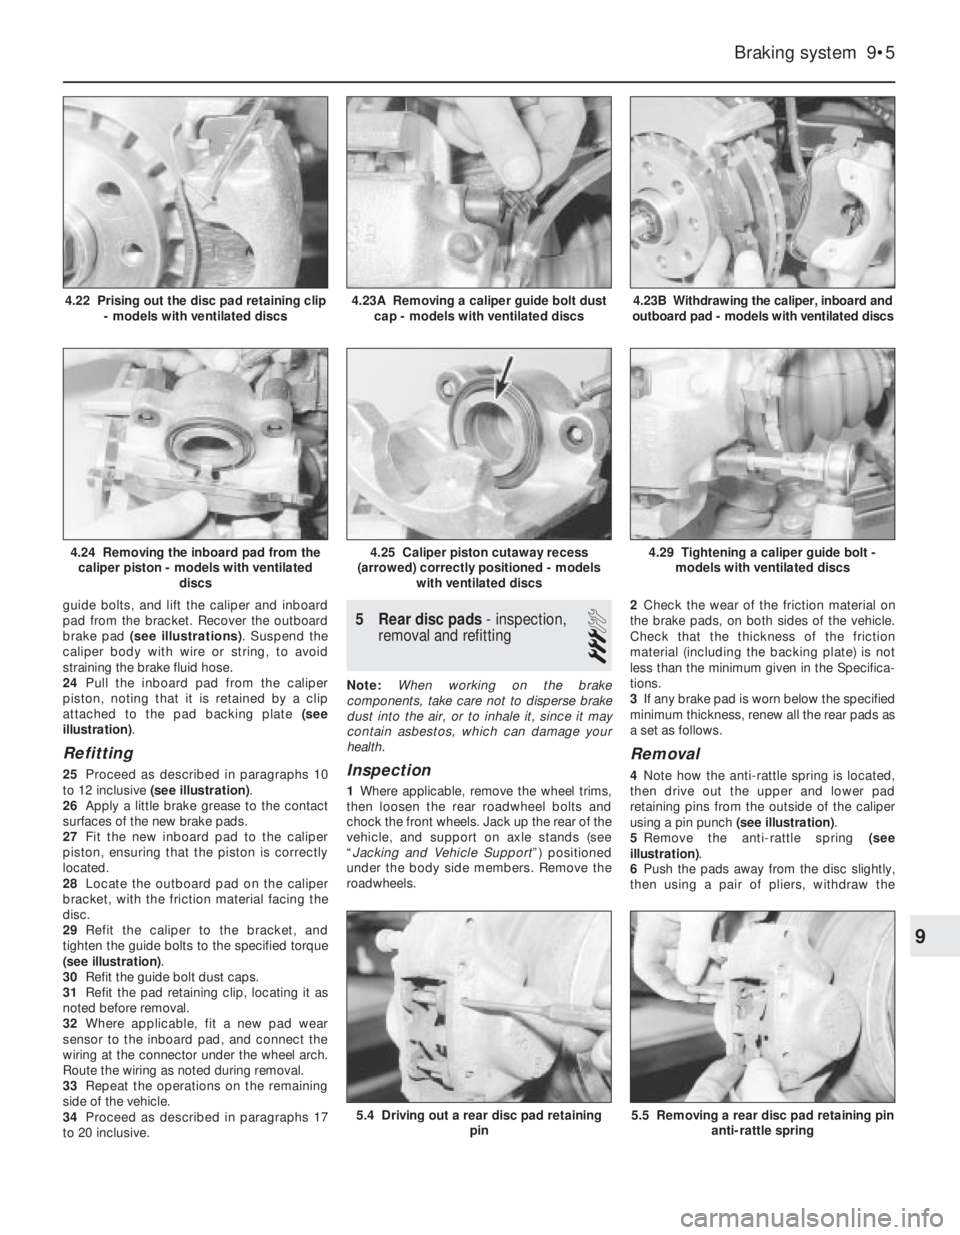
pad from the bracket. Recover the outboard
brake pad (see illustrations). Suspend the
caliper body with wire or string, to avoid
straining the brake fluid hose.
24Pull the inboard pad from the caliper
piston, noting that it is retained by a clip
attached to the pad backing plate (see
illustration).
Refitting
25Proceed as described in paragraphs 10
to 12 inclusive (see illustration).
26Apply a little brake grease to the contact
surfaces of the new brake pads.
27Fit the new inboard pad to the caliper
piston, ensuring that the piston is correctly
located.
28Locate the outboard pad on the caliper
bracket, with the friction material facing the
disc.
29Refit the caliper to the bracket, and
tighten the guide bolts to the specified torque
(see illustration).
30Refit the guide bolt dust caps.
31Refit the pad retaining clip, locating it as
noted before removal.
32Where applicable, fit a new pad wear
sensor to the inboard pad, and connect the
wiring at the connector under the wheel arch.
Route the wiring as noted during removal.
33Repeat the operations on the remaining
side of the vehicle.
34Proceed as described in paragraphs 17
to 20 inclusive.
5Rear disc pads - inspection,
removal and refitting
3
Note: When working on the brake
components, take care not to disperse brake
dust into the air, or to inhale it, since it may
contain asbestos, which can damage your
health.
Inspection
1Where applicable, remove the wheel trims,
then loosen the rear roadwheel bolts and
chock the front wheels. Jack up the rear of the
vehicle, and support on axle stands (see
“Jacking and Vehicle Support”) positioned
under the body side members. Remove the
roadwheels.2Check the wear of the friction material on
the brake pads, on both sides of the vehicle.
Check that the thickness of the friction
material (including the backing plate) is not
less than the minimum given in the Specifica-
tions.
3If any brake pad is worn below the specified
minimum thickness, renew all the rear pads as
a set as follows.
Removal
4Note how the anti-rattle spring is located,
then drive out the upper and lower pad
retaining pins from the outside of the caliper
using a pin punch (see illustration).
5Remove the anti-rattle spring (see
illustration).
6Push the pads away from the disc slightly,
then using a pair of pliers, withdraw the
Braking system 9•5
4.23B Withdrawing the caliper, inboard and
outboard pad - models with ventilated discs
5.5 Removing a rear disc pad retaining pin
anti-rattle spring5.4 Driving out a rear disc pad retaining
pin
4.29 Tightening a caliper guide bolt -
models with ventilated discs4.25 Caliper piston cutaway recess
(arrowed) correctly positioned - models
with ventilated discs4.24 Removing the inboard pad from the
caliper piston - models with ventilated
discs
4.23A Removing a caliper guide bolt dust
cap - models with ventilated discs4.22 Prising out the disc pad retaining clip
- models with ventilated discs
9
Page 137 of 525
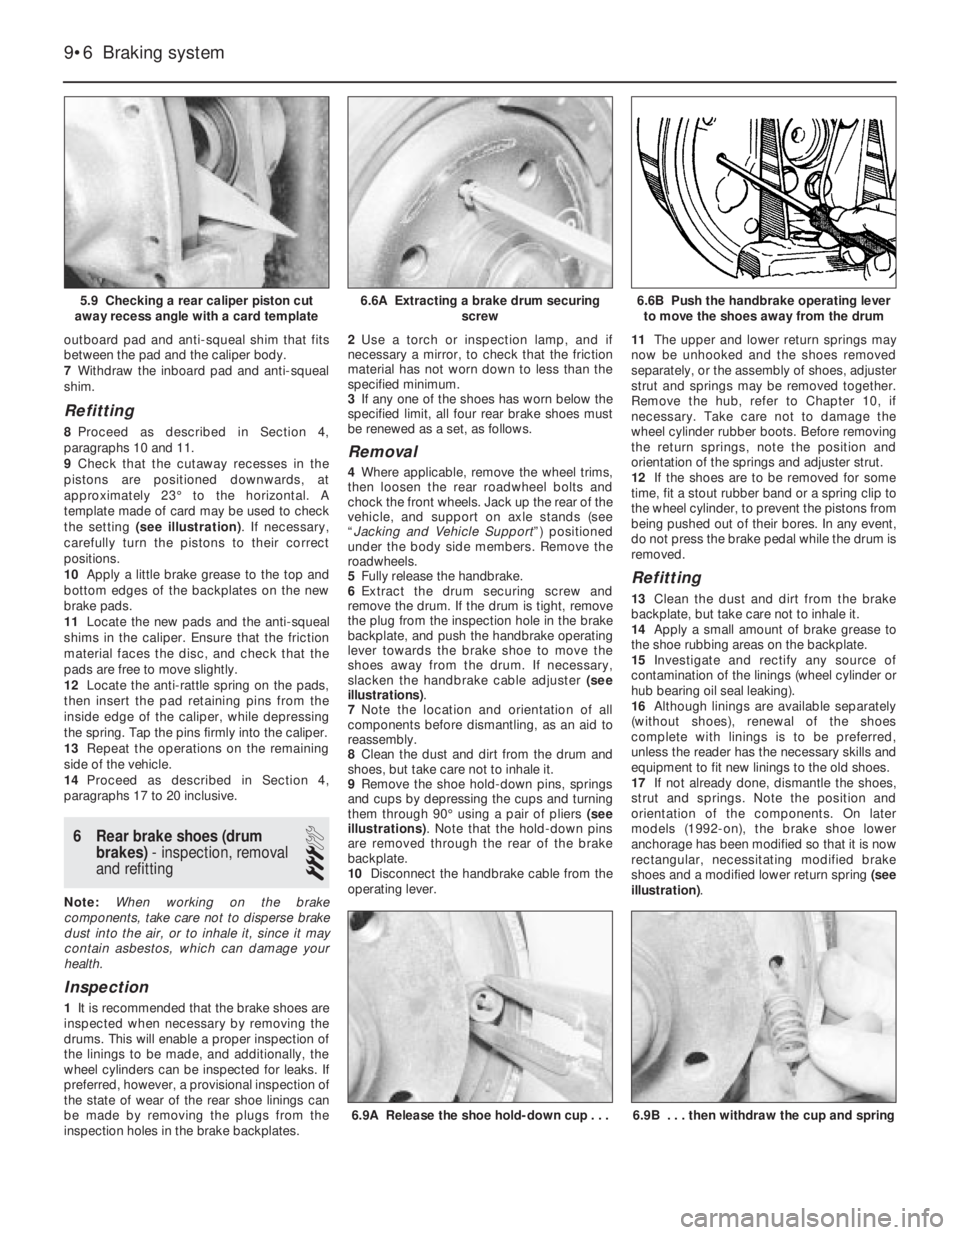
outboard pad and anti-squeal shim that fits
between the pad and the caliper body.
7Withdraw the inboard pad and anti-squeal
shim.
Refitting
8Proceed as described in Section 4,
paragraphs 10 and 11.
9Check that the cutaway recesses in the
pistons are positioned downwards, at
approximately 23°to the horizontal. A
template made of card may be used to check
the setting (see illustration). If necessary,
carefully turn the pistons to their correct
positions.
10Apply a little brake grease to the top and
bottom edges of the backplates on the new
brake pads.
11Locate the new pads and the anti-squeal
shims in the caliper. Ensure that the friction
material faces the disc, and check that the
pads are free to move slightly.
12Locate the anti-rattle spring on the pads,
then insert the pad retaining pins from the
inside edge of the caliper, while depressing
the spring. Tap the pins firmly into the caliper.
13Repeat the operations on the remaining
side of the vehicle.
14Proceed as described in Section 4,
paragraphs 17 to 20 inclusive.
6Rear brake shoes (drum
brakes) - inspection, removal
and refitting
3
Note: When working on the brake
components, take care not to disperse brake
dust into the air, or to inhale it, since it may
contain asbestos, which can damage your
health.
Inspection
1It is recommended that the brake shoes are
inspected when necessary by removing the
drums. This will enable a proper inspection of
the linings to be made, and additionally, the
wheel cylinders can be inspected for leaks. If
preferred, however, a provisional inspection of
the state of wear of the rear shoe linings can
be made by removing the plugs from the
inspection holes in the brake backplates.2Use a torch or inspection lamp, and if
necessary a mirror, to check that the friction
material has not worn down to less than the
specified minimum.
3If any one of the shoes has worn below the
specified limit, all four rear brake shoes must
be renewed as a set, as follows.
Removal
4Where applicable, remove the wheel trims,
then loosen the rear roadwheel bolts and
chock the front wheels. Jack up the rear of the
vehicle, and support on axle stands (see
“Jacking and Vehicle Support”) positioned
under the body side members. Remove the
roadwheels.
5Fully release the handbrake.
6Extract the drum securing screw and
remove the drum. If the drum is tight, remove
the plug from the inspection hole in the brake
backplate, and push the handbrake operating
lever towards the brake shoe to move the
shoes away from the drum. If necessary,
slacken the handbrake cable adjuster (see
illustrations).
7Note the location and orientation of all
components before dismantling, as an aid to
reassembly.
8Clean the dust and dirt from the drum and
shoes, but take care not to inhale it.
9Remove the shoe hold-down pins, springs
and cups by depressing the cups and turning
them through 90°using a pair of pliers (see
illustrations). Note that the hold-down pins
are removed through the rear of the brake
backplate.
10Disconnect the handbrake cable from the
operating lever.11The upper and lower return springs may
now be unhooked and the shoes removed
separately, or the assembly of shoes, adjuster
strut and springs may be removed together.
Remove the hub, refer to Chapter 10, if
necessary. Take care not to damage the
wheel cylinder rubber boots. Before removing
the return springs, note the position and
orientation of the springs and adjuster strut.
12If the shoes are to be removed for some
time, fit a stout rubber band or a spring clip to
the wheel cylinder, to prevent the pistons from
being pushed out of their bores. In any event,
do not press the brake pedal while the drum is
removed.
Refitting
13Clean the dust and dirt from the brake
backplate, but take care not to inhale it.
14Apply a small amount of brake grease to
the shoe rubbing areas on the backplate.
15Investigate and rectify any source of
contamination of the linings (wheel cylinder or
hub bearing oil seal leaking).
16Although linings are available separately
(without shoes), renewal of the shoes
complete with linings is to be preferred,
unless the reader has the necessary skills and
equipment to fit new linings to the old shoes.
17If not already done, dismantle the shoes,
strut and springs. Note the position and
orientation of the components. On later
models (1992-on), the brake shoe lower
anchorage has been modified so that it is now
rectangular, necessitating modified brake
shoes and a modified lower return spring (see
illustration).
9•6Braking system
5.9 Checking a rear caliper piston cut
away recess angle with a card template6.6B Push the handbrake operating lever
to move the shoes away from the drum
6.9B . . . then withdraw the cup and spring6.9A Release the shoe hold-down cup . . .
6.6A Extracting a brake drum securing
screw