Page 377 of 394
Downloaded from www.Manualslib.com manuals search engine .
DEVICE FOR HEATING THE INLET AIR
It consists of the following
A - A vacuum capsule situated at the air-filter intake
B A thermal sensor, situated in the duct linking the air-filter to the carburettor
C - A,device for heatinq the inlet air by means of the exhaust (by having a take-off on the exhaust manifold shield). ASSEMBLY DIAGRAM
Carburettor
Calibrated ori fi ce for
vacuum intake
COLD AIR -
A. VACUUM CAPSULE
II I
I
t I
Position of capsule, when
not under vacuum ( flap open,
closing plate closed )
I
m-t L2
L-H ii
---+- Thermal
sensor filter
Position of capsule
under vacuum
(flap closed, closing
plate
open 1
Page 378 of 394

Downloaded from www.Manualslib.com manuals search engine OPERATION No MA. 642-W : ~Thnracteristics o/ thy, e I:Ko/I) - -70 3 hc,nriug s, stew Op. MA. 642-00 3
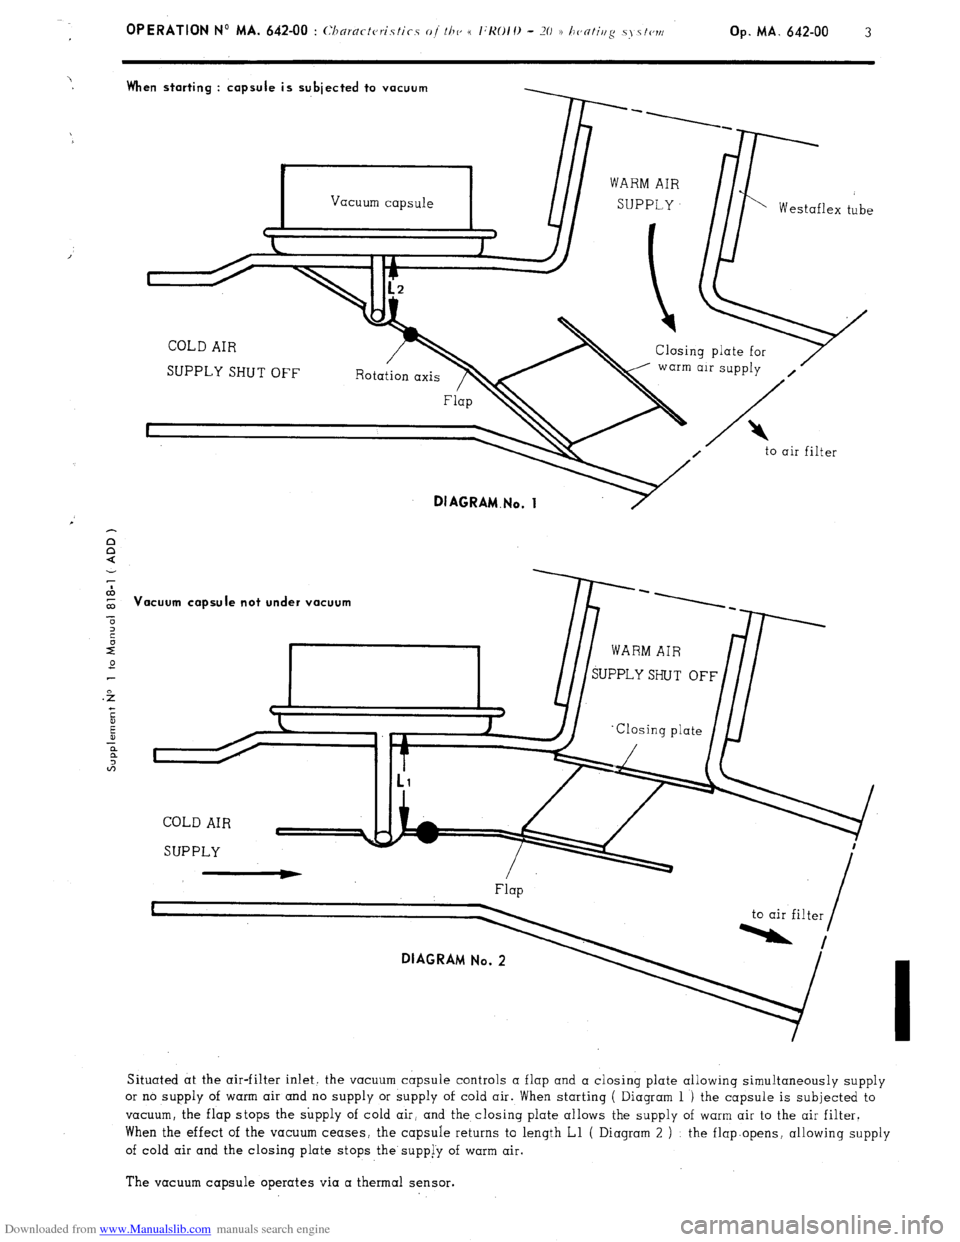
When starting : capsule is subjected to vacuum
Vacuum capsule
Westaflex tube
c J
J
COLD AIR
Closing plate for
SUPPLY SHUT OFF warm air supply
,
Flap B
I
to air filter
DIAGRAM.No. 1
‘acuum capsule not under vacuum
Flap
DIAGRAM No. 2
to air filter
Situated at the air-filter inlet. the vacuum capsule controls a flap and a closing plate allowing simultaneously supply
or no supply of warm air and no supply or supply of cold air. When starting ( Diagram 1 ) the capsule is subjected to
vacuum, the flap stops the supply of cold air, and the closing plate allows the supply of warm air to the air filter.
When the effect of the vacuum ceases, the capsule returns to length Ll ( Diagram 2 ) : the flap.opens, allowing supply
of cold air and the closing plate stops the supp[y of warm air.
The vacuum capsule operates via a thermal sensor.
Page 379 of 394

Downloaded from www.Manualslib.com manuals search engine B. THERMAL SENSOR
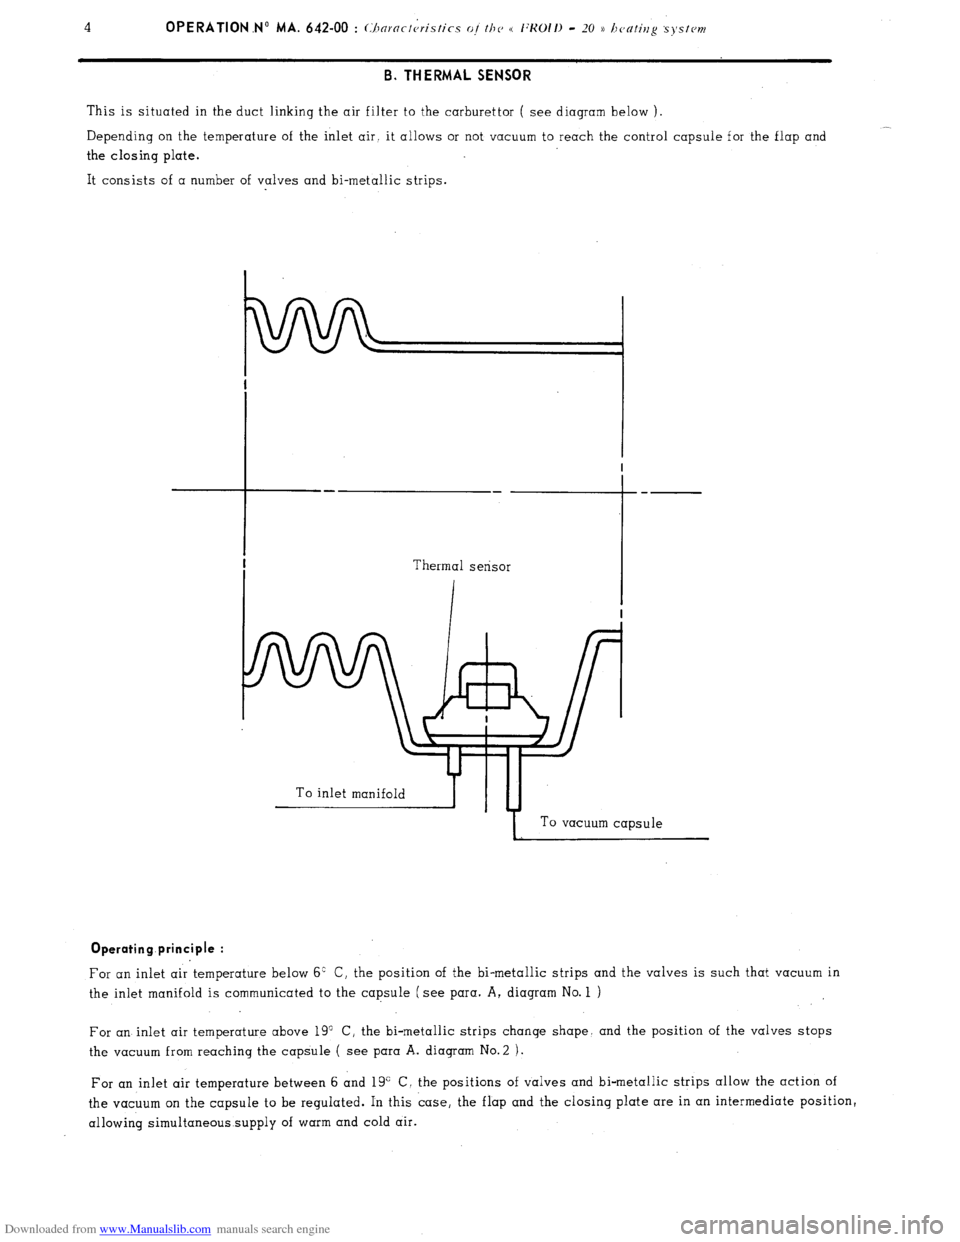
This is situated in the duct linking the air filter to the carburettor ( see diagram below ).
__
Depending on the temperature of the inlet air. it allows or not vacuum to reach the control capsule for the flap and
the closing plate.
It consists of a number of valves and bi-metallic strips.
To inlet manifoldb-yTu-4
I To vacuum capsule Operating principle :
For an inlet air temperature below 6’ C, the position of the bi-metallic strips and the valves is such that vacuum in
the inlet manifold is communicated to the capsule (see para. A, diagram No. 1 )
For an inlet air temperature above 19” C, the bi-metallic strips change shape. and the position of the valves stops
the vacuum from reaching the capsule ( see para A. diagram No.2 ).
For an inlet air temperature between 6 and 19” C, the positions of valves and bi-metallic strips allow the action of
the vacuum on the capsule to be regulated. In this case, the flap and the closing plate are in an intermediate position,
allowing simultaneous supply of warm and cold air.
Page 380 of 394
Downloaded from www.Manualslib.com manuals search engine Op MA. 642-00 5 II. DEVICE FOR INCREASING THE HEATING OF THE PASSENGER COMPARTMENT
This device entails modifying the following components
- Heater distribution box ( outlets towards side vents unplugged, different radiator )
Side vents with twin outlets ( ambient or heated air )
Addition of Westaflex ducts ( link from heater distribution box to side vents ). III. WATER TEMPERATURE GAUGE
The presence of a water temperature gauge entails modifying the following components :
- water pump spacer ( addition of a temperature sensor )
steerinq column surround ( location of temperature gauqe )
- engine harness for warning lamp senders ( addition of lead from temperature sensor to front wiring harness )
addition of a temperature sensor and a temperature gauge.
Ater temperature gauge on steering column surround
.Temperature sensor on
water-pump spacer
P
Page 381 of 394
Downloaded from www.Manualslib.com manuals search engine BODY
OPERATION No MA. 700.00 : Hods-shell nrountirrgs OVIO n\sov,hlcd uud<~r/m,<. Op. MA. 700.00 1
MOUNTING OF BODY-SHELL TO UNDERFRAME
L. 71.1
SPECIAL FEATURES :
‘,;i;::.gr;;ts@ are guide holes,
- Body-shell fixing nuts ( 1) on rubber pads
- Rubber pod fixing screws (2) on sidemembers 2.5 doNm ( 18 ft,lb )
3 daNm ( 21 l/2 ft.lb )
Page 382 of 394

Downloaded from www.Manualslib.com manuals search engine OPERATION NO MA. 840-O : Adjjrrsting the body-shell rompovcnts Op. MA. 840.0 1
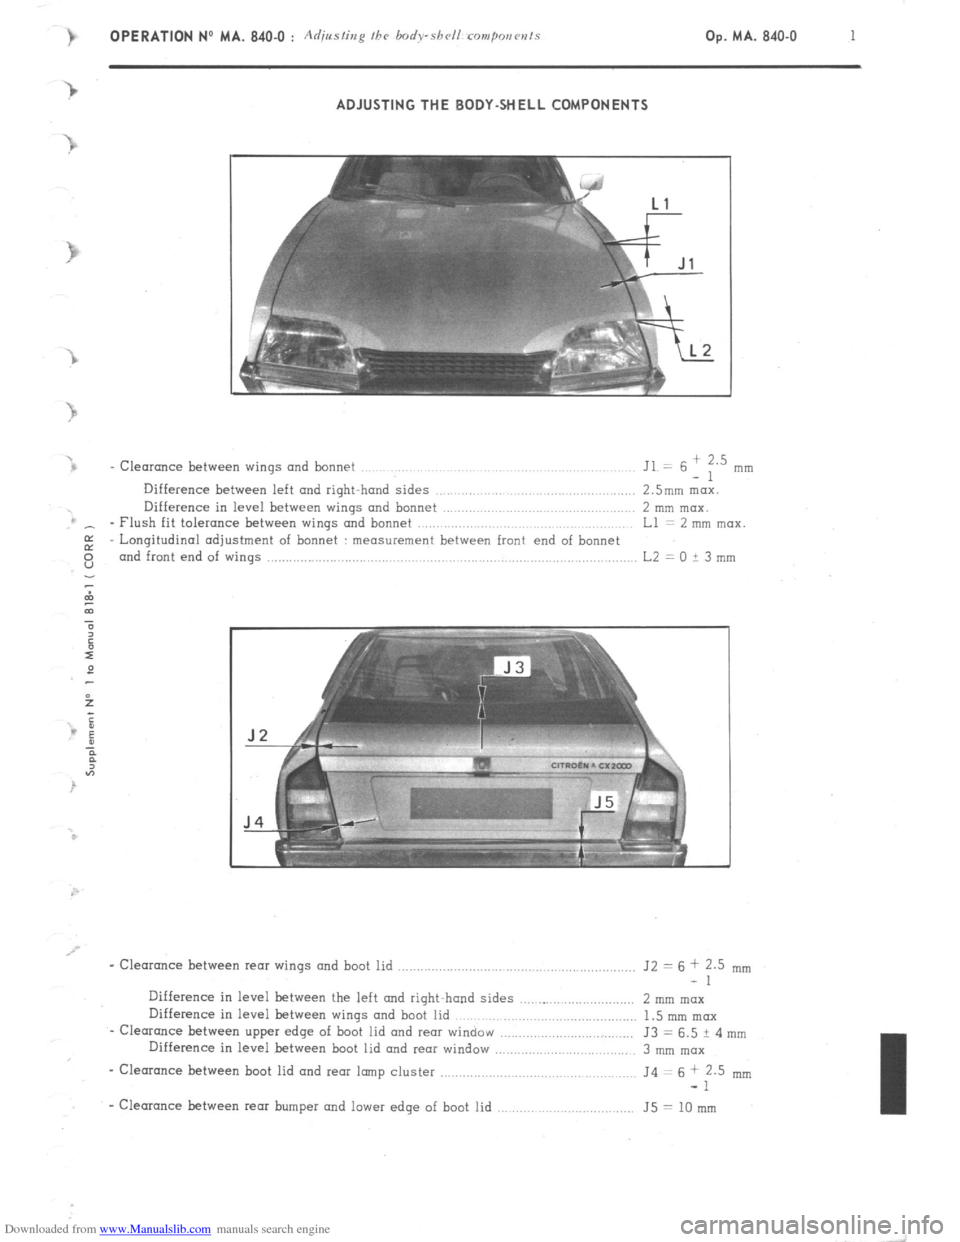
ADJUSTING THE BODY-SHELL COMPONENTS
t
Jl
-
- Clearance between wings and bonnet Jl.- 6; F.5 rnrn
Difference between left and right-hand sides 2.smm “lox.
Difference in level between wings and bonnet 2 mm max.
- - Flush fit tolerance between wings and bonnet ., Ll = 2 mm mox
E - Longitudinal adjustment of bonnet : measurement between front end of bonnet
E and front end of wings .,,,,,, ,., L2 = 0 t 3 mm
- Clearance between rear wings and boot lid ...................................... ....................
J2 = 6 + 2.5 mm
-1
Difference in level between the left and right-hand sides ............................... 2 mm max
Difference in level between wings and boot
lid ............................................. 1.5 mm max
- Clearance between upper edge of boot lid and rear window .............................. J3 = 6.5 ? 4 mm
Difference in level between boot lid and rear window ....................... ......... 3 mm max
- Clearance between boot lid rind rem irXI,p cluster ...................... ,, ., ............ J4 = 6 + 2.5 mm
-1
- Clearance between rem bumper and lower edge of boot lid ....................... ............ 55 = 10 mm
Page 383 of 394
Downloaded from www.Manualslib.com manuals search engine 2 OPERATION No MA. 840-O : A//ii,rs/hq /I><. body-sbcll rom/mncnts
Section A Section C
Section 8
4-k
J4
Clearance b&men side panels :
- Clearance between panels
Jl = J2 = J3 = 6 + 3 mm
Difference in level between edges of panels 2 mm max.
- Clearance between window frames of the front and rear doors J4 = 10 + 2 mm
Difference in level ( between window frames ) .,., 2 EN? max.
_ Clearance between side window frames and roof edge
J5 = 7 ? 2 mm
- Difference in level ( between window frames and roof ) 2 mm max
- Clearance between door and rubber seal fixings J6 = 14 + 2 mm -4
Flush-fit tolerances :
Protrusion of each component in relation to the one immediately
behind it 0 to 2 mm max
..,.................,,,II,
- Continuity of the s< light line >a Difference 2 mm max.
- Recess of side door window frames in relation to roof gutter R = .7 ’ 4 mm -2
Page 384 of 394

Downloaded from www.Manualslib.com manuals search engine OPERATION No MA. 841-O : Adjusting fh~ doors Op. MA. 841-O 1 I. ADJUSTING A FRONT DOOR
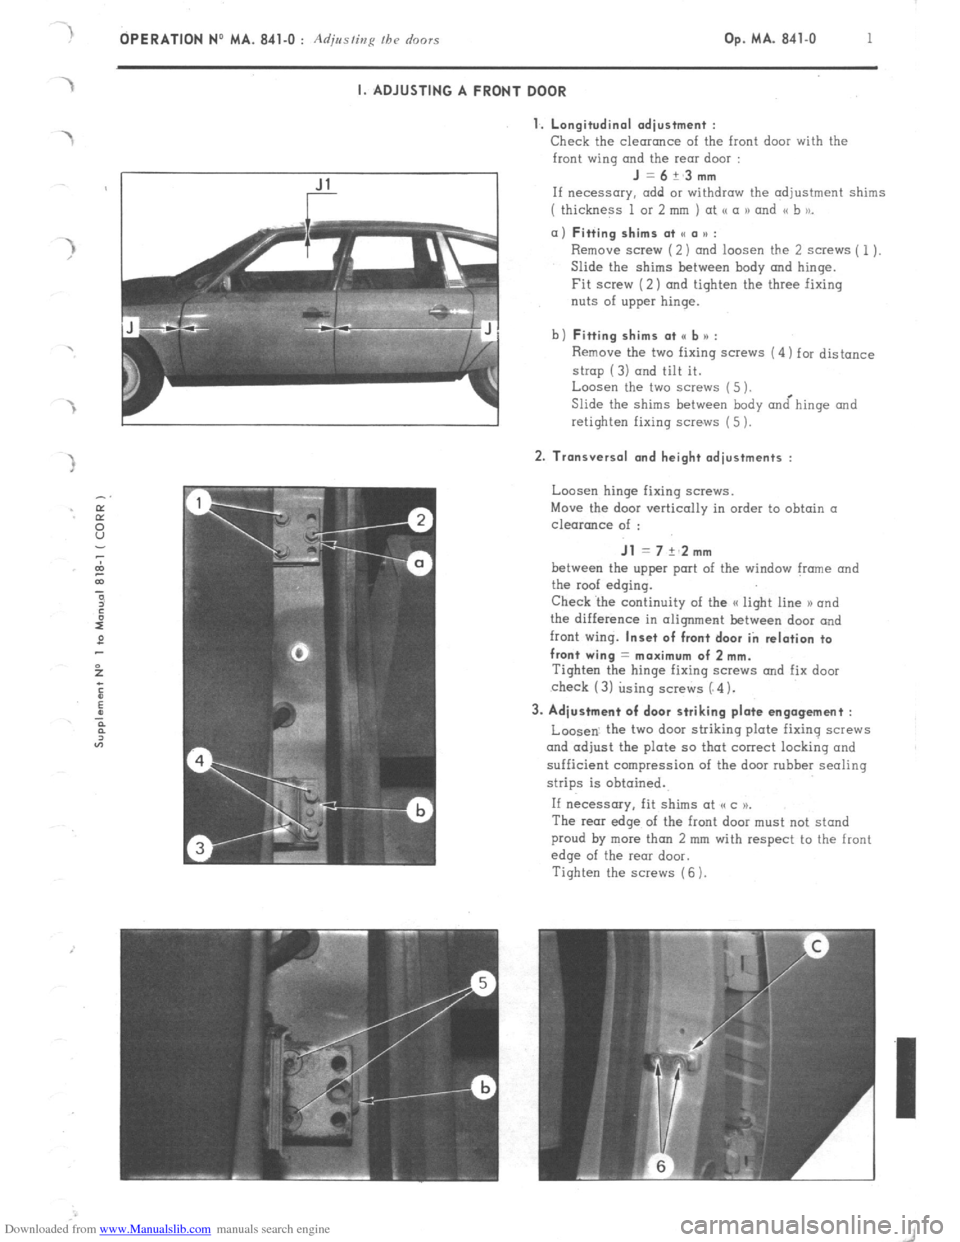
1. Longitudinal adiustment :
Check
the clearance of the front door with the
front wing and the rear door : J=6+_3mm
If necessary. add or withdraw the adjustment shims
( thickness 1 or 2 mm ) at <( a 1) and << b to_ a) Fitting shims at SC a u :
Remove screw (2) and loosen the 2 screws ( 1).
Slide the shims between hody and hinge.
Fit screw (2) and tighten the three fixing
nuts of upper hinge.
b) Fitting shims at <, b n :
Remove the two fixing screws (4) for distance
strop (3) and tilt it.
Loosen the two screws (5 ).
Slide the shims between body &hinge and
retighten fixing screws (5 ). 2. Transversal and height adjustments :
Loosen hinge fixing screws.
Move the door vertically in order to obtain a
clearance of : Jl = 7 +‘2mm
between the upper port of the window frame and
the roof edging.
Check ‘the continuity of the a light line 1) and
the difference in alignment between door and
front wing. Inset of front door in relation to
front wing = maximum of 2 mm.
Tighten the hinge fixing SCWNS and fix door
check (3) using screws (“4). 3. Adjustment of door striking plate engagement :
Loosen. the two door striking plate fixing screws
and adjust the plate so that correct locking and
sufficient compression of the door rubber sealing
strips is obtained.
If necessary, fit shims at (cc )P.
The rear edge of the front door must not stand
proud by more than 2 mm with respect to the front
edge of the rear door.
Tighten the screws (6 ).