1982 CHEVROLET CAMARO window
[x] Cancel search: windowPage 36 of 875

GM – CAMARO 1982-1992 – Repair Guide (Checked by WxMax) 36
2. Raise the window to half-
up position and hold in place by inserting a rubber
wedge door stops at the front and r ear of the window between window and
inner panel.
3. Remove the rear guide channel and inner panel cam channel.
4. Punch out the center pins of the r egulator rivets; then drill out the rivets
using a
1/4 in. (6mm) drill bit.
5. Move the regulator rear ward and disconnect wire harness from the motor (if
equipped). Disengage the roller on the re gulator lift arm from glass sash
channel.
6. Remove the regulator thr ough the rear access hole.
CAUTION - If electric motor removal from t he regulator is required, the sector
gear must be locked in positi on. The regulator lift arm is under tension from the
counterbalance spring and could cause personal injury if the sector gear is not
locked in position.
7. Drill a hole through the r egulator sector gear and backplate and install a bolt
and nut to lock the sector gear in position.
8. Using a
3/16 in. (5mm) drill bit, drill out the motor attaching rivets and remove
the motor from the regulator.
To install:
9. To install the motor to the regulator, use a rivet tool J-29022 or equivalent,
and install
3/16 in. (5mm) rivets or 3/16 in. (5mm) nuts and bolts. Remove bolt
and nut used to secure the sector gear in position.
10. Place the regulator th rough the rear access hole into the door inner panel. If
electric regulator is being installed, connect the wire connector to motor prior
to installing the regulat or to the inner panel.
11. Locate the lift arm roller in to the glass sash channel.
12. Using rivet tool J-29022 or equivalent, rivet the regulator to the inner panel
of the door using
1/4 in. (6mm) 1/2 in. (13mm) aluminum peel type rivets (part
No. 9436175 or equivalent). If rivet tool is not available, use the following nut
and bolt method:
a. Install U-clips on the regulator at the attaching locations. Be sure to
install the clips with clinch nuts on the outboard side of the regulator.
b. Locate the regulator in the door inner panel. If the electric regulator is
being installed, connect the wire connec tor to the regulator motor.
c. Locate the lift arm roller in the glass sash channel.
d. Align the regulator with clinch nuts to holes in the inner panel.
e. Attach the regulator (and mo tor) to the door inner panel with
1/4-20 x 1/2
in. screws (part No. 9 419723 or equivalent) into 1/4 in. (6mm) nuts with
integral washers. Tighten the screw to 90-125 inch lbs. (10-14 Nm)
torque.
13. Install the inner panel cam channel and rear guide channel.
14. Remove the rubber wedge door stops at the front and rear of the window
between window and inner panel.
15. Install the inner panel water deflector and the door trim panel.
Page 37 of 875

GM – CAMARO 1982-1992 – Repair Guide (Checked by WxMax) 37
WINDSHIELD AND FIXED GLASS
REMOVAL & INSTALLATION
If your windshield, or other fixed window,
is cracked or chipped, you may decide
to replace it with a new one yourself. Ho wever, there are two main reasons why
replacement windshields and other windo w glass should be installed only by a
professional automotive glass technician: safety and cost.
The most important reason a professional should install automotive glass is for
safety. The glass in the vehicle, espec ially the windshield, is designed with
safety in mind in case of a collision. The windshield is specially manufactured
from two panes of specia lly-tempered glass with a th in layer of transparent
plastic between them. This construction allows the glass to "give" in the event
that a part of your body hits the windshiel d during the collision, and prevents the
glass from shattering, which could caus e lacerations, blinding and other harm to
passengers of the vehicle. The other fixed windows are designed to be
tempered so that if they break during a coll ision, they shatter in such a way that
there are no large pointed glass piec es. The professional automotive glass
technician knows how to install the glass in a vehicle so that it will function
optimally during a collision. Without the proper experience, knowledge and
tools, installing a piece of automotive glass yourself could lead to additional
harm if an accident should ever occur.
Cost is also a factor when deciding to install automotive glass yourself.
Performing this could cost you much more than a professional may charge \
for
the same job. Since the windshield is designed to break under stress, an often
life saving characteristic, windshields tend to break VERY easily when an
inexperienced person attempts to install one. Do-it-yourselfers buying two, three
or even four windshields from a salvage yard because they have broken them
during installation are common stories. Also, since the automotive glass is
designed to prevent the out side elements from entering your vehicle, improper
installation can lead to water and air lea ks. Annoying whining noises at highway
speeds from air leaks or inside body pane l rusting from water leaks can add to
your stress level and subtract from y our wallet. After buying two or three
windshields, installing them and ending up with a leak that produces a noise
while driving and water damage during ra instorms, the cost of having a
professional do it correctly the first time may be much more alluring. The editors
of this repair guide, therefore, advise that you have a professional automotive
glass technician service any broken glass on your vehicle.
WINDSHIELD CHIP REPAIR
Check with your state and local authori ties on the laws for state safety
inspection. Some states or municipalities may not allow chip repair as a viable
option for correcting stone damage to your windshield.
Although severely cracked or damaged winds hields must be replaced, there is
something that you can do to prolong or even prevent the need for replacement
of a chipped windshield. T here are many companies wh ich offer windshield chip
Page 146 of 875

GM – CAMARO 1982-1992 – Repair Guide (Checked by WxMax) 146
SUPPLEMENTAL INFLATABLE RESTRAINT SYSTEM
GENERAL INFORMATION
All 1990-1992 models are equi
pped with an airbag system. The Supplemental
Inflatable Restraint (SIR) syst em helps supplement the protection offered by the
seat belts by deploying an ai r bag from the center of the steering wheel. The air
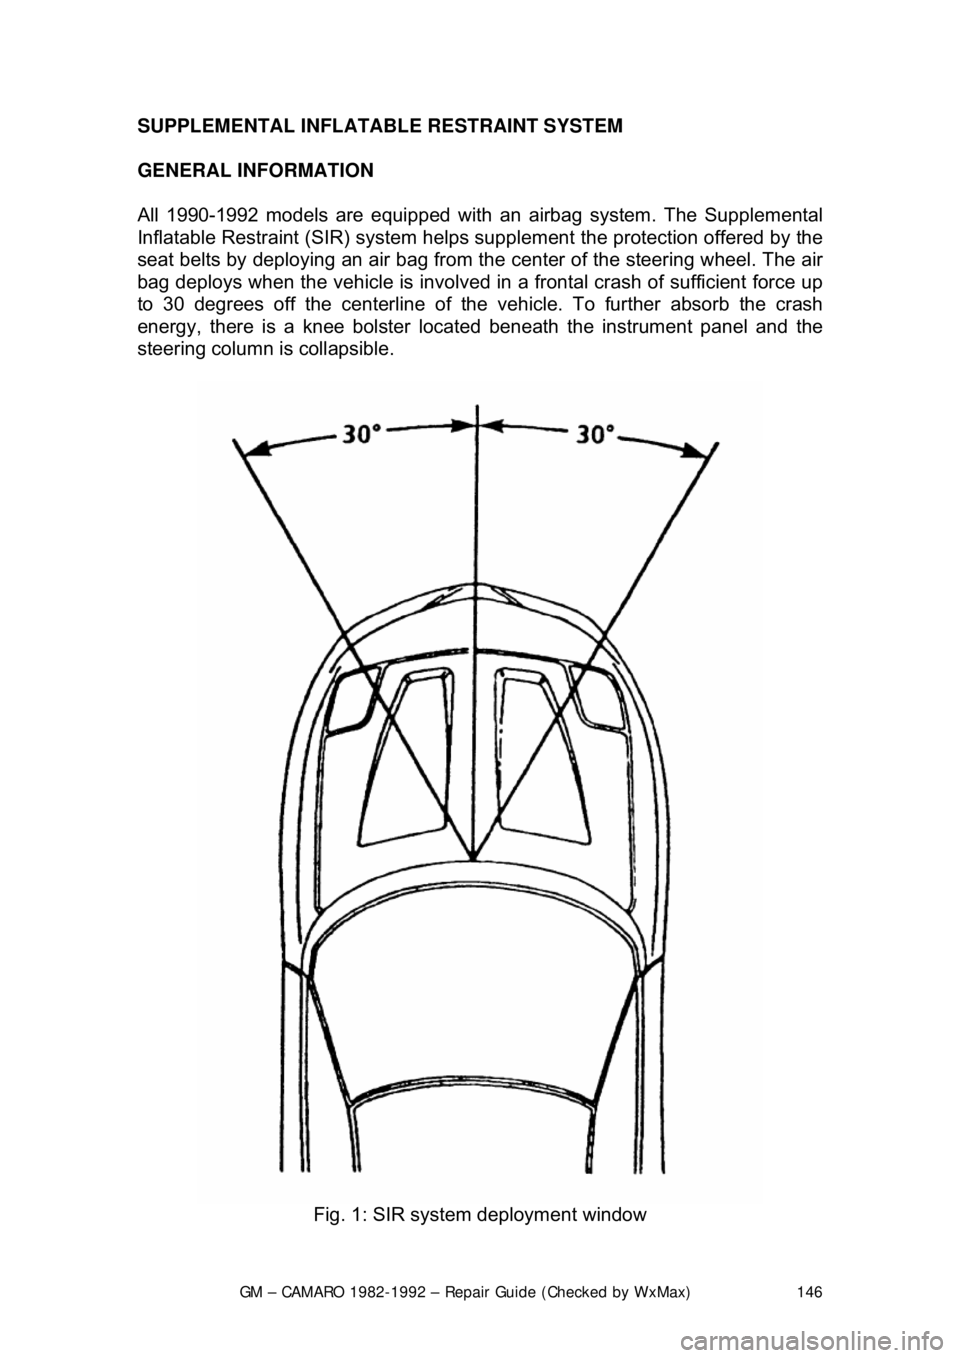
bag deploys when the vehicle is involved in a frontal crash of sufficient force up
to 30 degrees off the center line of the vehicle. To further absorb the crash
energy, there is a knee bolster located beneath the instrument panel and the
steering column is collapsible.
Fig. 1: SIR system deployment window
Page 190 of 875

GM – CAMARO 1982-1992 – Repair Guide (Checked by WxMax) 190
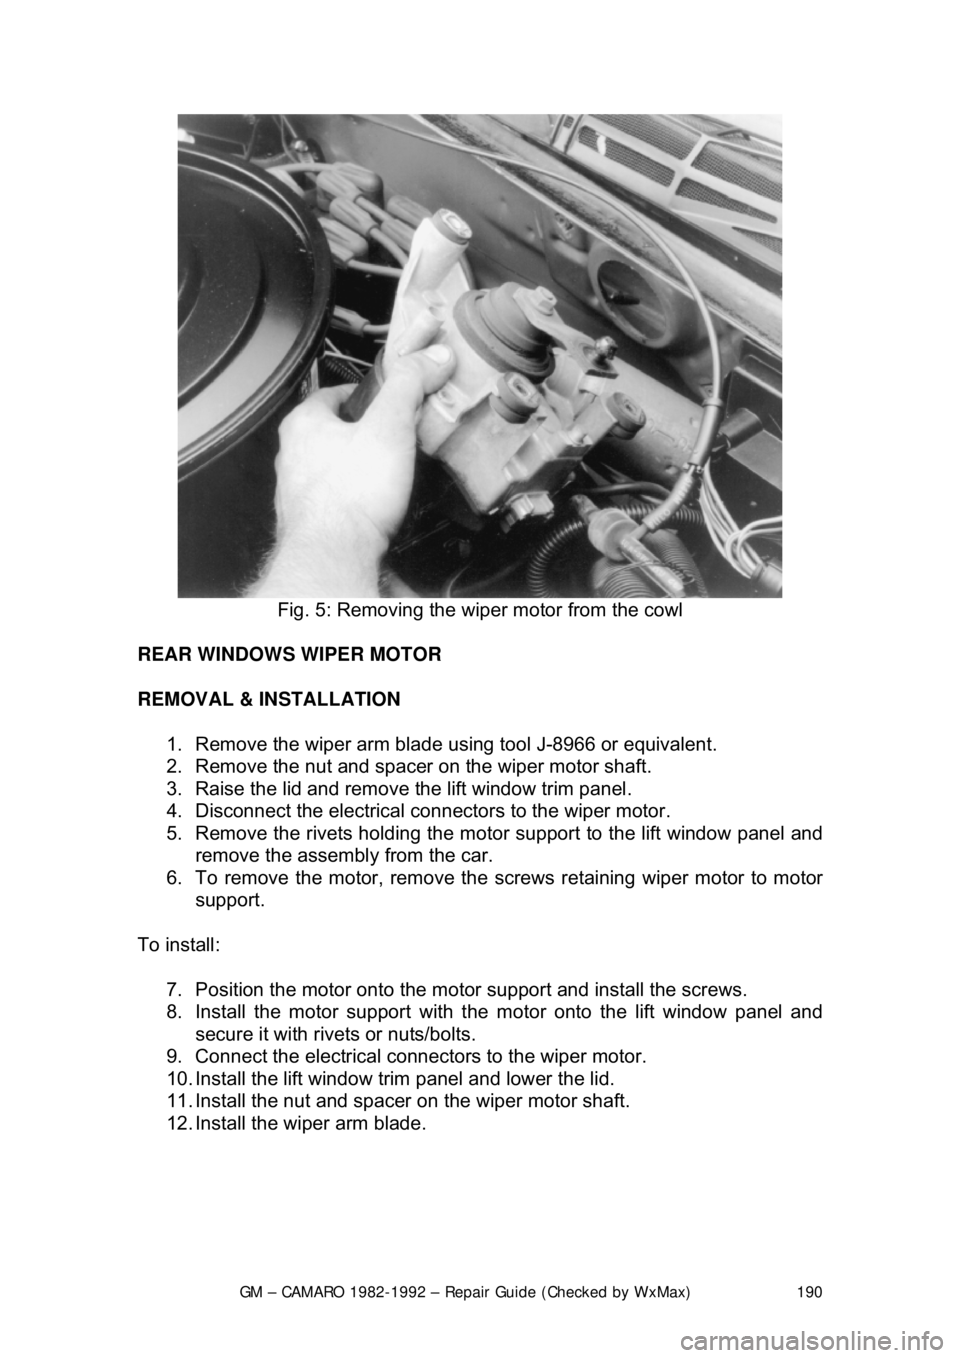
Fig. 5: Removing the wi per motor from the cowl
REAR WINDOWS WIPER MOTOR
REMOVAL & INSTALLATION 1. Remove the wiper arm blade using tool J-8966 or equivalent.
2. Remove the nut and spacer on the wiper motor shaft.
3. Raise the lid and remove the lift window trim panel.
4. Disconnect the electrical c onnectors to the wiper motor.
5. Remove the rivets holding the mo tor support to the lift window panel and
remove the assembly from the car.
6. To remove the motor, remove the screws retaining wiper motor to motor
support.
To install: 7. Position the motor onto the motor support and install the screws.
8. Install the motor support with t he motor onto the lift window panel and
secure it with rivets or nuts/bolts.
9. Connect the electrical connec tors to the wiper motor.
10. Install the lift window trim panel and lower the lid.
11. Install the nut and spacer on the wiper motor shaft.
12. Install the wiper arm blade.
Page 207 of 875

GM – CAMARO 1982-1992 – Repair Guide (Checked by WxMax) 207
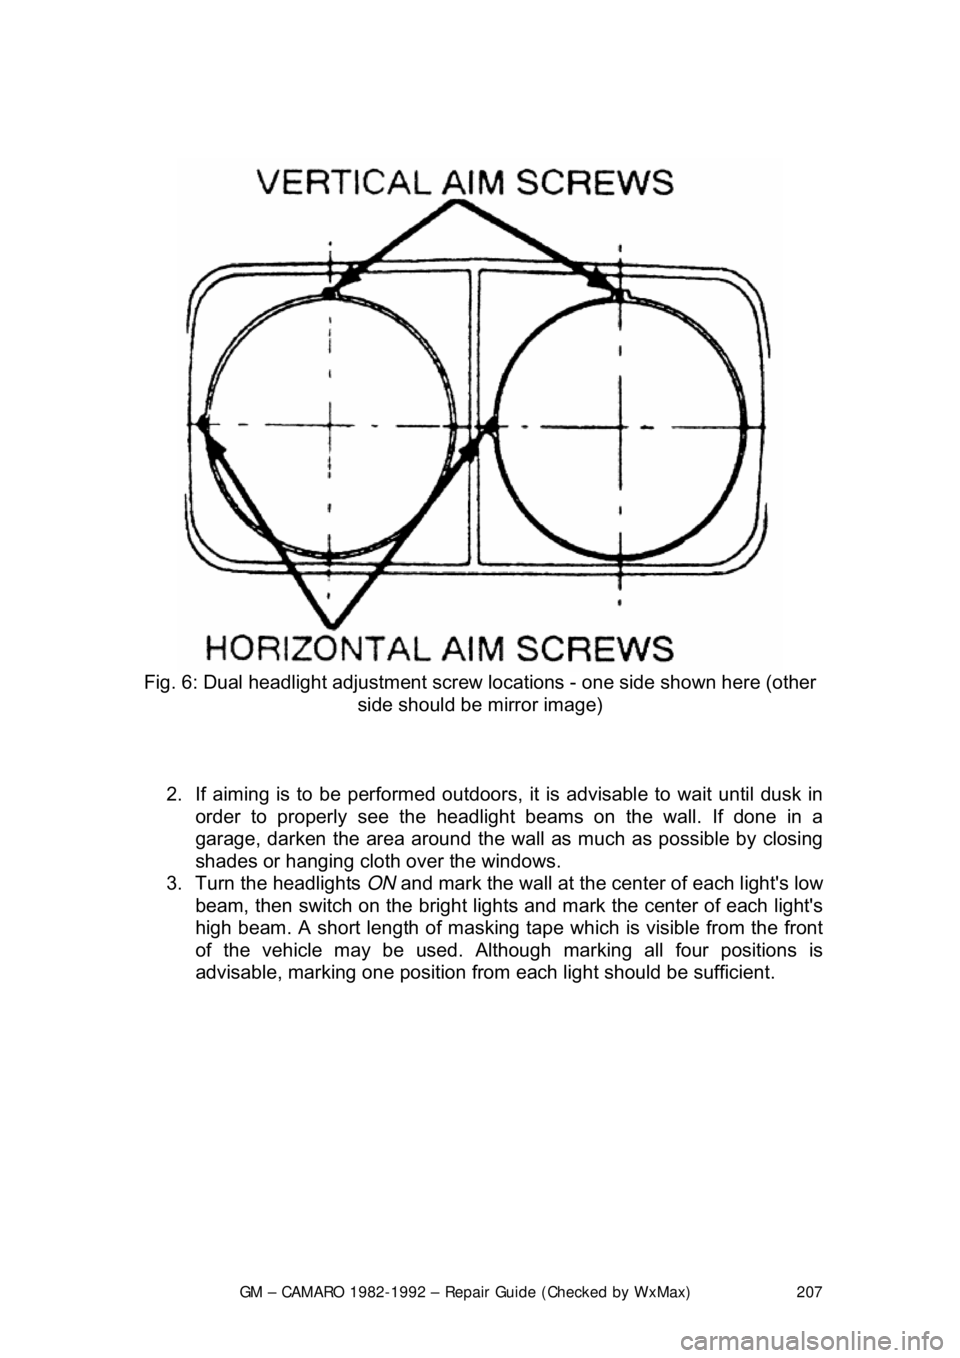
Fig. 6: Dual headlight adjustment screw locations - one side shown here (other
side should be mirror image)
2. If aiming is to be performed outdoors, it is advisable to wait until dusk in
order to properly see t he headlight beams on the wall. If done in a
garage, darken the area around the wall as much as possible by closing
shades or hanging cloth over the windows.
3. Turn the headlights ON and mark the wall at the center of each light's low
beam, then switch on the bright lights and mark the center of each light's
high beam. A short length of masking tape which is visible from the front
of the vehicle may be used. Althoug h marking all four positions is
advisable, marking one position from each light should be sufficient.
Page 799 of 875

GM – CAMARO 1982-1992 – Repair Guide (Checked by WxMax) 799
The master cylinder is located in
the left rear section of the engine
compartment. The brake master cylinder consists of an aluminum body and a
translucent nylon reservoir with minimum fill indicators.
1. Check the master cylinder body for cracks. Inspect the area around the
master cylinder for brake fluid. Leaks are indicated if there is at least a
drop of fluid. A damp condition is not normal.
2. Inspect the level of the brake fluid to assure it is at the correct height.
Clean the top of the reservoir cap so t hat all dirt is removed. Remove the
cap(s) or reservoir cover and the reservoir diaphragm.
3. Inspect the brake fluid level. Add clean DOT-3 brake fluid as required to
bring the fluid level to the line located inside the neck of the reservoir fill
opening.
4. Install the reservoir cap.
WARNING - Any sudden decrease in the fluid level indicates a possible leak in
the system and should be check ed out immediately. Do not allow brake fluid to
spill on the vehicle's finish; it will remove the paint. In case of a spill, flush the
area with water and mild soap.
HYDRAULIC CLUTCH SYSTEM
FLUID RECOMMENDATIONS
• 1982-1991 - Delco Supreme II Brake fl uid or an equivalent fluid that
meets DOT-3 specifications
• 1992 - Hydraulic clutch fluid, GM part number 12345347 or equivalent
LEVEL CHECK
The clutch master cylinder is normally lo cated below the brake master cylinder.
The reservoir for it is located right bes ide the brake master cylinder and is made
of translucent nylon. The fl uid level of the reservoir sh ould be kept near the top
of the observation window. Before removing the cap to the reservoir, clean all
dirt from the area. This will prevent syst em contamination due to particles falling
into the reservoir when the caps are removed.
POWER STEERING PUMP
FLUID RECOMMENDATIONS
• GM power steering fluid, or equivalent.