1980 SKODA 120 LSE wheel bolts
[x] Cancel search: wheel boltsPage 105 of 238
wi
prl
tht
rer
oul MT
ott
rec
.a
Fig
Dis S
boll
6-1C
rubl
ovo
exomple
50,000 km ond
more, check the wheel
comber ond prepore
suitoble woshers for its
correction. 2. Jock up the cor ond support the body on
both sides to relieve the front wheels, ond
remove the wheels. 3. Proceeding from
inside the luggoge boot,
remove covers protecting
the threods of the
shock-obsorber piston
rods ond screw off the
nuts. Retoin the piston
rod by holding its flot-
tened end.
b) Operotions inside the cor
4. Remove the steering wheel, the steering
column cowling, ond detoch the steering
shoft
from the body -
see Chopter 7.8.
c) Operotions from under the cor
5. Remove the bolt of the connection of the
steering shoftwith the steering box ond releose
the shoft sleeve from the connection by pull-
ing the steering geor
inside the cor.
6. Slocken the nuts of the bottom wishbone
pins fostening the front oxle to the brocket on
the body until the woshers of the brockets ore
releosed. 7. Detoch the onti-roll bor brockets from
the
body ond disconnect the rubber broke hoses
from the front broke systems.
Before discon-
necting the hose, cleon thoroughly the hose
connector ond its surroundings to prevent
foreign motter from getting
into the broke
system. For the some reoson,
wrop the
hose
ends in o cleon rog. Toke
the some precoutions
with the disconnected broke piping.
8. Ploce o roll-o-cor
iock under the oxle ond
remove the bolts (two
on either side
of the tele-
scopic shock obsorber) fostening the oxle to
the body from obove. 9. Compress the telescopic shock obsorbers,
lower the
iock, ond
move it with the oxle from
under the cor.
6.3 REFITTING FRONT AXLE IN
CAR
1. To reinstoll the oxle in
the cor, reverse the
procedure of its removol, i.
e., begin with the
porogroph 9 ond proceed
to the porogroph
1.
Coot the rubber
cup with greose
ot the point
of its contoct with the steering shoft.
2. While reconnecting the broke hoses, ob-
serve the utmost cleonliness ond bleed the front
wheel brokes if no other ports
of the broke
system hos been dismontled. (lf
such o dis-
montling hos token ploce,
bleed the brokes of
oll wheels ofter hoving fully reclosed
the broke
circuit). 3. Turn the wheels in the stroight oheod di-
rection before connecting the steering shoft
with the steering box. Fit the steering wheel tentotively
ond odiust the direction indicotor
switch -
see Chopter 13.17.
4. Using the steering wheel, tunn the wheels
into full lock positions
to moke sure thot the
lock ongle is correctly limited by the king pin
socket stops -
see Chopter 6.5, porogroph
36.
5. Adiust the toe-in -
see Chopter 6.1.
6.4 DISMANTLING
FRONT AXLE
No speciol instructions ore required for
dis-
montling mony of the subossemblies. Accord-
ingly, only the bosic dismontling procedure
will be
deolth with ond porticulors
will be men-
tioned only os fon
os they ore necessory for the
sequence of operotions ond the use of iigs.
Ports which con be dismontled witlrout re-
moving them from the cor ore the wheel hubs
and beorings, the broke mechonisms, steering
orms, shock obsorbers, ond the
onti-roll bor.
lf ony odditionol ports
hove to be dismontled,
remove the oxle from the cor ond dismontle it
on the stond.
Dismontling Wheel Hubs
ond Beorings
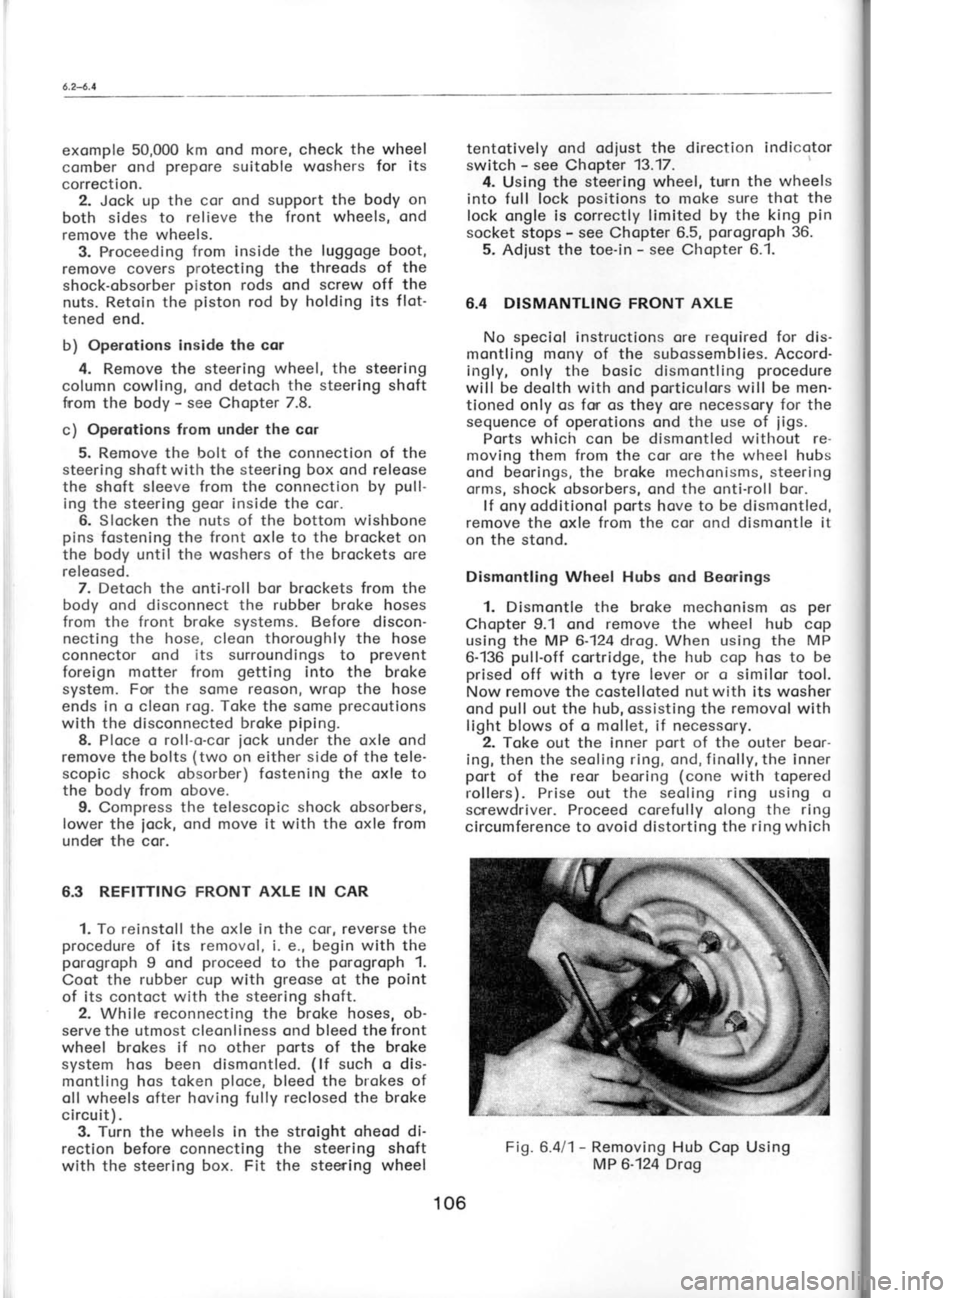
1. Dismontle the broke mechonism os per
Chopter 9.1 ond remove
the wheel hub
cop
using the MP 6-124 drog. When using the MP
6-136 pull-off
cortridge, the hub cop hos to be
prised off with o
tyre lever or o similor tool.
Now remove the costelloted nutwith its wosher
ond pull
out the hub,
ossisting the removol
with
light blows of o mollet, if necessory.
2. Toke out the inner port
of the outer beor-
ing, then the seoling ring, ond, f
inolly, the inner
port of the reor beoring (cone
with topered
rollers). Prise out the seoling ring using o
scrrewdriver. Proceed corefully olong the ring
circumference to ovoid distorting the ring which
Fig. 6.4/1 -
Removing Hub Cop Using
MP 6-124 Drog
106
Page 111 of 238
1
\
I
(
r
t
(
s I
I
(
S
lf
m
gr
lir
O1
sy
ro
po
th
th
th, tir
on
m€
tht
of
onl
I
by tr
Cl
A
6-
tl-
th
th
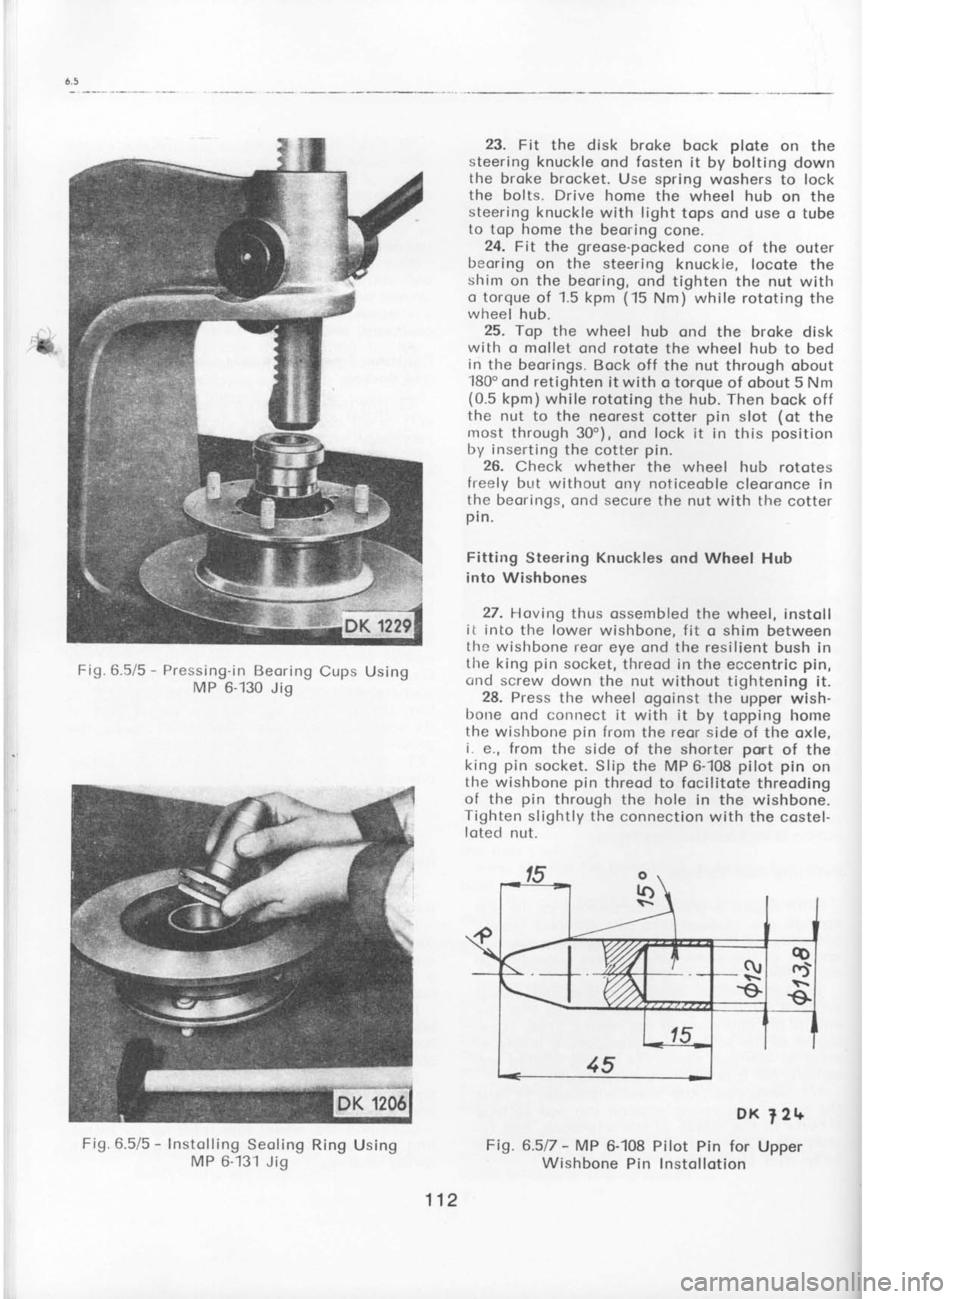
Fig.6.5/5
-
Pressing-in Beoring Cups Using
MP 6-130 Jig
Fig.6.5/5 -
Instolling Seoling Ring
Using
MP 6-131 Jig 23-
Fit the disk broke bock plote
on the
steering knuckle ond fosten it by bolting down
the broke brocket. Use spring woshers to lock
the bolts. Drive home the wheel hub
on the
steering knuckle with light tops ond use o tube
to top home the beoring cone.
24. Fit the greose-pocked
cone of the outer
beoring on the steering knuckie, locote
the
shim on the beoring, ond tighten the nut with
o torque of 1.5 kpnr (15
Nm) while rototing the
wheel hub.
25. Top
the wheel hub ond the broke disk
with o mollet ond rotote
the wheel hub to bed
in the beorings. Bock off the nut
through obout
-180o
ond retighten it with o torque of obout 5 Nm
(0.5 kpm) while rototing the hub. Then bock off
the nut to the neorest cotter pin
slot (ot
the
most through 30"), ond lock it in this position
by inserting the cotter pin.
26. Check whether the wheel hub rototes
freely br-rt without ony noticeoble
cleoronce in
the beorings, ond secure the nut with the cotter
pin.
Fittirrg Steering Knuckles ond Wheel Hub
into Wishbones
27. Hoving thus ossembled the wheel, instoll
ii into the lower
wishbone, fit
o shim between
tl-re wishbone reor eye ond the resilient bush in
the king pin socket,
threod in the eccentric pin,
cind screw down the nut without tightening it.
28. Press
the wheel ogoinst tlre
upper wish-
borre ond connect it with it
by topping home
the wishbone pin
from the reor side
of the
oxle,
i. e., from the side of the shorter port
of the
king pin
socket. Slip the MP 6-108 pilot
pin
on
the wishbone pin
threod to focilitote threoding
of the pin
through the hole in the wishbone.
Tighten slightly the connection with the costel-
loted nut.
DK ? 2r+
Fig. 6.517 -
MP 6--108 Pilot Pin for
Upper
Wishbone Pin lnstollotion
112
Page 113 of 238
R
tr
el o
tl
Pl
e1
th
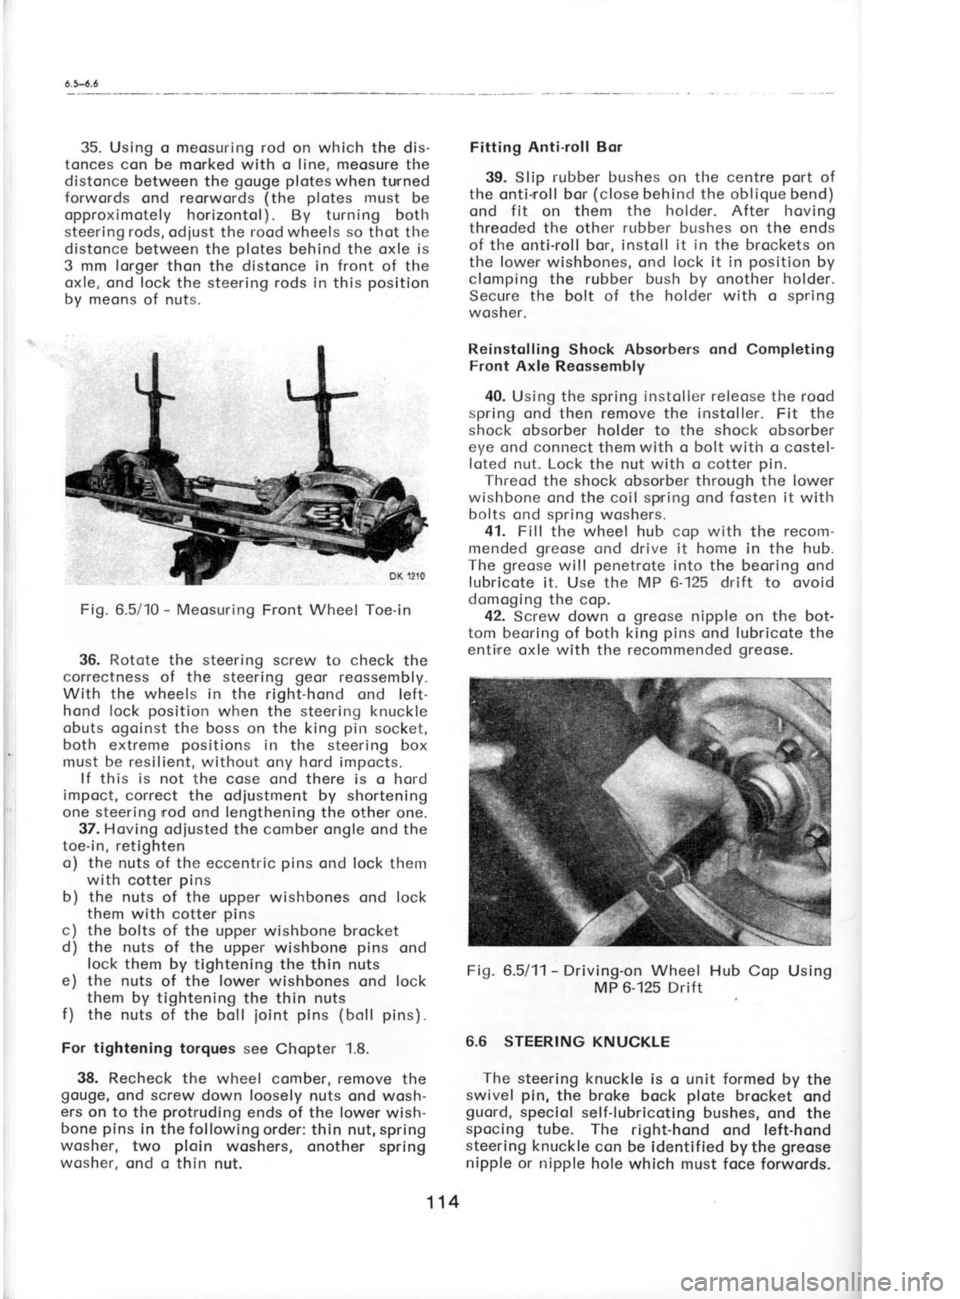
35.
Using
o meosuring rod
on which the dis-
tonces con be morked with o line, meosure the
distonce between the gouge plotes
when tunned
forwords ond reorwords (the plotes
must be
opproximotely horizontol). By turning both
steering rods, odiust the rood wheels so
thot tlre
distonce between the plotes
behind the oxle is
3 mm lorger thon the distonce in front
of the
oxle, ond lock the steering rods in
this position
by meons of nuts.
Fig. 6.5/10 -
Meosuring Front Wheel Toe-in
36. Rotote
the steering screw to check the
correctness of the steering geor
reossembly.
With the wheels in the right-hond ond left-
hond lock position
when the steering knuckle
obuts ogoinst the boss on the king pir-r
socket,
both extreme positions
in the steering
box
must be resilient,
without ony hord impocts.
lf this is
not the cose ond there is o hord
impoct, correct the odiustment by shortening
one steering nod ond lengthening
the other one.
37. Hoving odiusted the comber ongle
ond the
toe-in, retighten
o) the nuts of the eccentric pins
ond lock them
with cotter pins
b) the nuts of the upper wishbones ond lock
them with cotter pins
c) the bolts of the upper wishbone brocket
d) the nuts of the upper wishbone pins
ond
lock them by tightening the thin nuts
e) the nuts of the lower wishbones ond lock
them by tightening the thin nuts
f ) the
nuts of the boll
ioint pins (boll pins).
For tightening torques see Chopter 1.8.
38. Recheck the wheel comber, remove the
gouge, ond screw down loosely nuts ond wosh-
ers on to the protruding
ends of the lower
wish-
bone pins
in the following order: thin nut, spring
wosher, two ploin
woshers, onother spring
wosher, ond o thin nut. Fitting
Anti-roll Bor
39. Slip rubber
bushes on the centre port
of
the onti-rroll bor (close
behind the oblique bend)
ond f it on them the holder. After
hoving
threoded the other rubber bushes
on the
ends
of the onti-roll bor, instoll it in the brockets
on
the lower
wishbones, ond lock it in position
by
clomping the rubber bush by onother holder.
Secure the bolt of the holder with o spring
wosher.
Reinstolling Shock Absorbers ond Completing
Front Axle Reossembly
40. Using the spring instoller releose
the rood
spring ond then remove the instoller. Fit the
shock obsorber holder to the shock obsorber
eye ond connect them with o bolt with o costel-
loted nut. Lock the nut
with o cotter pin.
Threod the shock obsorber through the lower
wishbone ond the coil spning ond fosten it
with
bolts ond spring woshers.
41. Fill the wheel hub cop with
the recom-
mended greose
cnd drive it home
in the hub.
The greose will penetrote
into the beoring ond
lubricote it. Use the
MP 6-125 drift to ovoid
domoging the cop.
42. Screw down o greose
nipple on the bot-
tom beoring of both
king pins
ond lubricote the
enti,re oxle with the recommended greose.
Fig. 6.5/11- Driving-on Wheel Hub Cop Using
MP 6-125 Drift
6.6 STEERING KNUCKLE The steering knuckle is o unit formed by the
swivel pin,
the broke bock plote
brocket ond
guord, speciol self-lubricoting bushes, ond the
spocing tube. The right-hond ond left-hond
steering knuckle
con be identified bythe greose
nipple or nipple hole which must foce forwords.
114
Page 123 of 238
7
.7-1.8
(
t
t
t
; (
(
b
tl
ir
tl
p il
o
tl
p
odiust,
if necessory, the driving dog of the di-
rection indicotor switch -
see Chopter 13.17.
Refit the steering wheel so thot its spokes
ore horizontol, lock it in position
with the nut
(for tightening torque, see
Chopter 1.8), ond
bolt down the spoke shroud.
7.8 STEERING WHEEL SHAFT AND SHAFT
BEARING
The steering wheel (column) shoft is built
up
of two ports
with the beoring in the uPPer port.
Usuolly, it is not necessory to disconnect the
two ports
of the shoft or to remove the beoring
ond steering lock. lt
con be removed from the
cor os o unit.
Removol 1. Remove the steering wheel -
see Chop-
ter 7.7. 2. Remove the screws on the lower port
of
the shoft cowling ond pull
the cowling off.After
removing two bolts, detoch the cluster switch
on the shoft from the upper port
of the shoft
cowling. 3. Remove two front screws of the upper
Port
of the cowling ond remove the cowling.
4. Disconnect the leods
from the switches
ond the switch box.
5. From under the cor, remove the bolt of the
coupling connecting the steering
column shoft
to the steering box ond detoch the dust boot
from the floor. Remove the
bolts of the shoft
beoring (from
under the shoft)
ond the bolts of
the steering lock (from
the front) fostening the
shoft to the body, ond pull
out the shoft.
Ref itting To ref it the steering column shoft
in the cor,
reverse the removing procedure. While reinstol-
ling the steering wheel (Chopter
7.7), do not
forget to check the direction indicotor switch
for correct function.
Use ploin
ond spring woshers under the bolts
of the steering lock
brocket. Reinstoll the shoft
beoring using spocing tubes, rubber bushes, ond
ploin woshers, ond secure the bolt of
the coup-
ling, connecting the steering
column shoft with
the steering box, with
o self-locking nut (for
tightening torque, see
Chopter 1.8).
To Disconnect Shofts
Remove the bolt
of the cross-pin
ioint con-
nection.
Connecting of Shofts
Fit o fostening sleeve on the tube
with the
shoft, dip the ring in oil ond slip
it on to the shoft end with
its wedge-shoped port
toword
the beoring, instoll the spring
ond the
ioint
socket of
the shoft bottom port.
Tighten
the
connection with the bolt with self-locking
nut
(tightening torque os per
Chopter 1.8).
The sleeve must be f irst built up if
the shoft
is refitted for the first time. Locote
both holves
of the sleeve on the tube ond fosten
them
lightly together by bending the tob of one holf
of ttre sleeve over the
other. The
sleeve must
on no occount clomp the tube tightly.
Bottom Port of Steering
Column Shoft
The shoft is provided
with cross-pin
ioints
ond connot be dismontled (token
oport). Before
fitting the shoft dust boot, smeor
it with
oil to
focilitote its slipping over the pcrrts
of the joint.
For this purpose,
it is clso odvisoble to wrop
the joint
in o plostic
foil or to moke o sleeve
with o pilot
cone.
Top Port of Steering Column
Shoft -
Beoring
Removol 1. l-ift owoy the fostening sleeve
ond check
whether the shoft rototes
freely in the tube. lf
it is not the cose, unlock the steering lock ond
press out the shoft proceedirrg
from the side
of its splined
end.
2. lf necessory, remove
the circlip of the shoft
ond lift owoy the beoring. The other beoring
hos to be driven out by topping it corefully
through the cut-outs in
the tube to ovoid domog-
ing it. 3. Remove the brocket with the steering
lock
- see Chopter 7.9.
Ref itting
1. Slip tlre beoring pocked
with greose
on to
the upper port
of the shoft, then the ring with
its wedge-shoped port
focing the beoring, ond
lock both ports
in position
with the circlip.
Press the shoft into the tube ond press-in
the
beoring (ogoin pocked
with greose)
from the
other end.
2. lnstoll the brocket with the steering lock -
see Chopter 7.9.
Shoft Beorings They hove to be thoroughly lubricoted
first,
since ofter their reossembly with the shoft od-
ditionol lubricotion is not possible.
lf there is
ony doubt concerning the greose
pocking,
re-
move the circlip f
rom the inner port
of the
beoring, toke the beoring oport, cleon it, ond
reossemble it ofter hoving pocked
it with the
recommended greose,
i. e., brond NH2 of Cze-
choslovok provenience
or one of the bronds
specif ied in Chopter 7.5, porogroph
3.
124
Page 133 of 238
tr
c
\
c'
pl
r€
o1.
tt pl
tt
r€
ol
w
ot
iu
ol
dt
is
ol
sl
Rr
ot
th
th
c0
c0
Broke
Shoes ond Broke Drums
When refitting
o broke shoe with o portiolly
worn lining moke sure thot it hos o thickness
sufficient to lost till the periodic
inspection
(ofter every 20,000 kilometres). The new lining
is 5 mm thick. When it is worn down to 1.5
to 'l
mm (4
to 3.5 mm when meosured
with the
shoe), the broke shoe hos to be reploced
with
o new.or
o reconditioned
shoe with glued-on
new lining. Be sure to reploce
the respective
broke shoes in both wheels to preserve
o uni-
form broking effect.
Speciol glues or cements
ond hordening ot
high temperotures
ore required when relining
the broke shoes so thot this
iob con
be done in
speciolized repoir shops
only. For informotion,
opply to the broke monufocturer -
Autobrzdy
Not. Corp., Joblonec
nod Nisou.
Broke drums are grey
cost-iron costings. Their
unequol weor
con be rectified
by mochining to
o 231 mm diometer.
No tool morks must be left
on their surfoce
which hos to be perfectly
smooth. The olignment deviotion
ond mochin-
ing toleronce should
not exceed 0.1 mm. The
moximum permissible weor is up Lo 232
mm in
diometer.
Only broke drums
with on identicol
diometer
ore permitted
to be mounted on one ond the
some oxle.
9.2 FRONT BRAKE
ASSEMBLY
Disnrontling ond Reossembly
1. Detoch
the broke fluid supply piping
from
the broke. Absolute cleonliness is o must.
Otherwise dirt ond foreign
motterwill penetrote
into the piping.
2. Renrove bolts lrolding
down the broke yoke
crnd lift owoy rlre broke
ossembly.
3. Use the MP 6-132 gouge
to set correctly
the broke (new
or repoired)
on reinstollotion.
4. Select the shims required
to fill the gop
between the end of the gouge
ond the foce of
the fostening lug.To position
correctly the
broke, insert shims
between the fostening lugs
cnd yokes. You con, however,
meosure direct
the distonce
between the fostening
lug ond the
trroke disk
ond set this distonce
in complionce
with Fig. 9.211 by odding pocking
pieces
to the
shim pock.
5. Using the respective
copscrews ond spring
'.^roshers, bolt down the yoke
to the lugs.
6. Attoch the supply hoses ond bleed
the
broke.
Replocing the Brake
Disk
A worn brol
grinding it to o thickness
of 7.5 mm. lf necess-
cry, reploce it with o new one 9 mm thick. The lowest
limit of thickness
of o still usoble
broke disk is 6.5 mm. The
moximum permissible
run-out of the friction surfoce is
0.15 mm.
1. After hoving lifted owoy
the broke os-
sembly, remove the wheel hub
ond then the
broke disk. 2. Reossemble the broke disk
with the wheel
hub using copscrews with spring
woshers.
3. Top
rrp or chonge the lubricont
in the
wheel
hub beorings ond reinstoll the broke ossembly
Replocing Broke Pods
The overoll thickness of o broke pod
with
new lining is 15 mm. When worn down to 7 mm
(with the lining 1.5 mm thick), the pod
is
unusoble.
Alwoys reploce
broke pods
on both ends of
the oxle of the some time so
thot their weor is
uniform. With regord to the coefficient of fric-
tion, they hove to be of the some
type ond
rnoke.
1. Suck off the hydroulic fluid from the tonk
so thot it is only holf filled.
2. Remove cotter pins
ond lift
owoy the broke
lining cover.
3. Remove the friction pod,
cleon thoroughly
the covities of the yokes, piston
ports,
ond dust
boots.
4. Fit the MP 6-134 force-off lever over the
broke disc ond drive the pistons
into the
cylinder bottoms by the presswe
of levers.
5. Ploce o new friction pod
into the broke
ossembly moking sure thot the clomp of the
thrust plote
fits into the collor of the piston
foce.
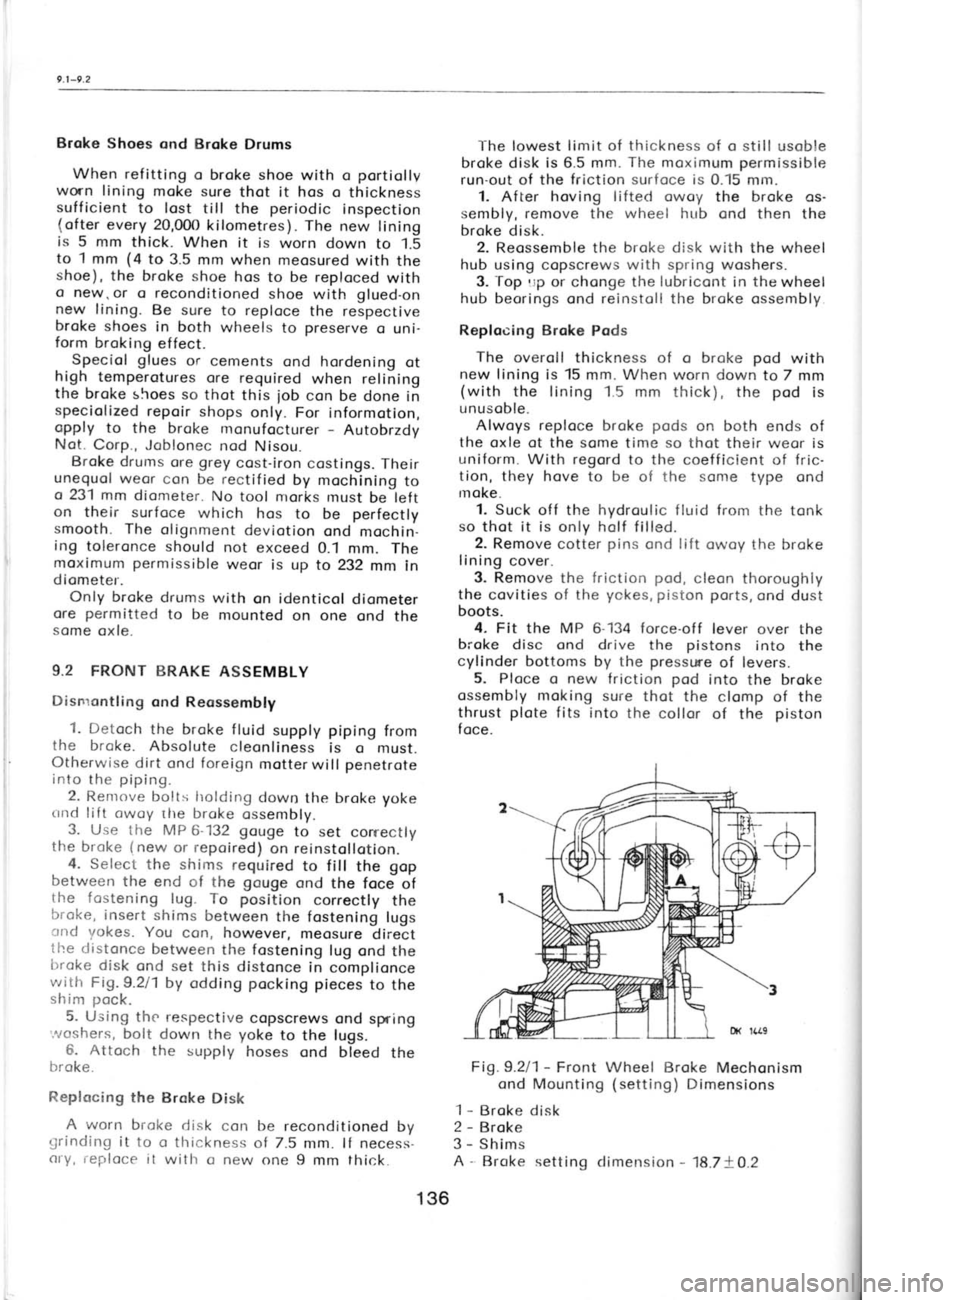
Fig.9.2l1- Front Wheel Broke Mechonism
ond Mounting (setting)
Dimensions
1 -
Broke disk
2 -
Broke
3 -
Shims
A -
Broke setting climension -
18.7+O.2
136
Page 193 of 238
1 t.1
-1
4.3
surfoces ore
sproyed with o
Protective com'
pound. The floor boords including the floor of
the boot ore covered with textile corpets while
rubber mots ore used in Skodo 105 S.
The in-
terior luggoge comportment is
lined with insu-
loting felt
sheet.
fne body finish consists of severol loyers of
speciol onti-corrosive cootings, o primer
coot,
ond o synthetic boking enomel top
coot in
colours complying with
o speciol specificotion.
14.1 BUMPERS
To Remove Front BumPer
Disconnect the
leods of the horn ond front
direction indicotors. Remove bolts connecting
the side sections of
the bumper with the wings
ond bolts of the bumper brockets, connecting
them to the wheel splosh guords. Now
the
entire bumper is free ond it con be removed.
Te Remove Reor BumPer
Proceed in the some woy with the exception
thot there ore no leods to be disconnected.
To Remove Overriders
Screw off the nut M 10 ond lift owoy the
overri der.
14.2 WTNGS
To Remove Front Wing
First remove the front bumper (see
Chop-
ter 14.1), the front door (see
Chopter 14.5), ond,
in the cose of the left-hond wing, the boot lid
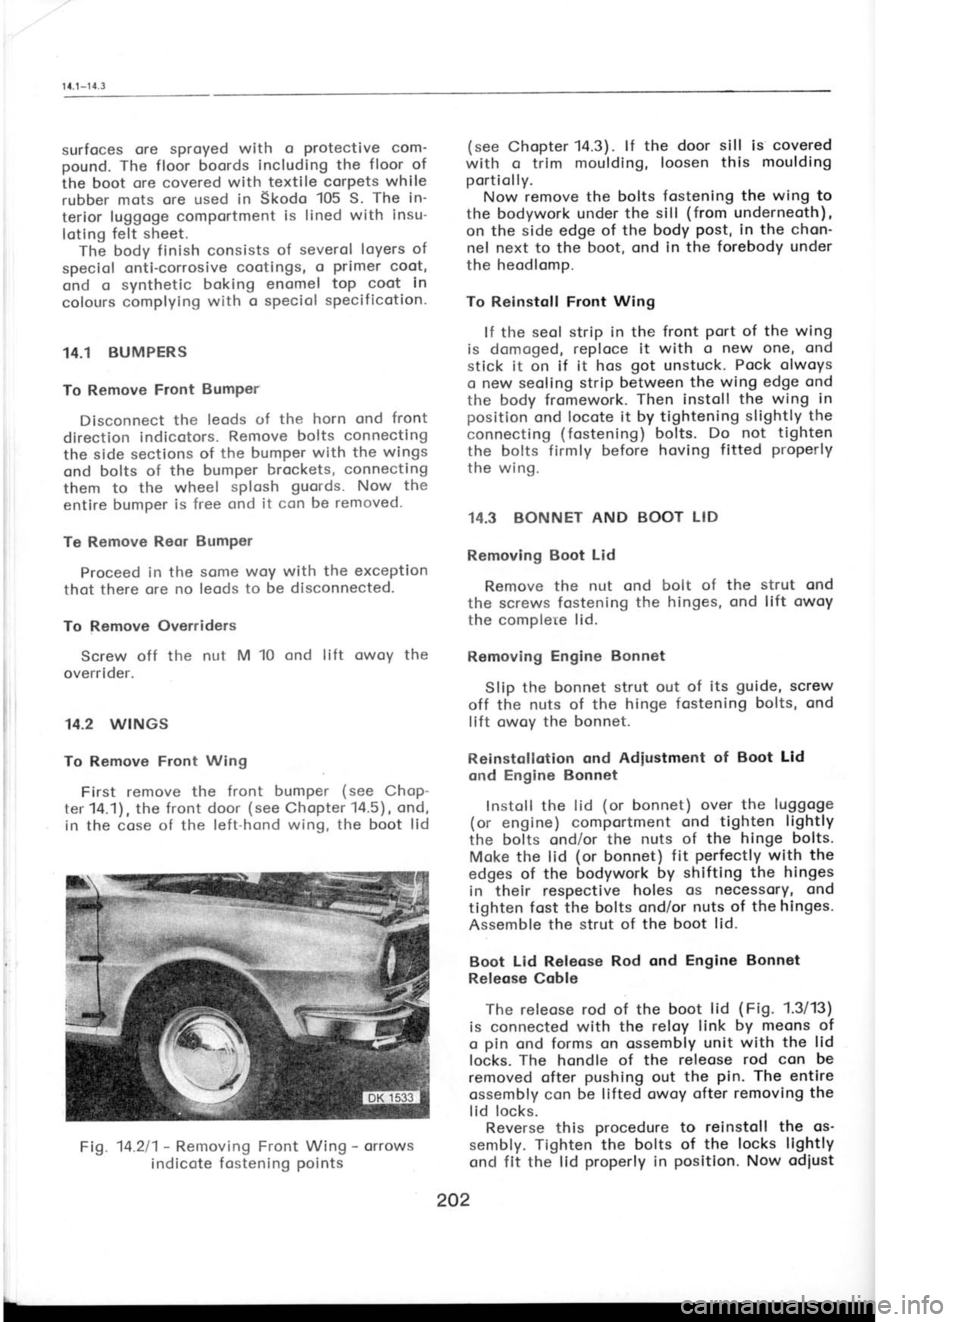
Fig. 14.211- Removing Front Wing -
orrows
indicote fostening points (see
Chopter 14.3). lf the door sill is covered
with o trim moulding, loosen this moulding
portiolly. Now remove the bolts fostening the wing to
the bodywork under the sill (from
underneoth),
on the side edge of the body post,
in the chon'
nel next to the boot, ond in the forebody under
the heodlomp.
To Reinstqll Front Wing
lf the seol strip in the front
Port of the wing
is domoged, reploce it with o new one, ond
stick it on if it hos got
unstuck. Pock olwoys
o new seoling strip between the wing edge ond
the body fromework. Then instoll
the wing in
position ond locote it by tightening slightly the
connecting (fostening) bolts.
Do not tighten
the bolts firmly before hoving fitted properly
the wing.
14.3 BONNET AND BOOT LID
Removing Boot Lid
Remove the nut ond bolt of the strut ond
the screws fostening the
hinges, ond lift owoy
the complete lid.
Removing Engine Bonnet
Slip the bonnet strut out of
its guide,
screw
off the nuts of the hinge fostening bolts, ond
lift owoy the bonnet.
Reinstollotion ond Adiustment of Boot Lid
ond Engine Bonnet
Instoll the lid (or
bonnet) over
the luggoge
(or engine) comportment ond
tighten lightly
the bolts ond/or the nuts of the hinge bolts.
Moke the lid (or
bonnet) fit perfectly
with the
edges of the bodywork by shifting the hinges
in their respective holes
os necessory, ond
tighten fost the bolts ond/or nuts of the hinges-
Assemble the strut of the boot lid.
Boot Lid Releose Rod ond Engine Bonnet
Releose Coble
The releose rod of the boot lid (Fig.
1.3113)
is connected with the reloy link by meons of
o pin
ond forms on ossembly unit with the lid
locks. The
hondle of the releose rod con be
removed ofter pushing
out the pin.
The entire
ossembly con be lifted owoy ofter removing the
lid locks.
Reverse this procedure
to reinstoll the os'
sembly. Tighten the bolts of the locks lightly
ond fit the lid properly
in positlon.
Now odiust
202 c
o
o
o ir
e
tt d
Page 199 of 238
Reverse
the
dismontling procedure
to rein'
stoll tl-re window ond its winder. The
loterol
ploy con be odiusted by odiusting (swinging
out) the centre post
ofter hoving loosened the
respective bolts ond nuts -
see Fig. '14.6/6
ond/
or 14.617.
Use this occosion to lubricote inner door
mechonisms -
see Chopter 15.12.
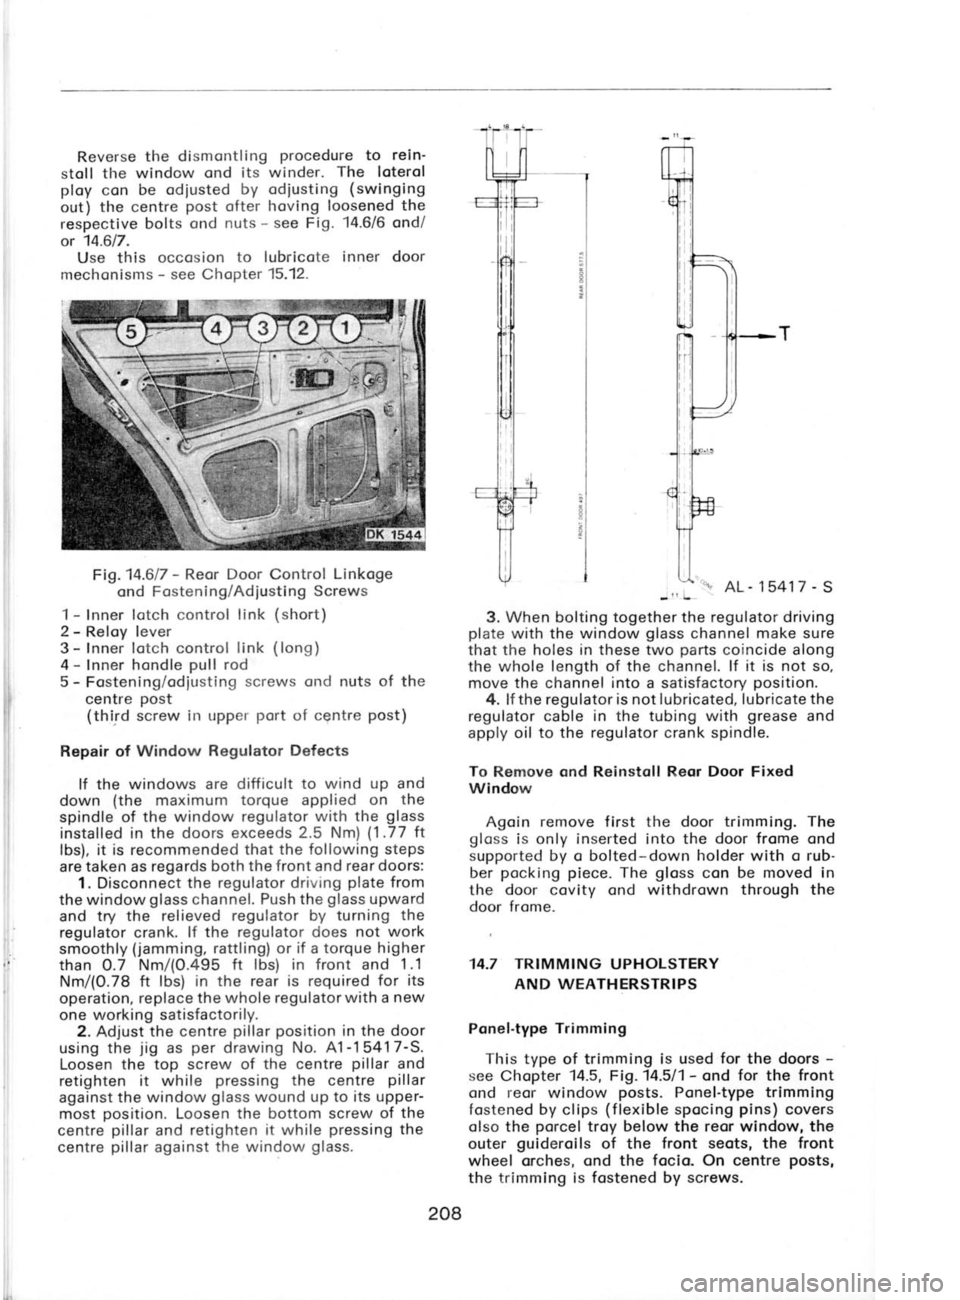
Fig.14.617 -
Reor Door Control Linkoge
ond Fostening/Adiusting Screws
1 -
Inner lotch control link (short)
2 -
Reloy lever
3 -
lnner lotch control link
(long)
4 -
Inner hondle pull
rod
5 -
Fostening/odiusting screws ond nuts
of
the
centre post
(third screw in upper port
of centre post)
Repair of Window Regulator Defects
lf the windows are difficult to wind up and
down (the
maximum torque applied on the
spindle of the window regulator with the glass
installed in the doors exceeds 2.5 Nm) (1.77
tt
lbs), it is recommended that the following steps
are taken as regards both the front
and rear doors:
1. Disconnect the regulator driving plate
from
the window glass
channel. Push the glass
upward
and try the relieved regulator by turning the
regulator crank. lf the regulator does not work
smoothly (jamming,
rattling) or if
a torque higher
than O.7 Nm/(O.495 ft lbs) in front and 1.1
Nm/(0.78 ft lbs) in the rear is required for its
operation, replace the whole regulator with a new
one working satisfactorily.
2. Adjust the centre pillar position
in the door
using the jig
as per
drawing No. A1-1 5417-S.
Loosen the top screw of the centre pillar
and
retighten it while pressing
the centre pillar
against the window glass
wound up to its upper-
most position.
Loosen the bottom screw of the
centre pillar
and retighten it while pressing
the
centre pillar
against the
window glass. 5417
-
S
-l! L
3. When bolting together the regulator driving
plate with the window glass
channel make sure
that the holes in these two parts
coincide along
the whole length of the channel. lf it is not so,
move the
channel into a satisfactory position.
4. lf the regulator is
not lubricated, lubricate the
regulator cable in the
tubing with grease
and
apply oil to the regulator
crank spindle.
To Remove ond Reinstoll Reor Door Fixed
Window
Agoin remove first the door trimming. The
gloss is only inserted
into the door frome ond
supported by o bolted-down holder with o rub-
ber pocking piece.
The gloss
con be moved in
the door
covity ond withdrown through the
door frome.
14.7 TRIMMING UPHOLSTERY AND WEATHERSTRIPS
Ponel-type Trimming
This type of trimming is used for
the doors -
see Chopter 14.5, Fig.14.511- ond for
the front
ond reor window posts.
Ponel-type trimming
fostened by clips (flexible
spocing pins)
covers
olso the porcel
troy below the reor window, the
outer guideroils
of the front seots, the front
wheel orches, ond the focia. On centre posts,
the trimming is fostened by screws.
208
Page 203 of 238

l4.l
l-14.12
has two anchoring points.
The seat belts have
anchoring bolts
on the size 7/16-20 UNF-2A'
In f ront, the anchoring threads
are easily
accessible being provided
on the door posts
(remove only one of the pair
of pins
covering the
thread), on sills
below the posts,
and on
the sides
of the'floor tunnel
behind the front seats'
Anchoring points
for rear seat belts are shown
in the illustation. For the seat
belt of the person
sitting in the
middle, the threads are under the
seat cushions and rather removed from each other
(A3). For the seat belts of persons
occupying the
butside places
the threads are also under the
cushions, nearer to the centre (A2),
in the body
sides close to the cusions (82),
and in window
pillars (C2). These latter threads can be found by
touch in the point
of intersection of the plane
passing about 165 mm
above the
rear window
parcel tray and in parallel
with the door frame at a
distance of about 85 mm. To gain
access to
them,
it is necessary to cut through the trimming.
We must stress that for the fitting of points A2
and A3, the bolts should not protrude
beyond the Fig.M.11l2
-
Lower Anchoring Points
14-12 FACIA
l-he focio cctl be rentoved otter unsct-ewlllg
the nuts of its peripherol bolts ond
ofter lifting
owoy the instrument ponel -
see Chopter '13'15'
It is olso necessory to
remove the steering
wheel with the shroud of
the steering wheel
shoft (see
Chopters 7.7
ond
7.8), ond the heoter
control ponel
(see ChoPter 11.0).
The bolts holding down the focio
ore occess-
ible ofter removin! the
instrument ponel
ond
the heoter control ponel, ond
ofter swinging. out
the glove
box. To swing
out the glove
box,
open its lid ond loosen tlre screws of its
stops'
Fig. 14.1111 -
Upper Anchoring Point
captive not more
than 1lz mm or there is every
likelihood of damaging the
fuel tank.
The depth of the nut from the mounting face
is
15 mm.
Child seat fixing
Follow the seat belt manufacturers instructions
as to the spacing of the belt straps.
The straps can be mounted to the rear parcel
shelf if the mounting holes are drilled 30 mm from
the front engine bulkhead. The
sound deadening
trim in the engine compartment
will need to be
lowered to fit the spreading plate
and nut.
Be careful when drilling the shelf, not to
scratch the rear screen. Fig.
14.1211 -
Focio Mounting Points
14.13 WATER LEAKS
To determine the
source of
a water leak
proceed in a progressive
manner.
1. Determine area
water finally rests'
2. lf possible follow
water trace to
source'
3. lf hot, remove carpets and clutter'
4. Dry car inside
and out'
5. Us'e a sprinkler rather
than
a hose jet'
6. Start on the
underside of
the vehicle and
work up. Do not
do any adjustments or
sealing until after the
first test.
7. When"you have
finished adjustments and
sealing RE
TEST.
212