1977 DATSUN PICK-UP tire pressure
[x] Cancel search: tire pressurePage 403 of 537

Center
This
wear
is
caused
by
overinflation
of
the
tire
The
inflation
pressure
must
be
kept
at
the
specified
value
Shoulder
The
wear
may
be
caused
by
under
inflation
incorrect
wheel
camber
or
continuous
high
speed
driving
on
curves
In
general
the
former
two
causes
are
common
Underinflation
wear
occurs
on
both
sides
of
treads
d
I
Ii
Toe
in
or
toe
out
wear
nf
I
Underinnation
wear
TIRE
ROTATION
Tires
wear
unevenly
and
become
unbalanced
according
to
running
dis
tance
Uneven
tire
wear
often
results
in
tire
noise
which
is
attributed
to
rear
axle
gears
bearing
etc
Meanwhile
the
front
tires
tend
to
wear
unevenly
because
of
improperly
aligned
front
wheel
Accordingly
to
equalize
tire
wear
it
is
necessary
to
rotate
tires
peri
odically
All
the
tires
including
the
spare
tire
are
of
the
same
type
Right
front
Right
rear
14
1
I
@
Spare
t
t
1
1
Left
front
Left
rear
Fig
WT
2
Tire
rotation
1
Wheel
and
Tire
and
on
the
other
hand
camber
causes
wear
only
on
one
side
of
treads
For
cornering
tread
wear
the
driver
must
operate
vehicle
slowing
down
on
curves
Uneven
Uneven
wear
is
caused
by
incorrect
camber
or
caster
malfunctioning
sus
pension
unbalanced
wheel
out
of
round
brake
drum
or
other
mechani
cal
conditions
To
repair
this
abnormal
wear
correct
the
above
faulty
parts
J
I
II
i
11
I
1
Overinllation
wear
1
I
I
t
Uneven
wear
WT007
Fig
WT
1
A
bnormal
tire
wear
The
spare
lire
has
a
different
brand
from
4
tires
on
the
vehicle
Right
front
Right
rear
I
@
Spare
x
J
r
Left
front
Left
rear
The
pare
tire
should
be
used
in
an
emergency
only
Fig
WT
3
Tire
rotation
2
The
tires
are
provided
with
tread
wear
indicator
at
six
places
around
tire
circumference
indicating
1
6
mm
J
in
tread
depth
When
the
tires
wear
and
then
the
marks
appear
re
place
them
with
new
ones
See
Figure
WT
4
WT3
Tire
tread
0E
I
Tread
wear
indicator
c
WH024
Fig
WT
4
Tread
wear
indicator
CHANGING
TIRE
To
change
tire
with
wheel
using
a
jack
in
the
safe
manner
observe
the
following
procedures
1
To
remove
spare
tire
insert
jack
rod
to
guide
and
then
turn
it
counter
clockwise
When
installing
lighten
a
little
strong
after
lifting
up
and
lock
Fig
WT
5
Removing
spare
tire
2
It
is
necessary
to
remove
wheel
cap
and
temporarily
to
loosen
wheel
nuts
before
vehicle
is
jacked
up
3
To
jack
up
front
place
jack
under
side
frame
about
S20
mOl
20
5
in
at
rear
of
front
axle
center
after
apply
ing
parking
brake
and
blocking
rear
wheels
g
1
WT012
Fig
WT
6
Jacking
up
front
side
Page 405 of 537

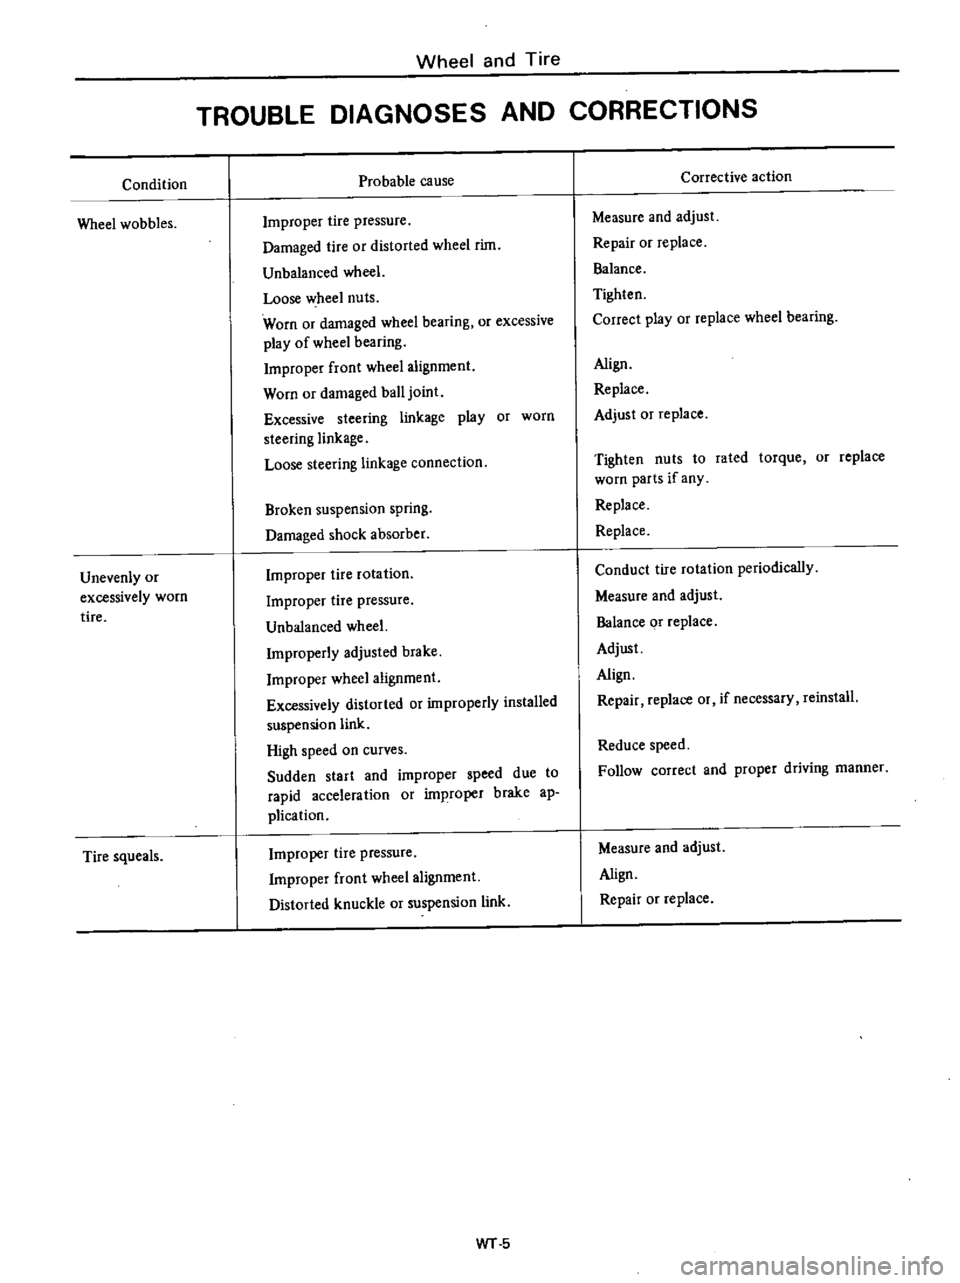
Condition
Wheel
wobbles
Unevenly
or
excessively
worn
tire
Tire
squeals
Wheel
and
Tire
TROUBLE
DIAGNOSES
AND
CORRECTIONS
Probable
cause
Improper
tire
pressure
Damaged
tire
or
distorted
wheel
rim
Unbalanced
wheel
Loose
wheel
nuts
Worn
or
damaged
wheel
bearing
or
excessive
play
of
wheel
bearing
Improper
front
wheel
alignment
Worn
or
damaged
ball
joint
Excessive
steering
linkage
play
or
worn
steering
linkage
Loose
steering
linkage
connection
Broken
suspension
spring
Damaged
shock
absorber
Improper
tire
rotation
Improper
tire
pressure
Unbalanced
wheel
Improperly
adjusted
brake
Improper
wheel
alignment
Excessively
distorted
or
improperly
installed
suspension
link
High
speed
on
curves
Sudden
start
and
improper
speed
due
to
rapid
acceleration
or
improper
brake
ap
plication
Improper
tire
pressure
Improper
front
wheel
alignment
Distorted
knuckle
or
suspension
link
WT
5
Corrective
action
Measure
and
adjust
Repair
or
replace
Balance
Tighten
Correct
play
or
replace
wheel
bearing
Align
Replace
Adjust
Or
replace
Tighten
nuts
to
rated
torque
or
replace
worn
parts
if
any
Replace
Replace
Conduct
tire
rotation
periodically
Measure
and
adjust
Balance
or
replace
Adjust
Align
Repair
replace
or
if
necessary
reinstall
Reduce
speed
Follow
correct
and
proper
driving
manner
Measure
and
adjust
Align
Repair
or
replace
Page 414 of 537

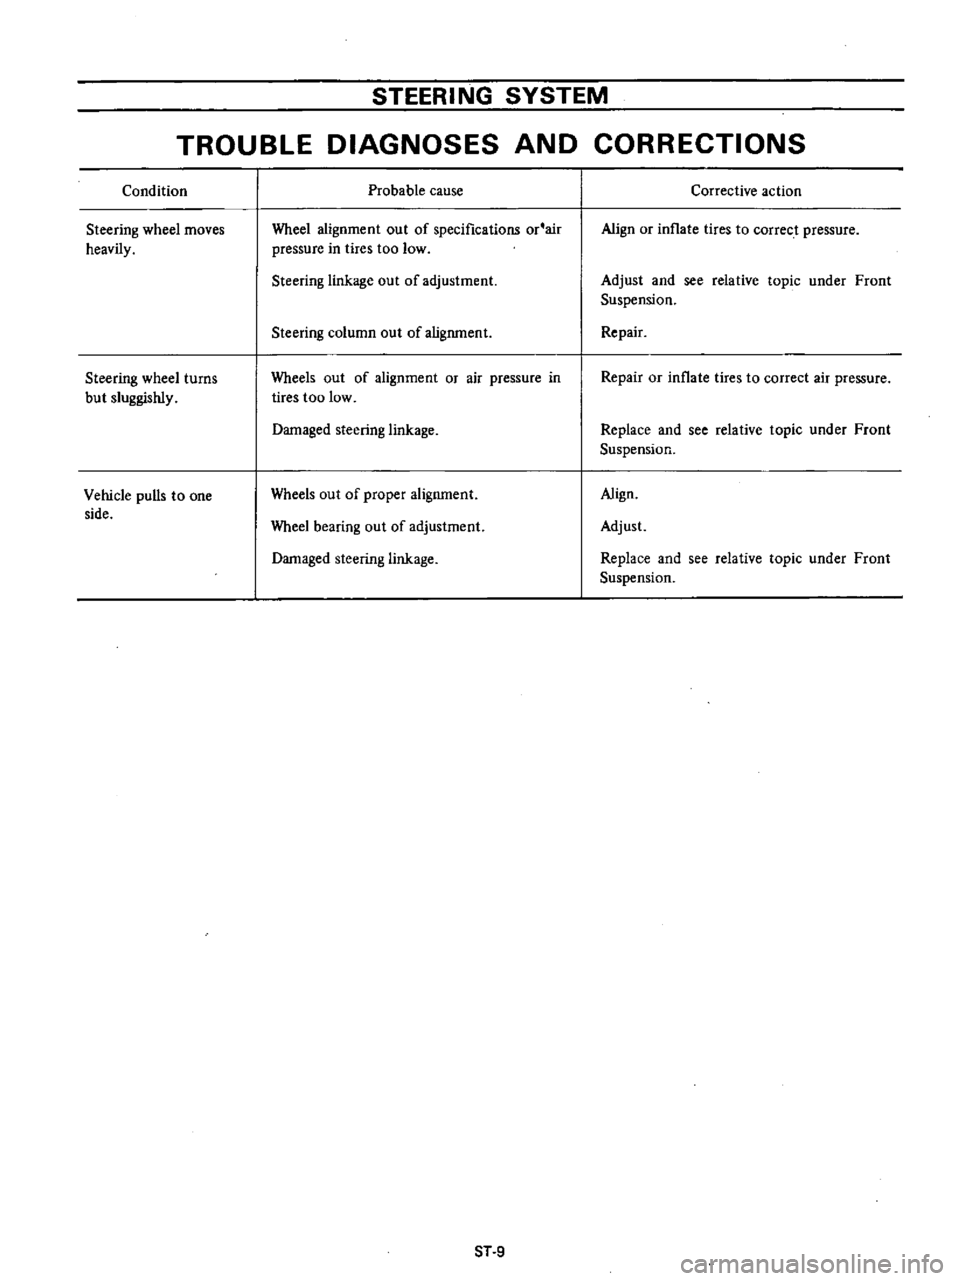
STEERING
SYSTEM
TROUBLE
DIAGNOSES
AND
CORRECTIONS
Condition
Steering
wheel
moves
heavily
Steering
wheel
turns
but
sluggishly
Vehicle
pulls
to
one
side
Probable
cause
Wheel
alignment
out
of
specifications
or
air
pressure
in
tires
too
low
Steering
linkage
out
of
adjustment
Steering
column
out
of
alignment
Wheels
out
of
alignment
or
air
pressure
in
tires
too
low
Damaged
steering
linkage
Wheels
out
of
proper
alignment
Wheel
bearing
out
of
adjustment
Damaged
steering
linkage
ST
9
Corrective
action
Align
or
inflate
tires
to
correct
pressure
Adjust
and
see
relative
topic
under
Front
Suspension
Repair
Repair
or
inflate
tires
to
correct
air
pressure
Replace
and
see
relative
topic
under
Front
Suspension
Align
Adjust
Replace
and
see
relative
topic
under
Front
Suspension
Page 451 of 537

To
adjust
vertical
aim
use
adjusting
screw
on
upper
side
of
headlamp
and
to
adjust
horizontal
aim
use
adjusting
screw
on
side
of
head
lamp
Notes
Before
making
headlarnp
aiming
ad
justment
observe
the
foUowing
in
structions
Body
Electrical
System
a
Keep
aU
tires
inflated
to
correct
pressures
b
Place
vehicle
and
tester
on
the
same
flat
surface
c
See
that
there
is
no
load
in
vehicle
I
Gasoline
radiator
and
engine
oil
pan
filled
up
to
correct
levels
2
Without
passenger
When
performing
headlamp
aiming
adjustment
use
an
aiming
device
aiming
wall
screen
or
headlamp
tester
For
operating
instructions
of
any
aimer
refer
to
respective
operation
manuals
supplied
with
the
unit
DRIVING
BEAM
HIGH
BEAM
L
wt
H
G
hi
i
iiI
PASSING
BEAM
LOW
BEAM
10
m
32
8
ft
W2
H2
10
m
02
8
n
d
20
h2
I
02
I
I
f
10
m
32
8
ft
Driving
beam
High
beam
Passing
beam
Low
beam
HI
WI
01
mm
mm
CO
in
in
I
715
780
48
All
models
28
15
30
71
hI
H2
W2
h2
O2
d
mm
mm
mm
in
in
in
0
140
I
715
11
160
12018
5
51
28
15
45
67
mm
mm
in
in
392
349
is
43
13
74
BE302
Fig
BE
8
Aiming
adjustment
BE
6
Page 497 of 537

REFRIGERAi
H
R
12
COMPRESSOR
OIL
MAINTENANCE
PERIODIC
MAINTENANCE
AND
SEASON
IN
INSPECTION
GENERAL
SERVICE
INSTRUCTION
SAFETY
PRECAUTIONS
EV
ACUA
TlNG
AND
CHARGING
SYSTEM
HANDLING
MANIFOLD
GAUGE
HANDLING
SERVICE
VALVE
HANDLING
CAN
TAP
DISCHARGING
SYSTEM
REFRIGERANT
R
12
The
refrigerant
used
in
the
air
conditioner
is
generally
called
Re
frigerant
12
R
12
No
other
refrig
erant
than
the
above
refrigerant
should
be
used
This
refrigerant
is
usually
available
in
a
small
can
or
a
cylinder
In
either
case
it
is
liquefied
under
high
pressure
in
the
container
Refrigerant
evaporates
easily
has
a
low
evaporation
point
and
moreover
since
the
latent
heat
of
the
refrigerant
is
large
it
can
abSorb
a
large
amount
of
heat
wh
err
e
vaporating
Extreme
care
must
be
exercised
when
handling
the
refrigerant
COMPRESSOR
OIL
The
SUNISO
5GS
or
SUNISO
351
should
be
used
as
refrigeration
lubricant
Mixing
of
the
two
is
allowable
The
refrigeration
lubricant
should
be
used
to
assure
the
successful
com
pressor
operation
Use
of
oils
other
than
recommended
or
mixing
of
the
oil
with
other
oils
would
cause
chemical
reaction
or
lead
to
lowered
viscosity
or
deficient
lubrication
The
oil
absorbs
moisture
as
it
con
tacts
the
air
This
points
out
the
need
for
care
not
to
expose
it
to
atmos
phere
for
an
extended
period
of
time
Air
Conditioning
GENERAL
SERVICE
CONTENTS
EVACUATING
SYSTEM
CHARGING
REFRIGERANT
CHECKING
FOR
LEAKS
HALIDE
LEAK
DETECTOR
ELECTRIC
LEAK
DETECTOR
REFRIGERANT
LEVEL
CHECK
SIGHT
GLASS
PERFORMANCE
TEST
COMPRESSOR
OIL
LEVEL
CHECK
PERFORMANCE
TEST
REFRIGERANT
LEAKS
AC
8
AC
8
AC
8
AC
8
AC
8
AC
9
AC
9
AC
9
AC10
AC
11
AC
12
MAINTENANCE
PERIODIC
MAINTENANCE
AND
SEASON
IN
INSPECTION
Both
periodic
maintenance
and
season
in
inspection
are
most
essential
to
enable
the
air
conditioner
to
give
full
performance
Perform
the
following
checks
Start
engine
and
check
refrigerant
level
through
sight
glass
on
receiver
dryer
For
details
refer
to
relative
topics
under
Refrigerant
Level
Check
2
Check
the
entire
sysiein
for
sign
of
refrigerant
leaks
Refer
to
relative
topics
under
Checking
for
Leaks
and
Refrigerant
Leaks
If
any
trace
of
oil
is
noted
at
and
around
connection
fittings
it
is
a
sure
indication
that
refrigerant
is
leaking
This
condition
can
be
corrected
easily
by
retightening
the
joints
If
any
joint
on
line
is
suspected
of
small
amount
of
leakage
use
a
leak
detector
to
locate
leaking
points
3
Check
compressor
drive
belts
for
proper
deflection
Season
off
Observe
the
following
maintenance
tips
to
allow
the
air
conditioner
to
operate
normally
in
the
next
season
I
Keep
the
entire
system
free
from
AC
8
AC12
AC
13
AC15
AC15
AC16
AC
16
AC16
AC
17
AC17
AC
17
AC18
refrigerant
leakage
by
periodically
checking
for
refrigerant
gas
leak
even
out
of
season
2
Turn
the
compressor
for
10
minutes
at
least
once
a
month
by
running
the
engine
at
1
500
rpm
c
ENERAL
SERVICE
INSTRUCTION
The
servicing
of
the
air
conditioner
should
be
carried
out
only
by
well
trained
servicemen
This
chapter
de
scribes
essential
points
of
servicing
Jf
a
Jarge
amount
of
dirt
and
sand
enter
the
system
they
will
be
carried
with
refrigerant
and
may
clog
the
system
or
scratch
rotating
parts
This
points
out
the
need
for
care
in
servicing
the
system
That
is
disconnecting
joints
should
be
carried
out
in
a
dean
place
Water
should
not
be
allowed
to
get
inside
the
system
The
refrigerant
does
not
readily
mix
with
water
However
the
presence
of
even
a
minute
amount
of
water
will
cause
a
chemical
reaction
at
high
tem
perature
which
will
in
turn
produce
hydrochloric
acid
HCl
Since
hydrochloric
acid
is
highly
corro
sive
to
metals
the
aluminum
and
copper
piping
etc
will
become
corroded
and
the
refrigeration
system
will
become
clogged