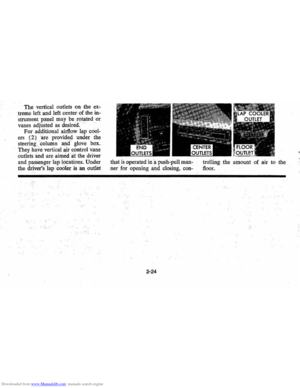
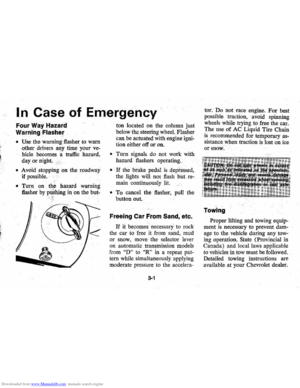
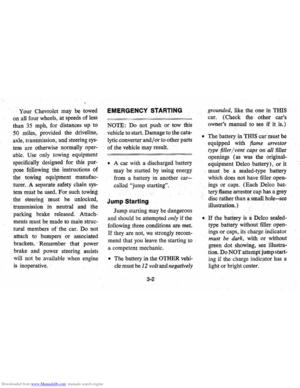
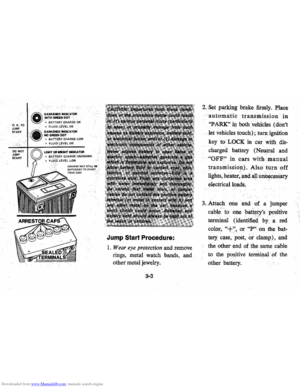
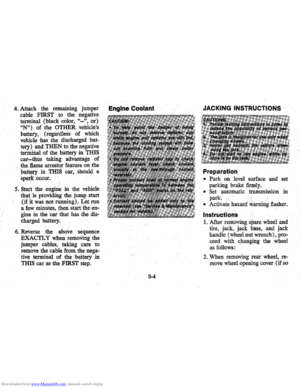
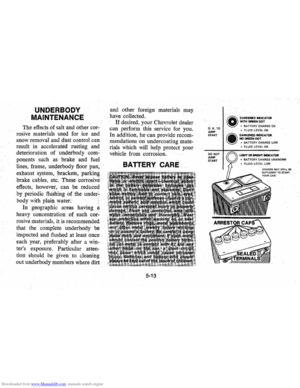
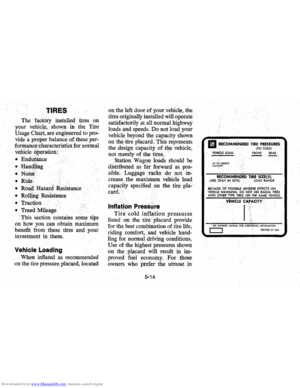
Page 57 of 102

Downloaded from www.Manualslib.com manuals search engine juice, milk . soft drinks , wine , vomit
and blood . Carefull y scrape o
ff ex
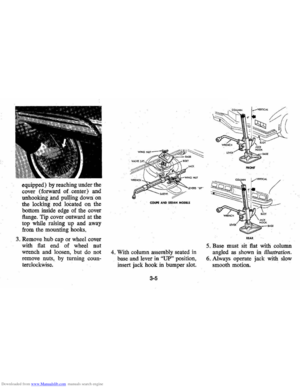
cess stain; ,then sponge stain with
cool
water. If stain remains use
Multi-Purpose Powdered Cleaner
(Foam Type) as previously de
scribed.If odor persists after clean
ing vomitus or urine, treat area with
a water-baking soda solution (1
teaspoon baking soda to 1 cup of
tepid
water ) -finally, if necessary ,
clean lightly with
Spot Lifter (Sol
vent Type).
IMPORTANT: In the event white
or light-colored seat trim becomes
stained due
to contact with materials
that
do not have color-fast dyes
(certain types
of casual clothing ,
decorative paper, etc. )
the trim
must be cleaned
IMMEDIATELY
to avoid permanent discoloration.
Clean with Multi-Purpose Powdered
Cl eaner
(Foam Type) as previously
described.
Combination Stains -Includes
, candy, ice cream, mayonnaise, chili
sauce and unknown stains.
Care
fully.scrape off'excess stain; then
clean first with cool water and
allow to dry,
If stain remains , clean
with , Spot Lifter (Solvent Type).
Cleaning Vinyl or Leather
Trim
'
Ordinary s oilage can be re
moved from vinyl or leather with
warm water and a mild soap such
as saddle soap
or oil soap , or ap
proved equivalent. Apply a small am
ount
of soap solution and allow
to so
ak for a few minutes to loosen
dirt; then,
rub briskly with a clean
damp cloth to remove dirt-and
so ap residues-this operation may
be repeated several times if nec
essary. Some soilage such as tars,
asphalts, shoe polish, etc, will stain
if allowed to
remain on trim-they
should be wiped off as quickly , as
possible and the area cleaned with
a clean
cloth dampened with G.M.
Spot Lifter (Solvent Type).
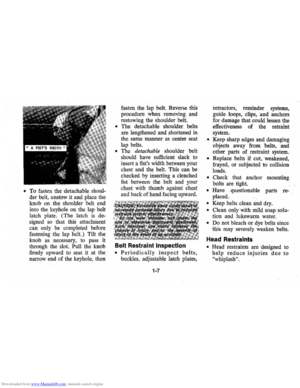
Belt Restraint Care
• Clean only with mild soap solu
tion and lukewarm water.
• ,Do not bleach or dye belts since
this
may severely weaken belts.
Page 58 of 102
rior Glass Surface
.. The interior glass surface . should
j;)e cleaned on a periodic basis for
continued good
visil;Jility. A com�")
Downloaded from www.Manualslib.com manuals search engine IntE)rior Glass Surface
.. The interior glass surface . should
j;)e cleaned on a periodic basis for
continued good
visil;Jility. A com
mercial household . glass cleaning
agent containing ammonia
will re
move normal tobacco smoke and
dust
films sometimes caused by inc
gredients used in' vinyls , plastics or
other interior trim materials.
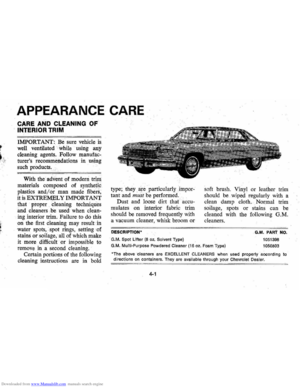
EXTERIOR APPEARANCE
Your car is finished with General
Motors "Magic";Mirror" acrylic lac'
quer. Tllis is a .· finish qf maximull)
beauty which,.in depth of color,
gloss retention and durability is
superior to conventiona l lacquer
finishes.
Washing Your Car
The best way to pres erve the
finish and maintain original beauty
of appearance
is to keep it clean. Wash
the car in lukewarm or cold
water . Never use stro
ng soap or
chemical detergents. Cleaning
agents should be quickl y flushed
from the surfaces .
Polishing and Waxing
Your Car
Although acrylic paint on your
car
is durable , you may wish to
wax or polish for added protection.
Your Chevrolet Dealer offers many
polishes and waxes now available
which have
proven of real value in
maintaining a good paint
finish.
When using a tar and road oil
remover, be certain it is safe for
use on acrylic painted surfaces.
Protection of Exterior
Bright
Metal Parts
Bright metal parts should he
cleaned regularly to maintain
luster. Washing with water is all
th at is usually required. However,
G.M. Chro
me Polish may be used
4-5
on CHROME or .STAINLESS
STEEL trim if necessary.
Use special care with ALU
MINUM . tr im . Never use auto
or chrome .polish , steam or any
caustic soap
to clean aluminum.
A coating of wax, rubbed to a
high polish,
is recommenlled for
all
bright · metal parts. .. ..
CIE)aning White Sidewall
TirE)s
Use a tire clea ner which will not
harm aluminum trim. A stiff brush
may be used with tile cleaner to
remove road grime and dirt from
white sidewall tires.
Cleaning thE) Optional
Vinyl
Top
The top should be washed fre
quently with neutral soap suds,
lukewarm water and a brush with
soft bristles. Rinse top with
suffi
cient quantities of clear water to
remove all traces of soap.
Page 59 of 102
Downloaded from www.Manualslib.com manuals search engine If the top requires additional
cleaning after us
ing soap and
water, a mild foaming cleanser can
be used su~h as GM Multi-Purpose
Powdered Cleaner. Rinse the whole
top with .
water; then apply a mild
foamingiype cleanser on an area of
approximately two square feet
Scrub area with a small soft bristle h
a
nd brush, adding water· as neces
sary until the cleanser foams to a
soapy consistency. Remove the first
accumulated soilage with a cloth
or sponge before it can be ground
into the top material. Apply
addi
tional cleanser to the area and
scrub until the top is clean . Care
must be exercised to keep the
4-6
cleanser running onto body finish
as it may cause streaks if allowed
to run down and dry. After the en
tire top has been cleaned, rinse gen
erously with clear water to remove
all traces of cleanser . Do not use
volatile cleaner or household
bleach
ing agents on the top material.
Page 60 of 102

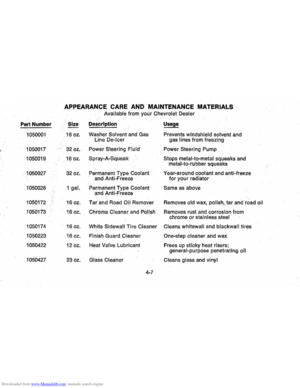
Downloaded from www.Manualslib.com manuals search engine APPEARANCE CARE AND MAINTENANCE MATERIALS
Available from your Chevrolet Dealer
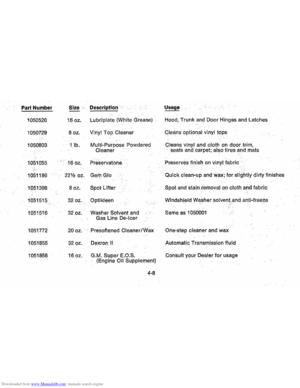
Part Number Size
Description Usage
1050001 16 oz. Washer Solvent and Gas Prevents windshield solvent and
Line
De-Icer gas lines from freezing
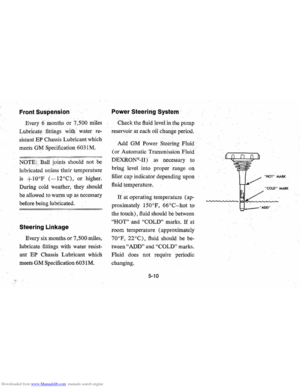
, 1050017 32 oz. Power
Steering Fluid Power Steering Pump
1050019 16 oz. Spray-A-Squeak
Stopsmetal-to-metal squeaks .and
metal-ta-rubber squeaks
1050027 32 oz. Permanent Type Coolant Year-around coolant and anti-freeze
and . Anti-Freeze for your radiator
1050028 1 gal. Permanent Type Coolant . Same as above
and Anti-Freeze
1050172 16 oz. Tar and Road Oil Remover Removes old wax, polish , tar and road oil
1050173 16 oz. Chrome Cleaner and Polish Removes rust and corrosion from
chrome
or stainless steel
1050174 16 oz
.
White Sidewall Tire Cleaner Cleans whitewall and blackwall tires
1050223 16 oz. Finish Guard Cleaner One-step cleaner and wax
1050422 12 oz. Heat Valve Lubricant
Frees up sticky heat risers ;
genera l-purpose penetrating oil
1050427 23 oz. Glass Cleaner Cleans glass and vinyl
4-7
Page 61 of 102
Downloaded from www.Manualslib.com manuals search engine Pari Number SiZe
1050520 16 oz.
1050729 8 oz.
1050803 1 lb.
1051055
16 oz.
1051186 22% oz.
1051398 8
oz.
1051515 32 oz.
1051516 32 oz.
1051772 20 oz.
1051855 32 oz.
1051858 16 oz.
Description
Lubriplate (White Grease)
Vinyl Top Cleaner
Multi-Purpose
Powdered
Cleaner
Preservatone
Gem Glo
Spot
Lifter
Optikleen
Washer Solvent and
Gas Line
De-Icer
Presoftened Cleaner/Wax
Dexron II
G.M. Super E.O:S.
(Engine Oil Supplement)
4-8 Hood,
Trunk and Door Hinges and Latches
Cleans optional vinyl tops
Qleans vinyl and cloth on door trim,
seats and carpet;
also ti res and mats
Preserves finish on
vinyl fabric
Quick
clean-up and wax; for slightly dirty finishes
Spot and stainiemoval on cloth and fabric
Windshield Washer solvent and anti-freeze
Same as 1050001
One-step cleaner and wax
Automatic Transmission fluid
Consult your Dealer for usage
Page 62 of 102

Downloaded from www.Manualslib.com manuals search engine SERVICE AND MAINTENANCE
The time or mileage intervals on
the following pages are intended
as a guide for establishing regular
maintenance and lubrication per
iods for your car. Sustained heavy
duty or high speed operations or
operation under adverse conditions
may necessitate more frequent ser
vicing.
To determine specific rec
ommendations for conditions un-
Fuel
Requirements
Your Chevrolet engine is de
signed to operate
only on unleaded
gasoline. Unleaded gasoline is essen
tial for proper emission control
system operation, and it will mini
mize spark plug fouling. The
use of der
which you use your car, con
sult your authorized Chevrolet
Dealer.
Maintenance Schedule
For owner convenience, a sepa
rate maintenance folder has been
provided with your car which con
tains a complete schedule and brief
explanation of the safety, emission
leaded gasoline can damage or
severely reduce the effectiveness of
the emission control system and re
sult in loss of warranty coverage.
Use unleaded gasoline meeting
the
minimum octane specifications
established by the Federal govern
ment.
In compliance with Federal
regulations, pumps dispensing such
gasoline are labeled with the word
5-1
control, lubrication and general
maintenance it requires. The main
tenance folder information
is sup
plemented by this section of the
Owner's Manual, as well as a
Warranty Information folder also
furnished with your car. Read all
three publications for a full under
standing of vehicle maintenance
requiremehts.
UNLEADED and are equipped
with dispensing nozzles which
fit
the filler neck of your car's gaso
line tank.
Supplementary gasoline addi
tives which contain lead and or
phosphorus should not
be used
under any circumstances. Such
additives can severely reduce the
effectiveness of your catalytic con
verter.
Page 63 of 102

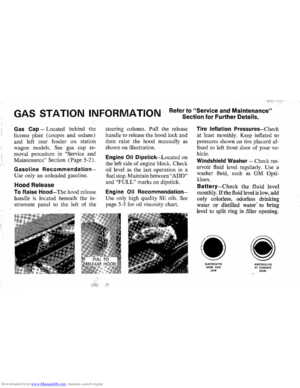
Downloaded from www.Manualslib.com manuals search engine Gas Cap-The fuel tank filler cap
has a
"Screw-on ratcheting type"
feature for proper gas tank sealing.
To remove:
• Rotate ~ap counterclockwise to
clear
the inside of the filler neck.
This will allow any residual
pres
sure t!J escape.
• To iQstall, reverse this procedure
and . tighten cap securely until a
"ratcheting", . clicking sound is
heard indicating proper cap to
filler neck sealing.
NOTE: If this cap requires a re
placement , only a cap with these
same features should
be used. Fail
ure to use the correct cap can result
in a serious malfunction of the
sys
tem. Correct replacement caps may
be obtained from your authorized
Chevrolet dealer.
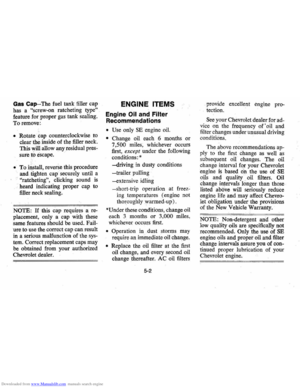
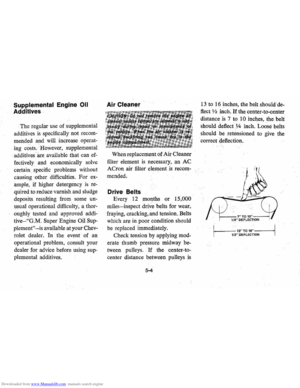
ENGINE ITEMS
Engine Oil and Filter
Recommendations
• Use only SE engine oil.
• Change oil each 6 months or
7,500 miles, whichever occurs
first ,
except under the following
conditions:
•
-driving in dusty conditions
-trailer pulling '
-extensive idling
-short-trip operation at freez-
ing
ternperatures( engine not
thoroughly warmed-up).
'Under these conditions, change oil
each 3 month s
or 3,000 miles,
whichever occurs first.
• Operation in dust stOmlS may
require an immediate oil change.
• Replace the oil filter at the first
oil change, and every second oil
change thereafter. AC oil filters
5-2
provide excellent engine pro
tection.
See your Chevrolet dealer for ad
vice on the frequency of' oil and
filter changes under unusual driving
conditions.
The above recommendations
ap
ply to the first change as well as
subsequent oil changes. The oil
change interval for your Chevrolet
engine
is based on the use of SE
oils and quality oil filters. Oil
change intervals longer than those
listed
above will seriously reduce
engine life and may affect
Chevro
let obligation undetthe provisions
of the New Vehicle Warranty.
NOTE: Non-detergent and other
low quality oils are
sgecifically not
recommended .
Only the use of SE
engine oils and proper oil and filter
change intervals assure you of
con
tinued proper lubrication of your
Chevrolet engine.
Page 64 of 102

Downloaded from www.Manualslib.com manuals search engine A high quality SE oil was in
stalled in
your engine at the factory.
It is not necessary to change this
factory-irtstalled oil prior to the
recommended normal chartge pe
riod . However , check the oil level
more frequently during the break
in period since higher oil consump
tion is normal until the piston rings
becom e sea ted.
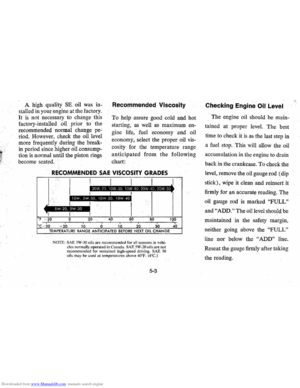
Recommended Viscosity
To help assure good cold and hot
starting, as well as maximum en
gine life, fuel economy and oil
economy , select the proper oil vis
cosity for
the temperature range
anticipated from the following
chart:
RECOMMENDED SAE VISCOSITY GRADES
I I I I 20W 20 lOW 30 lOW 10 7(lV, 10 JOW 50
JOW 5w 30 lOW 30 lOW 40
sw 20 5W 30
F --;fO , ? ,2,0 ,4,0 ~O 8,0 , 1~
°c 30' 20 10 0 1 30 40 TEMPERATURE RANGE ANTICIPATED BEFORE NEXT OIL,CHANGE
NOTE: SAE 5W-30 oils· are rec ommended for all seasons in vehicles normally operated in Canada. SAE 5W-20oi ls are nol recommended fur su stained high-speed driving. SAE 30 oi ls may be used at tempera tures above 4O"F. (4"C.)
5-3
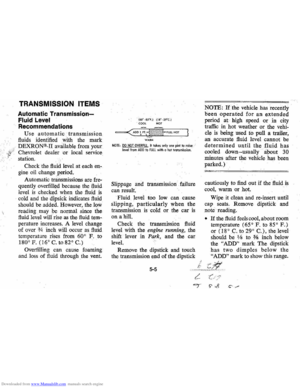
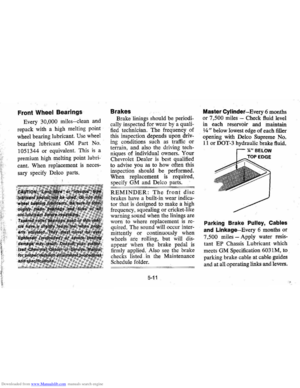
Checking Engine Oil Level
The engine oil should be main
tained
at proper level. The best
time
to check it is as the last step in
a fuel stop. This will allow the oil
accumulation in
the engine to drain
back in the crankcase.
To check the
level, remove the oil gauge rod (dip
stick), wipe it clean and reinsert it
firmly for an accurate reading. The
oil gauge rod is marked
"FULL"
and "ADD." The oil level should be
maintained in the safety margin,
neither going above the
"FULL"
line nor below the "ADD" line.
Re sea t the gauge firmly after taking
the reading.