1974 CHEVROLET CAMARO oil temperature
[x] Cancel search: oil temperaturePage 30 of 85
Downloaded from www.Manualslib.com manuals search engine Optional Instruments and Gauges
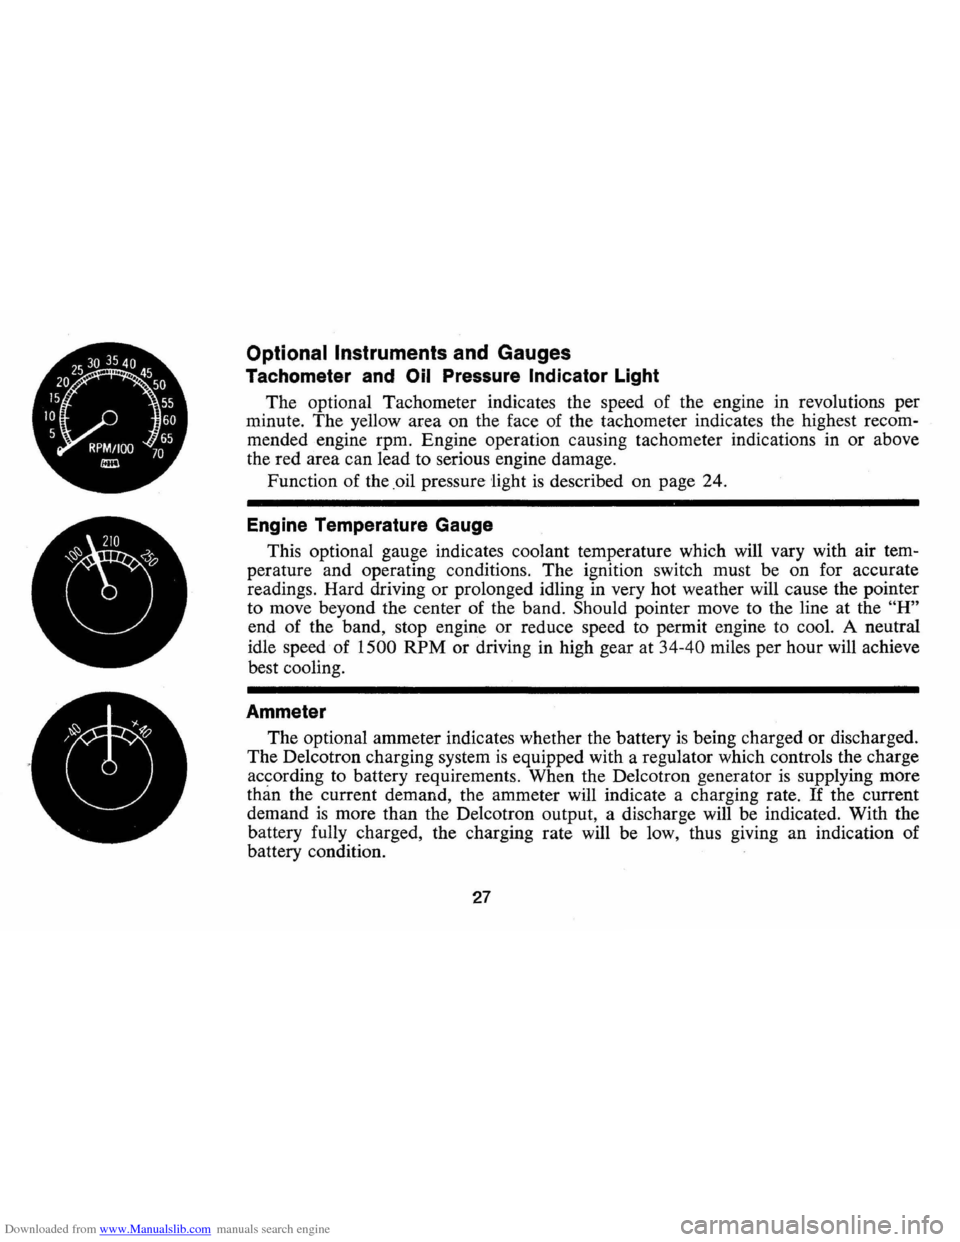
Tachometer and Oil Pressure Indicator Light
The optional Tachometer indicates the speed of the engine in revolutions per
minute. The yellow area on the face of the tachometer indicates the highest recom
mended engine rpm. Engine operation causing tachometer indications in or above
the red area can lead to serious engine damage.
Function of the .oil pressure
'light is described on page 24.
Engine Temperature Gauge
This optional gauge indicates coolant temperature which will vary with air tem
perature and operating conditions. The ignition switch must be on for accurate
readings. Hard driving
or prolonged idling in very hot weather will cause the pointer
to move beyond the center of the band.
Should pointer move to the line at the "H"
end of the band, stop engine or reduce speed to permit engine to cool. A neutral
idle speed of
1500 RPM or driving in high gear at 34-40 miles per hour will achieve
best cooling.
Ammeter
The optional ammeter indicates whether the battery is being charged or discharged.
The De1cotron charging system
is equipped with a regulator which controls the charge
according to battery requirements. When the De1cotron generator
is supplying more
than the current demand, the ammeter will indicate a charging rate. If the current
demand
is more than the De1cotron output, a discharge will be indicated. With the
battery fully charged, the charging rate will be low, thus giving an indication of
battery condition.
27
Page 31 of 85
Downloaded from www.Manualslib.com manuals search engine Clock
Reset the clock, if your car is so
equipped, by pulling
out the knob
and turning
the hands clockwise if
slow, counterclockwise if fast. This
will,
if the clock error is five min
utes
or more, automatically com
pensate for time gain
or lag. Sev
eral resettings, several days apart,
may be needed to properly adjust
the clock mechanism. Have your
clock cleaned
and oiled by a com
petent clock serviceman at least
every two years.
Cigarette Lighter
The accessory cigarette lighter is
located on the instrument panel
face.
To operate, push it in. When
it becomes heated,
it automatically
pops
out ready for use.
Windshield Wiper
and Washer
The windshield wiping system
operates
at two speeds and is de
signed to wipe clear designated areas
of the
windshield under most
inclement weather conditions.
The
windshield wipers work electrically
and are not affected by engine op
eration.
Push the control lever to the
right to
start the electric windshield
wiper .
The two-speed electric wiper
has both a
"low" and a "high" speed
po sition.
Pressing the control will send a
measured amount of water
or other
cleaning agent onto the windshield
and will also cause the wiper lever
to move, thus starting the wiper .
motor. The wiper will then con
tinue to operate until manually
turned off at the wiper lever.-
Fill the washer
jar only % full
during the winter to allow for ex
pansion if the temperature should
fall low enough to freeze the so
lution.
• Check washer fluid level regu
larly-do it frequently when the
weather is bad.
28
• Use fluid such as GM
OPTIKLEEN to preventfreez
ingdamage, and to provide bet
ter cleaning.
• Do not use radiator anti-freeze in
windshield washer; it could
cause paint damage.
• In cold weather, warm the wind
shield with defrosters before us
ing
washer-to help prevent ic
ing that may seriously obscure
vision.
Ventilation System
Your Camaro incorporates a
ventilation system
that provides
ventilation comfort, made possible
by the addition of air vent provi
sions in the rear body lock pillar.
Another feature of the system
is
continuous low-speed operation of
the air conditioner blower, result
ing in an uninterrupted supply
of
outside air flow into the car when-
Page 50 of 85
Downloaded from www.Manualslib.com manuals search engine below, preferably use unleaded or
low-lead gas with a symbol number
of
2. Regular fuel (symbol num
ber
3) should be used only when
needed to eliminate knock. Ask
your gasoline dealer for informa
tion on the fuel you are using both
as to
lead content and octane
rating.
Gas Cap-The fuel tank filler cap has
a new two-step removal and
installation procedure plus a pres
sure-vacuum safety relief valve. It
is equipped with a double set of
locking tangs. To remove:
• Rotate cap one-half turn coun
terclockwise to clear the first set
of tangs from the slots inside the
filler neck. This will allow any
residual pressure to escape.
• Pull the cap outward and rotate
one-quarter turn counterclock
wise to clear second set of tangs
and remove the cap.
• To install, reverse this procedure.
NOTE: If this cap requires a re
placement, only a cap with these
same features should be used. Fail
ure to use the correct cap can re
sult in a serious malfunction of the
system. Correct replacement caps
may be obtained from your Au
thorized Chevrolet Dealer.
47
Engine Oil and Filter
Recommendations
• Use only SE engine oil.
• Change oil each 4 months or
6,000 miles. If more than 6,000
miles are driven in a 4-month
period, change oil each
6,000
miles.
• Change oil each 2 months or
3,000 miles, whichever occurs
first, under the following con
ditions: - driving in dusty conditions,
-trailer pulling,
- extensive idling,
- short-trip operation at freez-
ing temperatures (engine not
II
thoroughly warmed-up).
• Operation in dust storms may
require an immediate oil change.
• Replace the oil filter at the first
oil change, and every second oil
change thereafter. AC oil filters
Page 51 of 85
Downloaded from www.Manualslib.com manuals search engine provide excellent engine pro
tection.
See your Chevrolet dealer for ad
vice on the frequency of oil and
filter changes under unusual driv
ing conditions.
The above recommendations ap
ply to the first change
as well as
subsequent oil changes. The oil
change interval for your Camaro
engine
is based on the use of SE oils
and quality oil filters.
Oil change in
tervals longer than those listed
above will seriously reduce engine
life and may affect Chevrolet obli
gation under the provisions of the
New Vehicle Warranty.
A high quality SE oil was in
stalled in your engine at the fac
tory. It
is not necessary to change
this factory-installed oil prior to the
recommended normal change pe
riod. However, check the oil level
more frequently during the break
in period since higher oil consump- tion
is normal
until the piston rings
become seated.
NOTE: Non-detergent and other
low quality oils are specifically
Recommended Viscosity
not recommended. Only the use
of
SE engine oils and proper oil
and filter change intervals assure
you of continued proper lubrica
tion of your Camaro engine.
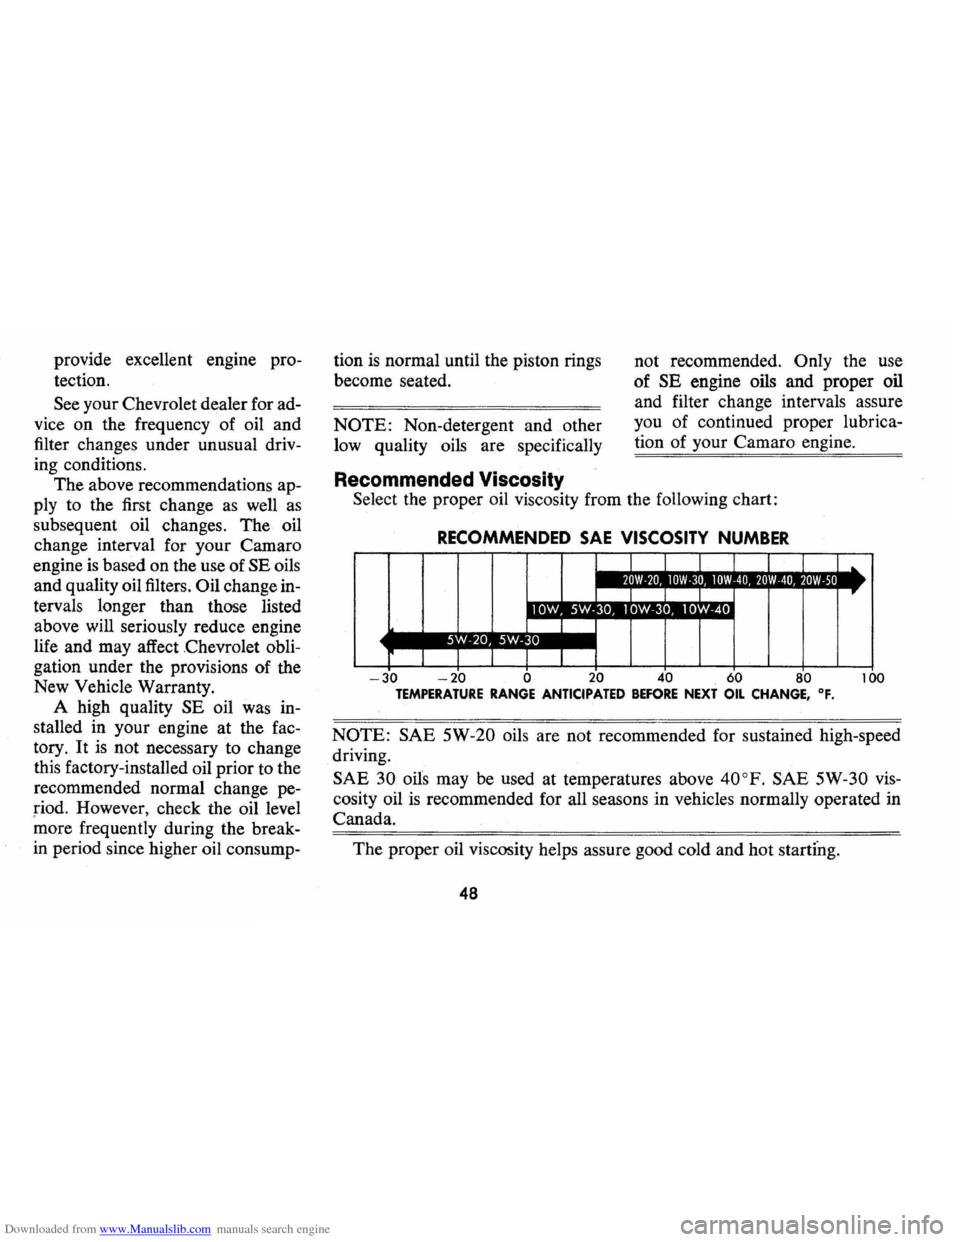
Select the proper oil viscosity from the following chart:
RECOMMENDED SAE VISCOSITY NUMBER
L 1 ..
1
_.LIl'I,."I_IIl'I'.II_IIl'I'J • ,1_,,1 'l'Irl!.I. IIl'J'611_ ~ ~ ~ .. ...
I I
J 1 I
-30 -20 0 20 40 60 80 100 TEMPERATURE RANGE ANTICIPATED BEFORE NEXT OIL CHANGE, OF.
NOTE: SAE 5W-20 oils are not recommended for sustained high-speed
driving.
SAE
30 oils may be used at temperatures above 40oP. SAE 5W-30 vis
cosity oil is recommended for all seasons in vehicles normally operated in
Canada.
The proper oil viscosity helps assure good cold and hot startfng.
48
Page 53 of 85
Downloaded from www.Manualslib.com manuals search engine first, check lubricant level and add
lubricant, if necessary, to
fill to
level of filler plug hole.
Use SAE
80
or SAE 90 GL-S Gear Lubri
cant.
(For vehicles normally 0per
ated in Canada use SAE 80 GL-S
Gear Lubricant.)
Positraction -Drain and refill
after the first
12,000 miles then
maintain same
as standard axle but
use only the special positraction
lubricanf
available from your
Chevrolet Dealer.
Manual Transmissions
3-Speed and 4-Speed -Every
6,000 miles or 4 months-Check
at operating temperature and
fill
as necessary to level of filler plug
hole with
SAE 80 or SAE 90 GL
S Gear Lubricant.
(For vehicles
normally operated in Canada use
SAE 80 GL-S Gear Lubricant.)
If temperatures of below 32°F.
are expected, use SAE 80 GL-S Gear
Lubricant only.
Clutch Cross-Shaft -Every
36,000 miles or sooner if neces
sary -Remove the plug, install a
lubrication fitting and lubricate
with water resistant
EP Chassis
Lubricant which meets GM
Speci
fication 6031 M.
Automatic Transmission
Fluid Recommendations
Use only automatic transmis
sion fluids identified with the
mark
DEXRON@ II or DEX
RON®. These fluids have been spe
cially formulated and tested for use
in your automatic transmission,
and are available from your Chev
rolet dealer or local service station.
Check the fluid level at each
engine oil change period. To make
an accurate fluid level check:
Check the fluid level at each en
gine oil change period.
To make an
accurate fluid level check:
50
1. Drive car several miles, making
frequent starts and stops, to
bring transmission up to normal
operating temperature (approxi
mately
180-190° F.).
2. Park car on a level surface.
3. Place selector level in "Park"
and leave engine running.
4. Remove dipstick and wipe clean.
S . Reinsert dipstick until
cap seats.
6. Remove dipstick and note read
ing.
If fluid level is at or below the
ADD mark, add sufficient fluid to
raise the level to the
FULL mark.
One pint raises the level from ADD
to FULL.
Do not overfill.
Under normal driving condi
tions, the transmission fluid should
be changed every 24,000 miles. If
your car is driven extensively in
heavy city traffic during hot weather,
or
is used to pull a trailer , change
fluid every
12,000 miles. Likewise,
operators of cars in commercial use
Page 56 of 85
Downloaded from www.Manualslib.com manuals search engine "HOT" MARK
"COLD" MARK
>-f.. __ "AOO"
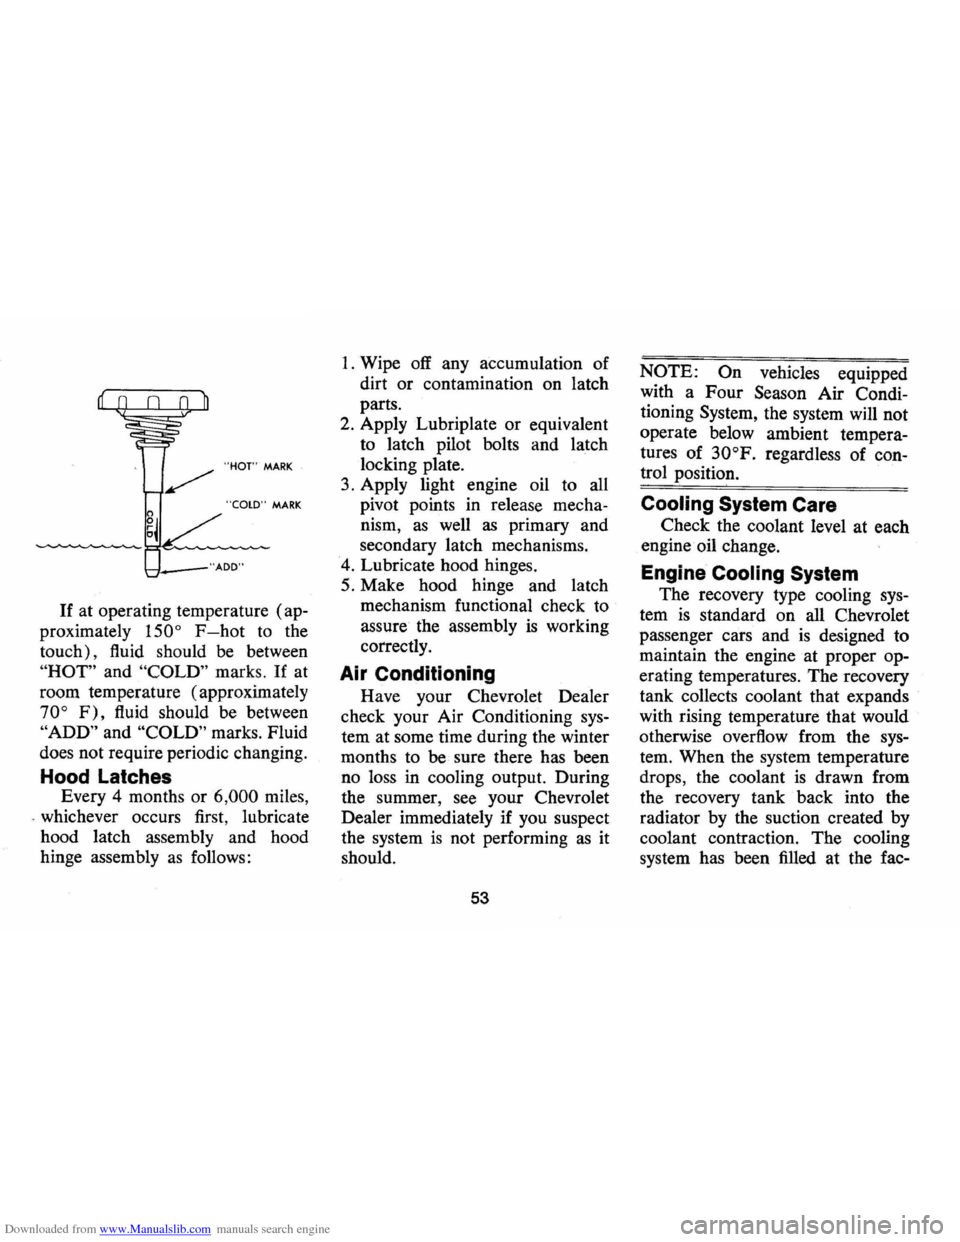
If at operating temperature (ap
proximately
150° F-hot to the
touch), fluid should be between
"HOT" and "COLD" marks. If at
room temperature (approximately
70° F), fluid should be between
"ADD" and "COLD" marks. Fluid
does not require periodic changing.
Hood Latches
Every 4 months or 6,000 miles,
. whichever occurs first, lubricate
hood latch assembly and hood
hinge assembly
as follows:
1. Wipe off any accumulation of
dirt or contamination on latch
parts.
2. Apply Lubriplate or equivalent
to latch pilot bolts and latch
locking plate.
3. Apply light engine oil to all
pivot points in release mecha
nism,
as well as primary and
secondary latch mechanisms.
4. Lubricate hood hinges.
5. Make hood hinge and latch
mechanism functional check to
assure the assembly
is working
correctly.
Air Conditioning
Have your Chevrolet Dealer
check your Air Conditioning
sys
tem at some time during the winter
months to
be sure there has been
no loss in cooling output. During
the summer,
see your Chevrolet
Dealer immediately if you suspect
the system
is not performing as it
should.
53
NOTE: On vehicles equipped
with a Four Season Air Condi
tioning System, the system will not
operate below ambient tempera
tures of
30°F. regardless of con
trol position.
Cooling System Care
Check the coolant level at each
engine · oil change.
Engine Cooling System
The recovery type cooling sys
tem is standard on all Chevrolet
passenger cars and
is designed to
maintain the engine at proper op
erating temperatures.
The recovery
tank collects coolant that expands
with rising temperature that would
otherwise overflow from the
sys
tem. When · the system temperature
drops, the coolant
is drawn from
the recovery tank back into the
radiator by the suction created by
coolant contraction. The cooling
system has been filled at the fac-
Page 57 of 85
Downloaded from www.Manualslib.com manuals search engine tory with a high-quality, inhibited,
year-around coolant that meets the
standards of General Motors
Spe
cification 1899-M. This coolant
solution provides freezing protec
tion to
-20oP (-35°P in Can
ada), and it has been formulated to
be used for two full calendar years
or
24,000 miles, whichever first
occurs, of normal operation with
out replacement, provided the
proper concentration of coolant is
maintained.
Cooling System Care
The radiator cap should not be
removed to check coolant level.
Check the coolant level visually in
the 'see thru' coolant recovery tank
at least
as frequently as engine oil
changes. Level should be at the
"full cold" mark on the recovery
tank when the system
is cold. At
normal operating temperature the
coolant should be at the
"full hot"
mark on the recovery tank. Add sufficient
coolant to the recovery
tank.
Use a 50/50 mixture of high
quality ethylene glycol antifreeze
and water for coolant additions.
If
regular additions are required, see
your dealer for a cooling system
check.
NOTE: If recommended quality
antifreeze
is used, supplemental in
hibitors or additives claiming to
provide increased capability are
not necessary. They may be detri
mental to the efficient operation of
the system, and represent an un
necessary operating expense.
Every year, the cooling system
should be serviced
as follows:
1. Wash
radiator cap and filler
neck with clean water.
2. Check coolant for proper level
and freeze protection.
3. Pressure test system and radia-
54
tor cap for proper pressure hold
ing capacity (15 psi) .
If re
placement of cap
is required, use
the special AC cap designed for
coolant recovery systems, speci
fied for your model.
4. Tighten hose clamps and inspect
all hoses. Replace hoses when
ever swollen, checked or other
wise deteriorated.
5. Clean frontal area of radiator
core and air conditioning con
denser.
Replace hoses every 24 months
or 24,000 miles or earlier if
checked, swollen or otherwise de
teriorated. Every two years
or 24,-
000 miles, whichever first occurs,
the cooling system should be
flushed and refilled using the fol
lowing recommended procedure:
1. Remove radiator cap when
engine is cool by:
• Slowly rotating cap counter-
Page 58 of 85

Downloaded from www.Manualslib.com manuals search engine clockwise to detent (do not
press down while rotating).
• Wait until any residual pres
sure (indicated by a hissing
sound)
is relieved.
• After all hissing ceases, press
down on cap while continuing
to rotate counterclockwise.
CAUTION: To ,a~()/d' thedange, .• olbfling "l)~ned;tlo n(Jtl'entoveradiator «aP while
, engipe and radiator are ,stlll hot because $ca/ding ' flU./d·antlsteam' will be blown .
(1utunder pressure.
2. If necessary, run engine, with
radiator cap removed, until nor
mal operating temperature
is
reached and upper radiator hose
is hot (indicates thermostat
is
open).
3. Stop engine and open radiator
drain valve to drain coolant. (To
speed this operation, the drain
plugs in the block can also be
removed.) 4.
Close valve (install block drain
plugs, if removed) and add suf
ficient water to
fill system .
5. Run engine, drain and refill the
system, as described in steps
1,
2, 3, and 4, a sufficient number
of times until the drained liquid
is nearly colorless.
6. Allow system to drain com
pletely and then close radiator
drain valve tightly. (Install
block drain plugs, if removed.)
7. Remove recovery cap leaving
hoses in place. Remove coolant
recovery tank and empty of
fluid. Flush tank with clean
water , drain and reinstall.
8. Add sufficient ethylene glycol
coolant , meeting GM specifica
tion 1899-M, to provide the re
quired freezing and corrosion
protection-at least a 44 percent
solution
(-20°F). Fill radiator
to the base of the radiator filler
55
neck and add sufficient coolant
to the recovery tank to raise level
to the
"FULL HOT" mark. Re
install recovery tank cap.
9. Run engine , with radiator cap
removed, until normal operat
ing
temperature is reached.
(Radiator upper hose becomes
hot.)
10. With engine idling, add cool
ant until level reaches bottom
of filler neck and install radia
tor cap making certain arrows
line up with overflow tube.
It is the owner's responsibility
to keep the freeze protection at a
level commensurate with the tem
peratures which may occur in the
area of vehicle operation .
• Maintain cooling system freeze
protection at
-20 °F or below
to ensure protection against cor
rosion and loss of coolant from
boiling even though freezing