1973 CHEVROLET MONTE CARLO check engine
[x] Cancel search: check enginePage 33 of 86

Downloaded from www.Manualslib.com manuals search engine Clock
Reset the clock , by pulling out
the knob and turning the hands
clockwise
if slow, counterclockwise
if fast. This will, if the clock error
is five minutes or more, automati
cally compensate for time gain or
lag . Several resettings, several days
apart, may be needed to propertly
adjust the clock mechanism. Have
your clock cleaned and oiled by a
competent clock serviceman at
least every two years.
Cigarette Lighter
The cigarette lighter is located
on the instrument panel face.
To
operate, push it in. When it be
comes heated, it automatically pops
out ready for use.
Windshield Wiper and
Washer
The windshield wiping system
operates at two speeds and
is de
signed to wipe clear specific areas of
the windshield under most in
clement weather conditions . The
windshield wipers work electrically
and are not affected by engine op
eration. Push the control lever to the
right to start the electric wind
shield wiper. The two-speed elec
tric wiper has both a "low" and a
"high" speed position.
31
Pressing the control will send a
measured amount of water or other
cleaning agent onto the windshield
and will also cause the wiper lever
to move thus starting the wiper
motor. The wiper will continue to
operate until manually turned off
at the wiper lever.
Fill the washer jar only
% full
during the winter to allow for ex
pansion if the temperature should
fall low enough to freeze the solu
tion .
• Check washer fluid level regu
larly-do it frequently when the
weather is bad .
• Use a fluid such as GM OPTI
KLEEN to prevent freezing
damage, and to provide better
cleaning.
• Do not use radiator anti-freeze
in windshield washer; it could
cause paint damage.
• In cold weather, warm the wind
shield with defrosters before
Page 45 of 86

Downloaded from www.Manualslib.com manuals search engine or property damage. All General
Motors cars have negative-ground
electrical systems and can be used
to jump start one another.
If you
cannot determine how the other
vehicle
is grounded (by checking
specifications in the owner's man
ual, etc.) we recommend that you
attempt no jump starting with that
vehicle.
Jump Starting with
Auxiliary (Booster) Battery
Both booster and discharged
battery should be treated carefully
when using jumper cables. Follow
exactly the procedure outlined be
low, being careful not to cause
sparks:
1.
Set parking brake and place
automatic transmission in
"PARK" (neutral for manual
transmission).
Turn off lights,
heater and other electrical loads. 2.
Remove vent caps from both
the booster and the discharged
batteries. Lay a cloth over the
open vent wells of each battery.
These two actions help reduce
the explosion hazard always
present in either battery when
connecting
"live" booster bat
teries to
"dead" batteries.
3. Attach one end of one jumper
cable to the positive terminal of
the booster battery (identified
by a red color,
"+" or "P" on
the battery case, post or clamp)
and the other end of same cable
to positive terminal of discharged
battery. Do
NOT permit cars to
touch each other,
as this could
'establish a ground connection
and counteract the benefits of
this procedure.
4. Attach one end of the remaining
negative cable to the negative
terminal (black color,
"-" or
"N") of the booster battery, and
43
the other end to the' de1cotron
mounting bracket (see illustra
tion) of your 1973 Monte Carlo
(do not connect directly to neg
ative post of dead battery) -
taking care that clamps from
one cable do not inadvertently
touch the clamps on the other
cable. Do not lean over the
battery when making this con
nection.
Reverse this sequence exactly
when removing the jumper cables.
Re-install vent caps and throw
cloths away
as the cloths may have
corrosive acid on them.
Page 46 of 86

Downloaded from www.Manualslib.com manuals search engine Changing Tires
Preparations:
• Park on a level surface and set
parking brake firmly.
• Set automatic transmission in
"P ARK" (manual transmission
in reverse) .
• Activate hazard warning flasher.
• Block both the front and back
of the wheel diagonally oppo
site the
jack position.
Jacking Instructions
1. After removing spare wheel and
tire, jack, jack base, and jack
handle (wheel nut wrench) , pro
ceed with changing the wheel
as
follows: 2.
Remove hub cap
or wheel cover
with flat end of wheel nut wrench
and loosen, but do not remove
nuts, by turning counterclock
wise.
44
3. Place the jack column assembly
in the jack base (make sure that
jack column
is fully inserted into
jack base) and move jack lever
to the
"UP" position. Also, check
Page 47 of 86
Downloaded from www.Manualslib.com manuals search engine that jack base is level before
raising car.
4. When jacking the car, position
the jack
so that jack hook is fully
inserted in lift slot of the bumper.
NOTE: Always use a smooth mo
tion when raising or lowering car.
5. Insert jack handle in jack and and
raise car until wheel
is just
off the ground.
6. Remove wheel nuts and wheel.
7. Install spare wheel and install
wheel nuts (with beveled end of
nut facing inward) until all are
finger tight.
8. Place jack control lever in
"down" position and lower wheel
until tire just touches ground.
Tighten wheel nuts, lower car
45
and remove jack. Carefully in
stall hub cap or wheel cover.
9. Replace jack assembly and wheel
in luggage compartment.
When possible check inflation of
replacement tire to agree with tire
placard affixed to the left front door.
NOTE: Illustrated instructions on
jack operation and storage are also
provided on underside of trunk lid.
Page 54 of 86
Downloaded from www.Manualslib.com manuals search engine SE oils and quality oil filters. Oil
change intervals longer than those
listed above will seriously reduce
engine life and may affect Chevro
let's obligation under the provisions
of the New Vehicle Warranty.
A high quality
SE oil was in
stalled in your engine at the factory.
It is not necessary to change this
facory-installed oil prior
to the rec
ommended normal change period.
However, check the oil level more
NOTE: Non-detergent and other
low quality oils are specifically not
recommended.
Only the use of SE
engine oils and proper oil and filter
change intervals assure you of con
tinued proper lubrication of your
Chevrolet engine.
frequently during the break-in pe
riod since higher oil consumption
is normal until the piston rings be
come seated.
Recommended Viscosity
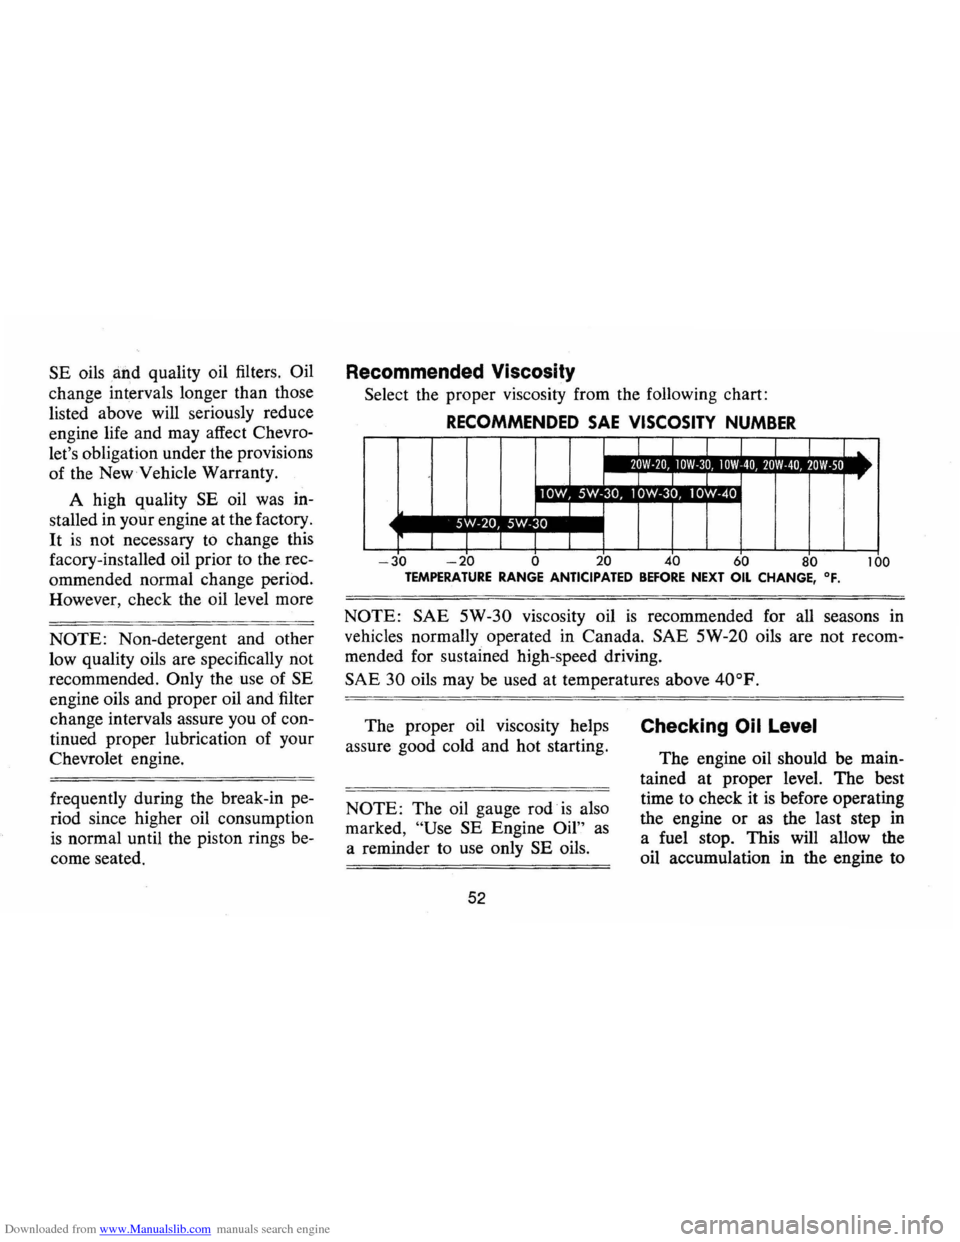
Select the proper viscosity from the following chart:
RECOMMENDED SAE VISCOSITY NUMBER
I ,.
.... ~.-."'). ... .II ••• :.; I
-30 -20 0 20 40 60 80 100 TEMPERATURE RANGE ANTICIPATED BEFORE NEXT OIL CHANGE, OF.
NOTE: SAE 5W-30 viscosity oil is recommended for all seasons in
vehicles normally operated in Canada.
SAE 5W-20 oils are not recom
mended for sustained high-speed driving.
SAE 30 oils may be used at temperatures above 40oP.
The proper oil viscosity helps
assure good cold and hot starting.
NOTE: The oil gauge rod is also
marked,
"Use SE Engine Oil" as
a reminder to use only SE oils.
52
Checking Oil Level
The engine oil should be main
tained at proper level. The best
time to check it
is before operating
the engine or
as the last step in
a fuel stop. This will allow the
oil accumulation in the engine to
Page 55 of 86
Downloaded from www.Manualslib.com manuals search engine drain back in the crankcase. To
check the level, remove the oil
gauge rod (dip stick), wipe
it
clean and reinsert it firmly for an
accurate reading. The oil gauge
rod is marked "FULL" and
"ADD." The oil level should be
maintained in the safety margin,
neither going above the
"FULL"
line nor below the "ADD" line.
Reseat the gauge firmly after tak
ing the reading.
Supplemental Engine Oil
Additives
The regular use of supplemental
additives
is specifically not recom
mended and will increase operat
ing costs. However, supplemental
additives are available that can
effectively and economically solve
certain specific problems without
causing other difficulties. For
example, if higher detergency is
required to reduce varnish and
sludge deposits resulting from some unusual
operational difficulty, a
thoroughly tested and approved
additive
- "Super Engine Oil Sup
plement " -
is available at your
Chevrolet dealer.
In the event of
an operational problem, consult
your dealer for advice before using
supplemental additives.
Drive Belts
Every 6,000 miles or 4 months
-inspect drive belts for wear,
fraying, cracking, and tension.
Belts which are in poor condition
should be replaced immediately.
Check tension by applying
moderate thumb pressure midway
between pulleys.
If the center-to
center distance · between pulleys
is
13 to 16 inches, the belt should
deflect
1/2 inch. If the center-to
center distance
is 7 to 10 inches ,
the belt should deflect
~ inch.
Loose belts should be retensioned
to give the correct deflection.
It
is recommended that belts be
53
replaced every 24 months or 24,000
miles, whichever occurs first.
Flame Arrester -Every 12,000
miles-Clean the arrester (located
in the base of the air cleaner) with
kerose:le or a suitable solvent. Dry
with compressed air.
Air Cleaner
Rear
Axle
Standard-Every 4 months or
6,000 miles, whichever occurs first,
check lubricant level and add lubri
cant, if necessary, to
fill to level of
filler plug hole.
Use SAE 80 or
SAE 90 GL-5 Gear Lubricant.
(For vehicles normally operated in
Canada use
SAE 80 GL-5 Gear
Lubricant.)
Positraction -Drain and refill
after
12,000 miles. Then maintain
Page 56 of 86
Downloaded from www.Manualslib.com manuals search engine same as standard axle but use only
the special positraction lubricant
available from your Chevrolet
Dealer.
Manual Transmissions
3-Speed -Every 6,000 miles or
4 months-Check at operating tem
perature and
fill as necessary to
level of filler plug hole with SAE
80
or SAE 90 GL-5 Gear Lubri
cant.
(For vehicles normally operated in
Canada use
SAE 80 GL-5 Gear
Lubricant.)
If temperatures below 32°F. are
expected, use
SAE 80 GL-5 Gear
Lubricant only.
Clutch Cross-Shaft -Every
36,000 miles or sooner if necessary
-Remove the plug, install a lubri
cation fitting and lubricate with
water resistant
EP Chassis Lubri
cant which meets GM Specific
a-
tion 6031M.
Automatic Transmissions
Fluid Recommendations
Use only automatic transmission
fluids identified with the mark
DEXRON ®. These fluids have been
specially formulated and tested for
use in your automatic transmission,
and are available from your Chev
rolet dealer or local service station.
Check the fluid level at each
engine oil change period. To make
an accurate fluid level check:
1. Drive car several miles, making
frequent starts and stops,
to
bring transmission up to normal
operating temperature (approxi
mately
180-190° F).
2. Park car on a level surface.
3. Place selector level in "PARK"
and leave engine running.
4. Remove dipstick and wipe clean.
54
5. Reinsert dipstick until cap seats.
6. Remove dipstick and note read
ing.
If fluid level is at or below the
ADD mark, add sufficient fluid
to
raise the level to the FULL mark.
One pint raises the level from ADD
to FULL.
Do not overfill.
Under normal driving condi
tions, the transmission fluid should
be changed every
24,000 miles.
If your car is driven extensively
in heavy city traffic during hot
weather, or
is used to pull a
trailer, {change fluid every
12,000
miles. Likewise, operators of cars
in commercial use (such
as taxicab,
limousine or patrol car service)
where the engine idles for long
periods, should change fluid every
12,000 miles.
Changing Fluid -Remove fluid
from the transmission sump and
Page 57 of 86
Downloaded from www.Manualslib.com manuals search engine add approximately 2.5 quarts U.S.
Measure (2.0 quarts Imperial
Measure) for Turbo Hydra-Matic
350. Operate transmission through
all shift ranges and recheck fluid
level
as described above.
Turbo Hydra-Matic 400-Lubri
cation of your Turbo Hydra-matic
400 will, except for fluid capacity
and filter change listed below,
follow previously stated automatic
transmission recommendations.
After checking transmission fluid
level it
is important that the dip
stick be pushed all the
way into
the
fill tube.
Changing Fluid-After removing
fluid from the transmission sump
approximately
7lh pints U.S.
Measure (6 pints Imperial Meas
ure) of fresh fluid will be required to
return level to proper mark in
the dipstick.
Every
24,000 miles the trans
mission sump filter should be re
placed.
Transmission Shift Linkage
(Manual and Automatic)
Transmission
Shift and Back·
drive Linkage (Manual and
Automatic) -Every 6,000 miles
or 4 months lubricate shift linkage
and on manual transmission floor
controls lever contacting faces with
water resistant EP chassis lubri
cant which meets GM Specifica
tion 6031M .
Chassis
Front Suspension
Every 6,000 miles or 4 months
Lubricate 4 fittings with water re
sistant
EP Chassis Lubricant which
meets GM Specification
6031 M.
55
Ball jOints should not be lu
bricated unless their tempera
ture
is 10°F. or higher. During
colder weather, they should be
allowed to warm up as neces
sary before
lubrication.
Steering Linkage
Every 6,000 miles or 4 months
Lubricate 7 fittings, one at each end
of each tie rod , one at each end of
relay rod, and one at idler lever
with water resistant EP Chassis
Lubricant which meets GM Speci
fication 6031M.
Front Wheel Bearings
Every 24,000 miles -clean and
repack with a high melting point
wheel bearing lubricant.
Use wheel
bearing lubricant GM Part No.
1051344 or equivalent. This
is a
premium high melting point lubri
cant. When replacement
is neces
sary specify Delco parts.