1973 CHEVROLET MONTE CARLO belt
[x] Cancel search: beltPage 49 of 86
Downloaded from www.Manualslib.com manuals search engine Cleaning Fabrics with
Cleaning
Fluid
This type of cleaner should be
used for cleaning stains containing
grease, oil or fats. Excess stain
should be gently scraped off with
a clean dull knife or scraper.
Use
very little cleaner, light pressure,
and clean cloths (preferably cheese
cloth). Cleaning action with
cloth should be from outside of
stain towards center and constantly
changing to a clean section of
cloth. When stain
is cleaned from
fabric, immediately wipe
area
briskly with a clean absorbent
towel or cheese cloth to help dry
area and prevent a cleaning ring.
If ring forms, immediately clean
entire area or panel section of the
trim assembly.
NOTE: Sometimes a difficult spot
may require a second application
of cleaning fluid followed immedi
ately by a soft brush to completely
remove the spot.
Cleaning Fabrics with
Detergent Foam Cleaners
This type of cleaner is excellent
for cleaning general soilage from
fabrics and for cleaning a panel
section where a minor cleaning
ring may be left from spot clean
ing. Vacuum area to remove ex
cess loose dirt. Always clean at
least a full trim panel or section
of trim. Mask adjacent trim along
stitch or weld lines. Mix detergent
type foam cleaners in strict ac
cordance with directions on label
of container.
Use foam only on a
clean sponge or soft bristle brush
-Do not wet fabric excessively or
47
rub harshly with brush. Wipe clean
with a slightly damp absorbent
towel or cloth. Immediately after
cleaning fabric, dry fabric with a
dry towel or hair dryer. Rewipe
fabric with dry absorbent towel or
cloth to restore luster of the trim
and to eliminate any dried residue.
Seat Belt Care
• Clean only with mild soap solu
tion and lukewarm water.
• Do not bleach or dye belts since
this may severely weaken belts.
Removal of Specific Stains
Candy-Chocolate, use cloth soak
ed in lukewarm water; other than
chocolate, use very hot water. Dry.
If necessary, clean lightly with
fabric cleaning fluid.
Chewing Gum-Harden gum with
ice cube and scrape off with dull
knife. Moisten with fabric cleaning
fluid and scrape again,
Page 55 of 86
Downloaded from www.Manualslib.com manuals search engine drain back in the crankcase. To
check the level, remove the oil
gauge rod (dip stick), wipe
it
clean and reinsert it firmly for an
accurate reading. The oil gauge
rod is marked "FULL" and
"ADD." The oil level should be
maintained in the safety margin,
neither going above the
"FULL"
line nor below the "ADD" line.
Reseat the gauge firmly after tak
ing the reading.
Supplemental Engine Oil
Additives
The regular use of supplemental
additives
is specifically not recom
mended and will increase operat
ing costs. However, supplemental
additives are available that can
effectively and economically solve
certain specific problems without
causing other difficulties. For
example, if higher detergency is
required to reduce varnish and
sludge deposits resulting from some unusual
operational difficulty, a
thoroughly tested and approved
additive
- "Super Engine Oil Sup
plement " -
is available at your
Chevrolet dealer.
In the event of
an operational problem, consult
your dealer for advice before using
supplemental additives.
Drive Belts
Every 6,000 miles or 4 months
-inspect drive belts for wear,
fraying, cracking, and tension.
Belts which are in poor condition
should be replaced immediately.
Check tension by applying
moderate thumb pressure midway
between pulleys.
If the center-to
center distance · between pulleys
is
13 to 16 inches, the belt should
deflect
1/2 inch. If the center-to
center distance
is 7 to 10 inches ,
the belt should deflect
~ inch.
Loose belts should be retensioned
to give the correct deflection.
It
is recommended that belts be
53
replaced every 24 months or 24,000
miles, whichever occurs first.
Flame Arrester -Every 12,000
miles-Clean the arrester (located
in the base of the air cleaner) with
kerose:le or a suitable solvent. Dry
with compressed air.
Air Cleaner
Rear
Axle
Standard-Every 4 months or
6,000 miles, whichever occurs first,
check lubricant level and add lubri
cant, if necessary, to
fill to level of
filler plug hole.
Use SAE 80 or
SAE 90 GL-5 Gear Lubricant.
(For vehicles normally operated in
Canada use
SAE 80 GL-5 Gear
Lubricant.)
Positraction -Drain and refill
after
12,000 miles. Then maintain
Page 63 of 86
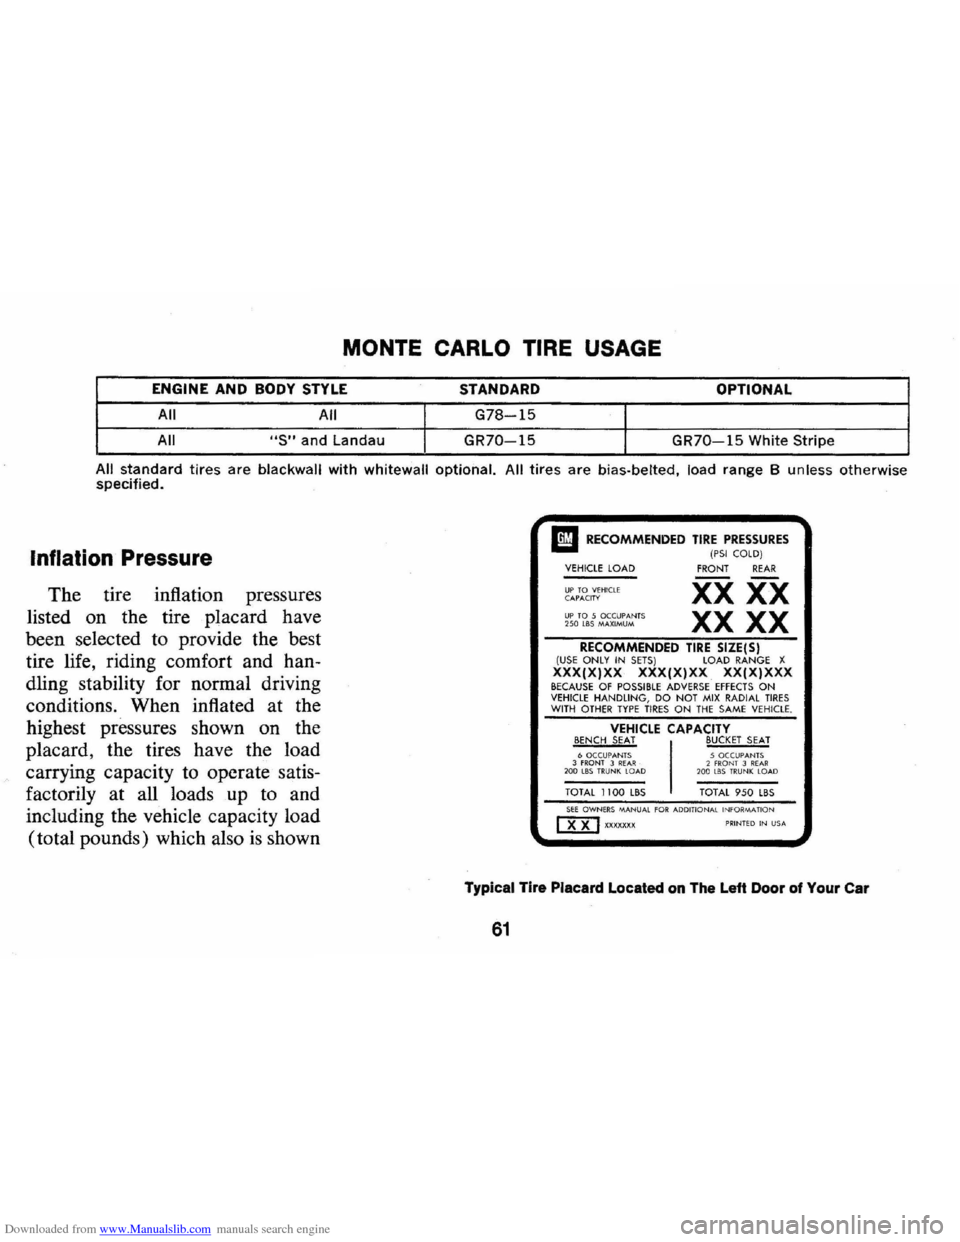
Downloaded from www.Manualslib.com manuals search engine MONTE CARLO TIRE USAGE
ENGINE AND BODY STYLE STANDARD OPTIONAL
All All
G78-15
All "S" and Landau GR70-15
GR70-15 White Stripe
All standard tires are blackwall with whitewall optional. All tires are bias·belted, load range B unless otherwise specified.
Inflation Pressure
The tire inflation pressures
listed on the tire placard have
been selected to provide the best
tire life, riding comfort and han
dling stability for normal driving
conditions. When inflated at the
highest pressures shown on the
placard, the tires have the load
carrying capacity to operate satis
factorily at all loads up to and
including the vehicle capacity load
(total pounds) which also
is shown
I!I RECOMMENDED TIRE PRESSURES (PSI COLD) VEHICLE LOAD
UP TO VEHICLE C APACIH UP TO 5 OCCU PANTS 250 185 MAX IMUM
FRONT REAR
xx XX
XX XX
RECOMMENDED TIRE SIZE(S) (USE ON LY IN SETS ) LOAD RANGE X XXX(X)XX XXX(X)XX XXIX)XXX BECAUSE OF POSSIBLE ADVERSE EFFECTS ON VEHICLE HANDLING, DO N O T MIX RADIAL TIRES WITH OTHER TYPE TIRES ON THE SA ME VEHICLE.
VEHICLE CAPACITY BENCH SEAT BUCKET SEAT 6 OCCUPANTS 3 fR ONT 3 REAR· 200 lBS TRUNK LOAD
TOTAL 1100 LBS
5 OCCUPAN TS 2 fR ONT 3 R EA R 200 U1S TRU NK LOA D
TOTAL 950 LBS SEE OWNERS MANUAL fOR ADD ITIONAL INfORMAflON mJ XXXXXXX PRINTED IN USA
Typical Tire Placard Located on The Left Door of Your Car
61
Page 66 of 86
Downloaded from www.Manualslib.com manuals search engine gencies. Such "stop-gap" devices
as plugs and aerosol-type sealants
are good for no more than
100
miles of driving at speeds not over
50 mph. A permanent vulcanized
repair, plug or patch applied from
inside the tire, should be made
as
soon as possible. Also, the instal
lation of an inner tube in a dam
aged tubeless tire
is not a recom
mended repair procedure.
Replacemeot Tires
When replacing tires, only the
size, load range, and construction
type (bias, bias-belted ,
or radial)
originally installed on your vehi
cle are recommended.
Use of any
other tire size
or type tire may
seriously affect ride, handling ,
speedometer / odometer calibration,
vehicle ground clearance and tire clearance
to the body and chassis.
The following also should be con
sidered when replacing tires:
• To achieve best all around vehi
cle performance, belted-bias tires
and
bias tires should not be
mixed on the same car.
• Because of possible adverse ef
fects on vehicle handling , do
not mix radial ply tires with
other type tires on the same
vehicle.
• It is recommended that new tires
be installed
in pairs on the same
axle.
• When replacing only one tire, it
should be paired with the tire
having the least wear, to equal
ize braking traction.
• When replacing original tires
64
with an optional recommended
size of different diameter, the
speedometer must be recali
brated
by installing the correct
speedometer driven gear.
Snow Tires
If you equip your vehicle with
snow tires, they should be inflated
4 psi above the recommended pres
sures shown on the tire placard up
to a maximum of 32 psi (cold) for
load range B tires and
40 psi for
load range D tires.
It is recom
mended that vehicle speeds be lim
ited to a maximum of 75 mph if
snow tires are installed.
Replacement Wheels
When replacing wheels for any
reason , care should be taken to in-
Page 73 of 86
Downloaded from www.Manualslib.com manuals search engine a bobby pin) between the rubber
cup
at the end of the spark plug
wire
and the tubular metal con
nector inside
of it. If the spark plug wire is wet or oily, wipe it
dry.
Wrap a dry handkerchief or
facial tissue, folded several thick
nesses,
around the wire at least
three inches back from the end and grasp the wire at this point.
Hold the bare wire about V4 inch
from the
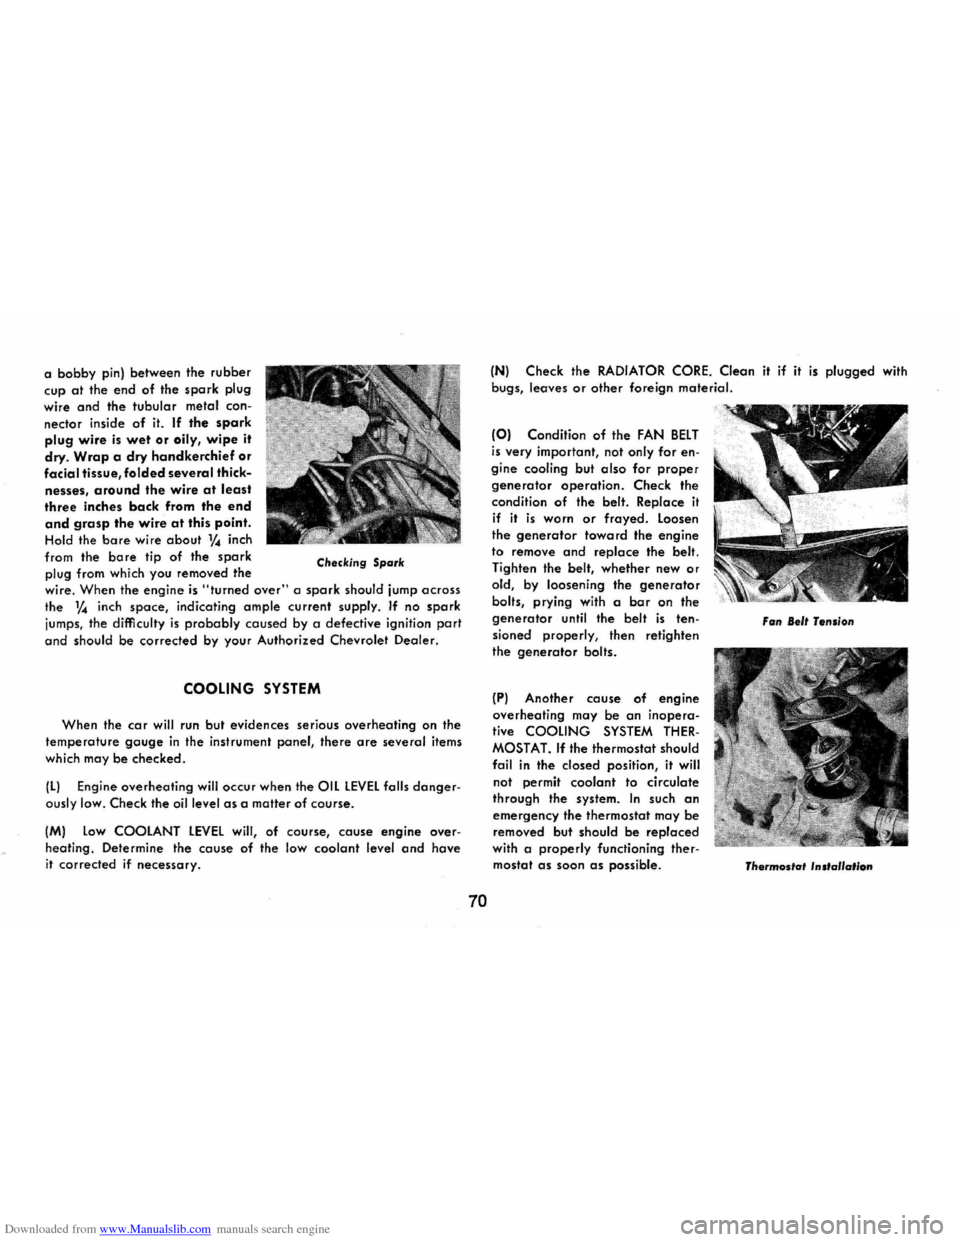
bore tip of the spark plug from which you removed the Checking Spark
wire. When the engine is "turned over" a spark should jump across
the 1,4 inch space, indicating ample current supply. If no spark
jumps, the difficulty is probably caused by a defective ignition part
and should be corrected by your Authorized Chevrolet Dealer.
COOLING SYSTEM
When the car will run but evidences serious overheating on the
temperature gauge in the instrument panel, there are several items
which may
be checked.
IL) Engine overheating will occur when the OIL LEVEL falls danger
ously low. Check the oil level as a mailer of course.
1M) Low COOLANT LEVEL will, of course, cause engine over
heating . Determine the
cause of the low coolant level and have it corrected if necessary.
70
IN) Check the RADIATOR CORE. Clean it if it is plugged with
bugs, leaves or other foreign material.
(0) Condition of the FAN BELT
is very important, not only for en
gine cooling but
also for proper
generator operation. Check the
condition of the belt. Replace it
if it is worn or frayed. Loosen
the generator toward the engine
to remove
and replace the belt.
Tighten the belt, whether new or
old, by loosening the generator
bolts, prying with a bar on the
generator until the belt is ten
sioned properly , then retighten
the
generator bolts.
(P) Another couse of engine
overheating may be
an inopera
tive
COOLING SYSTEM THER
MOSTAT. If the thermostat should
foil in the dosed position, it will
not permit
coolant to circulate
through the system. In such an
emergency the thermostat may be
removed but should be
replaced with a properly functioning ther
mostat as soon as possible.
Fan Belt Tension
Thermostat
'ns'alla"on
Page 76 of 86
Downloaded from www.Manualslib.com manuals search engine FUSES AND CIRCUIT BREAKER:
The headlamp circuit is protected by a circuit breaker in the light switch. An electrical overload on the breaker will cause the lamps to go on and
off, or in some cases to remain off. If this condition develops, have your
wiring circuits checked immediately. Also, a circuit breaker, mounted on the firewall, protects the power window and power seat circuits if vehicle is so equipped. Where current load is too heavy, the circuit breaker
intermittently opens and closes, protecting the circuit until the cause is found and eliminated.
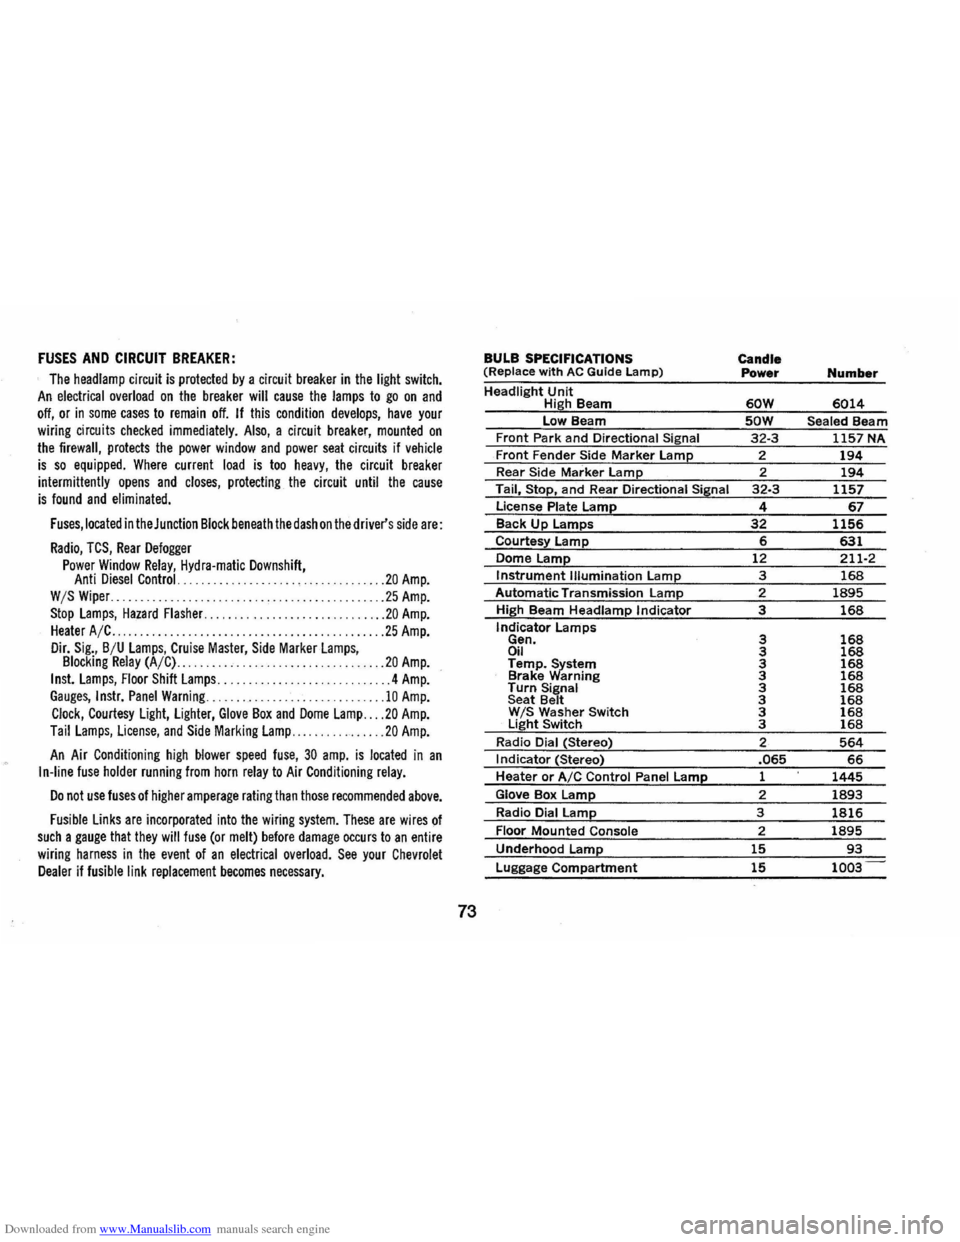
Fuses, located in the Junction Block beneath the dash on the driver's side are:
Radio, TCS, Rear Defogger
Power Window Relay, Hydra-matic Downshift, Anti Diesel Control. .... .. ................ ... ... .... .. 20 Amp. W /S Wiper. ... .......................................... 25 Amp.
Stop Lamps, Hazard Flasher .............................. 20 Amp. Heater A/C . . . . . . . . . .. . ..... ............................ 25 Amp.
Dir. Sig., B /U Lamps, Cruise Master, Side MarkerLamps, Blocking Relay (A/C) ............... .. .. .............. .. 20 Amp.
Inst. Lamps, Floor Shift Lamps ....... .... .. .... ............ 4 Amp. Gauges, Instr. Panel Warning .............................. 10 Amp.
Clock, Courtesy Light, Lighter, Glove Box and Dome Lamp ... . 20 Amp.
Tail Lamps, License, and Side Marking Lamp .............. .. 20 Amp.
An Air Conditioning high blower speed fuse, 30 amp. is located in an I n-line fuse holder running from horn relay to Air Conditioning relay.
Do not use fuses of higher amperage rating than those recommended above.
Fusible Links are incorporated into the wiring system. These are wires of such a gauge that they will fuse (or melt) before damage occurs to an entire
wiring harness in the event of an electrical overload. See your Chevrolet Dealer if fusible link replacement becomes necessary.
73
BULB SPECIFICATIONS
(Replace w ith AC Guide Lamp)
Headlight Unit High Beam
low Beam Front Park and Directional Signal
Front Fender Side Marker lamp Rear Side Marker lamp
Tail, Stop, and Rear Directional Siinal
License Plate Lame Back Up lamps
Courtes~ lamp
Dome Lame Instrument Illumination lamp
Automatic Transmission Lamp
High Beam Headlamp Indicator
Indicator
lamps Gen. Oil Temp.~stem Brake arning Turn Signal
Seat Belt W IS Washer Switch light Switch
Radio Dial (Stereo)
I ndicator (Stereo)
Heater or AIC Control Panel lame
Glove Box lamp
Radio Dial lamp
Floor Mounted Console
Underhood lame
Luggage Compartment
Candle
Power Number
60W 6014
SOW Sealed Beam 32-3 1157 NA
2
194 2 194 32-3 1157
4 67 32 1156 6 631 12 211-2
3 168 2 1895
3 168
3 168 3 168 3 168 3 168 3 168 3 168 3 168 3 168
2 564 .065 66 1 1445
2 1893
3 1816
2 1895
15 93
15 1003
Page 81 of 86
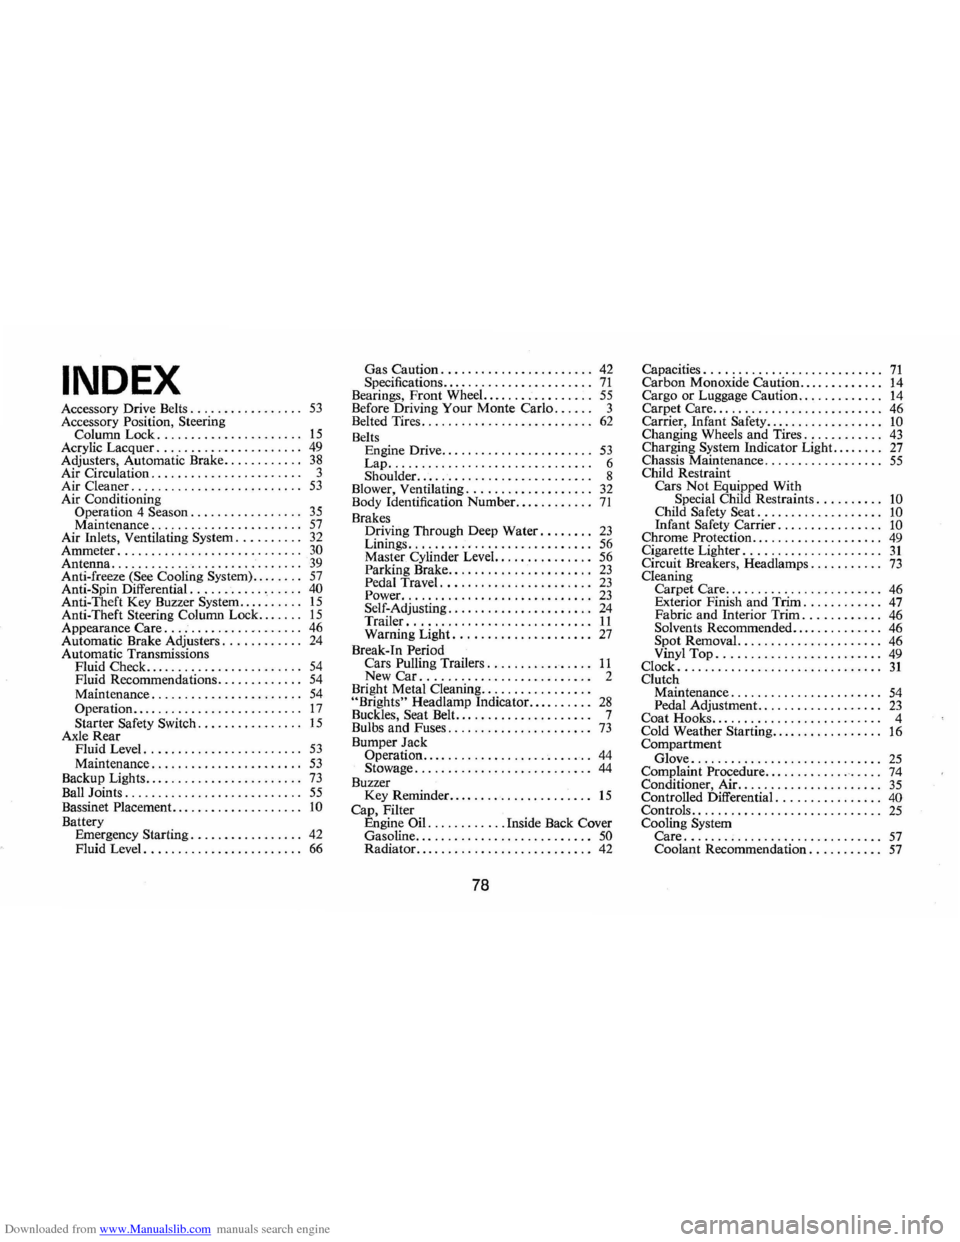
Downloaded from www.Manualslib.com manuals search engine INDEX
Accessory Drive Belts ............ , .... 53 Accessory Position, Steering Column Lock ...................... 15 Acrylic Lacquer ..................... , 49
Adjusters, Automatic Brake. . . . . . . . . . .. 38 Air Circulation . . . . . . . . . . . . . . . . . . . . . .. 3
Air Cleaner. . . . . . . . . . . . . . . . . . . . . . . . .. 53 Air Conditioning
Operation 4 Season. . . . . . . . . . . . . . . .. 35 Maintenance. . . . . . . . . . . . . . . . . . . . . .. 57 Air Inlets, Ventilating System .......... 32 Ammeter ............................ 30 Antenna ............................. 39 Anti-freeze (See Cooling System) ........ 57 Anti-Spin Differential. . . . . . . . . . . . . . . .. 40 Anti-Theft Key Buzzer System . . . . . . . . .. 15 Anti-Theft Steering Column Lock ....... 15 Appearance Care. . . . . . . . . . . . . . . . . . . .. 46 Automatic Brake Adjusters. . . . . . . . . . .. 24 Automatic Transmissions
Fluid Check ........................ 54 Fluid Recommendations. . . . . . . . . . . .. 54 Maintenance ...................... , 54 Operation.. . . . . . . . . . . . . . . . . . . . . . . .. 17 Starter Safety Switch ............... , 15 Axle Rear
Fluid Level. . . . . . . . . . . . . . . . . . . . . . .. 53 Maintenance ...................... , 53 Backup Lights ........................ 73 Ball Joints .......................... , 55 Bassinet Placement. .. . . . . . . . . . . . . . . . .. 10 Battery
Emergency Starting. . . . . . . . . . . . . . . .. 42 Fluid Level. . . . . . . . . . . . . . . . . . . . . . .. 66
Gas Caution ...................... , 42
Specifications. . .. . . . . . . . . . . . . . . . . . .. 71 Bearings, Front Wheel. ............... , 55 Before Driving Your Monte Carlo. . .. .. 3
Belted Tires. . . . . . . . . . . . . . . . . . . . . . . . .. 62
Belts
Engine Drive ...................... , 53 Lap ............................... 6 Shoulder ...... , .. . . .. .. . . . . .. . . .. .. 8
Blower, Ventilating ................... 32 Body Identification Number. ........... 71 Brakes
Driving Through Deep Water ........ 23 Linings ............................ 56
Master Cylinder Level. . . . . . . . . . . . . .. 56
Parking Brake. . . . . . . . . . . . . . . . . . . . .. 23 Pedal Travel ...................... , 23 Power ............................. 23 Self-Adjusting.. .. .. .. .. .. .. . . . . .. .. 24 Trailer ................. ........... 11 Warning Light. .................... 27 Break-In Period
Cars Pulling Trailers. . . . . . . . . . . . . . .. 11 New Car .......................... 2
Bright Metal Cleaning ................ . "Brights" Headlamp Indicator ......... , 28 Buckles, Seat Belt. . . . . . . . . . . . . . . . . . . .. 7
Bulbs and Fuses. . . . . . . . . . . . . . . . . . . . .. 73 Bumper Jack
Operation .......................... 44 Stowage .................... ....... 44 Buzzer
Key Reminder. . . . . . . . . . . . . . . . . . . . .. 15 Cap, Filter
Engine Oil ............ Inside Back Cover
Gasoline ....................... .... 50 Radiator. . . . . . . . . . . . . . . . . . . . . . . . . .. 42
78
Capacities. . . . . . . . . . . . . . . . . . . . . . . . . .. 71 Carbon Monoxide Caution ............. 14
Cargo or Luggage Caution. . . . . . . . . . . .. 14 Carpet Care ................... , .... " 46
Carrier, Infant Safety .................. 10 Changing Wheels and Tires. . . . . . . . . . .. 43 Charging System Indicator Light. ..... " 27 Chassis Maintenance .................. 55 Child Restraint
Cars Not Equipped With
Special Child Restraints. . . . . . . . .. 10 Child Safety Seat ............... .. " 10 Infant Safety Carrier. . . . . . . . . . . . . . .. 10 Chrome Protection.. . . . . . . . . . . . . . . . . .. 49 Cigarette Ligh ter. . . . . . . . . . . . . . . . . . . .. 31 Circuit Breakers, Headlamps ......... " 73 Cleaning
Carpet Care ...................... " 46
Exterior Finish and Trim. . . . . . . . . . .. 47 Fabric and Interior Trim. . . . . . . . . . .. 46 Solvents Recommended .............. 46 Spot Removal. . . . . . . . . . . . . . . . . . . . .. 46 Vinyl Top. . . . . . . . . . . . . . . . . . . . . . . .. 49
Clock ............................... 31 Clutch Maintenance. . . . . . . . . . . . . . . . . . . . . .. 54 Pedal Adjustment. . . . . . . . . . . . . . . . . .. 23 Coat Hooks... . .. .. . . .... .. . . .... . ... 4
Cold Weather Starting ................. 16 Compartment
Glove ............................. 25 Complaint Procedure .................. 74 Conditioner, Air ... , .................. 35 Controlled Differential .............. " 40 Controls ............................. 25 Cooling System Care .............................. 57 Coolant Recommendation. . . . . . . . . .. 57
Page 82 of 86
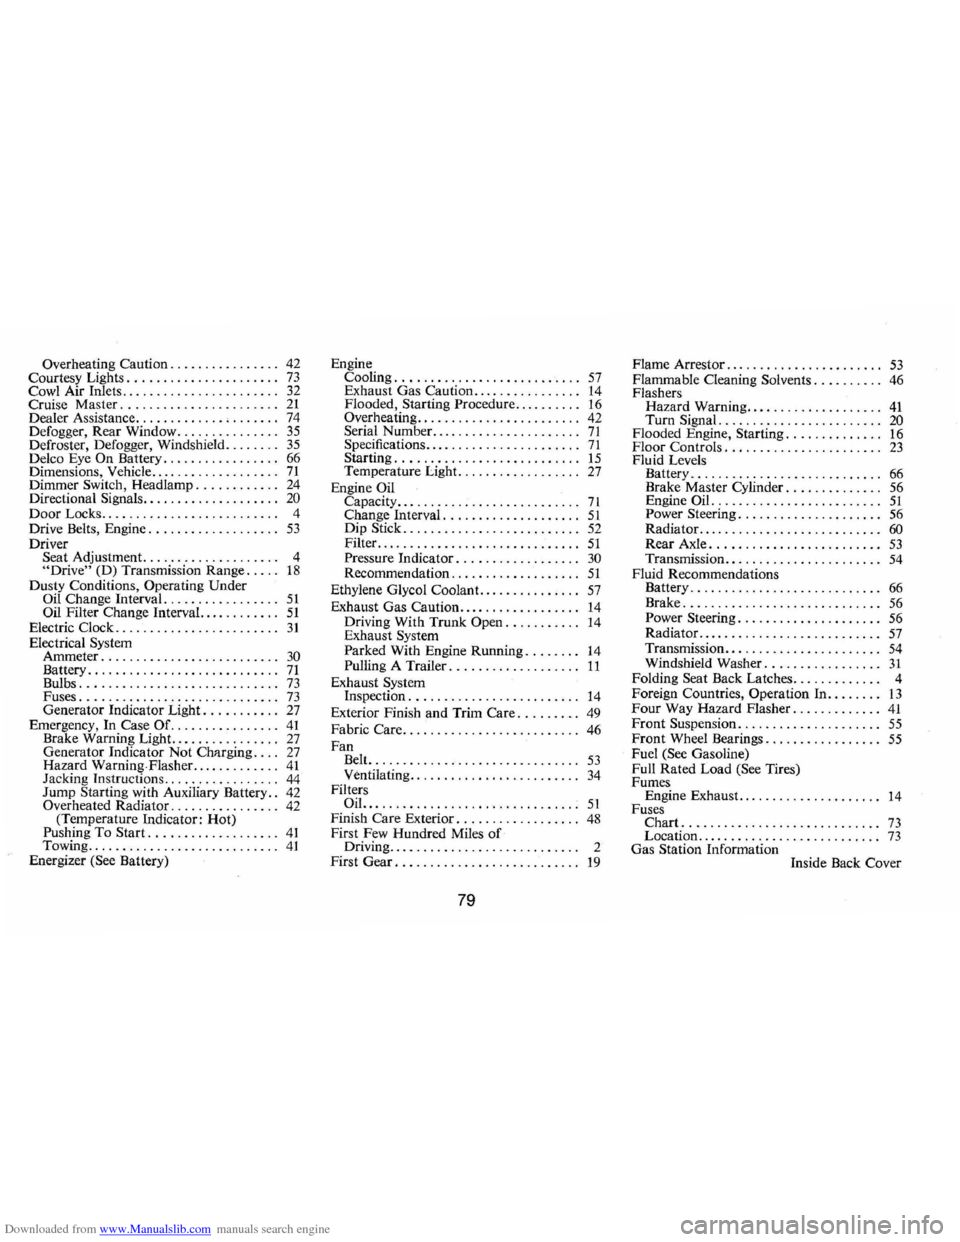
Downloaded from www.Manualslib.com manuals search engine Overheating Caution. . . . . . . . . . . . . . .. 42
Courtesy Lights ........... ........... 73 Cowl Air Inlets ....................... 32 Cruise Master ....................... 21 Deale r Assistance ............. , ...... , 74 Defogger, Rear Window ............... 35 Defroster, Defogger, Windshield ........ 35 Delco Eye On Battery. . . . . . . . . . . . . . . .. 66 Dimensions, Vehicle .................. , 71 Dimmer Switch, Headlamp. . . . . . . . . . .. 24 Directional Signals. . . . . . . . . . . . . . . . . . .. 20 Door Locks. . . . . . . . . . . . . . . . . . . . . . . . .. 4 Drive Belts, Engine. . . . . . . . . . . . . . . . . .. 53 Driver Seat Adjustment ................... , 4 "Drive" (D) Transmission Range ..... 18 Dusty Conditions, Operating Under
Oil Change Interval. ................ 51 Oil Filter Change Interval.. . . . . . . . . .. 51 Electric Clock ........................ 31 Electrical System Ammeter .......................... 30 Battery ............ ................ 71 Bulbs ............................. 73 Fuses ..... , ....................... 73 Generator Indicator Light. . . . . . . . . .. 27 Emergency, In Case Of. ............... 41 Brake Warning Light. . . . . . . . . . . . . . .. 27 Generator Indicator Not Chllrging ... , 27 Hazard Warning· Flasher. ............ 41 Jacking Instructions ................. 44 Jump Starting with Auxiliary Battery .. 42 Overheated Radiator. . . . . . . . . . . . . . .. 42 (Temperature Indicator: Hot) Pushing To Start. .................. 41 Towing ............................ 41 Energizer (See Battery) Engine
Cooling
........................... 57 Exhaust Gas Caution ................ 14 Flooded , Starting Procedure ......... , 16 Overheating. . . . . . . . . . . . . . . . . . . . . . .. 42 Serial Number. ....... .............. 71 Specifications .............. ..... ... , 71 Starting. . . . . . . . . . . . . . . . . . . . . . . . . .. 15 Temperature Light. . . . . . . . . . . . . . . . .. 27 Engine Oil Capacity.. . .. .. .. .. . . .. .. . . .. .. .. .. 71 Change Interval. . . . . . . . . . . . . . . . . . .. 51 Dip Stick. . . . . . . . . . . . . . . . . . . . . . . . .. 52 Filter. ....................... : . . . .. 51 Pressure Indicator . . . . . . . . . . . . . . . . .. 30 Recommendation. . . . . . . . . . . . . . . . . .. 51
Ethylene Glycol Coolant. . . . . . . . . . . . . .. 57
Exhaust Gas Caution ................. , 14 Driving With Trunk Open. . . . . . . . . .. 14
Exhaust System
Parked With Engine Running. . . . . . .. 14 Pulling A Trailer .................. , 11
Exhaust System Inspection ........................ , 14
Exterior Finish and Trim Care. . . . . . . .. 49
Fabric Care .... " .................... 46 Fan
Belt. .............................. 53 Ventilating. . . . . . . . . . . . . . . . . . . . . . . .. 34 Filters OiL ........... ....... , .. ......... , 51 Finish Care Exterior. . . . . . . . . . . . . . . . .. 48 First Few Hundred Miles of Driving........... ............. .. .. 2
First Gear. . . . . . . . . . . . . . . . . . . . . . . . . .. 19
79
Flame Arrestor ..... ........ ......... , 53 Flammable Cleaning Solvents. . . . . . . . .. 46 Flashers
Hazard Warning .................... 41 Turn Signal. . . . . . . . . . . . . . . . . . . . . . .. 20 Flooded Engine, Starting. . . . . . . . . . . . .. 16 Floor Controls. . . . . . . . . . . . . . . . . . . . . .. 23 Fluid Levels
Battery ...................... ..... , 66 Brake Master Cylinder. . . . . . . . . . . . .. 56 Engine Oil. ........................ 51 Power Steering. . . . . . . . . . . . . . . . . . . .. 56 Radiator. . . . . . . . . . . . . . . . . . . . . . . . . .. 60 Rear Axle. . . . . . . . . . . . . . . . . . . . . . . .. 53 Transmission. . . . . . . . . . . . . . . . . . . . . .. 54 Fluid Recommendations
Battery ........................... , 66 Brake ............................. 56 Power Steering . . . . . . . . . . . . . . . . . . . .. 56 Radiator. . . . . . . . . . . . . . . . . . . . . . . . . .. 57 Transmission .... ................... 54 Windshield Washer ................ , 31 Folding Seat Back Latches ............ , 4 Foreign Countries, Operation In ...... .. 13 Four Way Hazard Flasher ....... " .... 41 Front Suspension . ................... , 55 Front Wheel Bearings ................ , 55 Fuel (See Gasoline)
Full Rated Load (See Tires)
Fumes Engine Exhaust. . . . . . . . . . . . . . . . . . .
.. 14 Fuses Chart. ......................... .. , 73 Location .................... ...... , 73 Gas Station Information
Inside Back Cover