1973 CHEVROLET CAMARO light
[x] Cancel search: lightPage 40 of 84
Downloaded from www.Manualslib.com manuals search engine knowledgeable towing concern.
Your Camaro may be towed on
all four wheels, at speeds of
less
than 35 mph, for distances up to
50 miles, provided driveline, axle
and transmission are otherwise
normally operable. For such tow
ing, parking brake must be re
leased, transmission must be in
neutral
and ignition lock turned to
OFF position. Attachments must
be to main structural members of
the car, not to bumpers or brac
keting. Separate safety chains
or
cables should be used. Remember
that power brake and steering
as
sists will not be available when
engine
is inoperative.
Emergency Starting
• Never tow the car to start be
cause the surge forward when
the engine starts could cause a
collision with the tow vehicle.
• Engines in vehicles with auto
matic transmissions cannot be
started by (towing
or) pushing
the car.
• To start the car when the Ener
gizer (battery)
is discharged,
use a single auxiliary battery or
Energizer of the same nominal
voltage
(12 volts) as the dis
charged battery, with suitable
jumper cables.
• Make connections as set forth
below under
"Jump Starting
with Auxiliary (Booster) Bat
tery" to lessen the chance of
personal injury
or property
damage.
Jump Starting with
Auxiliary (Booster) Battery
Both booster and discharged
battery should be treated carefully
when using jumper cables. Follow
37
exactly the procedure outlined be
low, being careful not to cause
sparks:
1. Set parking brake and place
automatic transmission in
"PARK" (neutral for manual
transmission). Turn
off lights,
heater and other electrical loads.
2. Remove vent caps from both
the booster and the discharged
batteries. Lay a cloth over the
open vent wells of each battery.
These two actions help reduce
the explosion hazard always
Page 43 of 84
Downloaded from www.Manualslib.com manuals search engine • Activate hazard warning flasher.
• Block both the front and back
of the wheel diagonally opposite
the jack position.
Remove
hubcap or wheel cover
with flat end of wheel
nut wrench
and loosen wheel nuts slightly.
Set
lever on jack to UP position.
Properly position load rest which
engages bumper by moving base of
NOTE: Base of jack column
should be slightly angled in toward
car since it will straighteri
as car is
raised.
jack slightly under car and engage
tang of
bracket in bumper notch,
then bring jack base back toward
upright position. Check that
l~ad
rest is positioned before operatmg
jack.
40
Jack Operation
After jack is positioned as noted
above use
wheel nut wrench as . ,
jack handle and raise car until tire
clears ground. Remove wheel nuts
and wheel, install spare and tighten
wheel nuts. Move jack lever to
DOWN and install hub cap or
wheel cover.
Page 45 of 84
Downloaded from www.Manualslib.com manuals search engine Cleaning Fabrics with
Cleaning
Fluid
This type of cleaner should be
used for cleaning stains containing
grease, oil or fats. Exces s stain
should be gently scraped off with
a clean dull knife
or scraper. Use
very little cleaner, light pressure,
and clean cloths (preferably cheese
cloths) . Cleaning action with cloth
should be from outside of stain to
wards center and constantly chang
ing to a clean section of cloth.
When stain
is cleaned from fabric,
immediately wipe
area briskly with
a clean absorbent towel or cheese
cloth to help dry area and prevent
a cleaning ring.
If ring forms, im
mediately clean entire area or panel
section of the trim assembly.
NOTE: Sometimes a difficult spot
may require a second application
of cleaning fluid followed immedi- ately
by a soft brush to completely
remove the spot.
Cleaning Fabrics with
Detergent Foam Cleaners
This type of cleaner is excellent
for cleaning general soilage from
fabrics and for cleaning a panel sec
tion where a minor cleaning ring
may be left from spot cleaning.
Vacuum area to remove excess
loose dirt. Always clean at least a
full trim panel or section of trim.
Mask adjacent trim along stitch or
weld lines. Mix detergent type foam
cleaners in strict accordance with
directions on label of container.
Use
foam only on a clean sponge or
soft bristle brush -Do not wet
fabric excessively or rub harshly
with brush. Wipe clean with a
slightly damp absorbent towel
or
cloth. Imm~diately after cleaning
fabric, dry fabric with a dry towel
42
or hair dryer. Rewipe fabric with
dry absorbent towel
or cloth to re
store the luster of the trim and to
eliminate any dried residue.
Seat Belt Care
• Clean only with mild soap solu
tion and lukewarm water.
• Do not bleach or dye belts since
this may severely weaken belts.
Removal of Specific Stains
Candy -Chocolate, use cloth
soaked in lukewarm water; other
than chocolate, use very hot water.
Dry.
If necessary, clean lightly with
fabric cleaning fluid.
Chewing Gum-Harden gum with
ice cube and scrape off with dull
knife. Moisten with fabric cleaning
fluid and scrape again.
Page 46 of 84
Downloaded from www.Manualslib.com manuals search engine Fruit Stains, Coffee, Soft Drinks,
Ice Cream and Milk-Wipe with
cloth soaked in cold water.
If nec
essary clean lightly with fabric
cleaning fluid.
Soap and water is
not recommended as it might set
the stain.
Catsup-Wipe with cloth soaked in
cool water.
If further cleaning is
necessary, use a detergent foam
cleaner.
Grease, Oil, Butter, Margarine
and Crayon -
Scrape off excess
with dull knife.
Use fabric cleaning
fluid.
Paste or Wax Type Shoe Polish
-Light applications of fabric clean
ing fluid.
Exterior Appearance
Your car is finished with General
Motors "Magic-Mirror" acrylic
lacquer. This is a finish of maxi
mum beauty which, in depth of
color, gloss retention and durability
Tar -Remove excess with dull
knife, moisten with fabric cleaning
fluid, scrape again, rub lightly with
additional cleaner.
Blood -Wipe with clean cloth
moistened with cold water. Use no
soap.
Urine -Sponge stain with luke
warm soap suds from mild neutral
soap on clean cloth, rinse with cloth
soaked in cold water, saturate cloth
with one
part household ammonia
and 5 parts water, apply for 1 min
ute, rinse with clean, wet cloth.
Vomitus-Sponge with clean cloth
dipped
in clean, cold water. Wash
lightly with lukewarm water
and
is superior to conventional lacquer
finishes.
Washing Your Car
The best way to preserve the
finish and maintain original beauty
43
mild neutral soap. If odor persists,
treat area with a water-baking soda
solution (1 teaspoon
baking soda
to one cup of tepid water).
Rub
again with cloth and cold water.
Finally , if necessary , clean lightly
with fabric cleaning fluid.
Interior Glass Surface
The interior glass surface should
be cleaned on a periodic basis for
continued good visibility. A com
mercial household glass cleaning
agent containing ammonia will re
move normal tobacco smoke and
dust films sometimes caused by in
gredients used in vinyls, plastics
or
other interior trim materials.
of appearance
is to keep it clean .
Wash the car
in lukewarm or cold
water. Never use strong so ap
or
chemical detergents. Cleaning
agents should be quickly flushed
from the surfaces.
Page 55 of 84
Downloaded from www.Manualslib.com manuals search engine Transmission Fluid) as necessary
to bring level into proper range on
filler cap indicator depending
upon fluid temperature .
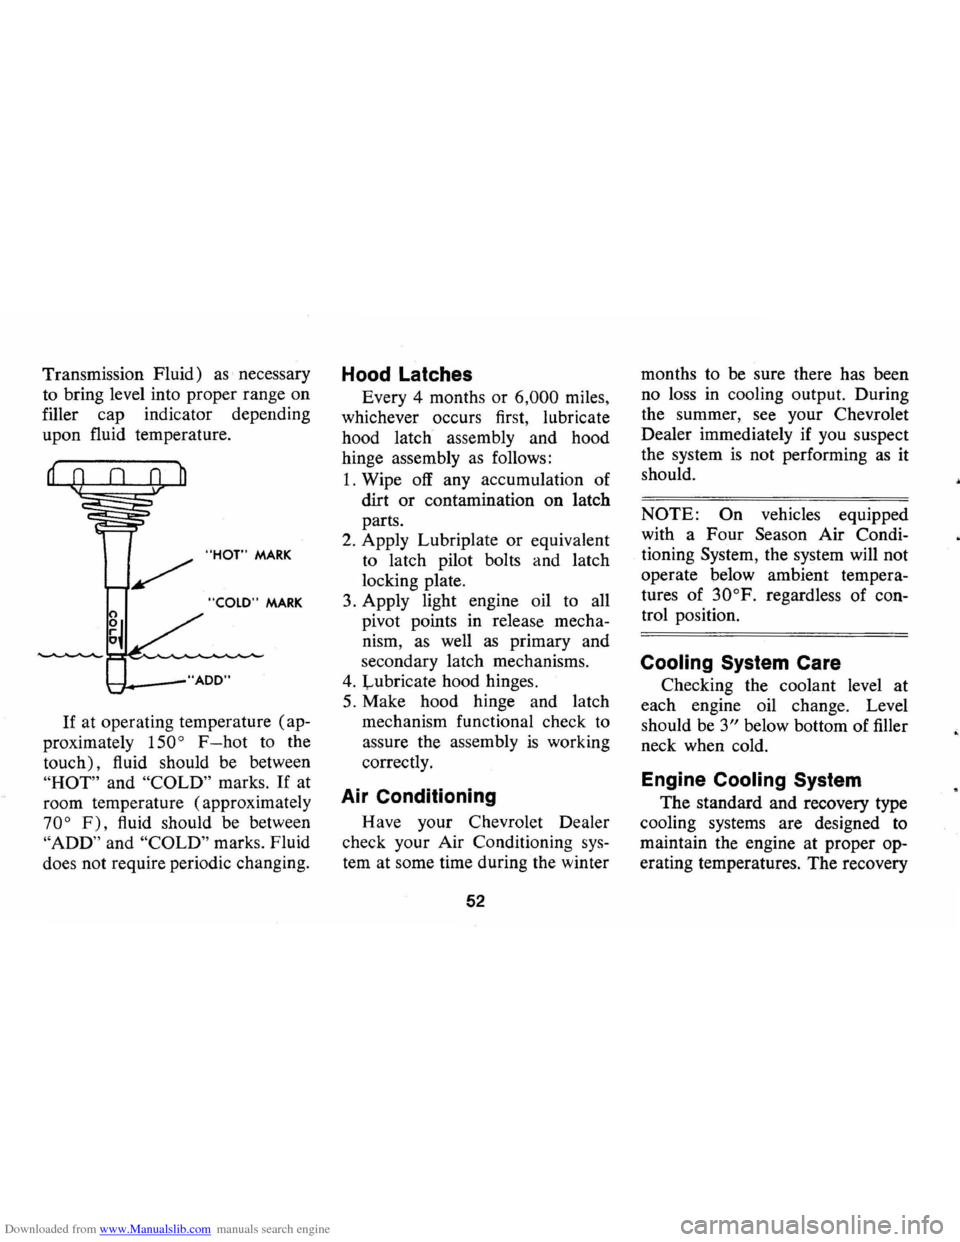
"HOT" MARK
"COLD" MARK
t-"f. __ -"AOO"
If at operating temperature (ap
proximately
150 ° F-hot to the
touch), fluid should be between
"HOT" and "COLD" marks. If at
room temperature (approximately
70° F), fluid should be between
"ADD" and "COLD" marks . Fluid
does not require periodic changing.
Hood Latches
Every 4 months or 6,000 miles,
whichever occurs first, lubricate
hood latch assembly and hood
hinge assembly
as follows:
1. Wipe off any accumulation of
dirt
or contamination on latch
parts.
2. Apply Lubriplate or equivalent
to latch pilot bolts and latch
locking plate.
3. Apply light engine oil to all
pivot points in release mecha
nism,
as well as primary and
secondary latch mechanisms.
4. Lubricate hood hinges.
5. Make hood hinge and latch
mechanism functional check to
assure the assembly
is working
correctly.
Air Conditioning
Have your Chevrolet Dealer
check your Air Conditioning
sys
tem at some time during the winter
52
months to be sure there has been
no loss
in cooling output. During
the summer,
see your Chevrolet
Dealer immediately if you suspect
the system
is not performing as it
should.
NOTE: On vehicles equipped
with a Four
Season Air Condi
tioning
System, the system will not
operate below ambient tempera
tures of
30°F. regardless of con
trol position.
Cooling System Care
Checking the coolant level at
each engine oil change. Level
should be
3" below bottom of filler
neck when cold.
Engine Cooling System
The standard and recovery type
cooling systems are designed
to
maintain the engine at proper op
erating temperatures. The recovery
•
Page 66 of 84
Downloaded from www.Manualslib.com manuals search engine The chart on the previous page, and the, information on the pages
which follow, contains information designed to aid the average
driver to discover, and possibly correct, conditions resulting in minor
mechanical difficulties
in his car. The chart, designed to point out
possible solutions to several
of the most common automotive malfunctions and point out a logical checking sequence, will lead step
by step to the most
likely causes and corrective procedures. If, after
making the checks and adjustments suggested, the source of the
trouble
has not been found and corrected, it is strongly recom
mended that an Authorized Chevrolet Dealer inspect the vehicle and make whatever repairs or adjustments are necessary.
FUEL SYSTEM AND ENGINE
If the ignition switch will cause the engine to "turn over" or
"crank" but the car will not start, check Steps A through 0 below.
NOTE: If continual ··f1ooding··, of the carburetor is evidenced by a
carburetor wet with fuel or black exhaust smoke, perform the
operation suggested in paragraph D only.
(A) The first and most obvious, and one of the most frequently
overlooked, items to check when
you have difficulty in starting your car is the amount of fuel in the
tank. Make it a habit to check the
FUEL GAUGE regularly and most
especially at a time when the engine will "turn over" but will not
start.
(8)
If the fuel tank is not empty,
you may check further to see
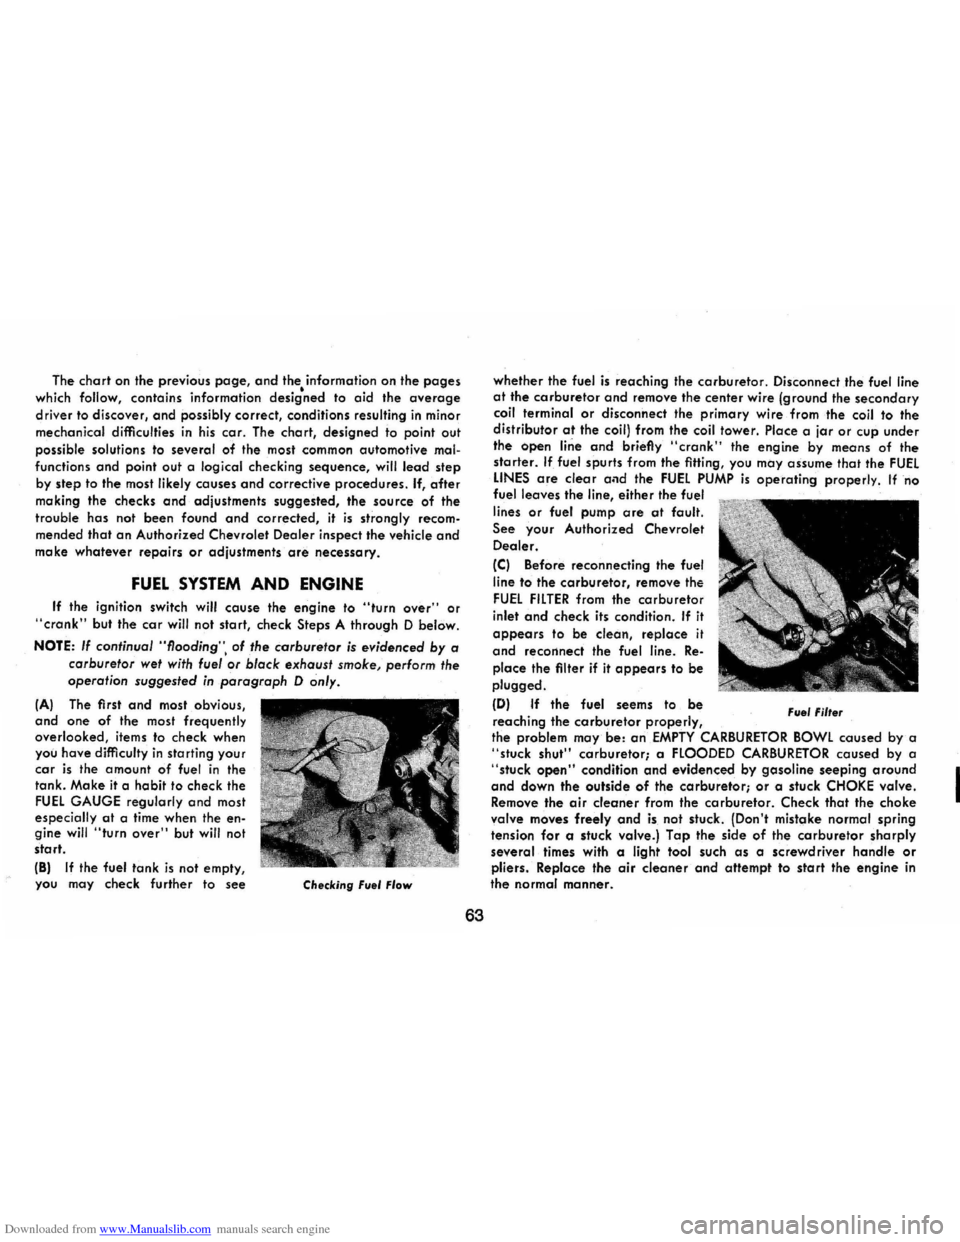
Checking Fuel Flow
63
whether the fuel is reaching the carburetor. Disconnect .the fuel line at the carburetor and remove the center wire (ground the secondary coil terminal or disconnect the primary wire from the coil to the
distributor at the coil) from the coil tower. Place a jar or cup under
the open line and briefly "crank" the engine by means of the
starter. If fuel spurts from the fitting, you may assume that the FUEL LINES are clear and the FUEL PUMP is operating properly. If no
fuel leaves the line, either the fuel
lines
or fuel pump are at fault.
See your Authorized Chevrolet
Dealer.
(C) Before reconnecting the fuel
line to the carburetor, remove
the
FUEL FILTER from the carburetor
inlet and check its condition. If it
appears to be clean, replace it
and recorinect the fuel line. Re
place the filter if it appears to be
plugged.
(D) If the fuel seems to be
reaching the carburetor properly, Fuel Filter
the problem may be: an EMPTY CARBURETOR BOWL caused by a "stuck shut" carburetor; a FLOODED CARBURETOR caused by a "stuck open" condition and evidenced by gasoline seeping around and down the outside of the carburetor; or a stuck CHOKE valve.
Remove the air cleaner from the carburetor. Check that the choke
valve moves freely and is not stuck. (Don't mistake normal spring
tension for a stuck valve.) Tap the side of the carburetor sharply
several times with a light tool such as a screwdriver handle or pliers. Replace the air cleaner and attempt to start the engine in the normal manner.
I
Page 67 of 84

Downloaded from www.Manualslib.com manuals search engine IE) If the car will start but stalls when hot or has a rough idle,
you can suspect a faulty IDLE ADJUSTMENT, a malfunctioning AUTOMATIC CHOKE or an extremely dirty and blocked AIR CLEANER ELEMENT. Replace paper element air cleaner if necessary. Idle adjustment or automatic choke service (other than that outlined in paragraph 0 above) should be performed by your
Chevrolet Dealer.
If the above Fuel System checks and the checks suggested under the Electrical System following do not correct the malfunction, it is recommended that you return to your Authorized Chevrolet Dealer
for further checks, adjustments or repairs.
ELECTRICAL SYSTEM If, when the ignition key is turned to "Start", the engine will not
turn over, you have good reason to suspect electrical trouble. NOTE: Never remove Delcotron bat lead without first disconnecting
battery ground cable.
IF) When there is no response at all to attempts to start the car, check the obvious-your AUTOMATIC TRANSMISSION SELECTOR LEVER must be in Neutral or Park position (manual transmission
must have clutch depressed all the way to floor) before the engine can be started. Turning the IGNITION SWITCH rapidly back and forth several times will sometimes correct a poor internal switch
contact.
IG) The BATIERY may be discharged. If so, lights will be dim and the horn will have a poor tone if it will blow at all.
Usually a garage recharge will be necessary to return the battery to operation. Occasionally, however, a long drive will recharge the battery. NOTE: If the battery is determined to be dead, and for no apparent reason, have your Authorized Chevrolet Dealer check the
battery, the GENERATOR and the VOLTAGE REGULATOR.
GENERATOR trouble should already have been indicated by the generator indicator light on the instrument panel.
64
POOR BATIERY CONNECTIONS may be suspected if the car has operated properly a short time before and now not even the horn
will operate. Check both ends of both battery cables. If the connections are corroded, a car may sometimes be restored to operation by removing all cable ends, scraping all contacting surfaces
clean with a pen knife, and reassembling. If the cables are broken,
they must be replaced. The power supply should now be restored
unless the battery is dead.
IH) If, however, the lights and horn work properly but the starter will still not turn over, check the STARTER connections. A "click" from the starter solenoid indicates that the wiring to the starter is properly installed. If the wiring seems to be clean and tightly in
stalled, the trouble is probably in the starter itself and should be referred to your Authorized Chevrolet Dealer.
When the engine will
"turn over" but will not start, the foilowing
items may be checked along with the Fuel Systems Checks listed
previously.
II) With a clean dry cloth, wipe the ceramic portions of the spark plugs dry. In particularly damp or rainy weather dampness may be
the cause of not sta rting, especi
ally when the engine is cold.
IJ) Check the cables at the top of the distributor and coil as well as each spark plug cable for
tightness.
IK) If the co r will still not sta rt,
check for spark at the spark plugs in the following manner:
Pull one of the spark plug
wires off its spark plug. Insert a
short piece of bare wire (such as Di.,ribu'or and Coil Cab I ••
Page 72 of 84
Downloaded from www.Manualslib.com manuals search engine FUSES AND CIRCUIT BREAKER:
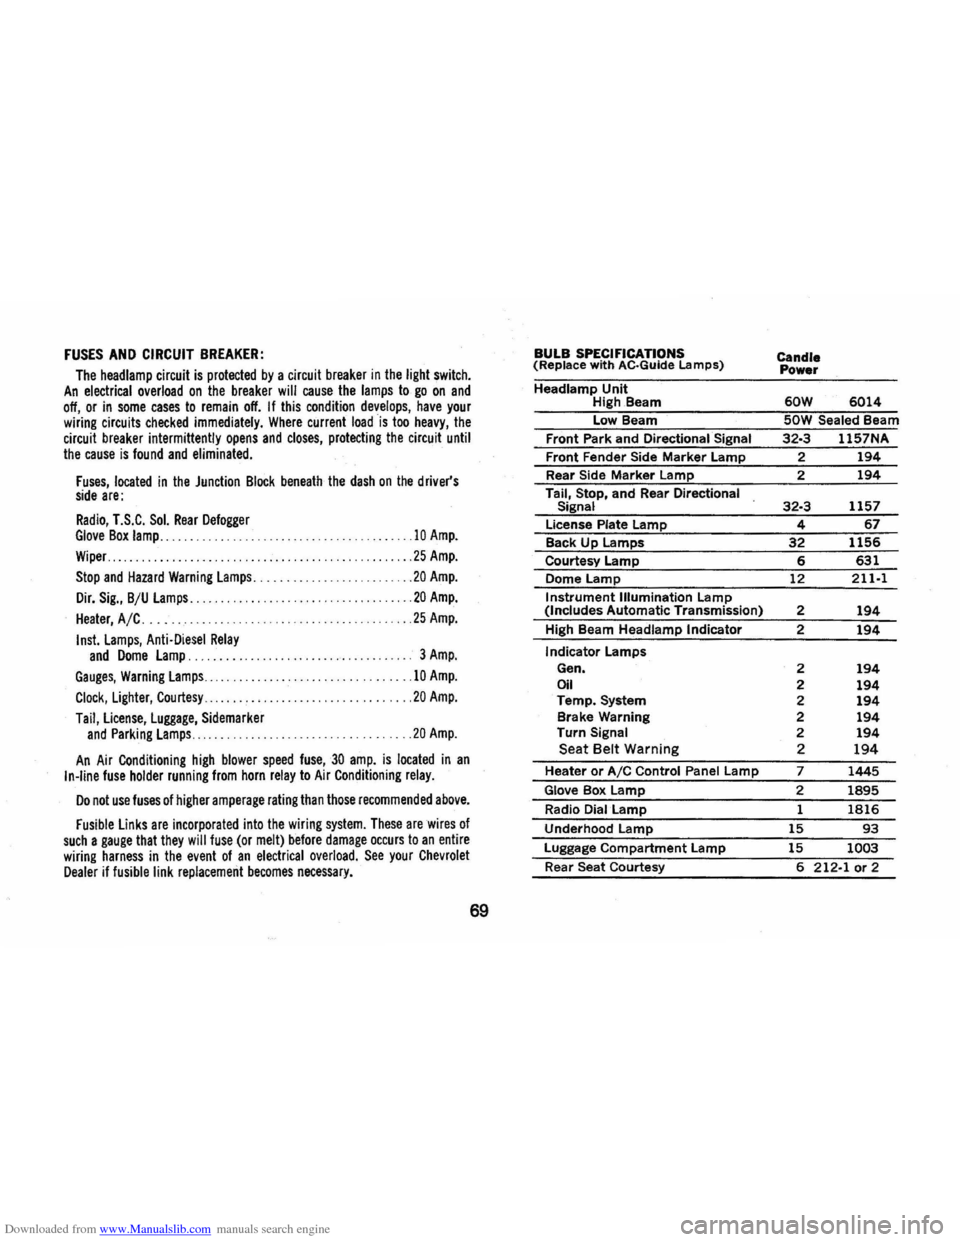
The headlamp circuit is protected by a circuit breaker in the light switch. An electrical overload on the breaker will cause the lamps to go on and off, or in some cases to remain off. If this condition develops, have your wiring circuits checked immediately. Where current load is too heavy, the circuit breaker intermittently opens and closes, protecting the circuit until the cause is found and eliminated.
Fuses, located in the Junction Block beneath the dash on the driver's side are:
Radio, T.S.C. Sol. Rear Defogger Glove Box lamp .......................... .
Wiper .................. . .
..
10 Amp.
25 Amp.
Stop and Hazard Warning lamps .................. ... ..... 20 Amp.
Dir. Sig., B/U lamps .................... ............ .... 20 Amp.
Heater, A/C. . . . .. .. . .. .. . .. . .. .. .. .. . . .. .. .. .. . .. ... 25 Amp.
Insl. lamps, Anti·Diesel Relay and Dome lamp. 3 Amp.
Gauges, Warning lamps.. .. .
. .. .. . .. .... . . .. . .. .. . . .. .. .10 Amp.
Clock, lighter, Courtesy.. .. .. . . . . .. . .. ... .. .. . .20 Amp.
Tail, license, luggage, Sidemarker and Parking lamps ...... . .20 Amp.
An Air Conditioning high blower speed fuse,30 amp. is located in an In·line fuse holder running from horn relay to Air Conditioning relay.
Do not use fuses of higher amperage rating than those recommended above.
Fusible links are incorporated into the wiring system. These are wires of such a gauge that they will fuse (or melt) before damage occurs to an entire wiring harness in the event of an electrical overload. See your Chevrolet Dealer if fusible link replacement becomes necessary.
69
BULB SPECIFICATIONS (Replace with AC·Guide Lamps)
Headlamp Unit High.Beam
Low Beam
Front Park and
Directional Signal
Front Fender Side Marker Lamp
Rear Side
Marker Lamp
Tail, Stop, and Rear
Directional
Signal
License Plate Lamp
Back Up Lamps
Courtesy Lamp
Dome
Lamp
Instrument Illumination Lamp (Includes Automatic Transmission)
High Beam
Headlamp Indicator
Indicator Lamps
Gen.
Oil Temp. System
Brake Warning
Turn
Signal Seat Belt Warning
Heater or AIC Control Panel Lamp
Glove Box Lamp
Radio Dial Lamp
Underhood
Lamp
Luggage Compartment Lamp
Rear Seat Courtesy
Candle Power
60W 6014
SOW Sealed Beam
32·3 1157NA
2 194
2 194
32·3 1157
4 67
32 1156
6 631
12
211·1
2 194
2 194
2 194 2 194 2 194 2 194 2 194 2 194
7 1445
2 1895
1 1816
15 93
15 1003
6 212·1 or 2