1971 CHEVROLET CAMARO instrument panel
[x] Cancel search: instrument panelPage 22 of 88

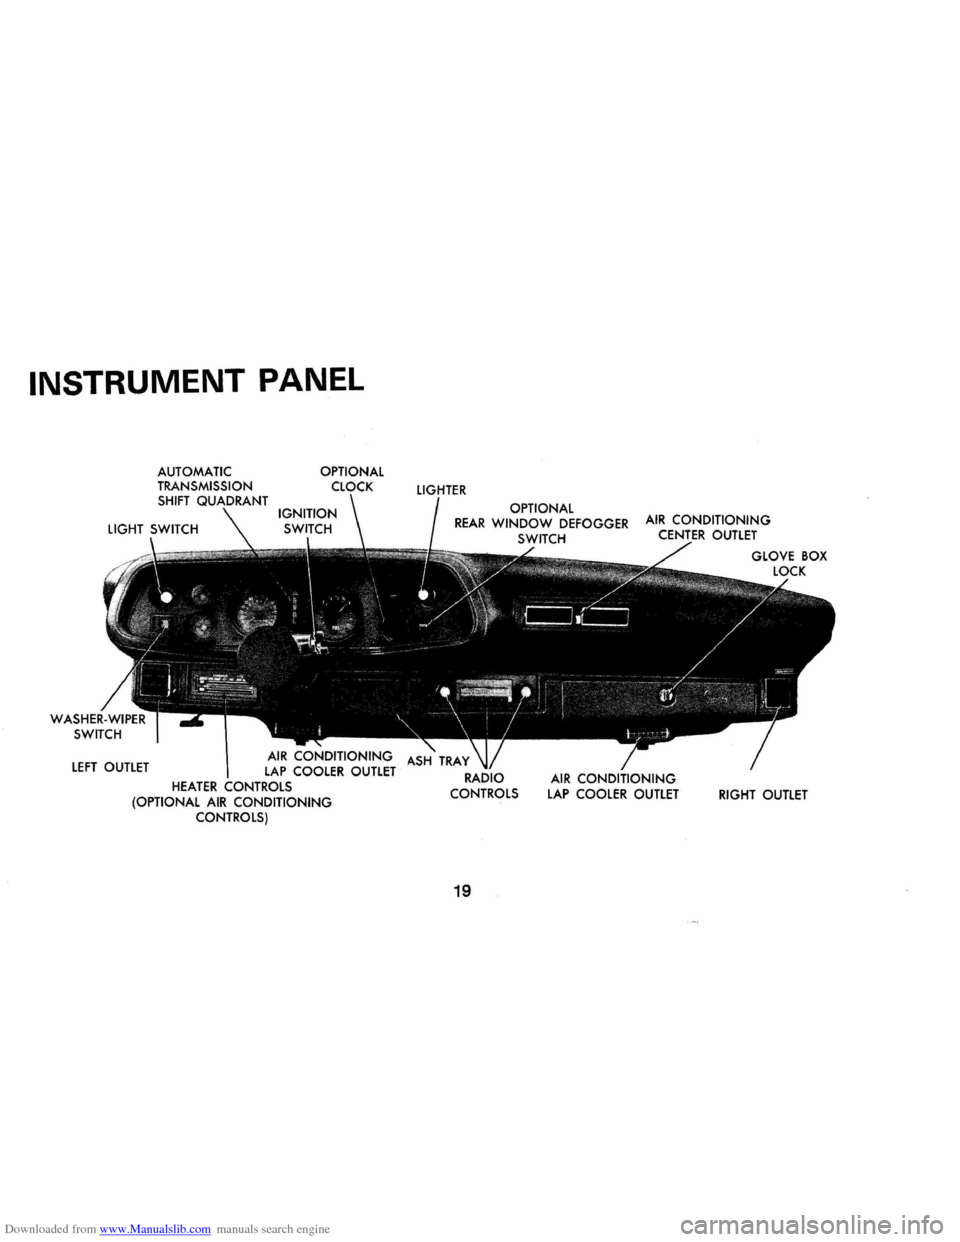
Downloaded from www.Manualslib.com manuals search engine INSTRUMENT PANEL
LEFT OUTLET
OPTIONAL
AIR CONDITIONING LAP COOLER OUTLET HEATER CONTROLS (OPTIONAL AIR CONDITIONING CONTROLS)
LIGHTER
OPTIONAL REAR WINDOW DEFOGGER SWITCH
19
AIR CONDITIONING LAP COOLER OUTLET RIGHT OUTLET
Page 27 of 88

Downloaded from www.Manualslib.com manuals search engine Clock
Reset the clock, if your car is so
equipped, by pulling out the knob
and turning the hands clockwise
if
slow, counterclockwise if fast. This
will, if the clock error
is five min
utes
or more, automatically com
pensate for time gain or lag.
Sev
eral resettings, several days apart,
may be needed to properly adjust
the clock mechanism. Have your
clock cleaned and oiled by a com
petent clock serviceman at least
every two years.
Cigarette Lighter
The accessory cigarette lighter is
located on the instrument panel
face. To operate, push it in. When
it becomes heated, it automatically
pops out ready for
use.
Windshield Wiper
and Washer
The windshield wiping system
operates at two speeds and
is de
signed to wipe clear designated areas
of the windshield under most
inclement weather conditions. The
windshield wipers work electrically
and are not affected by engine op
eration.
Push the control lever to the
right
to start the electric windshield
wiper. The two-speed electric wiper
has both a
"low" and a "high" speed
position.
Pressing the control will send a
measured amount of water or other
cleaning agent onto the windshield
and will also cause the wiper lever
to move, thus starting the wiper
motor. The wiper will then con
tinue to operate until manually
turned off at the wiper lever.
Fill the washer jar only
% full
during the winter to allow for ex
pansion if the temperature should
fall low enough to freeze the
so
lution.
• Check washer fluid level regu
larly-do it frequently when the
24
weather is bad.
• Use GM OPTIKLEEN to pre
vent freezing damage, and to
provide better cleaning.
• Do not use radiator anti-freeze in
windshield washer; it could
cause paint damage.
• In cold weather, warm the wind
shield with defrosters before
us
ing washer-to help prevent ic
ing that may seriously obscure
vision.
Air Vents
The air vents in each kick panel
admit air from the vent grille just
ahead of the windshield. Control
knobs open and close the vents .
The amount of air entering the
car through this system
is depend
ent upon vehicle speed.
Four Season Air Conditioning
equipped cars have no kick panel
vents since the vents are a part of
the air conditioning system. The
lever beside each instrument panel
Page 29 of 88

Downloaded from www.Manualslib.com manuals search engine vehicle, to clear the intake ducts
of snow.
• Keep all windows and vents
closed to reduce dust, road and
wind noise and uncomfortable
drafts.
• For most satisfactory heater op
eration and air circulation, oper
ate fan on low or medium speeds
for normal operation and high
speed for quick warm-up and
during extremely low tempera
tures.
• For adequate rear seat heating,
the area beneath the front seat
must not be blocked by carpet
ing, rags, paper
or other mate
rial and fan should operate on
high blower.
• For additional summer ventila
tion move the
AIR lever to mid
position and the
DEFROSTER
lever to DE-ICE. If greater air
flow is desired, move the FAN
lever down to operate the three-
Rear Window Defroster
To insure clear vision through
the rear window during inclement
weather, the Rear Window De
froster has become established
as a
popular accessory. This unit draws in
air from the passenger compart
ment and directs it against the back
window to remove frost or mois
ture. Its blower has a two-speed
control switch on the instrument
panel.
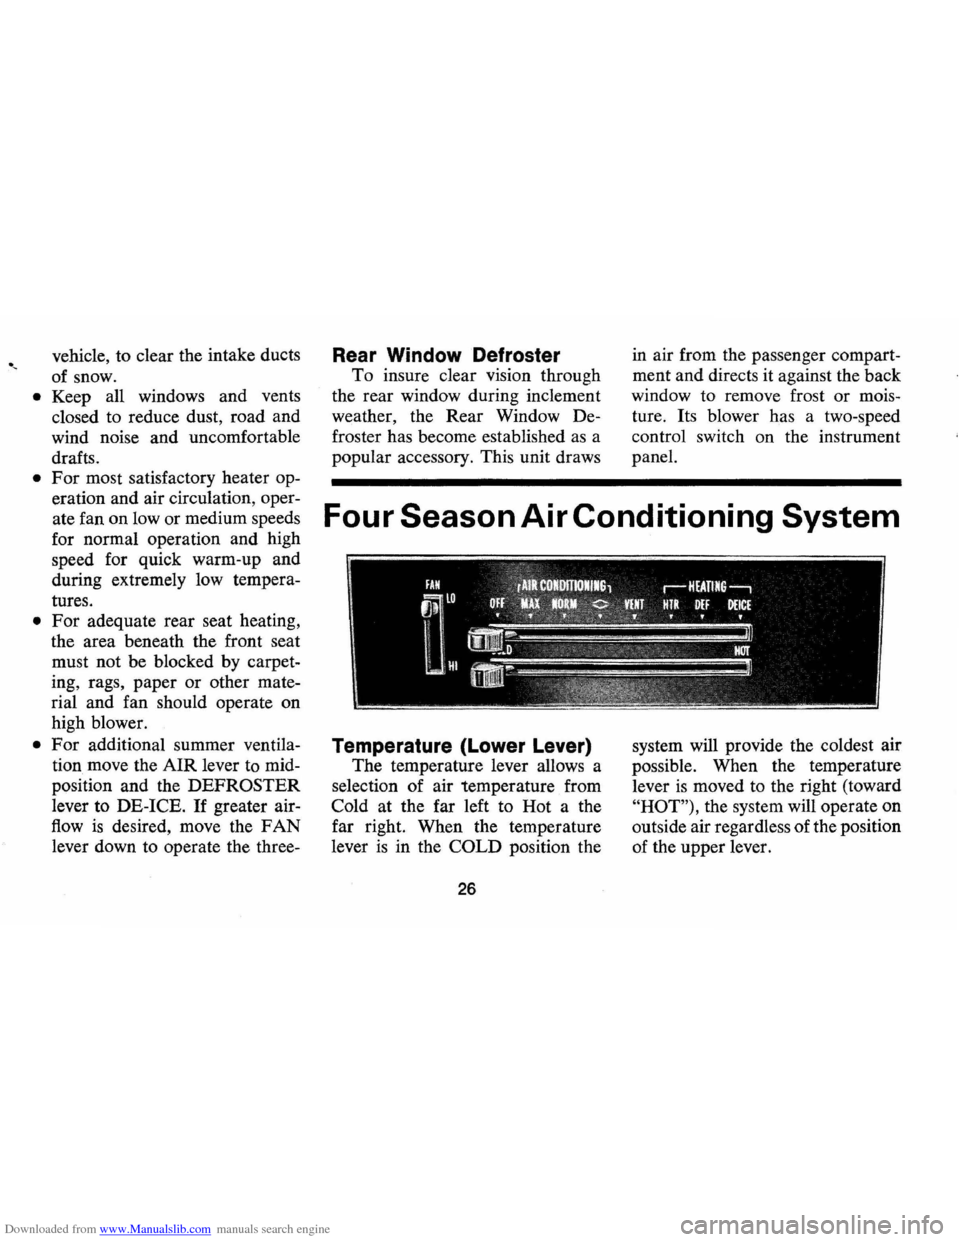
Four Season Air Conditioning System
Temperature (Lower Lever)
The temperature lever allows a
selection of air temperature from
Cold at the far left to Hot a the
far right. When the temperature
lever
is in the COLD position the
26
system will provide the coldest air
possible . When the temperature
lever
is moved to the right (toward
"HOT"), the system will operate on
outside air regardless of the position
of the upper lever.
Page 31 of 88

Downloaded from www.Manualslib.com manuals search engine . ~
is off. This position is provided for
cool to moderate weather when
refrigeration
is not required.
"HEATER"-Outside air is deliv
ered through the
lower outlets.
Temperature may be adjusted
as
required. This position is recom
mended for most winter driving.
"DE~FOG"-Outside air is deliv
ered from the lower outlets and the
defroster duct to provide comfort
and keep the windshield clear un
der low, fogging conditions.
Operating tip: When driving in
snow, if defog or deice
is not re
quired to keep the windshield from
fogging, it
is recommended that the
"Heater" position be used. This
keeps the windshield cold so that
snow will not stick and melt and
will provide a cleaner view.
"DE-ICE" -Outside air is deliv
ered through the defroster outlets only.
Temperature and blower
speeds
may be adjusted as required .
This position
is recommended for
conditions of severe fogging and
icing only.
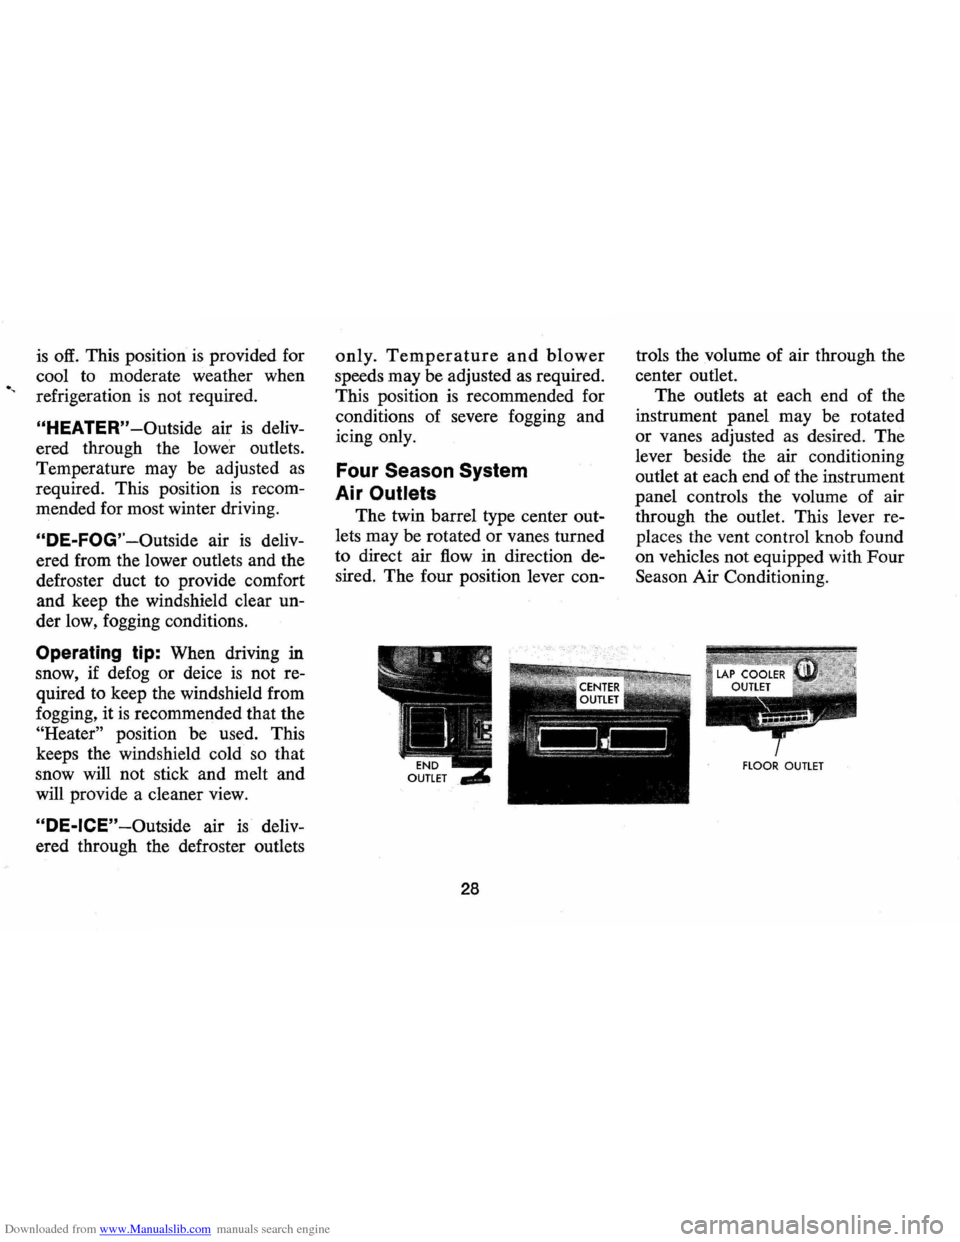
Four Season System
Air Outlets
The twin barrel type center out
lets may be rotated or vanes turned
to direct air
flow in direction de
sired. The four position lever con-
28
troIs the volume of air through the
center outlet.
The outlets at each end of the
instrument panel may be rotated
or vanes adjusted
as desired . The
lever beside the air conditioning
outlet at each end of the instrument
panel controls the volume of air
through the outlet. This lever re
places the vent control knob found
on vehicles not equipped with Four
Season Air Conditioning.
flOOR OUTLET
Page 34 of 88

Downloaded from www.Manualslib.com manuals search engine FLOOR CONTROLS
Braking System
The service brake system is de
signed for braking performance
under a wide range of driving con
ditions even when the vehicle
is
loaded to its full rated vehicle load.
Power Brakes
• Cars with power brakes can
make two or more brake stops
using reserve power assist after
the engine
is off.
• When reserve power is ex
hausted, the vehicle can still be
stopped by applying greater
force to the pedal.
Parking Brake
• To set parking brake, fully de
press foot pedal at far left side.
• For maximum holding power,
depress regular brake pedal with
the other foot at the same time.
• To release parking brake, pull
"BRAKE RELEASE" lever on
lower left instrument panel.
• Never drive car with parking
brake set
as this may overheat or
otherwise damage rear brakes.
REMINDER: Brake pedal travel
should not be obstructed by im
proper floor mats or other interfer
ing material under the pedal.
NOTE: "Riding the brake" by rest
ing your foot on the brake pedal
when not intending to brake can
cause abnormally high brake tem
peratures, excessive lining wear
and possible damage to the brakes.
31
REMINDER: Brake linings should
be inspected for wear by a qualified
mechanic at least once a year
or
every 12,000 miles, whichever oc
curs first. More frequent inspec
tions should be made if driving con
ditions in your area, such
as traffic
or terrain, or techniques of indi
vidual drivers result in frequent
brake applications. Your Chevrolet
dealer
is best qualified to advise you
as to how often this inspection
should be performed. When brakes
require relining, use those Genuine
General Motors
Parts specifically
recommended for your car, and
Delco, brake fluid as required.
Automatic Brake Adjusters
• Brakes on this car are self-adjust
ing, designed to eliminate peri
odic brake adjustments.
Page 68 of 88

Downloaded from www.Manualslib.com manuals search engine Operation in Foreign Countries
If you plan to operate your Camaro
outside the continental limits of
the United States or Canada, there
is a possibility
that the best fuels
available
are so low in anti-knock
quality
that excessive knocking and
serious engine damage may result
from their use.
To minimize this
possibility, write to Chevrolet
Motor Division, Service Depart
ment, Detroit, Michigan 48202,
giving:
• The compression ratio and cubic inch
displacement of the engine
(See page 74 or obtain from
your
Dealer.)
• The vehicle identification num
ber (on plate on instrument
panel
ahead of the steering
wheel
and visible through the
windshield ,
or from the regis
tration slip
or title) .
• The country or countries in
which you
plan to travel.
You will be furnished details of
65 adjustments
or modifi
cations which
should be
made to your engine at
your Chevrolet Dealership prior to
your departure.
Failure to make
the necessary changes to your car
and subsequent operation under
conditions of continuous
or exces
s ive knocking constitutes misuse of
the engine for which the Chevrolet
Division is
not responsible under
the terms of the Chevrolet New
Vehicle Warranty.
After arriving
in a foreign country, determine
and use the best fuels available.
Page 73 of 88

Downloaded from www.Manualslib.com manuals search engine (E) If the car will start but stalls when hot or has a rough idle, you can suspect a faulty IDLE ADJUSTMENT, a malfunctioning AUTOMATIC CHOKE or an extremely dirty and blocked AIR CLEANER ELEMENT. Replace paper element air cleaner if necessary. Idle adjustment or automatic choke service (other than that outlined in paragraph D above) should be performed by your Chevrolet Dealer.
If the above Fuel System checks and the checks suggested under the Electrical System following do not correct the malfunction, it is recommended that you return to your Authorized Chevrolet Dealer for further checks, adjustments or repairs.
ELECTRICAL SYSTEM
If, when the ignition key is turned to "Start", the engine will not
turn over, you have good reason to suspect electrical trouble.
NOTE: Never remove Delcotron bat lead without first disconnecting battery ground cable.
(F) When there is no response at all to attempts to start the car, check the obvious-your AUTOMATIC TRANSMISSION SELECTOR LEVER must be in Neutral or Park position before the engine can be started. Turning the IGNITION SWITCH rapidly back and forth several times will sometimes correct a poor internal switch contact.
(G) The BATIERY may be discharged. If so, lights will be dim and the horn will have a poor tone if it will blow at all.
Usually
a garage recharge will be necessary to return the battery to operation. Occasionally, however, a long drive will recharge the battery.
NOTE: If the battery is determined to be dead, and for no apparent reason, have your Authorized Chevrolet Dealer check the
battery, the GENERATOR and the VOLTAGE REGULATOR. GENERATOR trouble should already have been indicated by the gene~ator indicator light on the instrument panel.
70
POOR BATIERY CONNECTIONS may be suspected if the car has operated properly a short time before and now not even the horn will operate. Check both ends of both battery cables. If the con
nections are corroded, a car may sometimes be restored to operation by removing all cable ends, scraping all contacting surfaces clean with a pen knife, and reassembling. If the cables are broken,
they must be replaced. The power supply should now be restored unless the battery is dead.
(H) If, however, the lights and horn work properly but the starter will still not turn over, check the STARTER connections. A "click" from the starter solenoid indicates that the wiring to the starter is properly installed. If the wiring seems to be clean and tightly installed, the trouble is probably in the starter itself and should be referred to your Authorized Chevrolet Dealer.
When the engine will "turn over" but will not start, the following items may be checked along with the Fuel Systems Checks listed
previously.
(I) With a clean dry cloth, wipe the ceramic portions of the spark plugs dry. In particularly damp or rainy weather dampness may be the cause of not starting, especially when the engine is cold.
(J) Check the cables at the top of the distributor and coil as well as each spark plug cable for tightness.
(K) If the car will still not start, check for spark at the spark plugs in the following manner:
Pull one of the spark plug wires off its spark plug. Insert a
short piece of bare wire (such as Distributor and Coil Cables
Page 74 of 88

Downloaded from www.Manualslib.com manuals search engine a bobby pin) between the rubber
cup at the end of the spark plug
wire
and the tubular metal con
nector inside of it. If the spark plug wire is wet or oily, wipe it
dry. Wrap a dry handkerchief or facial tissue, folded several thick·
nesses, around the wire at least
three inches back from the end
and grasp the wire at this point.
Hold the bare wire about 1f4 inch
from the
bare tip of the spark
plug from which you removed the Checking Spark
wire. When the engine is "turned over" a spark should jump across
the 1f4 inch space, indicating ample current supply. If no spark
jumps, the difficulty is probably caused by a defective ignition part
and should be corrected by. your Authorized Chevrolet Dealer.
COOLING SYSTEM
When the car will run but evidences serious overheating on the temperature gauge in the instrument panel, there are several items
which may be checked.
(L) Engine overheating will occur when the OIL LEVEL falls dangerously low. Check the oil level as a matter of course.
(M) Low COOLANT LEVEL will, of course, cause engine over
heating. Determine the cause of the low coolant level and have
it corrected if necessary.
(N) Check the RADIATOR CORE. Clean it if it is plugged with
bugs, leaves or other foreign material.
71
(0) Condition of the FAN BELT is very important, not only for engine cooling but also for proper
generator operation. Check the
condition of the belt. Replace it if it is worn or frayed. Loosen the generator toward the engine to remove and replace the belt. Tighten the belt, whether new or old, by loosening the generator bolts, prying with a bar on the generator until the belt is ten
sioned properly, then retighten
the
generator bolts.
(P) Another cause of engine overheating may be an inoperative COOLING SYSTEM THERMOSTAT. If the thermostat should fail in the closed position, it will not
permit coolant to circulate through
the system.
In such an emergency the thermostat may be removed
but should be replaced with a properly functioning thermostat as soon as possible.
Fan Belt Tension
Thermostat
Installation