1965 DODGE MONACO engine
[x] Cancel search: enginePage 14 of 46
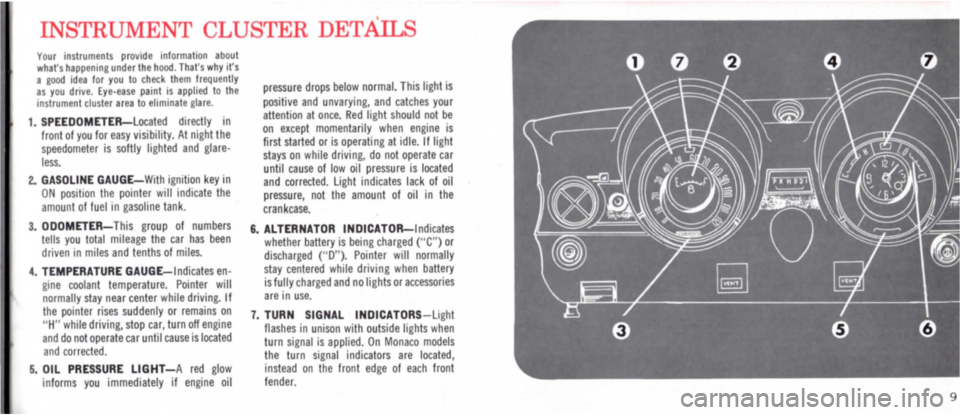
INSTRUMENT CLUSTER DETAILS
Your instruments provide Inlormation about whars happening under the hood. That's why It 's a good idea lor you to check them frequently as you drive. Eye-ease paint is applied to the instrument cluster area to eliminate glare.
1. SPEEDOMETER-Located directly 10 front of you for easy visibility. At night the speedometer is softly lighted and glareless.
2. GASOLINE GAUGE-With ignition key in ON posillon the pointer will indicate the amount of fuel \0 gasoline tank.
3. ODOMETER-This group of numbers tells you tolal mileage the car has been driven in miles and tenths of miles.
4. TEMPERATURE GAUGE-Indicates engine coolant temperature. Pointer will normally slay near center while driving. If the pointer rises suddenly or remains on " H " while driving, stop car, turn oft engine and do not operate car until cause is located and corrected.
S. OIL PRESSURE LlGHT-A red glow informs you immediately if engine oil
pressure drops below normal. This light is
positive and unvarying, and catches your attention at once. Red light should not be on except momentarily when engine is first started or is operating at idle. If light stays on while driving, do not operate car until cause of low oil pressure is located and corrected. Light indicates lack of oil pressure, not the amount of oil in the crankcase.
6. ALTERNATOR INDICATOR-Indicates whether battery is being charged (" e ") or discharged (" 0") . Pointer will normally stay centered while driving when battery is fully charged and no lights or accessories are in use.
7. TURN SIGNAL INDICATORS-Light flashes in unison with outside lights when turn signal is applied. On Monaco models the turn signal indicators are located, instead on the front edge of each front fender.
9
Page 16 of 46
Unusual Starting Conditions
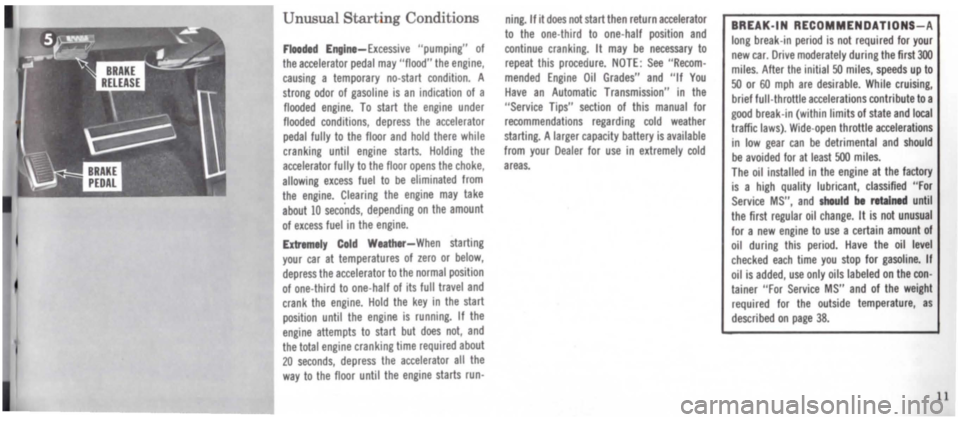
Flooded En Int-Excessive "pumping" of the accelerator pedal may "flood" the engine,
causing a temporary no·start condition. A
strong odor of gasoline is an indication of a flooded engine. To start the engine under flooded conditions, depress the accelerator
pedal fully to the floor and hold there while
cranking untIl engine starts. Holding the accelerator fully to the floor opens the choke, allowing excess fuel to be eliminated from
the engine. Clearing the engine may take
about 10 seco'nds, depending on the amount
of excess fuel in the engine.
Extremely Cold Weather-When starting
your car at temperatures of zero or below,
depress the accelerator to the normal position
of one·third to one· half of Its full travel and crank the engine. Hold the key in the start
position until the engine is running. If the
engine attempts to start but does not, and the total engine cranking time required about 20 seconds, depress the accelerator all the
way to the floor until the engine starts run·
ning. If it does not start then return accelerator
to the one· third to one·half position and continue cranking. It may be necessary to repeat this procedure. NOTE: See "Recom·
mended Engine Oil Grades" and "If You Have an Automatic Transmission" in the
"Service Tips" section of this manual for recommendations regarding cold weather
starting. A larger capacity battery is available from your Dealer for use in extremely cold
areas.
BREAK·IN RECOMMENDATIONS-A
long break-in period is not required for your
new car. Drive moderately during the first 300 miles. After the initial 50 miles, speeds up to 50 or 60 mph are desirable. While cruising,
brief full·throttle accelerations contribute to a
good break·in (Within limits of state and local traffic laws). Wide· open throttle accelerations in low gear can be detrimental and should
be avoided for at least 500 miles. The oil installed in the engine at the factory is a high quality lubricant, classified "For
Service MS", and should be retained until
the first regular oil change. It is not unusual
for a new engine to use a certain amount of oil during this period. Have the oil level checked each time you stop for gasoline. If
oil is added, use only oils labeled on the con·
tainer "For Service MS" and of the weight required for the outside temperature, as
described on page 38.
11
Page 17 of 46
AUTOMATIC TRANSMISSION '
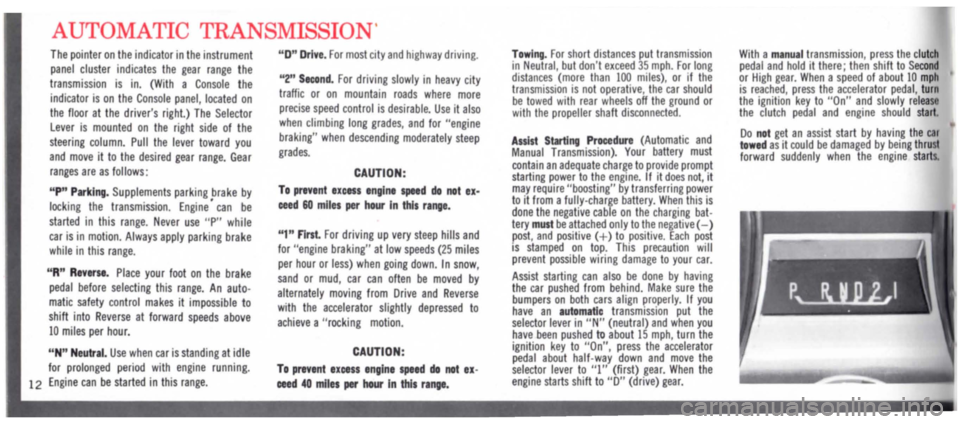
The pointer on the indicator in the instrument panel cluster indicates the gear range the
transmission is in. (With a Console the
indicator is on the Console panel, located on the floor at the driver's right.) The Selector Lever is mounted on the right side of the
steering column. Pull the lever toward you and move it to the desired gear range. Gear
ranges are as follows:
"P" Parking. Supplements parking brake by
locking the transmission. Engine' can be
started in this range. Never use " P " while
car is in motion. Always apply parking brake while in this range.
"R" Reverse. Place your foot on the brake
pedal before selecting this range. An auto· matic safety control makes it impossible to
shift into Reverse at forward speeds above 10 miles per hour.
"N " Neutral. Use when car is standing at idle for prolonged period with engine running.
12 Engine can be started in this range.
"0 " Drive. For most city and highway driving.
"2" Second. For driving slowly in heavy city
traffic or on mountain roads where more precise speed control is desirable. Use it also when climbing long grades, and for "engine
braking" when descending moderately steep grades.
CAUTION:
To prevent IICes s engine speed do not ex·
ceed 60 miles per hour In this range.
" 1" First. For driving up very steep hills and for "engine braking" at low speeds (25 miles
per hour or less) when going down. In snow,
sand or mud, car can often be moved by alternately moving from Drive and Reverse with the accelerator slightly depressed to
achieve a "rocking motion.
CAUTION:
To prevent excess engine speed do not ex
ceed 40 miles per hour In this range.
Towing. For short distances put transmission in Neutral, but don't exceed 35 mph. For long distances (more than 100 miles), or If the transmiSSion is not operative, the car should be towed with rear wheels off the ground or with the propeller shaft disconnected.
Assist Starting Procedure (Automatic and Manual Transmission). Your battery must contain an adequate charge to provide prompt starting power to the engine. If it does not, it may require "boosting" by transferring power t o it from a fully-charge battery. When this is done the negative cable on the charging battery must be attached only to the negative (- ) post, and positive (+ ) to positive. Each post IS stamped on top. This precaution will prevent possible wiring damage to your car.
Assist starting can also be done by having the car pushed from behind. Make sure the bumpers on both cars align properly. If you have an automatic transmission put the selector lever in "N" (neutral) and when you have been pushed to about 15 mph, turn the ignition key to "On", press the accelerator pedal about half-way down and move the selector lever to "I" (first) gear. When the engine starts shift to "0" (drive) gear.
With a m anual transmission, press the clutch pedal and hold it there; then shift to Second or High gear. When a speed of about 10 mph is reached, press the accelerator pedal, turn the ignition key to "On" and slowly release the clutch pedal and engine should start.
Do not get an assist start by having t h e cal towed as it could be damaged by being thrust forward suddenly when the engine starts.
Page 24 of 46
Resulting color mav rub off and webbing strength may be affected.
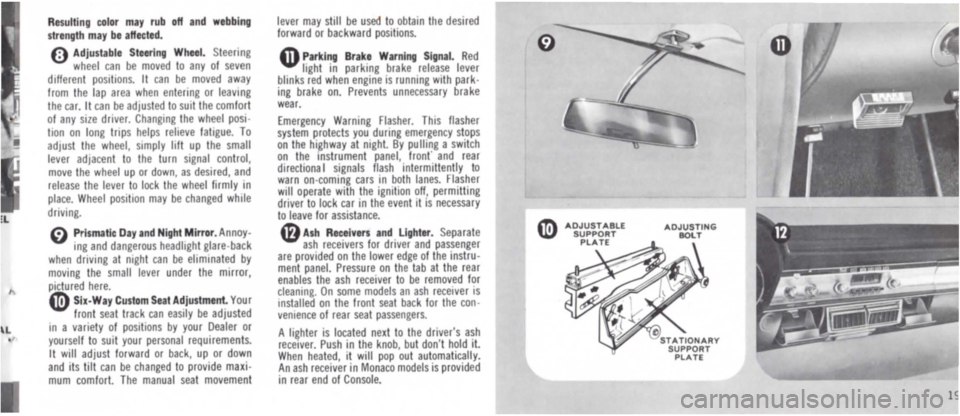
o Adjustable Steering Wheel. Steering wheel can be moved to any of seven different positions. It can be moved away from the lap area when entering or leaving the car. It can be adjusted to suit the comfort of any SIZe driver. Changing the wheel position on long trips helps relieve fatigue. To adjust the wheel, simply hft up the small lever adjacent to the turn signal control, move the wheel up or down, as desired, and release the lever to lock the wheel firmly in place. Wheel position may be changed while driving.
~ Prismatic Day and Night Mirror. Annoy-ing and dangerous headlight glare-back when driving at night can be elimmated by moving the small lever under the mirror, pictured here. o Six-Way Custom Seat Adjustment. Your front seat track can easily be adjusted In a variety of positions by your Dealer or yourself to suit your personal requirements. It will adjust forward or back, up or down and its tilt can be changed to provide maximum comfort. The manual seat movement
lever may still be used to obtain the desired forward or backward positions.
Q Parking Brake Warning S ignal. Red light in parking brake release lever blinks red when engine is running with parking brake on. Prevents unnecessary brake wear.
Emergency Warning Flasher. This flasher system protects you during emergency stops on the highway at night. By pu lIing a switch on the instrument panel, front' and rear directiona I signals flash intermittently to warn on-coming cars in both lanes. Flasher will operate with the ignition off, permitting driver \0 lock car in the event it is necessary to leave for assistance.
41) Ash Receivers and Lighter. Separate ash receivers for driver and passenger are provided on the lower edge of the instrument panel. Pressure on the tab at the rear enables the ash receiver to be removed for cleaning. On some models an ash receiver is Installed on the front seat back lor the convenience of rear seat passengers.
A lighter is located next to the driver's ash receiver. Push in the knob, but don't hold it. When heated, it will pop out automatically. An ash receiver in Monaco models is provided in rear end of Console.
AOJUSTING BOLT
1
Page 25 of 46
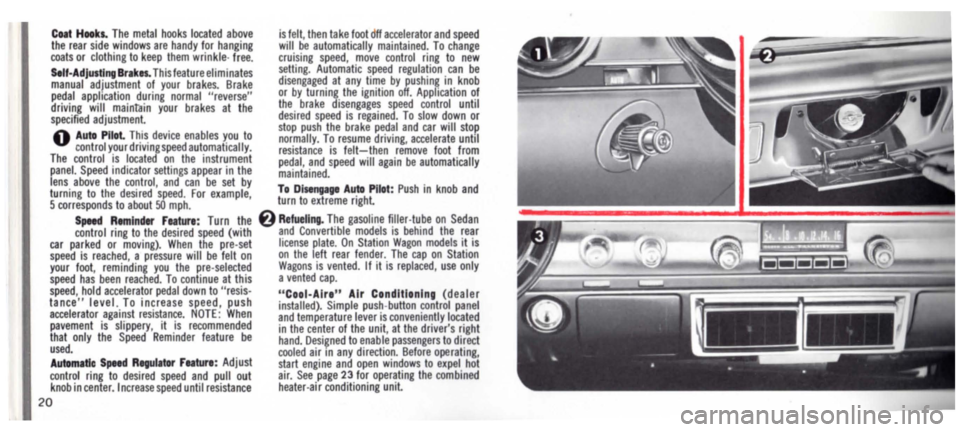
Coat Hookl. The metal hooks located above is felt. then take foot dff accelerator and speed the rear side windows are handy for hanging will be automatically maintained. To change coats or clothing to keep them wrinkle· free. cruising speed. move control ring to new Self-Adjusting Brakes. This feature eliminates setting. Automatic speed regulation can be manual adjustment of your brakes. Brake disengaged at any time by pushing in knob pedal application during normal "reverse" or by turning the ignition off. Application of driving will maintain your brakes at the the brake disengages speed control until specified adjustment. desired speed is regained. To slow down or stop push the brake pedal and car will stop' o Auto Pilot This device enables you to normally. To resume driving. accelerate until control yourdrivingspeed automatically. resistance is felt-then remove foot from The control is located on the instrument pedal. and speed will again be automatically panel. Speed indicator settings appear in the maintained. lens above the control. and can be set by . turning to the desired speed. For example. To Dlsen~ge A~ Pilot: Push In knob and 5 corresponds to about 50 mph. turn to extreme nght.
Speed Reminder reature: Turn the 6 Refuell"1-T~e gasoline ~lIer·tu.be on Sedan control ring to the desired speed (with ~nd Convertible mod~ls IS behind the ~e~r car parked or moving). When the pre-set license plate. On Stallon Wagon models I~ IS speed is reached. a pressure will be felt on on the I~ft rear fend~r .. The cap on Station your foot. reminding you the pre-selected Wagons IS vented. If It IS replaced. use only speed has been reached. To continue at this a vented cap. speed •• ~old accelera!or pedal down to "resis-" Cool-Air. " Air Conditioning (dealer tance level..T0 In~rease speed. push installed). Simple push-bullon control panel accelerator .agal~st resls~an~. NOTE: When and temperature lever is conveniently located pavement IS slippery. It .IS recommended in the center of the unit. at the driver's right that only the Speed Reminder feature be hand. Desi~ned to enable passengers to direct used. . cooled air In any direction. Before operating. Automatic Speed Rl9ulator reatur.: Adlust start engine and open windows to expel hot control ring to desired speed and pull out air. See page 23 for operating the combined knob in center. Increase speed until resistance heater-air conditioning unit.
20
Page 30 of 46
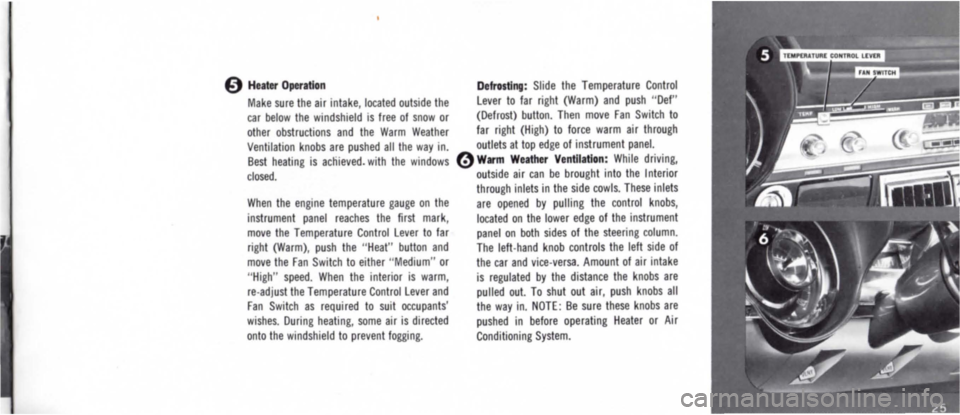
o Heater Operation
Make sure the air intake, located outside the car below the windshield is free of snow or
other obstructions and the Warm Weather
Ventilation knobs are pushed all the way in. Best heating is achieved. with the windows
closed.
When the engine temperature gauge on the
instrument panel reaches the first mark, move the Temperature Control lever to far right (Warm), push the "Heat" button and
move the Fan Switch to either "Medium" or
"High" speed. When the interior is warm,
re·adjust the Temperature Control lever and Fan Switch as required to suit occupants'
wishes. During heating, some air is directed
onto the windshield to prevent fogging.
Defrosting: Slide the Temperature Control
lever to far right (Warm) and push "Def" (Defrost) button. Then move Fan Switch to far right (High) to force warm air through
outlets at top edge of instrument panel.
<:) Warm Weather Ventilation: While driving, outside air can be brought into the Interior
through inlets in the side cowls. These inlets are opened by pulling the control knobs,
located on the lower edge of the instrument panel on both sides of the steering column.
The left·hand knob controls the left side of
the car and vice· versa. Amount of air intake
is regulated by the distance the knobs are pulled out. To shut out air, push knobs all the way in. NOTE: Be sure these knobs are
pushed in before operating Heater or Air
Conditioning System.
Page 36 of 46
THE SAFE WAY TO CHANGE A WHEEL
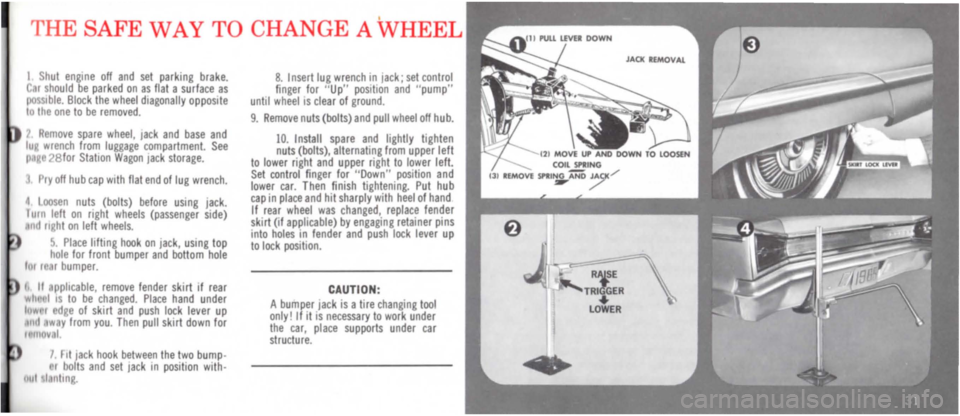
I Shut engine off and set parking brake. C. r should be parked on as flat a surface as possible. Block the wheel diagonally opposite to the one to be removed.
7 R move spare wheel. lack and base and IUR wrench from luggage compartment. See II lie ;>8for StatIOn Wagon lack storage.
Pry off hub cap With flat end of lug wrench.
" Loosen nuts (bolts) before uSing lack. I urn left on right wheels (passenger side) nd ueht on left wheels.
5. Place lifting hook on lack, uSing top hole for front bumper and bottom hole till r ,r bumper.
! II applicable, remove fender skirt If rear ",II I IS to be changed. Place hand under 111"'1'1 dge of skirt and push lock lever up 1111 way from you. Then pull skirt down for I IIIOV I.
I r I t lack hook between the two bumpr bolts and set lack In position withlui I nling.
8. I nsert lug wrench In lack; set control finger for "Up" posllion and "pump" until wheelis clear of ground.
9 . Remove nuts (bolts) and pull wheel off hub.
10. Install spare and lightly tighten nuts (bolts), alternating from upper left to lower right and upper right to lower left . Set control finger for "Down" position and lower car. Then finish tightening. Put hub cap in place and hit sharply with heel of hand If rear wheel was changed, replace fender skirt (if applicable) by engaging retainer pins into holes in fender and push lock lever up to lock poslhon.
CAUTION: A bumper jack is a tire changing tool only! If It IS necessary to work under the car, place supports under car structure.
Page 39 of 46
Authorlled Dodge Service. Your new Dodge deserves the finest care to keep it performing like new. That means Authorized Dodge Service. You r Dodge Dealer's service department has technicians trained by Dodge t o care for you r car-genuine parts-tools especially designed for Dodge service. You won't find them anywhere else.
Genuine Chrysler Parts. When you need a replacement part, make sure that you get a part designed especially for your car by the manufacturer. That means Genuine Chrysler Parts-engineered and manufactured by Dodge just for your car. Only these parts give you assurance that your Dodge will be "good as new."
You • •• And Your Dodge ServIce Manager. Together ... you and your Dodge Service Manager can keep your Dodge as good lookmg, as great a performer, and as much fun to drive-as It is today. Check w ith him regularly, and check the next pages of this Owner's Guide for some t ips on keeping your car young and gay.
The car that gives you most for your money
3 4