Page 18 of 52

The retractable dual headlights contribute much to the long, low appearance 01 your Corvette and also
serve to protect the headlights when not in use . Two switches are necessary for headlight operation.
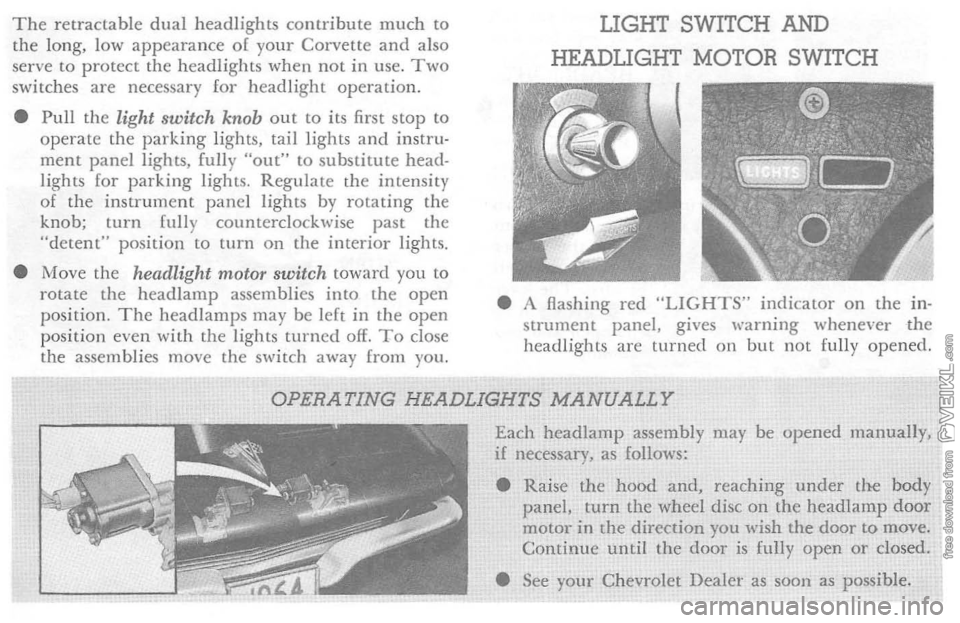
• Pull
the light switch knob out to its first stop to operate the parking lights, tail lights and instru· ment panel lights, fully "out" to substitute head·
lights lor parking lights. Regulate th e intensity 01 the instrument panel lights by rotating the
knob; turn fully counterclockwise past the
"detent" position
to turn on the interior lights.
• Move
the headlight motor switch toward you to
rotate the head lamp assemblies into the open
position. The headlamps may be lelt in the open
position even WiLh the lights turned off. To close
the assemblies move the switch away from you.
LIGHT SWITCH AND
HEADLIGHT MOTOR SWITCH
• A flashing red "LIGHTS" indicator on the in·
strument panel, gives warning whenever the
headlights are
turned on but not fully opened.
OPERATING HEADLIGHTS MANUALLY
Each headlamp assembly may be opened manuaJly, if necessary, as follows:
• Raise
the hood and, reaching under the body panel, turn the wheel disc on the headlamp door motor in the direction you wish the door to move. Continue until the door is fully open or closed .
• See
your Chevrolet Dealer as sOOn as possible.
Page 19 of 52

HEADLIGHT
BEAM •
SWITCH
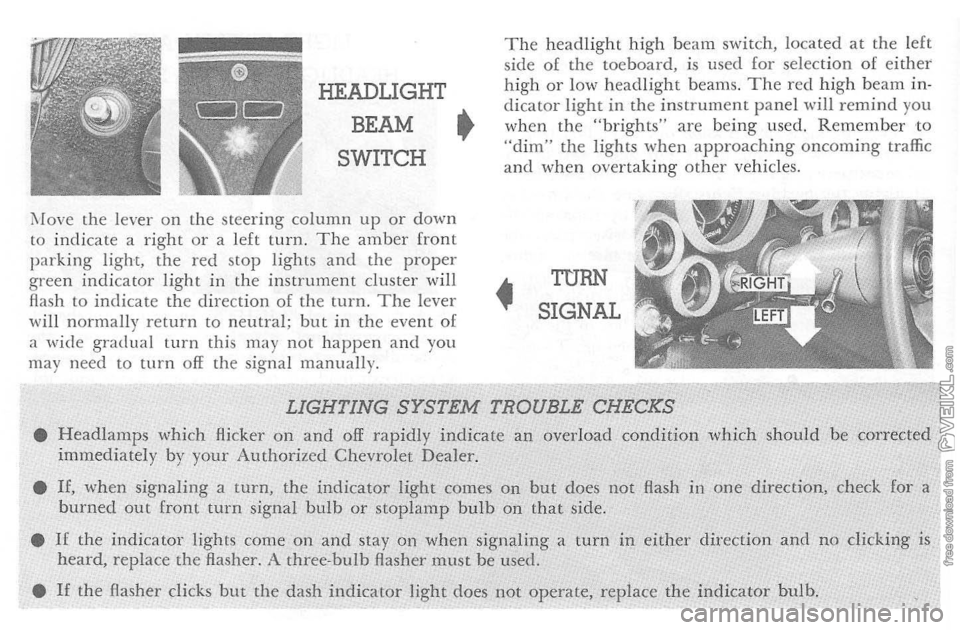
i\fove the lever on t h e steering column up or down to indicate a right o r a left turn. The amber front parking light, the red stop lights and the proper green indicator light in the instrument cluster will
flash to indicate the d irection of the turn. The lever
wi ll normally return to neutral; but in the event of
a wide gradual turn this may not happen and you
may nee d to turn off the signa l manually.
The headlight high beam switch, located at the left
side of the toeboard. is used for selection of either high or low headlight beams. The red high beam indicator light in the instrument p a nel will remind you when the "brights" are being used. Remember to "dim" the lights when approaching oncoming traffic and when overtaking other vehicles .
•
TURN
SIGNAL
LIGHTING SYSTEM TROUBLE CHECKS • Headlamps which Hickel' on and off rapidly indicate an overload condition which should be corrected immediately by your Authorized Chevrolet Dealer.
•
If, when signaling a turn, the indicator light comes on but does not Hash in one direction, check for a burned out front turn signal bulb or stoplamp bulb on that side.
•
If the indicator lights come on and stay on when signaling a turn in either direction and no clicking is heard, replace the flasher. A three-bulb Aasher must be used.
•
If the Hasher clicks but the dash indicator light does not operate, replace the indicator bulb.
Page 40 of 52

HEADLAMP REPLACEMENT
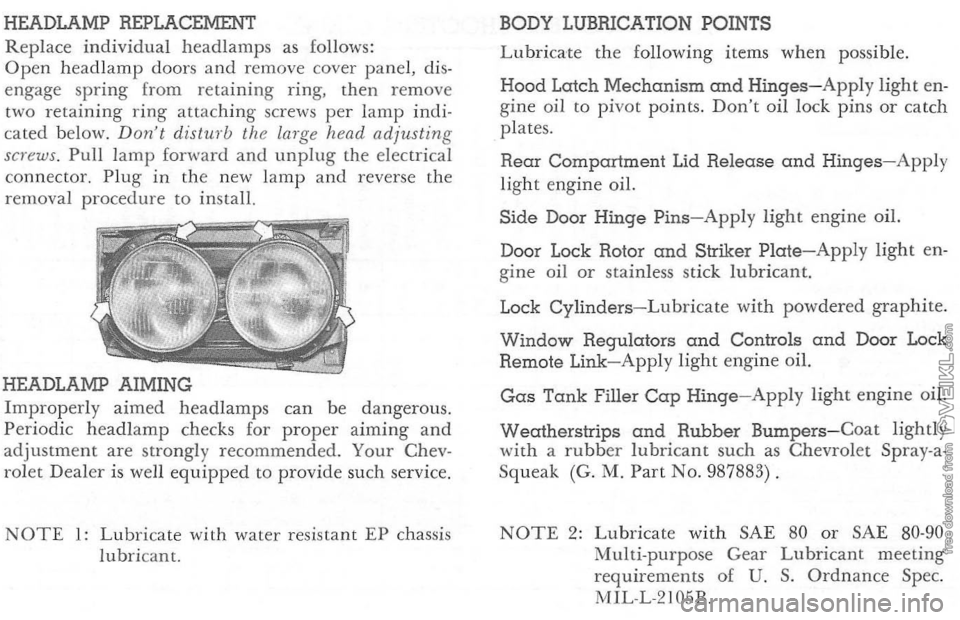
Replace individual head lamp s as follows:
Open head lamp doors and remove cover panel, dis
e n gage spring from retaining ring, then remove
two retai
ning ring attaching screws per lamp indi
cate d b elow. Don·t dist",·b the larg e head adjusting
screws . Pull lamp fanltard and unplug the electri cal
connector. Plug in the new l amp and reverse the
removal procedure to install.
HEADLAMP AIMING
Improperly aimed headlamps can be dangerous.
Periodic headlam p checks for proper aiming and adjustm en t are strongly recommend ed. Your Chev
rol et Dea l er is well equipped to provide such service.
NOTE 1: Lubricate with water resi stant EP chassis
lubri cant. BODY
LUBRICATION POINTS
L ubric ate the following items when possible.
Hood Latch Mechanism and Hinges-Apply light en
gine oil to pivot points. Don't oil lock pins or catch
plates.
Rear Compartment Lid Release and Hinges-Apply
light engine oil.
Side Door Hinge Pins-Apply light engine oil.
Door Lock Rotor
and Striker Plate-Apply light en
g ine oil or stai nles s stick lubric ant.
Lock
Cylinders-Lubricate wit h powdered graphite.
Window Regulators and Controls and Door Lock
Remote Link-Apply light engine oil.
Gas Tank Filler Cap Hinge-Apply light engine oil.
Wecdherstrips and Rubber Bumpers-Coat lightly
wit h a rubber lubricant such as Chevrolet Spray-a
Squeak (G. M. Part No. 987883) .
NOTE 2: Lubricate with SAE 80 or SAE 80-90 Multi-purp ose Gear Lubricant meeting
requirements of U. S. Ordnance Spec.
M1L-L-2105B.
Page 48 of 52

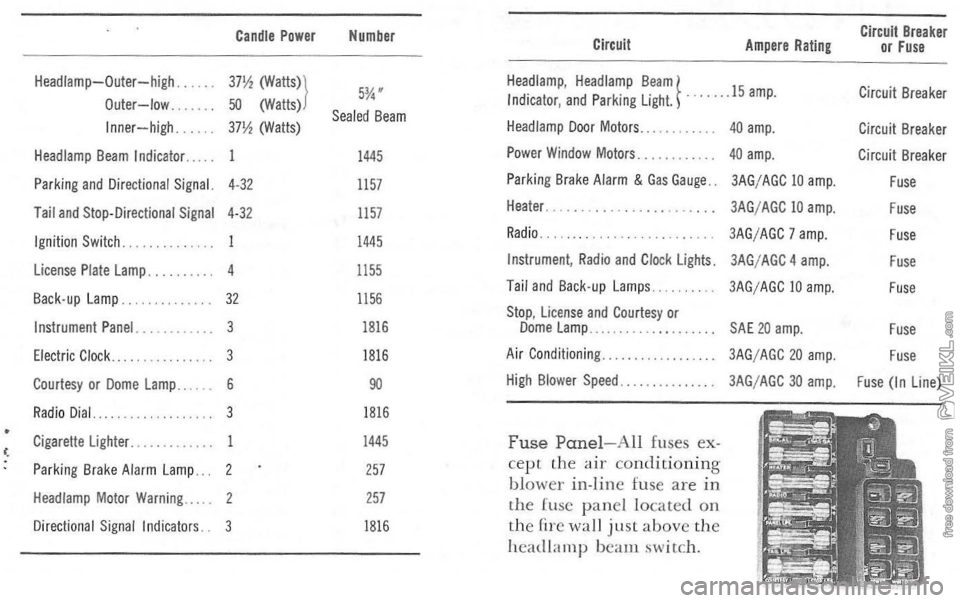
Candle Power Number Circuit Breaker Circuit Ampere Rating or Fuse
HeadJamp-Outer-high. 37\ (watts») 5%" Headlamp. Headlamp Beam} . ..... 15amp. Circuit Breaker Outer-low. 50 (Watts) Indicator. and Parking light. Sealed Beam Inner-high. 311l (Watts) Headlamp Door Motors . . 40 amp. Circuit Breaker Headlamp Beam Indicator ... 1445 Power Window Motors . . 40 amp. Circuit Breaker
Parking
and Directional Signal. 4·32 1157 Parking Brake Alarm & Gas Gauge .. 3AG/AGe 10 amp. Fuse
Tail and Stop-Directional Signal 4·32 1157 Heater .. 3AG/AGe 10 amp. Fuse
Ignition Switch. 1445 Radio. 3AG/AGe 7 amp. Fuse
license Plate lamp. 1155 Instrument, Radio and Clock Ughts. 3AG/AGe 4 amp. Fuse
Back-up lamp. 32 1156 Tail and Back-up lamps . . 3AG/AGe 10 amp. Fuse
Instrument Panel. Stop. license and Courtesy or 1816 Dome lamp .. SAE 20 amp. Fuse Electric Clock . . 1816 Air Conditioning ... 3AG/AGC 20 amp. Fuse Courtesy or Dome lamp ... 90 High Blower Speed 3AG/AGe 30 amp. Fuse (In line)
Radio Dial.. 1816
Cigarette lighter . . 1445 Fuse Panel- All fuses ex-Parking Brake Alarm lamp . . 257 cept the air conditioning b lower in-line fu se are in Headlamp Motor Warning . ... 257 lhe [usc pane l loca ted on Directional Signal Indicators. 1816 t h e {-ire wall just above the
head lamp bea m s witch.