1953 JEEP DJ change wheel
[x] Cancel search: change wheelPage 3 of 376
'Jeep*
UNIVERSAL
SERIES SERVICE
MANUAL
A
GENERAL
DHTfl
Contents
SUBJECT
PAR.
General
A-l
Vehicle
Description .A-2
Vehicle
Identification A-3
Identification
Number Location A-4
Serial
Number Location A-5
Engine
Code Number A-6
Plate-And-Trim
Option Plate A-7
General
Specifications A-8
A-1.
GENERAL
This
manual is provided for the guidance of all
automotive service men, vehicle owners, and service salesmen who
repair,
maintain, or adjust
the 'Jeep' Universal Series vehicles. The information herein was prepared from the service man's
viewpoint to
give
him the accurate and concise
data
he may need to service the entire vehicle.
The
information is not elementary as it is intended
for automotive service men who are familiar with
automotive construction and repair in general. It is not intended, nor would it be possible in such
limited
space, to cover every possible repair that he may encounter. All specifications are in accord
with
Engineering Specifications and should be
adhered
to in all work on the vehicle.
The
manual sections follow logical division into
major
components of the vehicles. The first
page
of each section has a detailed index of the
contents
of that section. Subject matter covers all models
included
in this manual unless an exception for a
particular
model is specifically mentioned.
Specifications and components covered were for
standard
production models of 'Jeep' vehicles
current
at the time the manual was approved for
printing.
'Jeep' Corporation reserves the right to
discontinue models at any time or change specifi
cations or design of any of its models without
notice and without
incurring
any obligation.
A-2.
Vehicle Description
This
manual covers all standard production 'Jeep'
Universal
models currently being produced at the time this manual was approved for publication.
Significant
changes made in each model since it
was first produced are included in the manual.
A
description of each model follows.
General
specifications for each model are listed in Par. A-8. Detailed specifications covering major vehicle units
are
listed at the end of each section of the manual.
CJ-3B
—
This
is a 4-wheel-drive 'Jeep' Universal
model, equipped with the four-cylinder
Hurricane
F4-134 engine. Wheelbase is 80".
CJ-5
CJ-5A
— These are 4-wheel-drive 'Jeep' Universal models, equipped with either the Daunt
less
V-6 engine, or the four-cylinder
Hurricane
F4-134 engine. Wheelbase is 81".
CJ-6
CJ-6A
— These are 4-wheel-drive 'Jeep' Universal models, equipped with either the Daunt
less
V-6 engine, or the four-cylinder
Hurricane
F4-134 engine. Wheelbase is 101".
DJ-5
DJ-6
— These are 2-wheel-drive 'Jeep' Universal models, equipped with the four-cylinder
Hurricane
F4-134 engine. DJ-5 wheel- base is 81". DJ-6 wheelbase is 101".
A-3.
Vehicle Identification
Each
'Jeep' vehicle model series has one or more
serial
number prefixes to identify it. Complete
identification of a specific vehicle requires the
prefix
plus the
serial
number.
Serial
numbers are
consecutive for each prefix grouping. Prefix infor
mation following
will
identify the 'Jeep' models
shown by
serial
number prefix from model inception to date.-.
••
' . -
Note:
Vehicles with a
serial
number prefix of five
(5) or more digits that have an S, 5, or 7 as the last
digit are equipped with
Exhaust
Emission
Control.
A
number 1 in the sixth (6th) digit within a seven (7) digit vehicle
serial
number prefix indicates
Left
Hand
Drive;
a 2 indicates Right
Hand
Drive;
a
3 indicates
Left
Hand
Drive
California
Exhaust
Emission
Control
Engine;
a 4 indicates Right
Hand
Drive
California
Exhaust
Emission
Control
Engine.
3
Page 7 of 376
'Jeep*
UNIVERSAL SERIES
SERVICE
MANUAL
B
LUBRICATION
AND
PERIODIC SERVICES
Contents
PAR. SUBJECT
PAR.
SUBJECT
GENERAL
.B-l
Chassis
Lubrication
B-7
Engine
Lubrication System B-4, B-6
Special
Lubricants B-2
Fresh
Lubricant.
.B-3
LUBRICATION CHARTS
. Pages 8, 9
SERVICE
MAINTENANCE SCHEDULE.
.B-8
Air
Cleaner
B-2
5,
B-2
6
Air
Filter
—
F.E.E.C.
System Canister
B-2
4
Axle
U-Bolts B-49 Body
Lube
Points: B-65 Hood Hinge Pivot Points B-66
Glove
Compartment Door
Latch
B-6
7
Tailgate Hinges .B-68
Brakes,
Adjust .B-41
Brake
Linings .B-42
Brake
Master Cylinder B-40
Charging
Circuit
B-l9
Clutch
. B-43, B-44
Cooling System—Radiator. B-28, B-29 Differentials
........
.B-50, B-51, B-52, B-53
Distributor
B-14, B-l5
Engine
Oil B-9
Engine
Oil
Filter
B-10, B-ll
Engine
Tune-Up B-20
Exhaust
Emission Control System
B-2
2
Exhaust
Manifold Heat Control Valve. . . .B-l2
Exhaust
System
B-2 3
Fan
Belt . .B-21
Front
Axle U-Joint B-54, B-55
Generator
.B-16
Headlights B-61
Heater Controls B-62
Lights
and Controls B-59 Positive Crankcase Ventilation Valve. . . .B-l3
Shock Absorbers B-48
Spark
Plugs. B-17
Speedometer Cable. .B-60
Spring
Bushings.. . .B-46
Spring
Shackles .B-47
Steering
Gear
B-2 7
B-l. GENERAL
All
'Jeep' Universal vehicles require periodic
lubri
cation and other maintenance services for normal
vehicle
usage
and application to promote satis factory operation and prevent
excessive
wear. Un
der severe operating or atmospheric conditions
these
services should be performed more
often
than
under normal conditions. It should also be remem
bered that common short trips and
stop-and-go
driving
are more severe on lubrication
points
than
Starting
Circuit
B-l8
Tie
Rod and Drag
Link
Sockets
.
B-45
Tires
B-64
Transmission
and Transfer Case—
Lubricant
Level
Check B-30
General
B-31
Transfer
Case B-32
Transmission
.B-33
Transmission
and Transfer
Case
—
Lubricant
Change .B-34
General
.B-35
Transfer
Case B-36
Transmission
B-3
7, B-38
Transfer
Case Linkage B-39
Universal
Joints and Slip Joints.
.......
.B-58
Wheel
Bearings..
.........
. . .B-56, B-57
Windshield
Wiper and Washer B-63
LUBRICATION
OF
OPTIONAL EQUIPMENT
B-69
Centrifugal
Governor. .B-71
Pintle Hook .B-70
Powr-Lok
or
Trac-Lok
Differential B-72
PARTS REQUIRING
NO LUBRICATION.
. . .B-73
Alternator
Bearings. B-76
Clutch
Release Bearings.
.............
.B-74
Shock Absorbers B-78
Springs
B-7
7
Starter
Motor Bearings B-75
Water
Pump Bearings B-74
LUBRICATION REQUIREMENTS FOR OFF-HIGHWAY OPERATIONS
B-79
Air
Cleaner B-82
Chassis
Lubrication
B-83
Engine
Oil B-80
Engine
Oil
Filter
B-81
Differentials .B-86
Front
Axle U-Joints. B-84
Transfer
Case and Transmission .B-85
constant
speed
driving on highways, and even more
intensified in extreme cold or hot weather; there fore, vehicles driven under
these
conditions must
be lubricated and serviced more
often
than nor mally operated vehicles. The specifications of
types
and
amounts of lubricant given in the Lubrication
Chart
and
text
of this section should be closely
followed. The off-highway operation lubrication
notes,
given in the last part of the section, should
be followed when applicable. 7
Page 8 of 376
B
LUBRICATION D0®
® ® ®
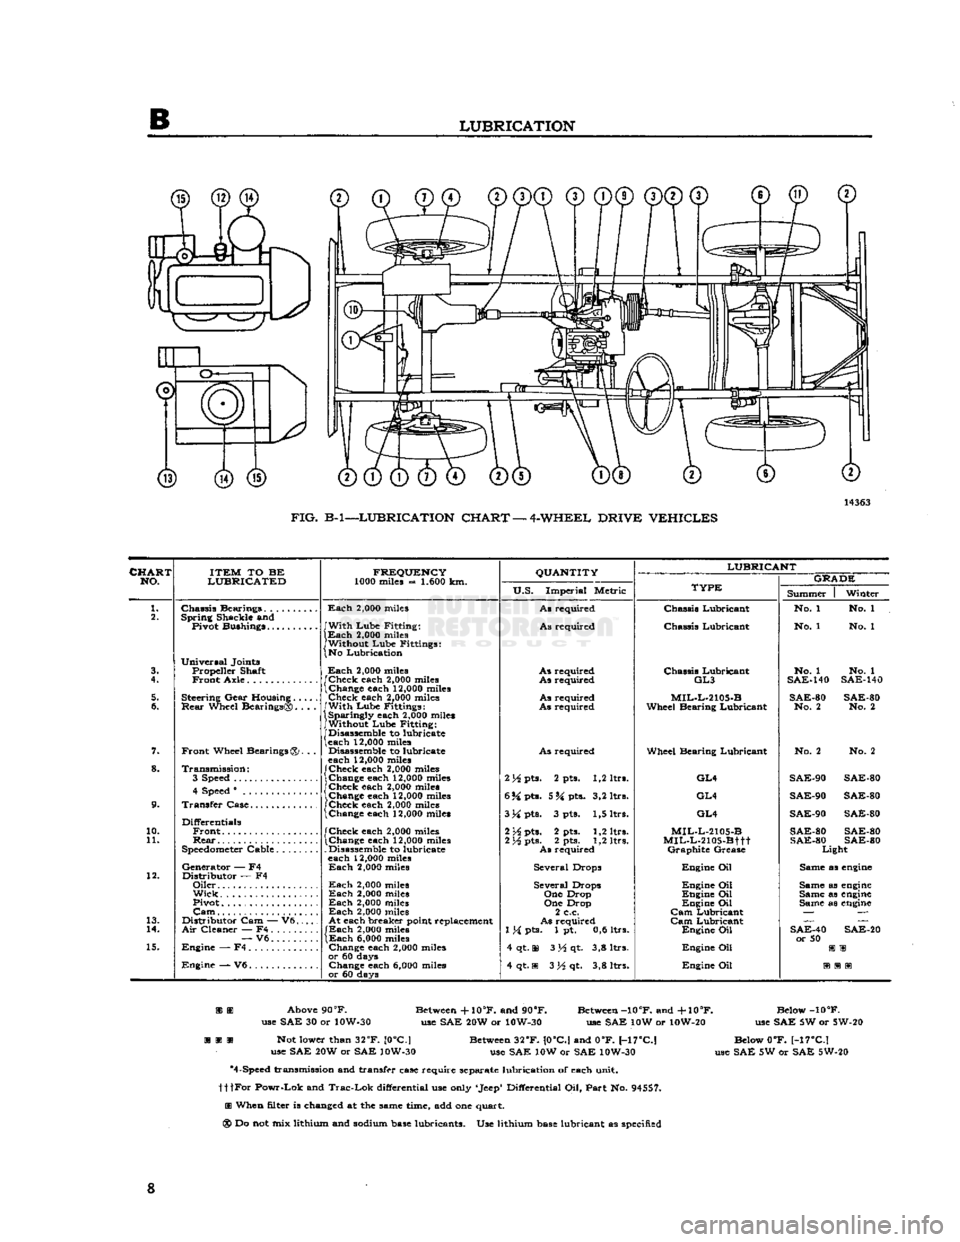
FIG.
B-l—-LUBRICATION CHART
—
4-WHEEL DRIVE
VEHICLES
CHART NO.
ITEM
TO BE
LUBRICATED
10.
11.
13.
14.
Chassis
Bearings. . .
Spring
Shackle and Pivot Bushings...
Universal
Joints Propeller Shaft
Front
Axle
Steering
Gear
Housing
Rear
Wheel BearingstS
Front
Wheel Bearings
.
Transmission:
3
Speed
4 Speed °
Transfer
Case
Differentials
Front.
Rear
Speedometer Cable
Generator
— F4
Distributor
— F4
Oiler
Wick
Pivot.
Gam
Distributor
Cam — V6.
Air
Cleaner — F4
—
V6
Engine
— F4
Engine
— V6.
FREQUENCY
1000 miles — 1.600 km.
Each
2,000
miles
/With
Lube
Fitting;
(Each
2,000
miles [Without
Lube
Fittings:
\No Lubrication
Each
2,000
miles
f
Check
each
2,000
miles
\
Change each
12,000
miles
Check
each
2,000
miles
fWith
Lube
Fittings:
1
Sparingly each
2,000
miles
J
Without
Lube
Fitting:
|
Disassemble to lubricate
\each
12,000
miles
Disassemble to lubricate
each
12,000
miles
I
Check
each
2,000
miles
l
Change each
12,000
miles
/Check
each
2,000
miles
l
Change each
12,000
miles
!Check
each
2,000
miles
\
Change each
12,000
miles
f
Check
each
2,000
miles
\
Change each
12,000
miles
.
Disassemble to lubricate each
12,000
miles
Each
2,000
miles
Each
2,000
miles
Each
2,000
miles
Each
2,000
miles
Each
2,000
miles
At
each breaker point replacement
/Each
2,000
miles
\Each
6,000
miles
Change each
2,000
miles
or 60 days
Change each
6,000
miles
or 60 days
QUANTITY
U.S.
Imperial Metric
As
required
As
required
As
required
As
required
As
required
As
required
As
required
2H
Pts. 2 pts. 1,2 ltrs.
6 H pts. 5
M
pts. 3,2 ltrs.
3Mpti«
3 pts. 1,5 ltrs. 2
M
pts. 2 pts. 1,2 ltrs.
2
Yi
pts. 2 pts. 1,2 ltrs.
As
required
Several
Drops
Several
Drops
One
Drop
One
Drop
2 c.c.
As
required
1 H pts. 1 pt. 0,6 ltrs.
4 qt. m 314 qt. 3,8 ltrs.
4 qt.
11
3 34 qt. 3,8 ltrs.
LUBRICANT
TYPE
Chassis
Lubricant
Chassis
Lubricant
Chassis
Lubricant
GL3
MIL-L-2105-B
Wheel
Bearing
Lubricant
Wheel
Bearing
Lubricant
GL4
GL4 GL4
MIL-L-2105-B
MIL-L-2105-Bttt
Graphite
Grease
Engine
Oil
Engine
Oil
Engine
Oil
Engine
Oil
Cam
Lubricant
Cam
Lubricant
Engine
Oil
Engine
Oil
Engine
Oil
GRADE
No. 1 No.
1
No. 1 No. 1
No. 1
SAE-140
No. 1
SAE-140
SAE-80
No. 2
SAE-
No. 80
2
No. 2 No. 2
SAE-90
SAE
80
SAE-90
SAE
80
SAE-90
SAE
80
SAE-80
SAE-80
SAE
SAE
80
80
Light
Same as
engine
Same as
engine
Same as
engine
Same as
engine
SAE-40
or 50
SAE-20
Above 90
°F.
use SAE 30 or 10W-30
Not lower than
32°F.
[0°C.|
use SAE 20W or SAE 10W-30 Between
-f-10°F.
and 90
8F.
use SAE 20W or 10W-30 Between
-10°F.
and
+10°F.
use SAE 10W or 10W-20 Between
32eF.
[0°C.]
and 0°F.
l-17°Cl
use SAE 10W or SAE 10W-30
*4-Speed transmission and transfer case require separate lubrication of each unit.
tttFor
Powr-Lok
and
Trac-Lok
differential use only 'Jeep* Differential Oil,
Part
No. 94557.
SI
When filter is changed at the same time, add one quart.
®
Do not mix lithium and sodium base lubricants. Use lithium base lubricant as specified Below
-10°F.
use SAE 5W or 5W-20
Below 0°F. [-17°C.J
use SAE 5W or SAE 5W-20 8
Page 9 of 376
*Jeep?
UNIVERSAL
SERIES
SERVICE
MANUAL
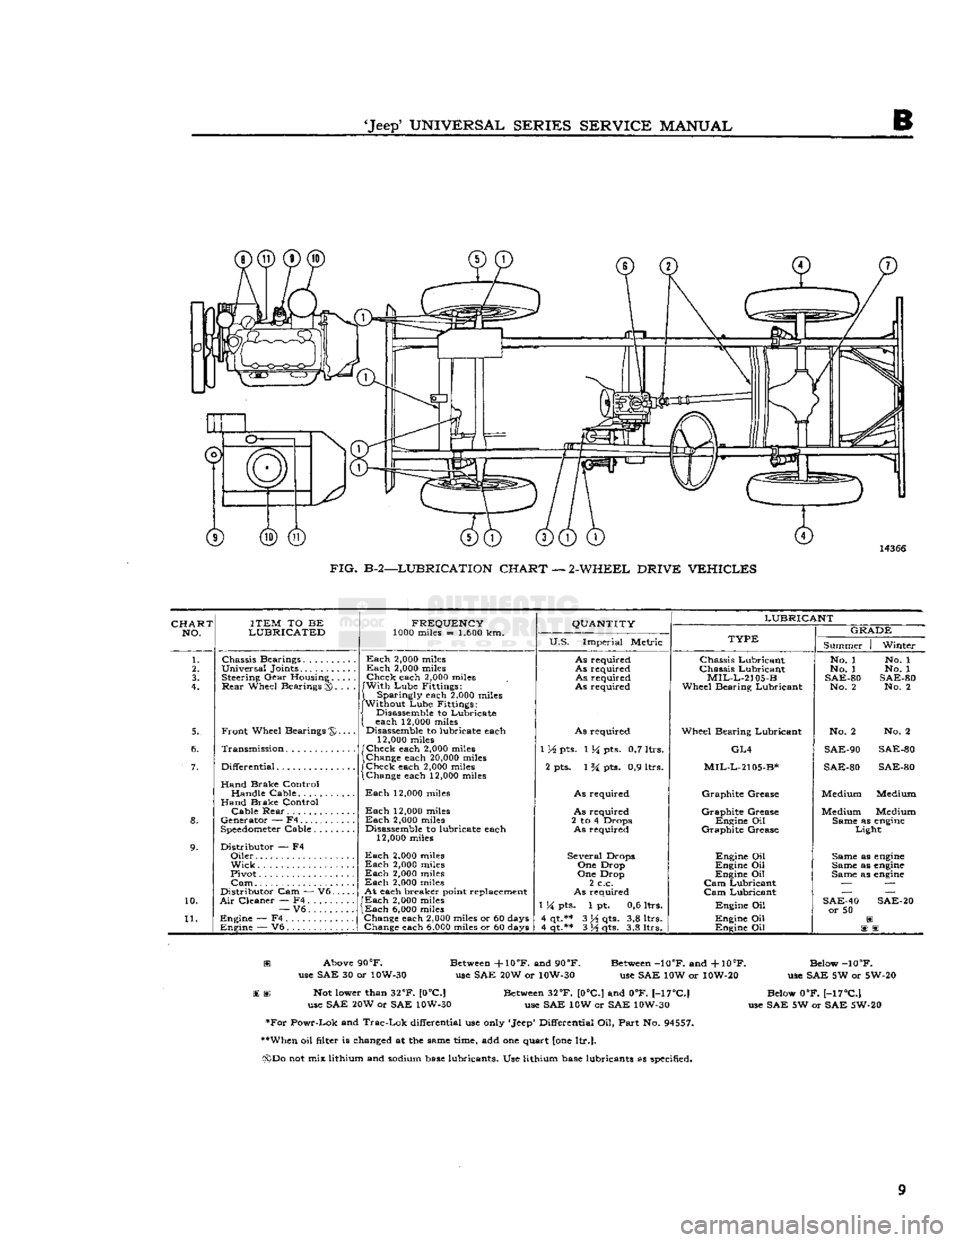
FIG.
B-2—LUBRICATION
CHART
—
2-WHEEL
DRIVE
VEHICLES
CHART
NO
ITEM
TO BE
LUBRICATED
FREQUENCY
1000 miles = 1.600 km.
QUANTITY
U.S.
Imperial Metric
LUBRICANT
TYPE
Summer I Winter
Chassis
Bearings.....
Universal
Joints...... Steering
Gear
Housing
Rear
Wheel Bearings fx
Front
Wheel
Bearings®
Transmission
Differential
Hand
Brake Control Handle Cable
Hand
Brake Control
Cable
Rear
Generator — F4
Speedometer
Cable....
Distributor — F4
Oiler
Wick
Pivot
Cam
Distributor Cam — V6.
Air
Cleaner — F4
—
V6.
....
Engine
— F4
Engine
— V6
Each
2,000
miles
Each
2,000
miles
Check
each
2,000
miles
With
Lube Fittings;
Sparingly each
2.000
miles
Without Lube Fittings: Disassemble to Lubricate
each
12,000
miles
Disassemble to lubricate each
12,000
miles
Check
each
2,000
miles
Change each
20,000
miles
Check
each
2,000
miles Change each
12,000
miles
Each
12,000
miles
Each
12,000
miles
Each
2,000
miles Disassemble to lubricate each
12,000
miles
Each
2,000
miles
Each
2,000
miles
Each
2,000
miles
Each
2,000
miles
At
each breaker point replacement
Each
2,000
miles
Each
6,000
miles
Change each
2,000
miles or 60 days Change each
6.000
miles or 60 days
As
required
As
required
As
required
As
required
As
required
1 XA pts. 114 pts. 0,7 ltrs. 2 pts. 1 % pts. 0,9 ltrs.
As
required
As
required
2 to 4 Drops
As
required
Several
Drops One Drop
One Drop
2 c.c.
As
required
1
M
pts. 1 pt. 0,6 ltrs.
4 qt.** 3 H qts. 3,8 ltrs. 4 qt.** 3
}A
qts. 3,8 ltrs.
Chassis
Lubricant
Chassis
Lubricant
MIL-L-2105-B
Wheel Bearing Lubricant
Wheel Bearing Lubricant
GL4
MIL-L-2105-B*
Graphite
Grease
Graphite
Grease
Engine
Oil
Graphite
Grease
Engine
Oil
Engine
Oil
Engine
Oil
Cam
Lubricant
Cam
Lubricant
Engine
Oil
Engine
Oil
Engine
Oil No. 1 No. 1
No. 1 No. 1
SAE-80 SAE-80
No. 2 No. 2
No. 2 No. 2
SAE-90 SAE-80
SAE-80 SAE-80
Medium Medium
Medium Medium Same as
engine
Light
Same as
engine
Same as
engine
Same as
engine
SAE-40
or 50
®
Above
90°F.
Between -f
10°F.
and
90°F.
Between
-10°F.
and
-fl0°F.
Below
-10°F.
use SAE 30 or 10W-30 use SAE 20W or 10W-30 use SAE 10W or 10W-20 use SAE 5W or 5W-20
BE
St
Not lower than
32°F.
[08C] Between
32°F.
10°C] and 0°F.
l-17°CI
Below 0°F. [-17°C] use SAE 20W or SAE 10W-30 use SAE 10W or SAE 10W-30 use SAE 5W or SAE 5W-20
•For
Powr-Lok and
Trac-Lok
differential use only 'Jeep' Differential Oil, Part No.
94557.
**When oil filter is changed at the same time, add one quart {one
ltr.].
(x)Do not mix lithium and sodium
base
lubricants. Use lithium
base
lubricants as specified. 9
Page 12 of 376
B
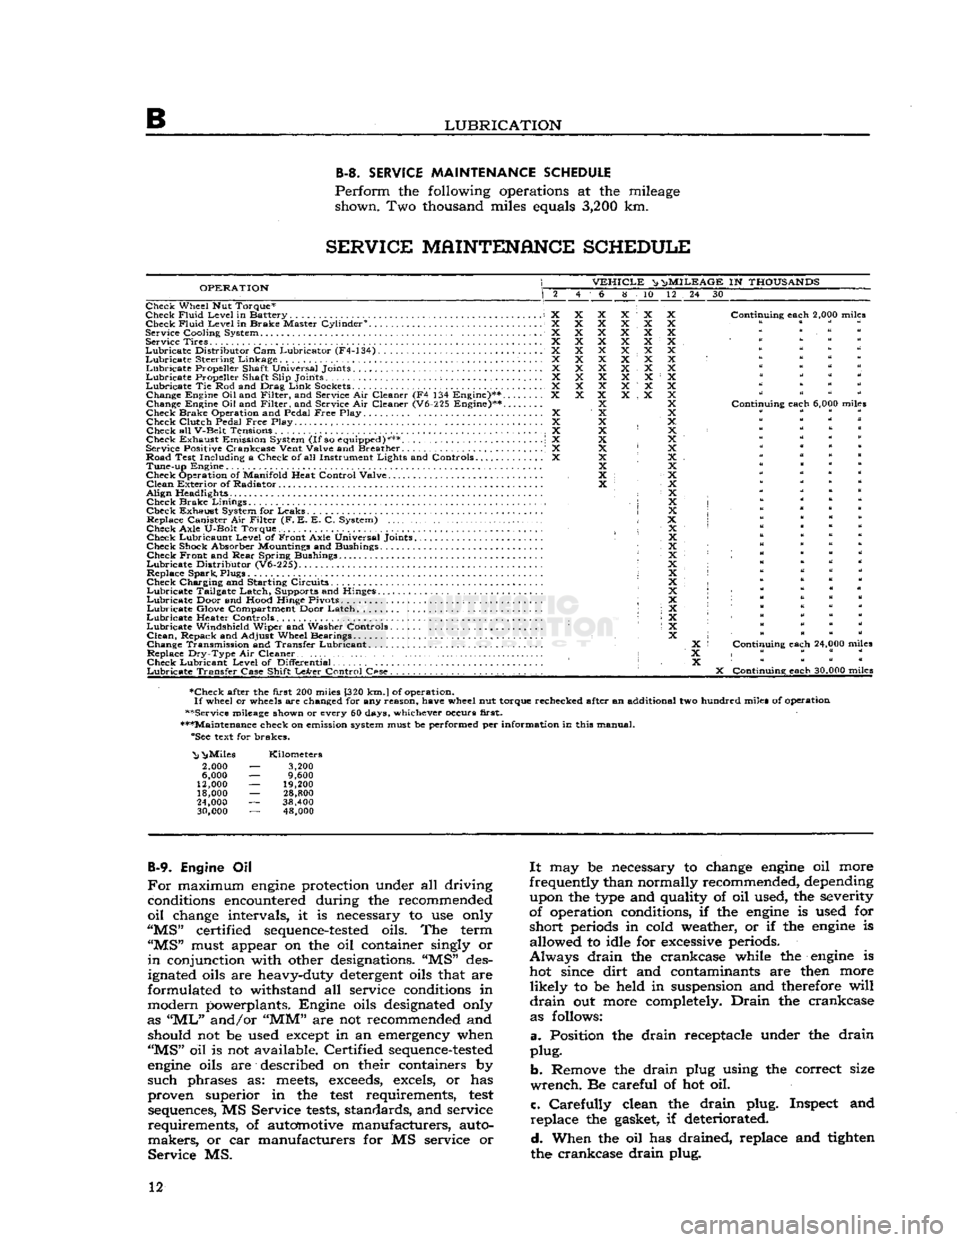
LUBRICATION B-3.
SERVICE
MAINTENANCE
SCHEDULE
Perform
the following operations at the mileage shown. Two thousand miles equals
3,200
km.
SERVICE
MAINTENANCE
SCHEDULE
OPERATION
VEHICLE
^ n>
MILEAGE
IN
THOUSANDS
6 8 10 12 24 30
Check Wheel Nut Torque*
Check
Fluid
Level
in Battery X Check
Fluid
Level
in Brake Master Cylinder0. X
Service
Cooling
System X Service Tires X
Lubricate
Distributor
Cam Lubricator (F4-134) X
Lubricate
Steering Linkage X
Lubricate
Propeller Shaft Universal Joints X
Lubricate
Propeller Shaft
Slip
Joints ; X
Lubricate
Tie Rod and Drag
Link
Sockets................................... X Change Engine
Oil
and
Filter,
and Service Air Cleaner (F4 134 Engine)** X
Change Engine Oil and
Filter,
and Service Air Cleaner (V6-225 Engine)**....
Check Brake Operation and Pedal
Free
Play X Check
Clutch
Pedal
Free
Play. .... X
Check all
V-Belt
Tensions X
Check Exhaust Emission System
(If
so equipped)*** \ X
Service Positive
Crankcase
Vent
Valve
and Breather . .' X
Road Test
Including
a Check of all Instrument
Lights
and Controls X Tune-up Engine
Check Operation of
Manifold
Heat
Control
Valve
Clean
Exterior of Radiator
Align
Headlights • Check Brake
Linings
,
Check Exhaust System for Leaks Replace Canister Air
Filter
(F. E. E. C. System)
Check
Axle
U-Bolt
Torque. Check Lubricaunt
Level
of Front
Axle
Universal Joints
Check Shock Absorber Mountings and Bushings Check Front and
Rear
Spring Bushings
Lubricate
Distributor
(V6-225).
Replace Spark, Plugs
Check Charging and Starting Circuits
Lubricate
Tailgate Latch, Supports and Hinges.
Lubricate
Door and
Hood
Hinge Pivots ;
Lubricate
Glove Compartment Door Latch
Lubricate
Heater Controls •
Lubricate
Windshield
Wiper and Washer Controls
Clean,
Repack and
Adjust
Wheel Bearings
Change Transmission and Transfer Lubricant. .
Replace
Dry-Type
Air Cleaner • Check Lubricant
Level
of
Differential
Lubricate
Transfer
Case
Shift
LeArer
Control
C«se.
. , . . . . . . . .
Continuing
each
2,000 miles
Continuing
each
6,000 miles
Continuing
each
24,000 miles
X
Continuing
each
30,000 miles
•Check after the
first
200 miles [320
km.
J
of operation.
If
wheel or wheels are changed for any
reason,
have
wheel nut torque rechecked after an additional two hundred miles of operation
••Service mileage shown or every 60 days, whichever occurs
first.
•••Maintenance check on emission system must be performed per
information
in this manual. "See text for brakes.
"Nj
^Miles
2,000
6,000
12,000
18,000
24,000
30,000
Kilometers
3,200
9,600
19,200
28,800
38,400 48,000
B-9.
Engine Oil
For
maximum
engine
protection under all driving conditions encountered during the recommended
oil
change intervals, it is necessary to use only
"MS"
certified
sequence-tested
oils. The term
"MS"
must appear on the oil container singly or
in
conjunction with other designations. "MS" des
ignated oils are heavy-duty detergent oils that are
formulated to withstand all service conditions in
modern powerplants. Engine oils designated only
as
"ML"
and/or
"MM"
are not recommended and should not be used except in an emergency when
"MS"
oil is not available. Certified
sequence-tested
engine
oils are described on their containers by
such
phrases as:
meets,
exceeds,
excels, or has
proven superior in the
test
requirements,
test
sequences, MS Service
tests,
standards, and service
requirements,
of automotive manufacturers, auto
makers,
or car manufacturers for MS service or
Service
MS.
It
may be necessary to change
engine
oil more
frequently than normally recommended, depending upon the type and quality of oil used, the severity
of operation conditions, if the
engine
is used for
short
periods in cold weather, or if the
engine
is allowed to idle for excessive periods.
Always
drain
the crankcase while the
engine
is hot since
dirt
and contaminants are then more
likely
to be held in suspension and therefore
will
drain
out more completely.
Drain
the crankcase as follows:
a.
Position the
drain
receptacle under the
drain
plug.
b.
Remove the
drain
plug using the correct size
wrench.
Be careful of hot oil.
c.
Carefully
clean the
drain
plug. Inspect and
replace
the gasket, if deteriorated.
d.
When the oil has drained, replace and tighten
the crankcase
drain
plug. 12
Page 17 of 376
'Jeep'
UNIVERSAL SERIES SERVICE
MANUAL
B
Reinstall
the axle shafts, and
refill
the housings to
plug level using the universal joint lubricant
specified in
Lubrication
Specifications.
B-56.
Front
Axle Wheel Bearings
To
lubricate the wheel bearings, it is necessary
to remove, clean, repack, and adjust them. When
front wheel hubs and bearings are removed for
lubrication,
they should be thoroughly washed in a
suitable cleaning solvent. The bearings should be
carefully
dried and then given a thorough cleaning
and
inspection. Use a clean brush to remove all
particles
of old lubricant from bearings and hubs.
After
the bearings are cleaned, inspect them for
pitted races and rollers. Also, check the hub oil
seals.
Note:
Wheel bearing lithium base lubricants are
used at the factory for
initial
fill
of
these
bearings.
When
lithium base and sodium base lubricants are
mixed,
the result is a thinned-out mixture that
can
bleed through seals. It is therefore important
that lubricants with the correct base be used when
lubricating
the wheel bearings.
Should
leaks occur at wheel bearing seals, the leaks
may
be caused by a mixture of two
types
of
lubri
cants.
In such cases, the old lubricant should be
completely removed before new lubricant is added.
Wheel
bearings should be thoroughly cleaned,
lubricated
with lithium base and reinstalled.
Repack
the bearing
cones
and rollers with grease
and
reassemble hub in the reverse order of the
disassembly. Test the bearing adjustment as out
lined
in Section Q.
B-57.
Rear
Axle Wheel Bearings
The
Rear
wheel bearings an early models equipped
with
lubrication fittings with a vent opening
through the housings above each fitting should be
lubricated
sparingly, each
2,000
miles
[3.200
km.].
Use
a hand compressor and wheel bearing grease,
forcing
the grease through each lubrication fitting
until
it flows from the vent. Vent should be kept
clear
of obstruction or grease
will
back up into the
brakes.
Do not add grease after it flows from the
vent for it may be forced through the wheel key-
way
onto
the outside of the wheel and possibly
onto
the brake linings.
Rear
wheel bearings that do
not have lubrication fittings should be removed
each
12,000
miles
[19.200
km.] and the bearing
cleaned, inspected and repacked. Refer to proce
dure
in Par. B-56.
Note:
When servicing the Flanged Axle Unit
Bear
ing Assembly, refer to Section N, Par. N-5 for
proper
lubrication procedures.
B-58.
Propeller Shafts
and
Universal Joints
The
propeller shaft slip joints and universals should
be lubricated with a hand compressor grease gun so as to not damage the bearing seals. The units
should be lubricated with a
good
quality grease.
Refer
to the
Lubrication
Chart
for lubrication fre
quency and lubricant type and grade. B-59.
Lights
and
Controls
a.
Check
all interior and exterior lights and light
switches for proper operation, including: parking
lights, headlamps (high beam and low beam),
tail
lights, brake lights, directional lights, and in strument panel lights.
b.
Check
all instrument panel controls and
instru
ments for proper operation.
B-60.
Speedometer Cable
Remove the
speedometer
cable from its housing every
12,000
miles
[19.300
km.].
Clean
it thor
oughly and coat it with a
good
quality light graphite grease.
B-61.
Headlights
Refer
to Section H.
B-62.
Heater Controls
Apply
Lubriplate
130-A to all friction points and
pivot points on the heater controls panel unit as well as the pivot points at the dashpot. Apply
a
few drops of penetrating oil all along the Bowden
cable.
This
oil
will
penetrate into the center wire.
B-63.
Windshield Wiper and
Washer Controls
Lubricate
the friction points and the pivot points
on the windshield wiper transmission and linkage
arms
with a slight amount of
Lubriplate
130-A.
B-64.
Rotate Tires
Refer
to Section Q for the correct method of rotat ing the tires.
B-65.
Body Lube Points
•
Refer to Par. B-66 through B-68.
B-66.
Hood Hinge Pivot Points
Lubricate
the frictional points of the hood hinge
pivot points with a few drops of light-weight
engine
oil.
B-67.
Glove Compartment Door Latch
Sparingly
wipe
Lubriplate
130-A on the
glove
com
partment door latch.
B-68.
Tailgate Hinges
Lubricate
the friction points of the tailgate hinges
with
a few drops of light-weight
engine
oil.
B-69.
LUBRICATION
OF
OPTIONAL EQUIPMENT
B-70.
Pintle Hook
When
lubricating the vehicle, place a few drops of oil on the pintle hook and safety latch pivot pins.
B-7!.
Centrifugal Governor
Check
the oil level in the governor housing at each
vehicle lubrication. Use the same seasonal grade
oil
as is used in the
engine
and change oil at each
engine
oil change. Do not
fill
the housing above
the level indicating plug opening. Keep the vent
in
the filler plug open at all times. 17
Page 54 of 376
D
HURRICANE
F4
ENGINE
against the hub of the crankshaft pulley.
Timing
gears are accessible for inspection or replacement
with
the
engine
installed in the vehicle after re moving the radiator, belt drive pulley, and timing
cover.
Should
it be necessary to replace the timing gears, attention must be given to the end float of both
the camshaft and crankshaft and to the running
clearance
of both gears. It is also advisable to
check
both the oil jet and oil passage to the
crank
shaft front bearing to be sure that they are clear.
D-55.
Inspection and
Repair
Check
the general condition of both gears and
inspect for evidence of excessive wear. Replace
excessively worn or damaged gears. Inspect the
cover and replace if bent or damaged. It is recom mended that the crankshaft oil seal in the cover
be replaced when the cover is removed to ensure a
good
seal around the crankshaft. To replace this
seal
with the
engine
in the vehicle
requires
removing
the radiator and water pump.
D-56.
Valves, Springs, and Guides
The
exhaust valves seat on the top of the cylinder
block
with the
stems
extending down through
replaceable valve guides. The exhaust valves are actuated by the camshaft through exhaust valve
tappets. The exhaust valve springs are assembled
and
locked on the lower end of the exhaust valve
stems. The retaining locks are the split type, which
fit in a recess on the valve
stems
and into the taper
in
the valve spring retainers.
Adjustment
of exhaust valves is by means of the
adjusting
screw threaded into the upper end of the
exhaust valve tappets. An exhaust valve rotator used as a valve spring retainer is installed on the
lower end of the exhaust valve.
This
valve rotator,
known
as "Roto Cap", is a spring-loaded
ball
bearing
device. On each lift, or opening stroke of
a
valve, the rotator
gives
the valve a slight positive
clockwise rotation.
The
intake valves operate in valve
guides
in the
cylinder
head and are actuated by rocker arms.
The
rocker arms are actuated by valve push rods
and
the intake valve tappets. The intake valve
springs,
the intake valve spring retainers, and the
intake
valve spring retainer locks make up the
remainder
of the valve operating parts. An intake
valve spring retainer oil seal which encircles the
upper
end of the intake valve
between
the valve
locks and the upper end of the valve spring re
tainer,
controls the passage of oil along the valve
stem and guide.
Note:
When
engine
trouble indicates defective
valves as a possible source of trouble, also check
all
vacuum line connections for possible leaks.
D-57.
Inspection of Valves, Springs,
and
Guides
Clean
the valves on a wire wheel, making sure that
all
carbon is removed from the top and the under
side of the heads and that all gum and varnish
deposits
are removed from the stems.
Polish
the valve
stems
with steel wool or crocus
cloth.
Visually
inspect all valves for warpage,
cracks,
or excessive burning and discard if one of
these
conditions exists. Replace any worn, pitted,
or
corroded valves that cannot be cleaned with a
wire
brush.
Replace any valves when
seats
are pitted, burned, or corroded so badly that they
cannot be cleaned up with a light refacing on a valve refacing machine.
Replace
valves with marks of scoring or abrasion visible on the stem. Replace any valves with bent
stems
which
will
be apparent when the valve is
mounted in the valve refacing machine.
Note:
Use only hard-face exhaust valves for
replacement.
Examine
the
stems
of valves which employ the
ball
bearing rotators.
Wear
marks around the
cir
cumference of the
stems
indicates that the valve is
rotating satisfactorily.
Vertical
heavy pressure
areas
indicate that the valve is not rotating and the valve spring retainer (Roto
Cap)
should be replaced
if
at fault.
Check
the diameter of the valve stem at two or three places along the length of the stem
with
a micrometer. The intake valve stem diameter is .3733" to .3738" [9,482 a
9,495
mm.]. The
exhaust valve stem diameter is .371" to .372"
[9,423
a
9,449
mm.].
Note:
Exhaust
and intake valve springs are
similar
in appearance. They must not be inter
changed as they have different spring
charac
teristics.
Wash
the valve springs thoroughly in solvent.
Visually
examine the springs and replace any that
are
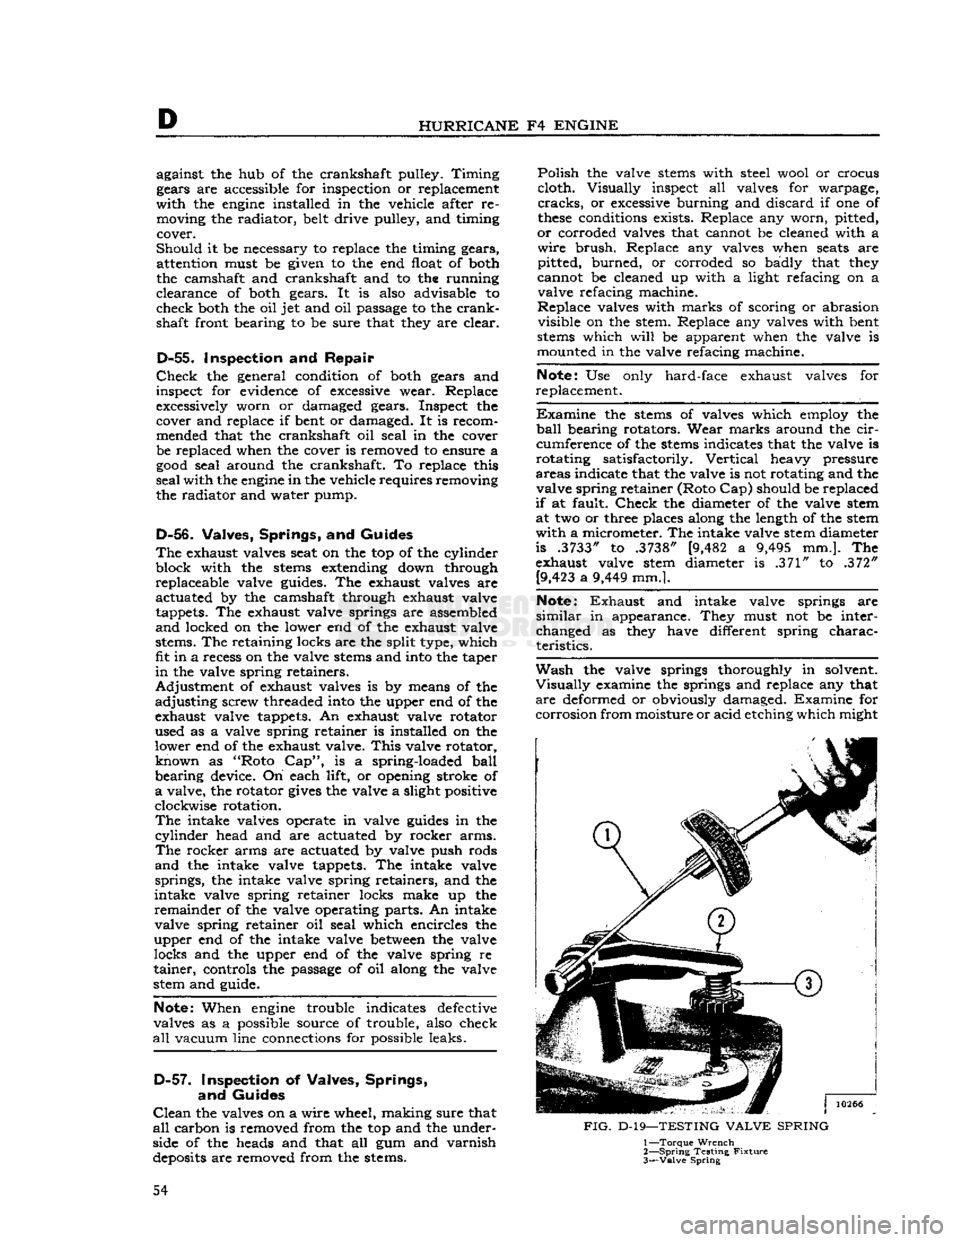
deformed or obviously damaged. Examine for
corrosion
from moisture or acid etching which might
FIG.
D-19—TESTING
VALVE
SPRING
1—
Torque
Wrench
2—
Spring
Testing
Fixture
3—
Valve
Spring
54
Page 59 of 376

'Jeep*
UNIVERSAL SERIES SERVICE
MANUAL
D
10262
FIG.
D-26—FLOATING OIL INTAKE AND PAN 1—
Oil
Float
2—
Gasket
3—
Oil
Float Support
4—
Screw and Lockwasher 5—
Oil
Pan Gasket
6—
Oil
Pan 7—
Bolt
and Lockwasher
8—
Drain
Plug
9—
Drain
Plug Gasket
place it with the gasket in position. The rotors
should then rotate freely, providing that end float of the rotors is
less
than the thickness of the gasket
when compressed or .004" [0,102 mm.]. After as
sembling the gear on the pump shaft, check the
running
clearance
between
the gear and pump body with a feeler
gauge.
This
clearance should be
from
.022" to .051" [0,559 a 1,295 mm.].
Pump
output is controlled by a pressure relief valve.
CAUTION:
The oil pressure relief spring is
cali
brated.
Never stretch this spring to alter the relief valve pressure setting. Adjust this setting by the use of shims only. Shims are available that can be
added
between
the retainer and the spring to in
crease pressure. When shims are present, removing
shims
will
decrease pressure.
This
adjustment
will
change the pressure at higher
speeds
but not at idle speed. Safe minimum pres
sure
is 6 psi. [0,4 kg-cm2] at idle, at which point
the oil pressure light
goes
out; and 20 psi. [1,4
kg-cm2] at
2000
rpm. (32 mph. [51 kph.]).
D-66.
Oil Pan
Examine
the oil pan carefully for evidence of cor
rosion,
dents, or other damage. Special attention
should be given to the mounting flange to be sure of proper alignment and a tight seal at the cylinder
block, oil pan, and
engine
front plate. Whenever
the oil pan is removed, it is
best
to install a new
oil
pan gasket.
D-67.
Flywheel
The
flywheel is mounted on the
rear
flange of the
crankshaft.
The crankshaft, flywheel, and clutch
assembly are statically and dynamically balanced
separately and as a unit; therefore,
these
com
ponents
should be assembled in their original
rela
tive positions to maintain this balance.
D-68.
Flywheel Inspection
Clean
the flywheel thoroughly with cleaning sol vent. Inspect the clutch face of the flywheel for
a
burned or scuffed condition or rivet grooves.
Check
the flywheel for run-out or improper mount
ing according to the installation procedure given
in Par.
D-87.
If
the inner ends of the flywheel ring gear
teeth
are
only slightly burred cr snubbed, remove the burrs
and
reshape the
teeth
using a small emery wheel. 59