1953 JEEP CJ checking oil
[x] Cancel search: checking oilPage 227 of 376
![JEEP CJ 1953 Service Manual
Jeep
UNIVERSAL SERIES SERVICE
MANUAL
The
correct distance should be 10%"
[26,04
cm.].
If
the length of the clutch release pedal rod is
other than
10
W
[26,04
cm.], the vheicle is eq JEEP CJ 1953 Service Manual
Jeep
UNIVERSAL SERIES SERVICE
MANUAL
The
correct distance should be 10%"
[26,04
cm.].
If
the length of the clutch release pedal rod is
other than
10
W
[26,04
cm.], the vheicle is eq](/manual-img/16/57040/w960_57040-226.png)
'Jeep'
UNIVERSAL SERIES SERVICE
MANUAL
The
correct distance should be 10%"
[26,04
cm.].
If
the length of the clutch release pedal rod is
other than
10
W
[26,04
cm.], the vheicle is equipped with the early
type
Clutch
Control
Lever
and
Tube Assembly, which should be removed, and^trie latest
designed
parts should be installed.
The
free pedal clearance is adjusted by lengthening
or shortening the" clutch fork cable. To make this adjustment,
loosen
the jam nut on the cable clevis
and
lengthen or shorten the cable to obtain %"
[19,05
mm.] free travel at the pedal pad, then
tighten the jam unit.
•
Clutch
Control Cable Type
Refer
to Fig. 1-2.
a.
With the clutch pedal pad against the floor
panel, (pedal up, clutch
engaged)
adjust ball ad
justing nut until slack is removed from the cable
and
the clutch throwout bearing contacts the clutch
pressure plate, release levers or diaphragm plate.
b. Back-off ball adjusting nut 2
V2
turns to obtain
approximately %"
[19,05
mm.] free travel.
Lock
hex nut.
FIG.
1-3—AUBURN
CLUTCH
ASSEMBLY —
HURRICANE F4 ENGINE 1—
Driven
Plate and Hub
2—
Pressure
Plate
3—
Pivot Pin
4—
Bracket
5—
Spring
Cup 6—
Pressure
Spring 7— Release
Lever
8—
Return
Spring
9—
Adjusting
Screw
10—
Jam
Nut 11—
Washer
Note:
Some older 'Jeep' vehicles may
develop
side
movement
of the clutch and brake pedals resulting
from wear of the pedals, shafts, and bushings. One way to
compensate
for this wear is to install a pedal
slack
adjuster kit 1-4.
CLUTCH
—
HURRICANE
F4
ENGINE
•
Auburn
Vehicles equipped with the Hurricane F4
engine
have a 9.25" [23,4 cm.] driven plate. The auburn clutch driving (pressure) plate assembly (Fig. 1-3)
has three pressure springs and three levers or
fingers.
1-5.
Clutch
Removal
When
necessary to remove the clutch,
follow
the procedures outlined in Section J for the removal
of the transmission and transfer case from the vehicle. Then remove the flywheel housing and use
the following procedures for removing the clutch assembly.
Note:
The F4
engine
may be removed from the
vehicle when inspecting or replacing the clutch.
Refer
to Section D for Hurricane F4
engine
removal and then
follow
the instructions given
below
to remove the clutch assembly.
a.
Mark
the clutch pressure plate and
engine
fly
wheel with a center punch so the clutch assembly
may be installed in the same position after adjust
ments
or replacement are completed.
b. Remove the clutch pressure plate bracket
bolts
equally, a little at a time, to prevent distortion and
to relieve the clutch springs evenly.
c. Remove the pressure plate assembly and driven
plate from the flywheel.
1-6.
Clutch
Pressure Plate and Disc Inspection
Inspect the pressure plate face for
cracks,
chips,
and
warpage.
Check
the pressure plate levers for
excessive
wear and the springs for breaks. If any of the
above
conditions exist, the
complete
pressure
plate must be replaced.
Check
the clutch disc for
excessive
wear,
loose
or damaged facings, broken
vibration damper springs and evidence of grease
or oil. If any of the
above
conditions exist, replace
the clutch disc.
1-7.
Clutch
Pressure Plate Adjustment —
Auburn
The
clutch pressure plate must be checked
before
installing a new or reconditioned clutch. The proper 11339
FIG.
1-4—CHECKING
AUBURN
CLUTCH
LEVER
ADJUSTMENT
1— Adjustment Gauge
2—
Fixture
Mounting Bolt
3—
Clutch
Fixture
227
Page 299 of 376

'Jeep9
UNIVERSAL
SERIES SERVICE
MANUAL
N
c.
Check
side gear clearance as described in Par.
N-18.
d.
Examine contacting surfaces of ring gear and
differential case for
burrs
or foreign matter.
e.
Assemble ring gear on differential case with assembly
hole
on each lined up.
f.
Tap ring gear
into
place with mallet.
g.
Install
ring gear screws. Torque 35 to 55 lb-ft. [4,84 a 7,60 kg-m.].
N-18.
Adjustment
of
Differential
Side
Gears
Clearance
between
the differential side gears and differential case should be .000" to .006"
[0,000
a
0,192 mm.] Procedure for checking clearance is as
follows:
a.
With
the differential positioned as shown in
Fig.
N-31, tap the differential lightly on a flat
sur
face so the differential gears
settle
into
proper
position.
b. Measure the clearance
between
side gears and
the case with leaf feeler
gauge
as illustrated. c. If the clearance
exceds
.006" add shims
between
the side gears and the case. To bring the clearance
within specified tolerance, shims in
these
thick
nesses
are available.
.004"
[0,102
mm.], .006"
[0,152
mm.], .008"
[0,203
mm.].
If shims are required, at least one shim
should be placed on each side and the shim packs kept as even as possible. After adding shims, repeat
the clearance check.
10009
FIG.
N-31—CHECKING SIDE GEAR CLEARANCE N-l9.
Adjustment of
Differential
Bearing Preload
and
Ring
Gear
Backlash
Refer
to Fig. N-30.
The
adjustment of the differential bearings is main
tained by the use of shims placed
betwen
the dif
ferential case and the differential bearing. Proce
dure for adjusting bearing preload is as follows:
a.
Install
the differential case and bearings in the
axle housing without shims and with the bearing
cups snug.
b. Holding the ring gear in contact with the pinipn
and
using a screwdriver blade to
move
the differen
tial
bearing cups toward the center, insert feeler
gauge
on each side
between
differential bearing cup and the axle housing.
There
should be only
.001" to .002"
[0,025
a 0,051 mm.] backlash
remaining with the feeler
gauge
inserted.
c.
After the shim pack requirement for each bear
ing has
been
established remove the differential
assembly. Make up shim packs and
keep
them separated.
d.
Add an additional .015"
[0,381
mm.] thickness:
of shims to the pack on the
tooth
side of the ring gear.
e.
Place the differential bearing shim packs on the
differential case under each bearing.
Install
bear
ings
with
Driver
C-3716 for Model
27AF
axles
and
Driver
W-188 for Model 44 axles. See Fig. N-32.
Note:
When overhauling the Model
27AF
front
axle differential, check the axle inner oil seals. Should new seals be required, install them using
Tool
W-128 as shown in Fig. N-33. When installing
the axle differential in the axle housing, use
Spreader
Tool W-129.
f. Attach the
Carrier
Spreader W-129, (see
note
Par.
N-12) install a
dial
indicator, (Fig. N-19) and spread the
carrier
a maximum of .020"
[0,508
mm.].
FIG.
N-32—DIFFERENTIAL BEARING DRIVER
299
Page 300 of 376

N
REAR AXLE
11874
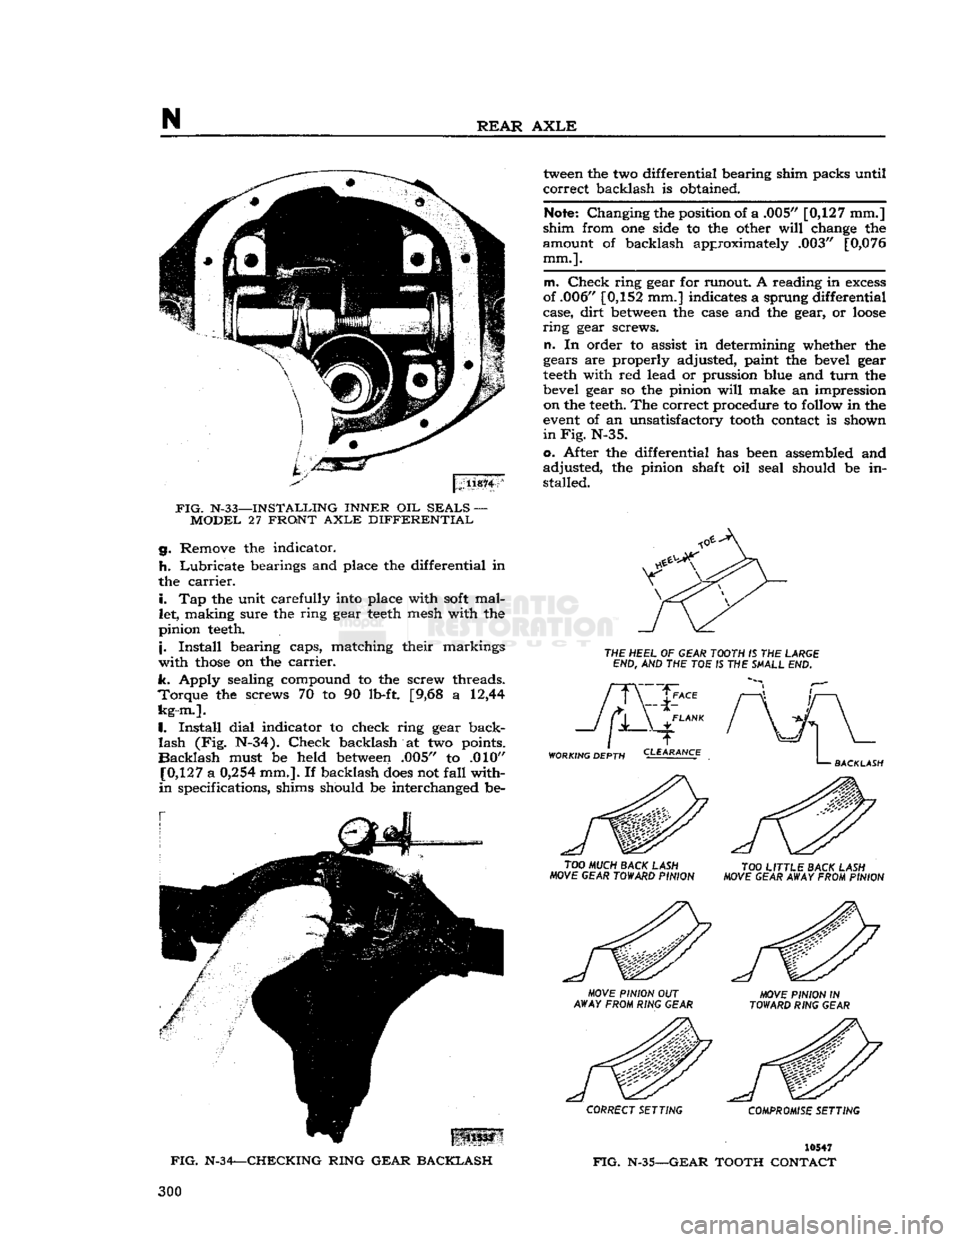
FIG.
N-33—INSTALLING INNER OIL SEALS — MODEL 27 FRONT
AXLE
DIFFERENTIAL g. Remove the indicator.
h.
Lubricate bearings and place the differential in
the
carrier.
i.
Tap the unit carefully
into
place with
soft
mallet, making sure the ring gear
teeth
mesh with the
pinion
teeth.
j.
Install bearing caps, matching their markings
with
those
on the
carrier.
k. Apply sealing compound to the screw threads.
Torque
the screws 70 to 90 lb-ft. [9,68 a 12,44
kg-m.].
I.
Install dial indicator to check ring gear back
lash
(Fig. N-34). Check backlash at two points.
Backlash
must be held
between
.005" to .010"
[0,127
a
0,254
mm.]. If backlash
does
not fall with
in
specifications, shims should be interchanged be
tween
the two differential bearing shim packs until
correct backlash is obtained.
Note:
Changing the position of a .005"
[0,127
mm.]
shim from one side to the other
will
change the
amount of backlash approximately .003"
[0,076
mm.].
m. Check ring gear for runout. A reading in
excess
of .006"
[0,152
mm.] indicates a sprung differential
case, dirt
between
the case and the gear, or
loose
ring
gear screws.
n.
In order to assist in determining whether the
gears are properly adjusted, paint the bevel gear
teeth
with red lead or prussion blue and turn the
bevel gear so the pinion
will
make an impression on the
teeth.
The correct procedure to
follow
in the
event
of an unsatisfactory
tooth
contact is shown
in Fig.
N-35.
o. After the differential has
been
assembled and
adjusted, the pinion shaft oil seal should be in
stalled.
THE
HEEL
OF
GEAR TOOTH
IS THE
LARGE
END,
AND THE TOE IS THE
SHALL
END.
WORKING DEPTH
TOO
MUCH BACK LASH
MOVE GEAR TOWARD PINION
TOO
LITTLE BACK LASH
MOVE GEAR AWAY FROM PINION
\:
US33
FIG.
N-34—CHECKING RING GEAR BACKLASH
MOVE
PINION
OUT
AWAY FROM RING GEAR MOVE PINION
IN
TOWARD RING GEAR
CORRECT SETTING COMPROMISE SETTING
10547
FIG.
N-35—GEAR
TOOTH CONTACT 300
Page 335 of 376

'Jeep'
UNIVERSAL
SERIES SERVICE
MANUAL
WHEELS
Contents
SUBJECT PAR.
GENERAL
Q-l Wheel Balancing. Q-2
WHEEL BEARING SERVICE.
......
Q-3
Checking
Front Wheel Bearings Q-4
Checking
Rear Wheel Bearings.
.......
.
Q-7
Front
Wheel Bearing Adjustment. Q-5
Rear
Wheel Bearing Adjustment — Flanged Axle Q-6
Rear
Wheel Bearing Adjustment —
Tapered
Axle Q-8 SUBJECT PAR.
REAR WHEEL
MOUNTING
.Q-9
BRAKE
DRUM
SERVICE.
......
. . .Q-10
TIRE
SERVICE.
.................
.Q-ll
Tire
Care
Q-l2
Tire
Removal and Installation. Q-l3
SPECIFICATIONS
. .Q-14
Q-l.
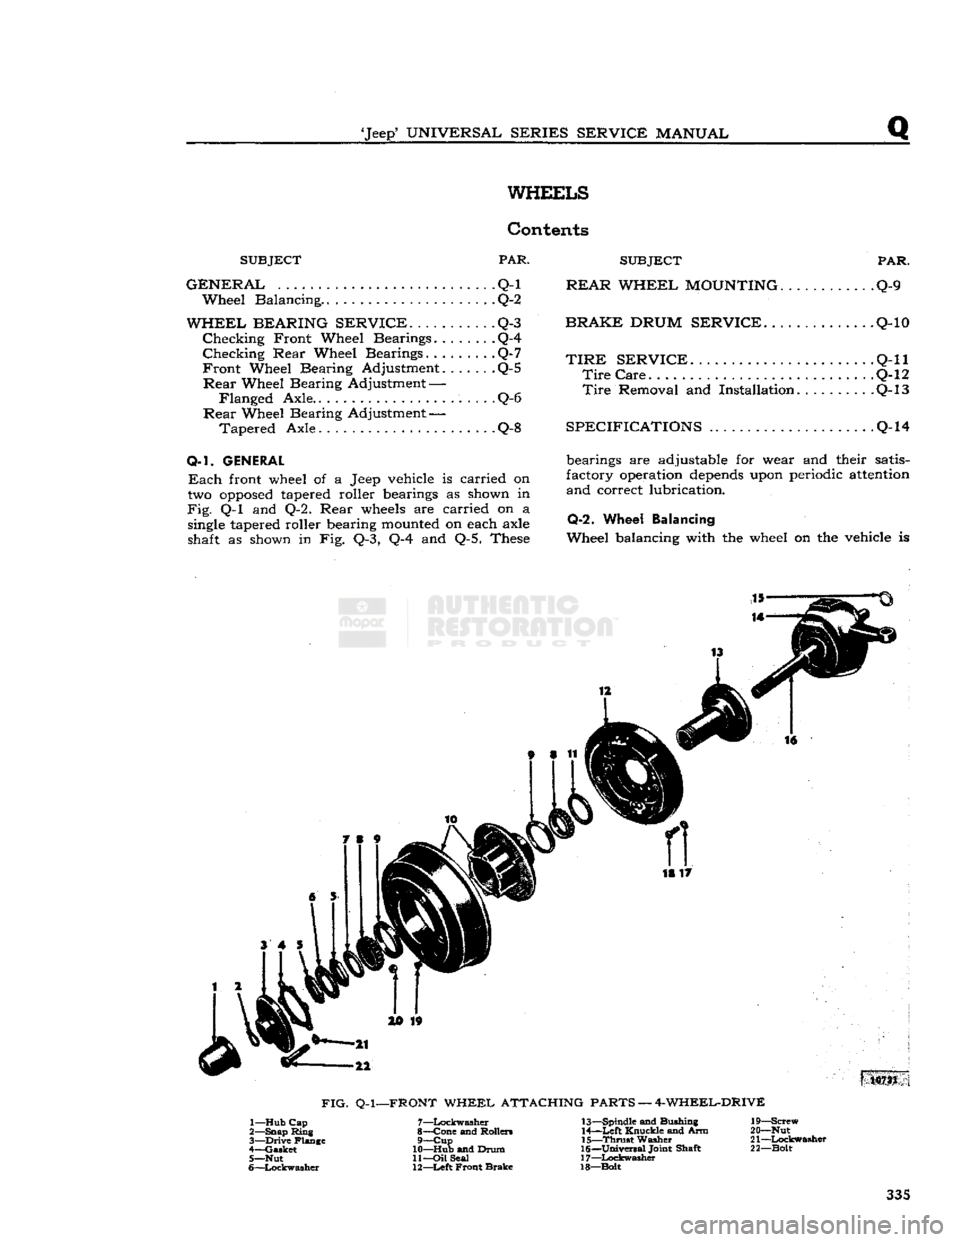
GENERAL
Each
front wheel of a Jeep vehicle is carried on
two
opposed
tapered roller bearings as shown in
Fig.
Q-l and Q-2. Rear
wheels
are carried on a
single
tapered roller bearing
mounted
on each axle
shaft as shown in Fig. Q-3, Q-4 and Q-5. These bearings are adjustable for wear and their satis
factory operation
depends
upon periodic
attention
and correct lubrication.
Q-2.
Wheel Balancing
Wheel balancing with the wheel on the vehicle is 18 17
10731
FIG.
Q-l—FRONT
WHEEL ATTACHING PARTS — 4-WHEEL-DRIVE 1— Hub Cap
2— Snap Ring
3—
Drive
Flange
4— Gasket 5— Nut
6—
Lockwasher
7—
Lockwasher
8— Cone and Rollers 9—
Cup
10— Hub and Drum 11—
Oil
Seal
12—
Left
Front Brake 13— Spindle and Bushing
14—
Left
Knuckle and Arm
15—
Thrust
Washer
16—
Universal
Joint Shaft
17—
Lockwasher
18—Bolt 19— Screw
20— Nut
21—
Lockwasher
22— Bolt 335
Page 337 of 376

'Jeep'
UNIVERSAL
SERIES SERVICE
MANUAL
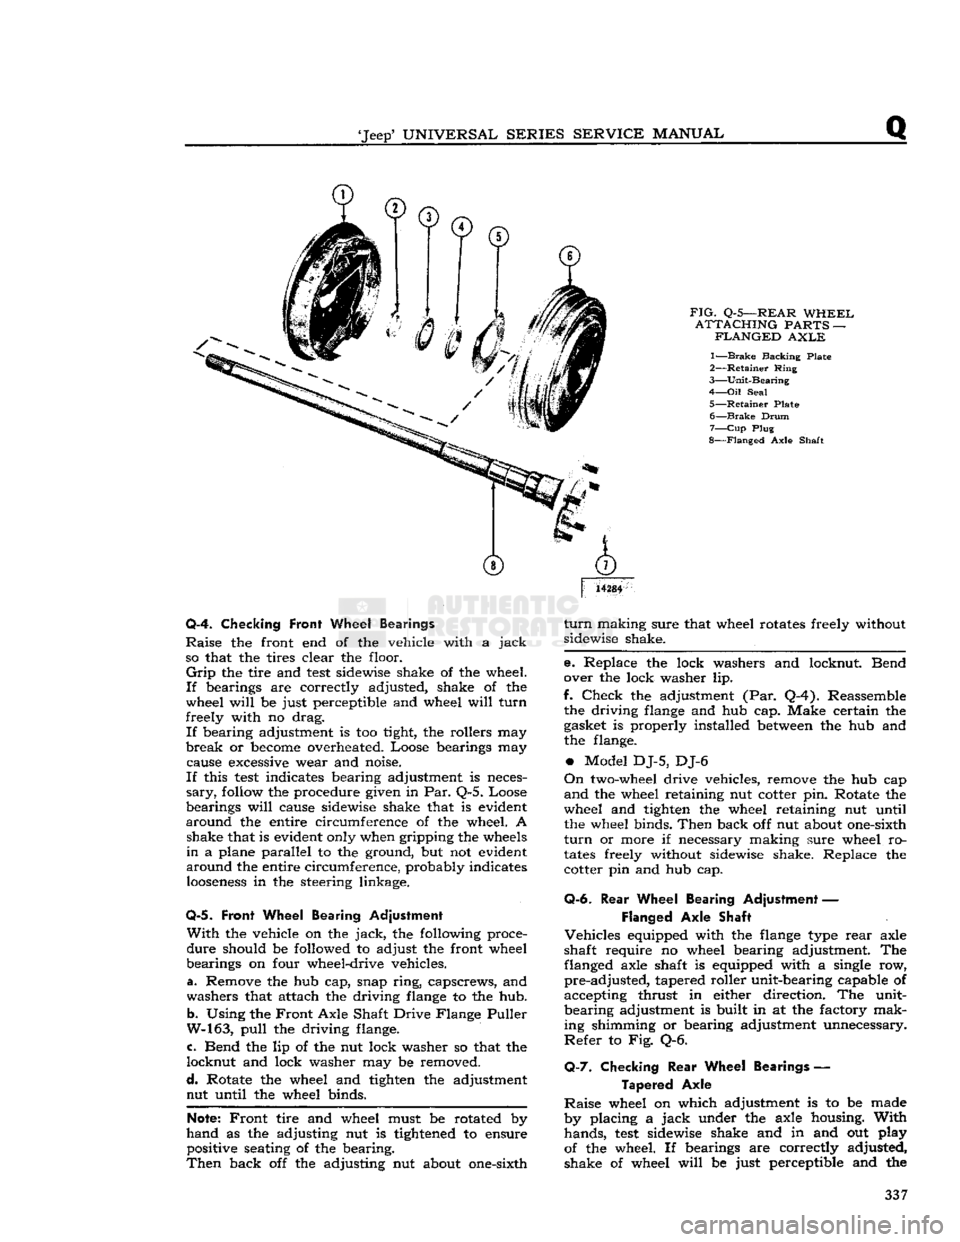
FIG.
Q-5—REAR
WHEEL
ATTACHING
PARTS —
FLANGED
AXLE
1—
Brake
Backing Plate
2—
Retainer
Ring
3—
Unit-Bearing
4—
Oil
Seal
5—
Retainer
Plate 6—
Brake
Drum
7—
Cup
Plug
8—
Flanged
Axle Shaft
14284
Q-4. Checking
Front
Wheel Bearings
Raise
the front end of the vehicle with a
jack
so that the tires clear the floor.
Grip
the tire and
test
sidewise shake of the wheel.
If
bearings are correctly adjusted, shake of the
wheel
will
be just perceptible and wheel
will
turn
freely with no drag.
If
bearing adjustment is too tight, the rollers may
break
or
become
overheated. Loose bearings may cause
excessive
wear and noise.
If
this
test
indicates bearing adjustment is neces
sary,
follow
the procedure given in Par. Q-5. Loose
bearings
will
cause sidewise shake that is evident
around
the entire circumference of the wheel. A shake that is evident only when gripping the
wheels
in
a plane parallel to the ground, but not evident
around
the entire circumference, probably indicates
looseness
in the steering linkage.
Q-5.
Front Wheel Bearing Adjustment
With
the vehicle on the
jack,
the following proce
dure
should be followed to adjust the front wheel
bearings on four wheel-drive vehicles.
a. Remove the hub cap, snap
ring,
capscrews, and
washers that attach the driving
flange
to the hub.
b.
Using the
Front
Axle Shaft Drive Flange Puller
W-163,
pull
the driving flange.
c. Bend the lip of the nut lock washer so that the
locknut
and lock washer may be removed.
d.
Rotate the wheel and tighten the adjustment nut until the wheel binds.
Note:
Front
tire and wheel must be rotated by
hand
as the adjusting nut is
tightened
to ensure positive seating of the bearing.
Then
back off the adjusting nut about one-sixth
turn
making sure that wheel rotates freely without
sidewise shake.
e. Replace the lock washers and locknut. Bend
over the lock washer lip.
f.
Check
the adjustment (Par. Q-4). Reassemble the driving
flange
and hub cap. Make certain the
gasket is properly installed
between
the hub and
the flange.
•
Model DJ-5, DJ-6
On
two-wheel drive vehicles, remove the hub cap
and
the wheel retaining nut cotter pin. Rotate the
wheel and tighten the wheel retaining nut until the wheel binds.
Then
back off nut about one-sixth
turn
or more if necessary making sure wheel ro
tates
freely without sidewise shake. Replace the cotter pin and hub cap.
Q-6.
Rear
Wheel Bearing Adjustment —
Flanged
Axle Shaft
Vehicles
equipped with the
flange
type
rear
axle
shaft require no wheel bearing adjustment. The flanged axle shaft is equipped with a single row,
pre-adjusted,
tapered roller unit-bearing capable of
accepting thrust in either direction. The unit-
bearing
adjustment is built in at the factory mak
ing shimming or bearing adjustment unnecessary.
Refer
to Fig. Q-6.
Q-7.
Checking
Rear
Wheel Bearings —
Tapered
Axle
Raise
wheel on which adjustment is to be made
by placing a
jack
under the axle housing.
With
hands,
test
sidewise shake and in and out play
of the wheel. If bearings are correctly adjusted,
shake of wheel
will
be just perceptible and the 337
Page 361 of 376

'Jeep*
UNIVERSAL
SERIES
SERVICE
MANUAL
U
DESCRIPTION
—
Continued
AXLES
W-99* Gauge — Pinion & Ring
Gear
Setting
W-104-B* Puller — Tapered Roller Bearing Removing
W-126* Driver — Pinion Bearing Cup
W-128* Installer — Differential Inner Oil Seal W-129 Spreader — Differential
Carrier
Housing
W-138* Driver & Adapter —
King
Pin Bearing
W-144* Wrench — Wheel Bearing Adjusting Nut W-147* Driver — Pinion Oil Seal W-163* Puller
—-
Axle Shaft Drive Flange
W-186* Driver — Axle Shaft Oil Seal
W-188* Driver — Differential Case Bearing W-251* Puller — Pinion Oil Seal
W-262*
Sleeve
— Pinion Bearing Installing
W-263
Semi-Floating
Rear
Axle Shaft Oil Seal W-264* Driver — Pinion Outer Bearing Cup
W-297* Torque Wrench — Pinion Bearing Adjusting W-343* Remover
85
Installer —
Rear
Axle Bearing (Flanged Axle)
W-344* Installer — Pinion Inner Bearing Cups
C-319-A
Puller —
Rear
Wheel Hub (Tapered Axle Shaft)
C-690 Checking Scale —
King
Pin Bearing Preload DD-914-P Press — Tapered Roller Bearing Removing
DD-914-9 Reducer Ring — Differential & Pinion Bearings (Use with DD-914-P)
C-3
716 Driver — Differential
Carrier
Bearing C-4142
Gear
Rotating Tool —
Trac-Lok
Differential
**Jeep*
exclusive
tool
Steering
Group
C-3646 Puller, Steering Shaft Arm
Brake
Group
W-172 Puller, Parking Brake Drum
U-12.
STflNDfiRD
AND
RECOMMENDED
TOOLS
Tool
Description
ENGINE
W-292
Tester — Cooling
System
Thermostat
C-119 Indicator — Cylinder Bore C-385 Compressor — Piston Ring
C-647 Fixture — Spring Testing
C-823
Hone
— Cylinder Bore Refinishing
C-3012 Reamer — Cylinder Ridge
C-3250 Pliers — Radiator fis Heater
Hose
Wire Clamp
C-3411
Gauge — Pressure & Vacuum
C-3422-A Compressor — E-type Valve Spring
C-3501
Hone
— Cylinder
Deglazing
C-3514
Flusher — Cooling
System
C-3886 Fixture — Carburetor Holding C-3896-A Tachometer — Portable
C-3943 Gauge — Compression Checking
C-3952 Torque Wrench, 150
lb-ft.
Swivel Head C-3953 Stand, Engine Repair
C-3959 Light — Ignition Timing
C-4065 Wrench — Oil Filter Removing
C-4080 Tester — Cooling
System
fig
Pressure Cap
ELECTRICAL
40B Hydrometer — Battery Service
W-291 Tester — Instrument
C-3674
Aimers —
Headlight
(Pair)
C-3829 Tester —
Diode
Polarity
C-3888 Tester — Volt-Ampere C-3950 Tester — 12V 60 Amp. Carbon Pile Resistor 361
Page 362 of 376

u
MISCELLANEOUS
U-12.
STANDARD
AND
RECOMMENDED TOOLS
(Continued)
Tool
Description
CLUTCH
W-296 Fixture — Adjusting
TRANSMISSION
C-3201
- A
Lo-Jack
— Floor Type
AXLE
C-637 Puller — Axle Shaft & Oil Seal
STEERING
DD-428 Gauge — Camber & Caster
DD-435 Turntables — Wheel Alignment C-3479 Gauge & Scribe — Toe-in Checking
BRAKES
C-416 Clamps — Brake Cylinder Retaining C-3080 Hone — Brake Cylinder
C-3496-B Bleeder — Hydraulic Pressure Type C-3785 Remover & Installer — Brake Return Spring
C-3920 Micrometer — Brake Drum Checking
U-13.
ENGINE TORQUE SPECIFICATIONS HURRICANE
F4
ENGINE
Pounds - Feet
kg-m.
30-40
4,1
a
5,5
Camshaft
Thrust Plate Bolt
20-26
2,8
a
3,6
Clutch
Control
Ball
Stud — [7,93 mm.]
35-45
4,8
a
6,2
Connecting Rod Cap Bolt Nut — y8" [9,53 mm.|
35-45
4,8
a
6,2
60-70
8,3
a
9,7
Cylinder
Head to Block Bolts
60-70
8,3
a
9,7
45-55
6,2
a
7,6
29-35
4,0
a
4,8
Flywheel
to Crankshaft Bolt. 35-41
4,8
a
5,7
Fuel
Pump Mounting Bolts 13-17 1,8
a
2,4
Alternator Bracket to Cylinder Block.
25-35
3,5
a
4,8
29-35
4,0
a
4,8
Main
Bearing
Caps.
.
65-75
9,0
a
10,4
Oil
Pan
Drain
Plug
25-35
3,5
a
4,8
9-14 1,2
a
1,9
Piston Pin
Lock
Bolt 35-41
4,8
a
5,7
30-36
4,1
a
5,0
Spark
Plugs to Cylinder Head
25-33
3,5
a
4,6
Starting Motor Mounting Bolt.
20-25
2,8
a
3,5
7-10 0,9
a
1,4
Water
Outlet Elbow to Cylinder Head
20-25
2,8
a
3,5
Water
Pump to Cylinder Block 12-17
1,7
a
2,4
NOTE:
Turn
the connecting rod cap nut locks (inverted type, pressed
steel)
finger
tight
and then
tighten
% turn more with wrench
362